2016 HONDA ACCORD audio
[x] Cancel search: audioPage 41 of 83

74 || 75
BLUETOOTH® HANDSFREELINK® (HFL)
Learn how to operate the vehicle’s hands-free calling system.
Models with one display
Basic HFL Operation
Make and receive phone calls using the vehicle’s audio system, without handling
your phone. visit handsfreelink.com (U.S.) or handsfreelink.ca (Canada) to check
phone compatibility.
To reduce the potential for driver distraction, certain manual functions \
may be
inoperable or grayed out while the vehicle is moving. Stop or pull over \
to perform
the function.
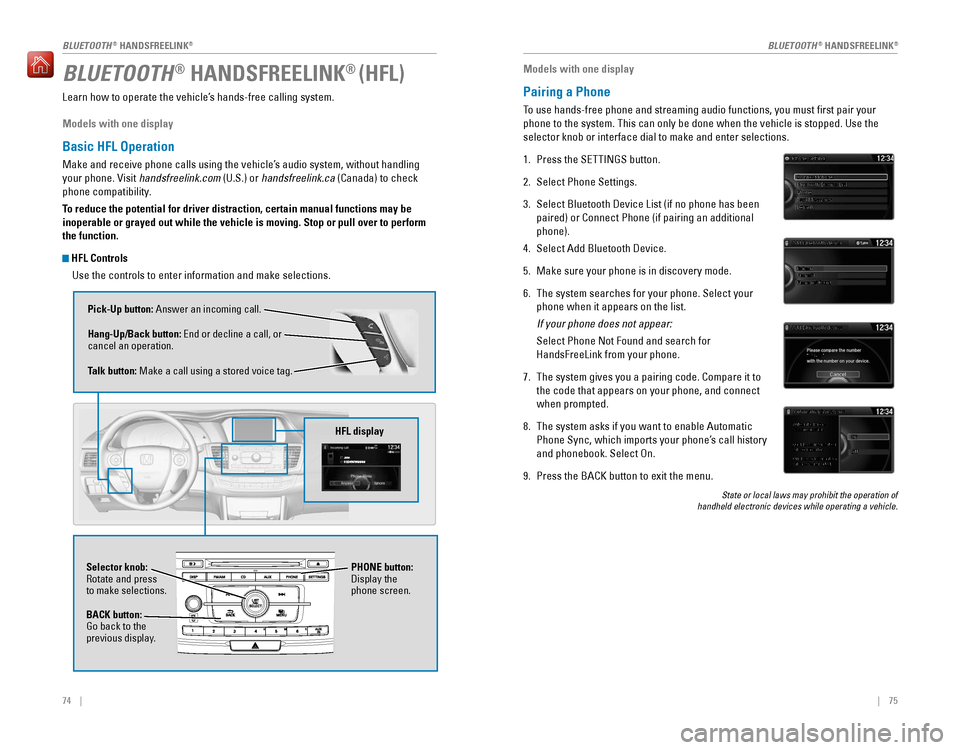
HFL Controls
Use the controls to enter information and make selections.
Pick-Up button: Answer an incoming call.
Hang-Up/Back button:
end or decline a call, or cancel an operation.
Talk button: Make a call using a stored voice tag.
HFL display
Selector knob: rotate and press to make selections.
BACK button:
Go back to the previous display.
PHONE button:
Display the
phone screen.
Models with one display
Pairing a Phone
To use hands-free phone and streaming audio functions, you must first p\
air your
phone to the system. This can only be done when the vehicle is stopped. Use the
selector knob or interface dial to make and enter selections.
1. Press the SETTINGS button.
2. Select Phone Settings.
3. Select Bluetooth Device List (if no phone has been
paired) or Connect Phone (if pairing an additional
phone).
4. Select Add Bluetooth Device.
5. Make sure your phone is in discovery mode.
6. The system searches for your phone. Select your
phone when it appears on the list.
If your phone does not appear:
Select Phone Not Found and search for
HandsFreeLink from your phone.
7. The system gives you a pairing code. Compare it to
the code that appears on your phone, and connect
when prompted.
8. The system asks if you want to enable Automatic
Phone Sync, which imports your phone’s call history
and phonebook. Select On.
9. Press the BACK button to exit the menu.
State or local laws may prohibit the operation of handheld electronic devices while operating a vehicle.
BLUETOOTH® HANDSFreeLINK®BLUETOOTH® HANDSFreeLINK®
Page 43 of 83

78 || 79
Models with one display
SMS Text Messaging
receive and send messages from your paired and connected phone. visit
handsfreelink.com (U.S.) or handsfreelink.ca (Canada) to check phone compatibility.
Standard message rates apply. This feature is limited while the vehicle is moving.
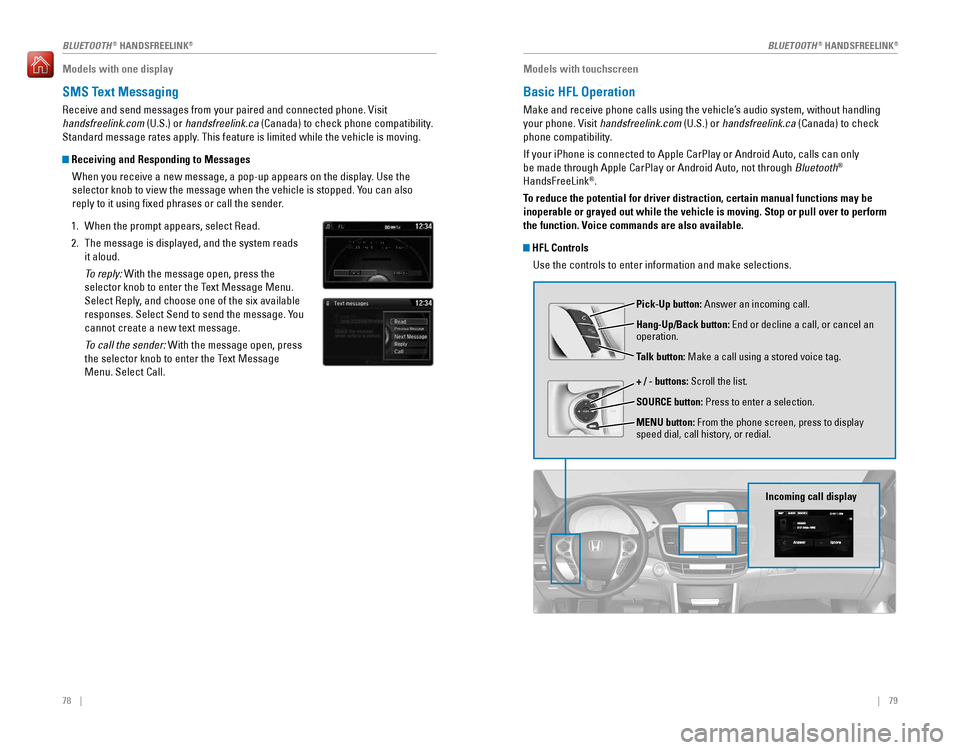
Receiving and Responding to Messages
When you receive a new message, a pop-up appears on the display. Use the
selector knob to view the message when the vehicle is stopped. You can also
reply to it using fixed phrases or call the sender.
1. When the prompt appears, select Read.
2. The message is displayed, and the system reads
it aloud.
To reply: With the message open, press the
selector knob to enter the Text Message Menu.
Select Reply, and choose one of the six available
responses. Select Send to send the message. You
cannot create a new text message.
To call the sender: With the message open, press
the selector knob to enter the Text Message
Menu. Select Call.
Models with touchscreen
Basic HFL Operation
Make and receive phone calls using the vehicle’s audio system, without handling
your phone. visit handsfreelink.com (U.S.) or handsfreelink.ca (Canada) to check
phone compatibility.
If your iPhone is connected to Apple CarPlay or Android Auto, calls can only
be made through Apple CarPlay or Android Auto, not through Bluetooth®
HandsFreeLink®.
To reduce the potential for driver distraction, certain manual functions \
may be
inoperable or grayed out while the vehicle is moving. Stop or pull over \
to perform
the function. Voice commands are also available.
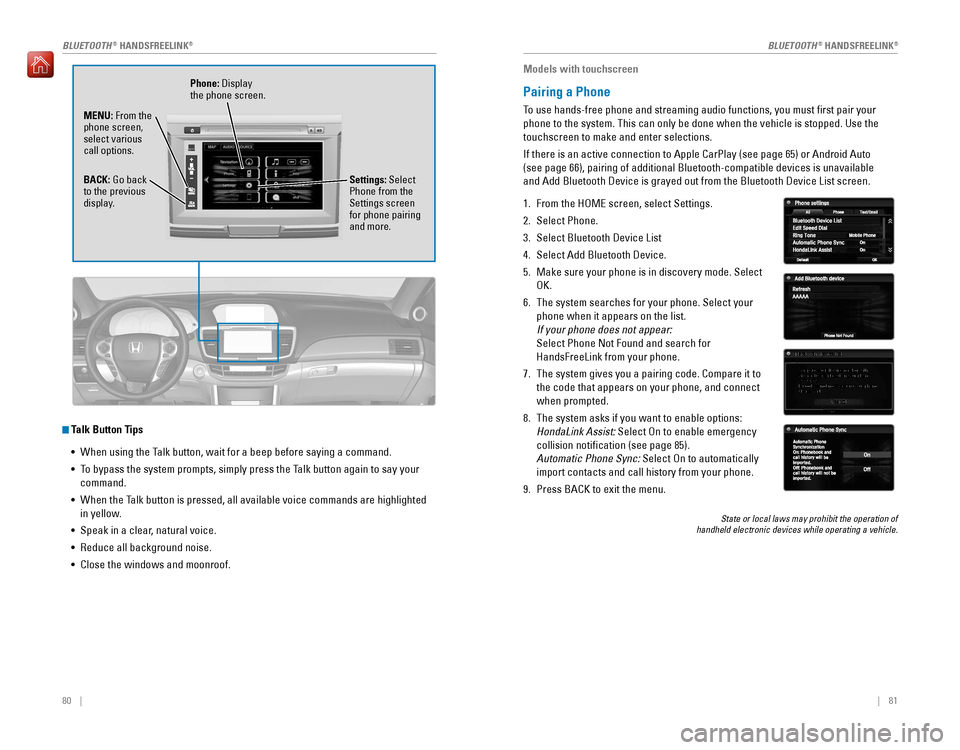
HFL Controls Use the controls to enter information and make selections.
Pick-Up button: Answer an incoming call.
Hang-Up/Back button:
end or decline a call, or cancel an operation.
Talk button: Make a call using a stored voice tag.
+ / - buttons: Scroll the list.
SOURCE button: Press to enter a selection.
MENU button: From the phone screen, press to display
speed dial, call history, or redial.
Incoming call display
BLUETOOTH® HANDSFreeLINK®BLUETOOTH® HANDSFreeLINK®
Page 44 of 83

80 || 81
Talk Button Tips
•
When using the Talk button, wait for a beep before saying a command.
• To bypass the system prompts, simply press the Talk button again to say your
command.
•
When the Talk button is pressed, all available voice commands are highlighted
in yellow.
• Speak in a clear, natural voice.
•
Reduce all background noise.
• Close the windows and moonroof.
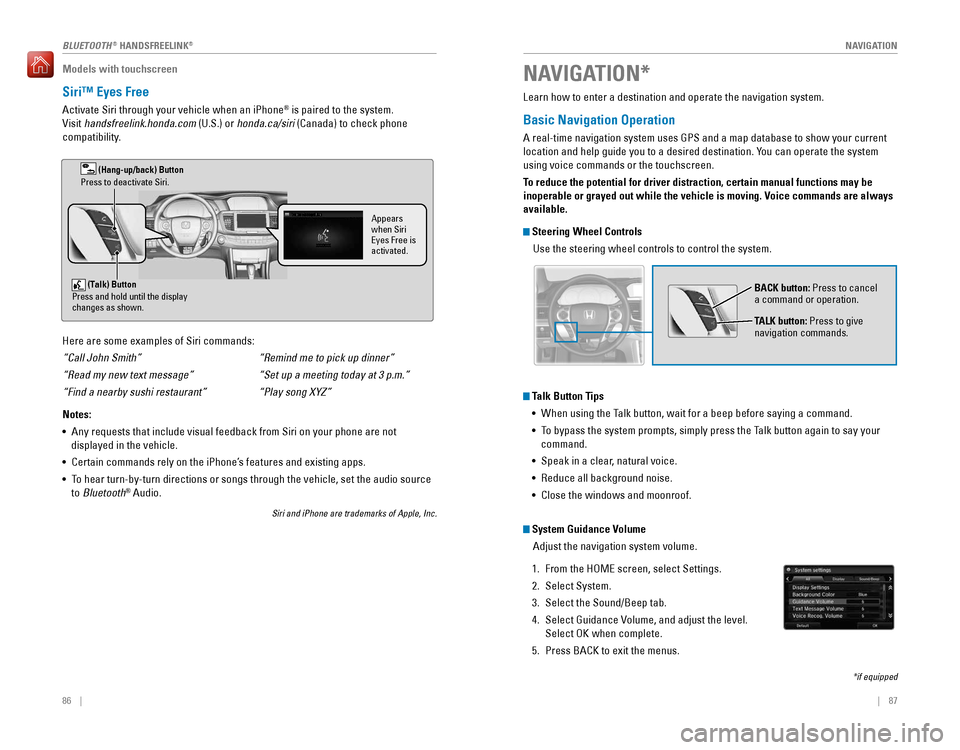
Phone: Display
the phone screen.
MENU: From the
phone screen,
select various
call options.
BACK:
Go back to the previous
display. Settings: Select
Phone from the
Settings screen
for phone pairing
and more.
Models with touchscreen
Pairing a Phone
To use hands-free phone and streaming audio functions, you must first p\
air your
phone to the system. This can only be done when the vehicle is stopped. Use the
touchscreen to make and enter selections.
If there is an active connection to Apple CarPlay (see page 65) or Android Auto
(see page 66), pairing of additional Bluetooth-compatible devices is unavailable
and Add Bluetooth Device is grayed out from the Bluetooth Device List sc\
reen.
1. From the HoMe screen, select Settings.
2. Select Phone.
3. Select Bluetooth Device List
4. Select Add Bluetooth Device.
5. Make sure your phone is in discovery mode. Select
oK.
6. The system searches for your phone. Select your
phone when it appears on the list.
If your phone does not appear:
Select Phone Not Found and search for
HandsFreeLink from your phone.
7. The system gives you a pairing code. Compare it to
the code that appears on your phone, and connect
when prompted.
8. The system asks if you want to enable options:
HondaLink Assist: Select On to enable emergency
collision notification (see page 85).
Automatic Phone Sync: Select on to automatically
import contacts and call history from your phone.
9. Press BACK to exit the menu.
State or local laws may prohibit the operation of handheld electronic devices while operating a vehicle.
BLUETOOTH® HANDSFreeLINK®BLUETOOTH® HANDSFreeLINK®
Page 47 of 83

| 87
NAVIGATION86 |
Models with touchscreen
Siri™ Eyes Free
Activate Siri through your vehicle when an iPhone® is paired to the system.
visit handsfreelink.honda.com (U.S.) or honda.ca/siri (Canada) to check phone
compatibility.
(Talk) Button
Press and hold until the display
changes as shown.
(Hang-up/back) Button
Press to deactivate Siri.
Appears
when Siri
Eyes Free is
activated.
Here are some examples of Siri commands:
“Call John Smith”
“Read my new text message”
“Find a nearby sushi restaurant”
Notes:
•
Any requests that include visual feedback from Siri on your phone are not
displayed in the vehicle.
• Certain commands rely on the iPhone’s features and existing apps.
•
To hear turn-by-turn directions or songs through the vehicle, set the audio source
to Bluetooth® Audio.
Siri and iPhone are trademarks of Apple, Inc.
“Remind me to pick up dinner”
“Set
up a meeting today at 3 p.m.”
“Play
song XYZ”
Learn how to enter a destination and operate the navigation system.
Basic Navigation Operation
A real-time navigation system uses GPS and a map database to show your current
location and help guide you to a desired destination. You can operate the system
using voice commands or the touchscreen.
To reduce the potential for driver distraction, certain manual functions \
may be
inoperable or grayed out while the vehicle is moving. Voice commands are always
available.
Steering Wheel Controls Use the steering wheel controls to control the system.
NAVIGATION*
*if equipped
BACK button: Press to cancel
a command or operation.
TALK button: Press to give
navigation commands.
Talk Button Tips
•
When using the Talk button, wait for a beep before saying a command.
• To bypass the system prompts, simply press the Talk button again to say your
command.
• Speak in a clear, natural voice.
•
Reduce all background noise.
• Close the windows and moonroof.
System Guidance Volume
Adjust the navigation system volume.
1. From the HoMe screen, select Settings.
2. Select System.
3. Select the Sound/Beep tab.
4. Select Guidance volume, and adjust the level.
Select oK when complete.
5. Press BACK to exit the menus.
BLUeTooTH® HANDSFREELINK®
Page 54 of 83

100 || 101
DRIVING
DRIVING
Starting to Drive
Turn on the vehicle and start the engine to begin driving.
Before Starting the Engine
Continuously Variable Transmission (CVT)
Check that the shift lever is in Park (P), then press
the brake pedal. Keep your foot firmly on the brake
pedal when starting the engine.
Manual transmission
Check that the shift lever is in Neutral (N), then
press the brake pedal with your right foot and the
clutch pedal with your left foot. The clutch must be
fully pressed to start the engine.
The engine is harder to start in cold weather and in thinner air found a\
t altitudes
above 8,000 feet (2,400 m). When starting the engine in cold weather, turn off
all electrical accessories such as the lights, climate control system, a\
nd rear
defogger in order to reduce battery drain.
Starting the Ignition*
Insert the key into the ignition and turn to turn on the vehicle or start the engine.
0 LOCK: Insert and remove the key in this position.
I ACCESSORY: operate the audio system and other
accessories in this position.
II ON: operate other electrical items, such as
wipers and power windows. This is also the position
when driving.
III START: This position is for starting the engine. The switch returns to oN when
you release the key.
Manual transmission models
*if equipped
Brake peda l
Brake pedal
Clutch pedal
removing the key from the ignition switch while driving locks the steerin\
g.
This can cause you to lose control of the vehicle.
remove the key from the ignition switch only when parked.
WARNING
Changing the Power Mode*
Use the
ENGINE START/STOP button to cycle through power modes or start the
engine.
Accessory or On mode:
Press the ENGINE START/
STOP button once without pressing the brake pedal
for Accessory mode. Press it again for on mode.
Starting the engine: Press and hold the brake pedal
or clutch, then press the ENGINE START/STOP button.
Keep your foot firmly on the brake pedal when starting
the engine.
Turning the vehicle off:
Shift to Park (P) or apply the parking brake, then press the
ENGINE START/STOP button. If you press the button and the shift lever is not in
Park (P), the vehicle goes into Accessory mode.
*if equipped
Shifting
Change the shift position based on your driving needs.
Continuously Variable Transmission (CVT)*Park (P):
Used for parking or starting/stopping
the engine. Press the brake pedal, then press the
release button to shift.
Reverse (R): Used for reversing.
Neutral (N): Used for idling.
Drive (D): Used for normal driving.
Drive (S):
Used for better acceleration, increased
engine braking, driving in hilly terrain, or paddle
shifting*.
Low (L)*: Used for stronger engine power and
braking when driving in hilly terrain.
When you change the shift lever from D to R and vice versa, come to a complete
stop and keep the brake pedal depressed. Operating the shift lever before the
vehicle has come to a complete standstill can damage the transmission.
Do not operate the shift lever while pressing the accelerator pedal. You could
damage the transmission.
NOTICE
Release button
Page 62 of 83

116 || 117
HANDLING THE UNEXPECTED
HANDLING THE UNEXPECTED
HANDLING THE UNEXPECTED
Learn about what to do in critical or emergency situations.
Smart Entry Remote Battery Strength*
If the battery life in your remote transmitter is weak, a beep sounds and the ENGINE
START/STOP button indicator flashes. A message appears in the multi-information
display with information on how to start the engine.*
1. Touch the back of the remote transmitter to the
ENGINE START/STOP button while the indicator is
flashing.
2. With the brake pedal or clutch pedal pressed,
press the ENGINE START/STOP button within 10
seconds.
Shift Lever Does Not Move*
Follow the procedure below if you cannot move the shift lever out of Park (P).
1. Set the parking brake.
2. remove the key from the ignition, or remove the
built-in key from the remote transmitter.
3. Wrap a cloth around the tip of a small flat-tip
screwdriver. Put it into the shift lock release slot as
shown in the image, and remove the cover.
4. Insert the key into the shift lock release slot.
5. While pushing the key down, press the shift lever
release button and place the shift lever into Neutral
(N). The lock is now released. Have the shift lever
checked by a dealer as soon as possible.
*if equipped
Slo t
Cove r
Release button
Shift lock
release slot
FPO
Jump Starting
Turn off the power to electric devices, such as audio and lights. Turn off the engine,
then open the hood.
1. Connect the first jumper cable to your vehicle’s
battery (+) terminal.
2. Connect the other end of the first jumper cable
to the booster battery (+) terminal. Use a 12-volt
booster battery only.
3. Connect the second jumper cable to the booster
battery (-) terminal.
4. Connect the other end of the second jumper cable
to the engine mounting bolt as shown. Do not
connect this jumper cable to any other part.
5. If your vehicle is connected to another vehicle,
start the assisting vehicle’s engine and increase its
rpm slightly.
6. Attempt to start your vehicle’s engine. If it turns
over slowly, make sure that the jumper cables have
good metal-to-metal contact.
WARNING: Battery posts, terminals, and related accessories contain lead and lead\
compounds. Wash your hands after handling.
Booster battery
4-cylinder model s
6-cylinder models
Booster battery
4-cylinder
models
6-cylinder
models
A battery can explode if you do not follow the correct procedure, seriously
injuring anyone nearby.
Keep all sparks, open flames, and smoking materials away from the battery.
WARNING
Page 67 of 83

126 || 127
HANDLING THE UNEXPECTED
HANDLING THE UNEXPECTED
Fuse Locations
If any electrical devices are not working, turn the vehicle off and check to see if any
applicable fuse is blown. Fuse locations are shown on the fuse box cover. Locate the
fuse in question by the fuse number and box cover number.
Engine Compartment Fuse Box
Located under the hood near the brake fluid reservoir. Push the tabs to open the
box.
*if equipped*1 : Models with LKAS
*2 : Models without LKAS
*3 : 4-cylinder models
*4 : 6-cylinder models
Circuit ProtectedAmps1Battery125A
2
EPS70 A
Fuse Box Main 1(60A)
Fuse Box Option 1(40A )����
ABS/VSA FSR 20
A*1
40A*2
ABS/VSA Motor 40
A*1
30A*2
3
��������
4F ront Fog Ligh t*(10A )5Horn10A
6S top Light10A7FI Sub15A
8D RL(7.5 A)
9IG Coil15A
10 Injector*3
�*4(2
0A )*3
�*4
*5: M odels with smart entry syste m
*6: Models without smart entry system Circuit Protected
Amps
11 Hazard 15A
12 Fuse Box Main
260A
Fuse Box Option 2(40 A)
IG Main 1 30
A
*5
50A*6
IG Main 2*5
�*630A*5
�*6
Sub Fan Moto r20
A*3
30A*4
Headlight Low Beam Main 30 A
Fuse Box3 0A
Wiper Moto r3 0A
Main Fan Motor 30A
Starter Motor
*5
�*630 A*5
�*6
13 Rear Defogger 40A
14 Heater Moto r40A
15 FI Main 15A
16 Heated Door Mirror
*, *3
�*4(10 A)*3
�*4
17
MG Clutch 7.5 A
18 DBW1 5A
19 Small Light 20A
20 Interior Light 7.5A
21 Back Up 10A
22 Audio1 0A
23 Fan Timer 7.5 A
24 Right Headlight Low Beam 10A
25 Left Headlight Low Beam 10A
26 ABS/VSA EC
U
*1
�*27.5 A*1
�*2
*1: Models with LKAS
*2 : Models without LKAS
*3 : 4-cylinder models
*4 : 6-cylinder models
Circuit Protected Amps
1 Battery 125A
2 EPS
70A
Fuse Box Main 1(60A)
Fuse Box Option 1(40A )
��
� �
ABS/VSA FSR 20
A
*1
40A*2
ABS/VSA Motor 40
A*1
30A*2
3 �
�
� �
� �
� �
4F ront Fog Ligh t
*(10A )
5 Horn 10A
6S top Light1 0A
7 FI Sub 15A
8D RL(7.5 A)
9 IG Coil 15A
10 Injector
*3
�*4(2
0A )*3
�*4
*5: M odels with smart entry syste m
*6: Models without smart entry system
Circuit ProtectedAmps11Hazard15 A
12 Fuse Box Main 260A
Fuse Box Option 2(40 A)
IG Main 1 30
A
*5
50A*6
IG Main 2*5
�*630A*5
�*6
Sub Fan Moto r20
A*3
30A*4
Headlight Low Beam Main 30 A
Fuse Box30A
Wiper Motor30A
Main Fan Motor 30A
Starter Motor
*5
�*630 A*5
�*6
13Rear Defogger40A
14 Heater Motor40A15FI Main15 A
16 Heated Door Mirror*, *3
�*4(10 A)*3
�*4
17MG Clutch7.5 A
18 DBW15A19Small Light20A
20 Interior Light 7.5A
21Back Up10 A
22 Audio10A23Fan Timer7.5 A
24 Right Headlight Low Beam 10A
25Left Headlight Low Beam10A
26 ABS/VSA EC
U*1
�*27.5 A*1
�*2
Interior Fuse Box
Located under the dashboard on the driver’s side.
*if equipped
Circuit ProtectedAmps1A/C7.5 A2DRL7.5 A3��4��5Meter7.5 A6SRS7.5 A7Option(7.5A )8MISS SOL10A9Fuel Pump20A10ABS/VSA7.5A11��12Front Wipe r7.5A13ACG15 A
14Rear Accessory Power Socket
(Console Compartment )(20A )
15Driver’s Power Seat
Reclining*(20A )
16Moonroof*(20A )17Front Seat Heaters*(20A )18��
19Passenger Side Door
Unlock10A
20 Driver Side Rear Door
Unlock 10
A
21 Driver’s Door Lock 10A
22 Passenger Side Door Lock 10A
23 Driver’s Door Unlock 10A
24 SRS 10A
25 Illumination 10A
26 Key Lock 7.5A
27 Parking Lights 10A
28 Lumbar Support
*(10A )
29 Right Headlight High Beam 10A
30 Washer 15A
31 SMART
*(10A )
32 Driver’s Power Window 20A
33 Front Passenger’s Power
Window 20
A
34 Rear Driver Side Power
Window 20
A
35 Rear Passenger Side Power
Window 20
A
36 Driver’s Power Seat Sliding
*(20 A)
37 ACCESSORY 7.5A
38 � �
39 Left Headlight High Beam 10A
40
Front Accessory Powe r Socket
(Con sole Panel)20A
41 Driver Side Rear Door Lock 10A
42 Door Lock 20A
a Audio
*(7.5 A)
b ACM*(20 A)
c Rear Seat Heaters*(15 A)
d Premium Amp*(20 A)
e � �
f � �
g Passenger’s Power Seat
Reclining
*(20 A)
h Passenger’s Power Seat
Sliding
*(20 A)
Circuit Protecte dAmps
Fuse label
Circuit Protected Amps
1 A/C 7.5 A
2 DRL 7.5 A
3 � �
4 � �
5 Meter 7.5 A
6 SRS 7.5 A
7 Option (7.5A)
8 MISS SOL 10A
9 Fuel Pump 20A
10 ABS/VSA 7.5A
11 � �
12 Front Wiper 7.5A
13 ACG 15A
14
Rear Accessory Power Socket
(Console Compartment )(20A )
15 Driver’s Power Seat
Reclining
*(20A )
16 Moonroof
*(2 0A )
17 Front Seat Heaters*(20A )
18 � �
19 Passenger Side Door
Unlock 10
A
20 Driver Side Rear Door
Unlock 10
A
21Driver’s Door Lock10A22Passenger Side Door Lock10A23Driver’s Door Unlock10A24SRS10A25Illuminatio n10A26Key Lock7.5A27Parking Lights10 A28Lumbar Support*(10A )29Right Headlight High Beam10A30Washe r15A31SMART*(10A )32Driver’s Power Window20A
33Front Passenger’s Power
Window20A
34Rear Driver Side Power
Window20A
35Rear Passenger Side Power
Window20A
36Driver’s Power Seat Sliding*(20 A)37ACCESSORY7.5A38��39Left Headlight High Beam10A
40Front Accessory Powe r Socket
(Con sole Panel)20A
41Driver Side Rear Door Lock10A42Door Loc k20AaAudio*(7.5 A)bACM*(20 A)cRear Seat Heaters*(15 A)dPremium Amp*(20 A)e��f��
gPassenger’s Power Seat
Reclining*(20 A)
hPassenger’s Power Seat Sliding*(20 A)
Circuit Protecte dAmps
Page 79 of 83

150 || 151
CUSTOMER INFORMATION
SPECIFICATIONS
6-cylinder models
Vehicle
Engine and Fuel
Tires
Light Bulbs
Fluids
ModelHonda Accord SedanNo. of Passengers:
Front 2
Rear 3
Tota l5
Weights:Gross Vehicle
Weight Rating U.S.: 4,542 lbs (2,060 kg )
Canada: 2,060 kg
Gross Axle Weight
Rating (Front)U.S.: 2,491 lbs (1,130 kg )
Canada: 1,130 kg
Gross Axle Weight
Rating (Rear)U.S.: 2,072 lbs (940 kg )
Canada: 940 kg
Air Conditioning:
Refrigerant Type HFC-134a (R-134a)
Charge Quantit y15.0 – 16.8 oz (425 – 475 g)
Lubricant Type ND-OIL 8
Engine
FuelDisplacement212 cu-in (3,471 cm3)
Spark Plugs NG
KI LZKR7B11
DENSO SXU22HCR11
Fuel:
TypeUnleaded gasoline
Pump octane number of 87 or higher
Fuel Tank Capacity 17.2 US gal (65 �)
*1: EX-L V6 models*2: U.S. Touring models and Canadian V6 Touring models
Regular
Size215/55R17 94 V*1235/40R19 96V*2
Pressure
psi (kPa [kgf/cm2])33 (225 [2.3])*133 (230 [2.3])*2Front
Rear33 (225 [2.3])*132 (220 [2.2])*2
Compact
Spar e Size
T135/90D16 102M*1T135/80D17 103M*2Pressure
psi (kPa [kgf/cm2])
60 (420 [4.2])
Wheel SizeRegula
r17 x 7 1/2J*119 x 8J*2
Compact Spar e16 x 4T*117 x 4T*2
*1:Models with halogen headlights*2:Models with LED headlights*3:Models with bulb type parking lights*4:Models with LED type parking/daytime running lights*5:Models with bulb type brake lights*6: Models with LED type brake lights
Headlights (Low Beam)55W (H11)*1LED*2
Headlights (High Beam )60W (HB3
)*1LED*2Fog LightsLEDFront Turn Si gnal/Side Marker/Parki ng Ligh ts*1, *3Front Turn Signal/Side Marker Light s*1, *428/8W (Amber )
Parking/Daytime Running Lights*4LE D
Front Turn Signal Light s*2LEDFront Side Marker Lights*23CP
Side Turn Signal Lights
(on Door Mirrors ) LE
D
Brake Lights21W*5LED*6Rear Turn Signal Lights 21W (Amber)Rear Side Marker LightsLED
Taillights (on Fenders) LED
Back-Up Lights16W
Taillights (on Trunk Lid) LED
High-Mount Brake LightLED
Rear License Plate Lights5WTrunk Light5WIn terior Light sMap Lights8WCeiling Ligh t8WVanity Mirror Light s1.4WCourtesy Lights2CP
Brake Fluid
Automatic Transmission Fluid
Speci�edHonda Heavy Duty Brake Fluid DOT 3
Speci�edHonda ATF DW-1
(automatic transmission �uid )
Capacit yC hange3 .3 US qt (3.1 �)
Engine Oil
Engine Coolan
t
Recommended·Genuine Honda Motor Oil 0W-2 0
·API Premium-grade 0W-20 detergent oi l
Capacity Chang
e4 .2 US qt (4.0 �)
Change
including
�lter 4.5 US qt (4.3 �)
Speci�e
dHonda Long-Life Anti freeze/Coolant Type 2
Ratio 50/50 with distilled wate r
Capacity1.72 US gal (6.5 �)
(change including the remaining
0.17 US gal (0.64 �) in the reserve tank )
Washer Fluid
Tank CapacityU.S.: 2.6 US qt (2.5 �)
Canada: 4.85 �
CUSTOMER INFORMATION
*if equipped
Learn about information specific to you as a Honda customer and how to get help.
Frequently Asked Questions/Troubleshooting
Below are some frequently asked questions and troubleshooting items that you may
have about the vehicle.
Q: How do I set the vehicle clock?
A: For vehicles without navigation, see page 49. For vehicles with navigati\
on, the
time is automatically set using GPS signals.
Q: Why doesn’t the vehicle start when I press the ENGINE START/STOP button?*
A: The brake pedal (and/or clutch pedal*) must be pressed to start the engine.
Q: What is the AUTO setting on my headlight lever?
A: When in the AUTO position, the vehicle’ s exterior lights will automatically turn
on or off depending on the ambient lighting.
Q: Why won’t the driver’s door unlock when I grab the door handle, even though
the keyless access remote is within range?*
A: If you pull the handle too quickly, the system may not have time to confirm the
door is unlocked. Wait to hear a beep to confirm the door is unlocked. If you are
wearing gloves, the system may be slow to respond.
Q: After my battery was disconnected or went dead, the audio system is asking for
a code. Where do I find this?
A: In most cases, you do not need to enter a code. T urn on the vehicle and the
audio system, and press and hold the power button until the system reactivates.
Q: Why can’t I operate Pandora® through the audio system?*
A: Audio may be streaming through Bluetooth® Audio. Make sure Pandora mode
is selected and the phone cable is properly connected to the USB adapter
cable (if using). Some phones may prompt you to “Allow” a connection.
Q: Is my phone compatible with Bluetooth features?
A: visit handsfreelink.com (U.S.) or www.handsfreelink.ca (Canada) to
check phone compatibility for Bluetooth® Audio, Bluetooth® HandsFreeLink®,
and SMS text messaging.
Q: Every time I press the Talk button, the system gives me voice prompts. Can I turn
these off?*
A: From the Home screen, select SETTINGS. Select System, then select V oice
Prompt. Select off.