Page 14 of 509

GMC Sierra Owner Manual (GMNA-Localizing-U.S./Canada/Mexico-
9234758) - 2016 - crc - 11/9/15
In Brief 13
.Tilt the top of the control forward
to raise.
See Reclining Seatbacks 059.
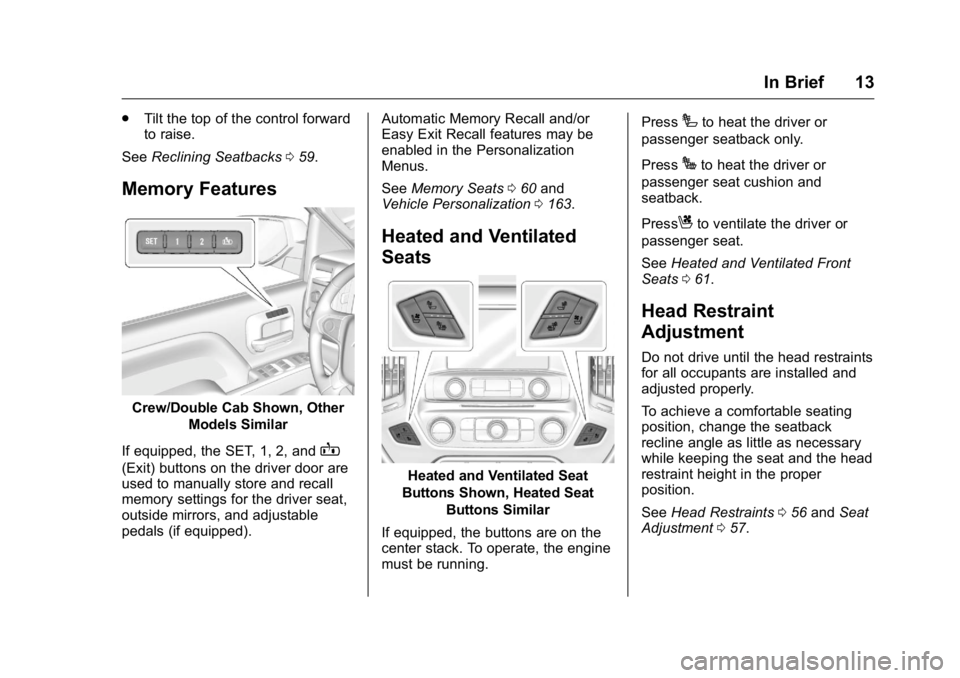
Memory Features
Crew/Double Cab Shown, Other
Models Similar
If equipped, the SET, 1, 2, and
B
(Exit) buttons on the driver door are
used to manually store and recall
memory settings for the driver seat,
outside mirrors, and adjustable
pedals (if equipped). Automatic Memory Recall and/or
Easy Exit Recall features may be
enabled in the Personalization
Menus.
See
Memory Seats 060 and
Vehicle Personalization 0163.
Heated and Ventilated
Seats
Heated and Ventilated Seat
Buttons Shown, Heated Seat Buttons Similar
If equipped, the buttons are on the
center stack. To operate, the engine
must be running. Press
Ito heat the driver or
passenger seatback only.
Press
Jto heat the driver or
passenger seat cushion and
seatback.
Press
Cto ventilate the driver or
passenger seat.
See Heated and Ventilated Front
Seats 061.
Head Restraint
Adjustment
Do not drive until the head restraints
for all occupants are installed and
adjusted properly.
To achieve a comfortable seating
position, change the seatback
recline angle as little as necessary
while keeping the seat and the head
restraint height in the proper
position.
See Head Restraints 056 and Seat
Adjustment 057.
Page 58 of 509

GMC Sierra Owner Manual (GMNA-Localizing-U.S./Canada/Mexico-
9234758) - 2016 - crc - 11/9/15
Seats and Restraints 57
Rear Seats
The rear seat has adjustable
headrests in the outboard seating
positions.
The height of the headrest can be
adjusted. Pull the headrest up to
raise it. To lower the headrest, push
the headrest down.
If you are installing a child restraint
in the rear seat, see“Securing a
Child Restraint Designed for the
LATCH System” underLower
Anchors and Tethers for Children
(LATCH System) 094.
Front Seats
Seat Adjustment
{Warning
You can lose control of the
vehicle if you try to adjust a driver
seat while the vehicle is moving.
Adjust the driver seat only when
the vehicle is not moving.
To adjust a manual seat:
1. Pull the handle at the front of the seat. 2. Slide the seat to the desired
position and release the
handle.
3. Try to move the seat back and forth to be sure it is locked in
place.
To adjust the seatback, see
Reclining Seatbacks 059.
To adjust the lumbar support, see
Lumbar Adjustment 058.
Center Seat
If equipped, the center front
seatback doubles as an armrest and
cupholder/storage area for the driver
and passenger when the center
front seat is not used. Do not use it
as a seating position when the
seatback is folded down.
Page 69 of 509

GMC Sierra Owner Manual (GMNA-Localizing-U.S./Canada/Mexico-
9234758) - 2016 - crc - 11/9/15
68 Seats and Restraints
3. Push the latch plate into thebuckle until it clicks.
Pull up on the latch plate to
make sure it is secure. If the
belt is not long enough, see
Safety Belt Extender 070.
Position the release button on
the buckle so that the safety
belt could be quickly unbuckled
if necessary.
4. If equipped with a shoulder belt height adjuster, move it to the
height that is right for you. See
“Shoulder Belt Height Adjuster”
later in this section for
instructions on use and
important safety information.
5. To make the lap part tight, pullup on the shoulder belt.
To unlatch the belt, push the button
on the buckle. The belt should
return to its stowed position.
Always stow the safety belt slowly.
If the safety belt webbing returns
quickly to the stowed position, the
retractor may lock and cannot be
pulled out. If this happens, pull the
safety belt straight out firmly to
unlock the webbing, and then
release it. If the webbing is still
locked in the retractor, see your
dealer.
Before a door is closed, be sure the
safety belt is out of the way. If a
door is slammed against a safety
belt, damage can occur to both the
safety belt and the vehicle.
Shoulder Belt Height Adjuster
The vehicle has a shoulder belt
height adjuster for the driver and
front outboard passenger.
Adjust the height so the shoulder
portion of the belt is on the shoulder
and not falling off of it. The belt
should be close to, but not
contacting, the neck. Improper
shoulder belt height adjustment
Page 422 of 509

GMC Sierra Owner Manual (GMNA-Localizing-U.S./Canada/Mexico-
9234758) - 2016 - crc - 11/9/15
Vehicle Care 421
Wheel Alignment and Tire
Balance
The tires and wheels were aligned
and balanced at the factory to
provide the longest tire life and best
overall performance. Adjustments to
wheel alignment and tire balancing
are not necessary on a regular
basis. Consider an alignment check
if there is unusual tire wear or the
vehicle is significantly pulling to one
side or the other. Some slight pull to
the left or right, depending on the
crown of the road and/or other road
surface variations such as troughs
or ruts, is normal. If the vehicle is
vibrating when driving on a smooth
road, the tires and wheels may need
to be rebalanced. See your dealer
for proper diagnosis.
Wheel Replacement
Replace any wheel that is bent,
cracked, or badly rusted or
corroded. If wheel nuts keep coming
loose, the wheel, wheel bolts and
wheel nuts should be replaced.
If the wheel leaks air, replace it.Some aluminum wheels can be
repaired. See your dealer if any of
these conditions exist.
Your dealer will know the kind of
wheel that is needed.
Each new wheel should have the
same load-carrying capacity,
diameter, width, offset and be
mounted the same way as the one it
replaces.
Replace wheels, wheel bolts, wheel
nuts, or Tire Pressure Monitor
System (TPMS) sensors with new
GM original equipment parts.
{Warning
Using the wrong replacement
wheels, wheel bolts, or wheel
nuts can be dangerous. It could
affect the braking and handling of
the vehicle. Tires can lose air,
and cause loss of control, causing
a crash. Always use the correct
wheel, wheel bolts, and wheel
nuts for replacement.
Caution
The wrong wheel can also cause
problems with bearing life, brake
cooling, speedometer or
odometer calibration, headlamp
aim, bumper height, vehicle
ground clearance, and tire or tire
chain clearance to the body and
chassis.
Whenever a wheel, wheel bolt,
or wheel nut is replaced on a dual
wheel setup, check the wheel nut
torque after 160,1 600, and
10 000 km (100,1,000, and
6,000 mi) of driving. For proper
torque, see “Wheel Nut Torque”
under Capacities and
Specifications 0468.
See If a Tire Goes Flat 0423 for
more information.