Page 322 of 509
GMC Sierra Owner Manual (GMNA-Localizing-U.S./Canada/Mexico-
9234758) - 2016 - crc - 11/9/15
Driving and Operating 321
The fuel cap is behind a hinged fuel
door on the driver side of the
vehicle. Vehicles that have a
FlexFuel badge and a yellow fuel
cap can use either unleaded
gasoline or ethanol fuel containing
up to 85% ethanol (E85). SeeE85
or FlexFuel 0319.
To remove the fuel cap, turn it
slowly counterclockwise.
If the vehicle is a dual fuel tank
chassis cab model, and it runs out
of fuel, refuel the front fuel tank first
to ensure a quick restart.
{Warning
Overfilling the fuel tank by more
than three clicks of a standard fill
nozzle may cause: . Vehicle performance issues,
including engine stalling and
damage to the fuel system.
. Fuel spills.
. Potential fuel fires. Be careful not to spill fuel. Wait a
few seconds after you have finished
pumping before removing the
nozzle. Clean fuel from painted
surfaces as soon as possible. See
Exterior Care
0444.
When replacing the fuel cap, turn it
clockwise until it clicks. It will require
more effort to turn the fuel cap on
the last turn as you tighten it. Make
sure the cap is fully installed. The
diagnostic system can determine if
the fuel cap has been left off or
improperly installed. This would
allow fuel to evaporate into the
atmosphere. See Malfunction
Indicator Lamp (Check Engine
Light) 0141.
The TIGHTEN GAS CAP message
displays on the Driver Information
Center (DIC) if the fuel cap is not
properly installed. See Fuel System
Messages 0156 for more
information.
{Warning
If a fire starts while you are
refueling, do not remove the
nozzle. Shut off the flow of fuel by
shutting off the pump or by
notifying the station attendant.
Leave the area immediately.
Caution
If a new fuel cap is needed, be
sure to get the right type of cap
from your dealer. The wrong type
of fuel cap may not fit properly,
may cause the malfunction
indicator lamp to light, and could
damage the fuel tank and
emissions system. See
Malfunction Indicator Lamp
(Check Engine Light) 0141.
Page 376 of 509
GMC Sierra Owner Manual (GMNA-Localizing-U.S./Canada/Mexico-
9234758) - 2016 - crc - 11/9/15
Vehicle Care 375
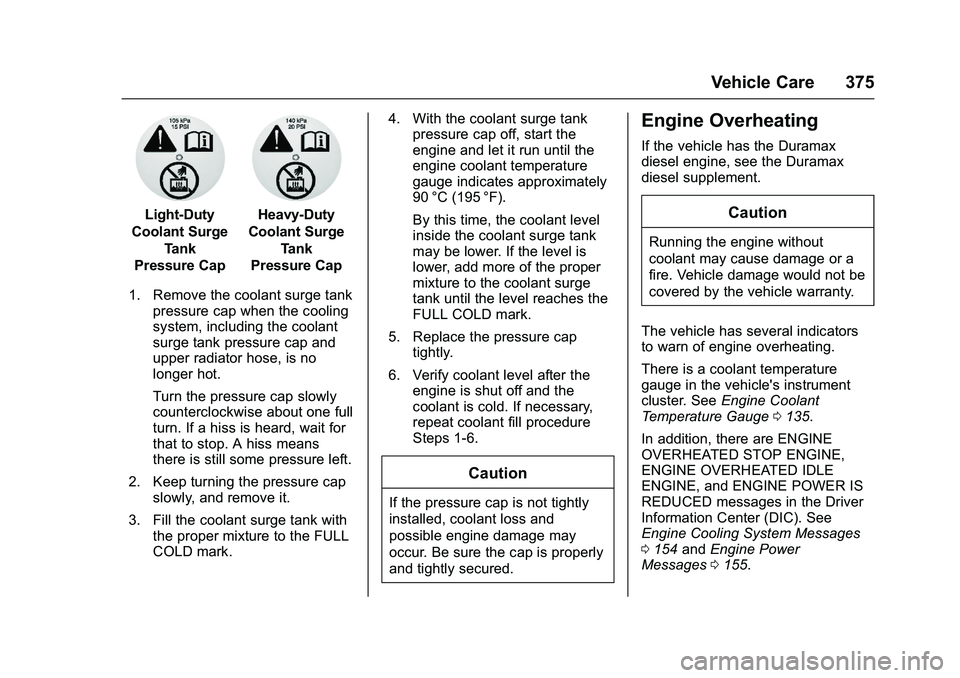
Light-Duty
Coolant Surge Tank
Pressure CapHeavy-Duty
Coolant Surge Tank
Pressure Cap
1. Remove the coolant surge tank pressure cap when the cooling
system, including the coolant
surge tank pressure cap and
upper radiator hose, is no
longer hot.
Turn the pressure cap slowly
counterclockwise about one full
turn. If a hiss is heard, wait for
that to stop. A hiss means
there is still some pressure left.
2. Keep turning the pressure cap slowly, and remove it.
3. Fill the coolant surge tank with the proper mixture to the FULL
COLD mark. 4. With the coolant surge tank
pressure cap off, start the
engine and let it run until the
engine coolant temperature
gauge indicates approximately
90 °C (195 °F).
By this time, the coolant level
inside the coolant surge tank
may be lower. If the level is
lower, add more of the proper
mixture to the coolant surge
tank until the level reaches the
FULL COLD mark.
5. Replace the pressure cap tightly.
6. Verify coolant level after the engine is shut off and the
coolant is cold. If necessary,
repeat coolant fill procedure
Steps 1-6.
Caution
If the pressure cap is not tightly
installed, coolant loss and
possible engine damage may
occur. Be sure the cap is properly
and tightly secured.
Engine Overheating
If the vehicle has the Duramax
diesel engine, see the Duramax
diesel supplement.
Caution
Running the engine without
coolant may cause damage or a
fire. Vehicle damage would not be
covered by the vehicle warranty.
The vehicle has several indicators
to warn of engine overheating.
There is a coolant temperature
gauge in the vehicle's instrument
cluster. See Engine Coolant
Temperature Gauge 0135.
In addition, there are ENGINE
OVERHEATED STOP ENGINE,
ENGINE OVERHEATED IDLE
ENGINE, and ENGINE POWER IS
REDUCED messages in the Driver
Information Center (DIC). See
Engine Cooling System Messages
0 154 andEngine Power
Messages 0155.
Page 391 of 509
GMC Sierra Owner Manual (GMNA-Localizing-U.S./Canada/Mexico-
9234758) - 2016 - crc - 11/9/15
390 Vehicle Care
4. Pull the rear lamp assemblystraight back to remove it from
the vehicle.
5. Turn the bulb socket counterclockwise.
6. Pull the bulb straight out from the socket.
7. Replace the bulb, then insert the bulb socket into the rear
lamp assembly and turn
clockwise.8. Verify the retainer ring ofattachment stud is pulled away
from lamp. If the retainer ring is
out of position, it will not
engage. Reset the retainer by
pulling it forward with a tool.
9. Push the rear lamp assembly straight in until it is seated
against the vehicle.
10. Make sure the rear lamp assembly is flush with the
box side.
11. Reinstall the two rear lamp assembly screws.
Center High-Mounted
Stoplamp (CHMSL) and
Cargo Lamp
1. Cargo Lamp Bulbs
2. Center High-Mounted
Stoplamp (CHMSL) Bulb
Page 392 of 509
GMC Sierra Owner Manual (GMNA-Localizing-U.S./Canada/Mexico-
9234758) - 2016 - crc - 11/9/15
Vehicle Care 391
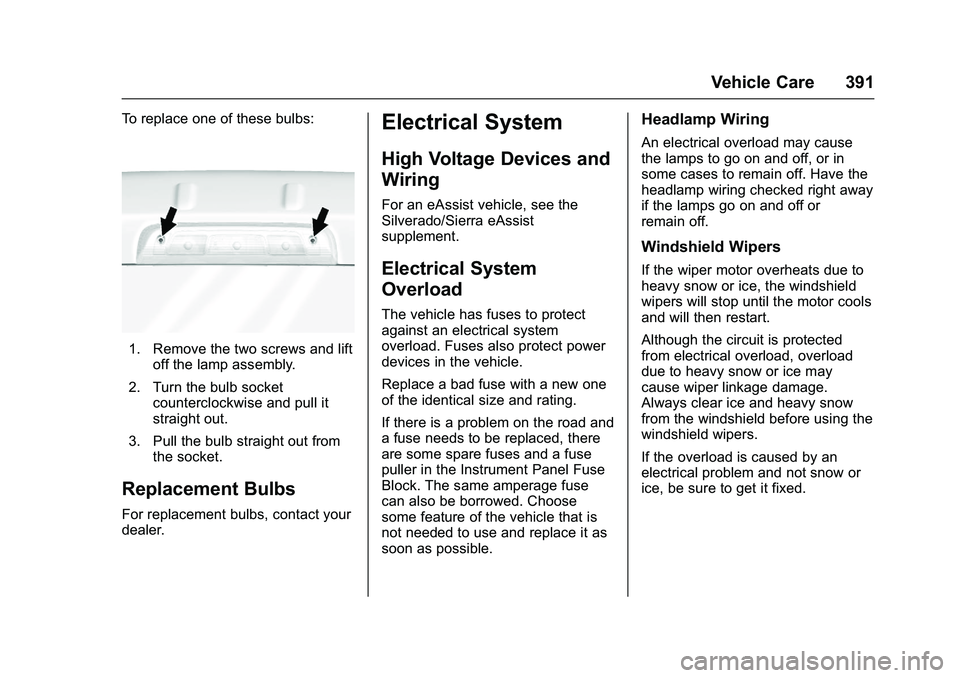
To replace one of these bulbs:
1. Remove the two screws and liftoff the lamp assembly.
2. Turn the bulb socket counterclockwise and pull it
straight out.
3. Pull the bulb straight out from the socket.
Replacement Bulbs
For replacement bulbs, contact your
dealer.
Electrical System
High Voltage Devices and
Wiring
For an eAssist vehicle, see the
Silverado/Sierra eAssist
supplement.
Electrical System
Overload
The vehicle has fuses to protect
against an electrical system
overload. Fuses also protect power
devices in the vehicle.
Replace a bad fuse with a new one
of the identical size and rating.
If there is a problem on the road and
a fuse needs to be replaced, there
are some spare fuses and a fuse
puller in the Instrument Panel Fuse
Block. The same amperage fuse
can also be borrowed. Choose
some feature of the vehicle that is
not needed to use and replace it as
soon as possible.
Headlamp Wiring
An electrical overload may cause
the lamps to go on and off, or in
some cases to remain off. Have the
headlamp wiring checked right away
if the lamps go on and off or
remain off.
Windshield Wipers
If the wiper motor overheats due to
heavy snow or ice, the windshield
wipers will stop until the motor cools
and will then restart.
Although the circuit is protected
from electrical overload, overload
due to heavy snow or ice may
cause wiper linkage damage.
Always clear ice and heavy snow
from the windshield before using the
windshield wipers.
If the overload is caused by an
electrical problem and not snow or
ice, be sure to get it fixed.
Page 426 of 509
GMC Sierra Owner Manual (GMNA-Localizing-U.S./Canada/Mexico-
9234758) - 2016 - crc - 11/9/15
Vehicle Care 425
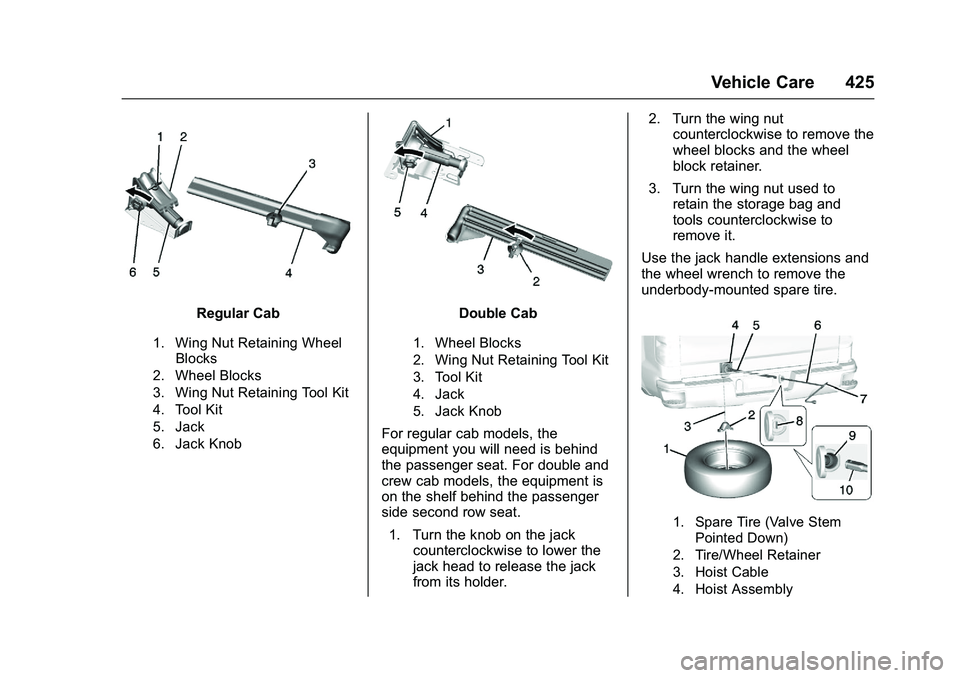
Regular Cab
1. Wing Nut Retaining WheelBlocks
2. Wheel Blocks
3. Wing Nut Retaining Tool Kit
4. Tool Kit
5. Jack
6. Jack Knob
Double Cab
1. Wheel Blocks
2. Wing Nut Retaining Tool Kit
3. Tool Kit
4. Jack
5. Jack Knob
For regular cab models, the
equipment you will need is behind
the passenger seat. For double and
crew cab models, the equipment is
on the shelf behind the passenger
side second row seat.
1. Turn the knob on the jack counterclockwise to lower the
jack head to release the jack
from its holder. 2. Turn the wing nut
counterclockwise to remove the
wheel blocks and the wheel
block retainer.
3. Turn the wing nut used to retain the storage bag and
tools counterclockwise to
remove it.
Use the jack handle extensions and
the wheel wrench to remove the
underbody-mounted spare tire.
1. Spare Tire (Valve Stem Pointed Down)
2. Tire/Wheel Retainer
3. Hoist Cable
4. Hoist Assembly
Page 427 of 509
GMC Sierra Owner Manual (GMNA-Localizing-U.S./Canada/Mexico-
9234758) - 2016 - crc - 11/9/15
426 Vehicle Care
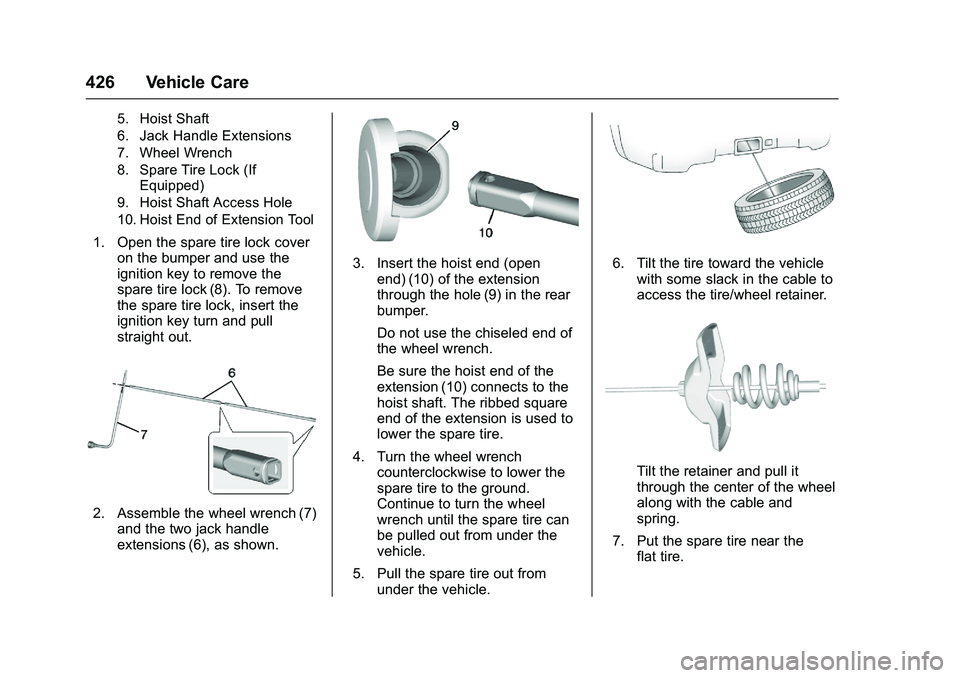
5. Hoist Shaft
6. Jack Handle Extensions
7. Wheel Wrench
8. Spare Tire Lock (IfEquipped)
9. Hoist Shaft Access Hole
10. Hoist End of Extension Tool
1. Open the spare tire lock cover on the bumper and use the
ignition key to remove the
spare tire lock (8). To remove
the spare tire lock, insert the
ignition key turn and pull
straight out.
2. Assemble the wheel wrench (7)and the two jack handle
extensions (6), as shown.
3. Insert the hoist end (openend) (10) of the extension
through the hole (9) in the rear
bumper.
Do not use the chiseled end of
the wheel wrench.
Be sure the hoist end of the
extension (10) connects to the
hoist shaft. The ribbed square
end of the extension is used to
lower the spare tire.
4. Turn the wheel wrench counterclockwise to lower the
spare tire to the ground.
Continue to turn the wheel
wrench until the spare tire can
be pulled out from under the
vehicle.
5. Pull the spare tire out from under the vehicle.6. Tilt the tire toward the vehiclewith some slack in the cable to
access the tire/wheel retainer.
Tilt the retainer and pull it
through the center of the wheel
along with the cable and
spring.
7. Put the spare tire near the flat tire.
Page 428 of 509
GMC Sierra Owner Manual (GMNA-Localizing-U.S./Canada/Mexico-
9234758) - 2016 - crc - 11/9/15
Vehicle Care 427
Removing the Flat Tire and
Installing the Spare Tire
Use the following pictures and
instructions to remove the flat tire
and raise the vehicle.
1. Jack
2. Wheel Blocks
3. Jack Handle
4. Jack Handle Extension
5. Wheel Wrench
The tools you will be using include
the jack (1), the wheel blocks (2),
the jack handle (3), the jack handle
extensions (4), and the wheel
wrench (5).1. Do a safety check before
proceeding. See If a Tire Goes
Flat 0423 for more information.
2. If the vehicle has wheel nut
caps, loosen them by turning
the wheel wrench
counterclockwise.
If the vehicle has a center cap
with wheel nut caps, the wheel
nut caps are designed to stay
with the center cap after they
are loosened. Remove the
entire center cap.
If the wheel has a smooth
center cap, place the chisel
end of the wheel wrench in the
slot on the wheel, and gently
pry it out.
Page 429 of 509
GMC Sierra Owner Manual (GMNA-Localizing-U.S./Canada/Mexico-
9234758) - 2016 - crc - 11/9/15
428 Vehicle Care
3. Use the wheel wrench and turnit counterclockwise to loosen
the wheel nuts. Do not remove
the wheel nuts yet.
Front Position –1500 Models
4. If the flat tire is on the front of the vehicle (1500 models),
position the jack under the
bracket attached to the
vehicle's frame, behind the flat
tire, as shown.
Front Position –All Other Models
If the flat tire is on the front of
the vehicle (all other models),
position the jack under the
vehicle, as shown.Rear Position –1500 Models
5. If the flat tire is on the rear, for 1500 models position the jack
under the rear axle about 5 cm
(2 in) inboard of the shock
absorber bracket.