2016 GMC SAVANA ignition
[x] Cancel search: ignitionPage 135 of 343

GMC Savana Owner Manual (GMNA-Localizing-U.S./Canada-9159232) -
2016 - crc - 11/11/15
134 Infotainment System
10. CD/AUX.Press to scroll through
selecting the CD or an
auxiliary device.
11.
\FWD (Forward)
. Press and hold to fast
forward through a track.
12.
sREV (Reverse)
. Press and hold to go
backward fast through a
track.
13.
P(Power/Volume)
. Press to turn the
infotainment system on
or off.
. Turn to adjust the volume.
14.
¨SEEK
. Seeks the next station.
15.
©SEEK
. Seeks the previous station. 16. BAND
.Press to scroll through the
available bands FM1, FM2,
AM, or SiriusXM if
equipped.
17.
H(Clock)
. Press to set the clock
and date.
Operation
Using the Radio
O(Power/Volume) : Press to turn
the system on and off.
Turn clockwise or counterclockwise
to increase or decrease the volume.
4(Information) : Press to switch
the display between the radio
station frequency and the time.
While the ignition is off, press this
button to display the time. Press to
display additional text information
related to the current FM-RDS
station or MP3 song. A choice of
additional information such as
Channel, Song, Artist, and CAT
(category) can display. Continue
pressing to highlight the desired tab, or press the softkey located under
any one of the tabs and the
information about that tab displays.
Speed Compensated Volume
(SCV) :
Radios with SCV
automatically adjust the radio
volume to compensate for road and
wind noise as the vehicle speed
changes while driving, so that the
volume level stays consistent.
To activate SCV:
1. Set the radio volume to the desired level.
2. Press the MENU button to display the radio setup menu.
3. Press the softkey under the AUTO VOLUM (automatic
volume) tab on the radio
display.
4. Press the softkey under the desired Speed Compensated
Volume setting (OFF, Low,
Med, or High) to select the
level of radio volume
compensation. The display
times out after approximately
10 seconds. Each higher
Page 141 of 343

GMC Savana Owner Manual (GMNA-Localizing-U.S./Canada-9159232) -
2016 - crc - 11/11/15
140 Infotainment System
Caution (Continued)
load one CD at a time, and keep
the CD player and the loading slot
free of foreign materials, liquids,
and debris.
If an error displays, see “CD Player
Messages” later in this section.
Care of CDs
If playing a CD-R, the sound quality
can be reduced due to CD-R or
CD-RW quality, the method of
recording, the quality of the music
that has been recorded, and the
way the CD-R or CD-RW has been
handled. Handle them carefully.
Store CD-Rs or CD-RWs in their
original cases or other protective
cases and away from direct sunlight
and dust. The CD player scans the
bottom surface of the disc. If the
surface of a CD is damaged, such
as cracked, broken, or scratched,
the CD does not play properly or not
at all. Do not touch the bottom side
of a CD while handling it; this could damage the surface. Pick up CDs
by the outer edges or the edge of
the hole and the outer edge.
If the surface of a CD is soiled,
clean it with a soft, lint-free cloth or
dampen a clean, soft cloth in a mild,
neutral detergent solution mixed
with water. Make sure the wiping
process starts from the center to
the edge.
Inserting a CD
Insert a CD partway into the slot,
label side up. The player pulls it in
and the CD should begin playing.
Ejecting a CD
ZEJECT :
Press and release to
eject the disc. Remove the CD
when Remove Disc displays. If the
disc is not removed, after several
seconds the disc is automatically
pulled back into the player.
Playing a CD
If the ignition or radio is turned off
with a CD in the player, it stays in
the player. When the ignition or radio is turned on, the CD starts
playing where it stopped, if it was
the last selected audio source.
When a CD is inserted, the CD
symbol displays on the left side of
the radio display. As each new track
starts to play, the track number
displays.
The CD player can play the smaller
8 cm (3 in) single CDs with an
adapter ring. Full-size CDs and the
smaller CDs are loaded in the same
manner.
CD/AUX (CD/Auxiliary) :
Press to
cycle between CD or Auxiliary when
listening to the radio. The CD icon
and a message showing the disc
and/or track number will display
when a CD is in the player. Press
again and the system automatically
searches for an auxiliary input
device; see Auxiliary Devices 0144.
If a portable audio player is not
connected, “No Input Device Found”
displays.4(Information) : Press to display
additional text information related to
the current song. If information is
available, the song title information
Page 156 of 343

GMC Savana Owner Manual (GMNA-Localizing-U.S./Canada-9159232) -
2016 - crc - 11/11/15
Infotainment System 155
Muting a Call
During a call, all sounds from inside
the vehicle can be muted so that the
person on the other end of the call
cannot hear them.
.To mute a call, press
b/g, and
then say “Mute call.”
. To cancel mute, press
b/g,
and then say “Un-mute call.”
Transferring a Call
Audio can be transferred between
the Bluetooth system and the cell
phone.
The cell phone must be paired and
connected with the Bluetooth
system before a call can be
transferred. The connection process
can take up to two minutes after the
ignition is turned to ON/RUN.
Transferring Audio from the
Bluetooth System to a Cell Phone
During a call with the audio in the
vehicle:
1. Press
b/g.
2. Say “Transfer Call.” Transferring Audio to the
Bluetooth System from a Cell
Phone
During a call with the audio on the
cell phone, press
b/g. The audio
transfers to the vehicle. If the audio
does not transfer to the vehicle, use
the audio transfer feature on the cell
phone. See your cell phone
manufacturer's user guide for more
information.
Voice Pass-Thru
Voice pass-thru allows access to the
voice recognition commands on the
cell phone. See your cell phone
manufacturer's user guide to see if
the cell phone supports this feature.
To access contacts stored in the cell
phone:
1. Press and hold
b/gfor
two seconds.
2. Say “Bluetooth.” This command
can be skipped.
3. Say “Voice.”The system
responds “OK, accessing
messages will go through their cycle
according to the phone's operating
instructions.
Dual Tone Multi-Frequency
(DTMF) Tones
The Bluetooth system can send
numbers and the numbers stored as
name tags during a call. You can
use this feature when calling a
menu-driven phone system.
Account numbers can also be
stored for use.
Sending a Number or Name Tag
During a Call
1. Press
b/g. The system
responds “Ready,”followed by
a tone.
2. Say “Dial.”
3. Say the number or name tag to send.
Page 160 of 343

GMC Savana Owner Manual (GMNA-Localizing-U.S./Canada-9159232) -
2016 - crc - 11/11/15
Climate Controls 159
The defogger only works when the
ignition is in ON/RUN. The defogger
turns off if the ignition is in the ACC/
ACCESSORY or LOCK/OFF
position.
Do not drive the vehicle until all the
windows are clear.
Caution
Do not use a razor blade or sharp
object to clear the inside rear
window. Do not adhere anything
to the defogger grid lines in the
rear glass. These actions may
damage the rear defogger.
Repairs would not be covered by
the vehicle warranty.
Rear Heating System
If equipped, the rear heating system
lets you adjust the amount of air
flowing into the rear of the vehicle,
from the front seating area. This
feature works with the main climate
control system in the vehicle.
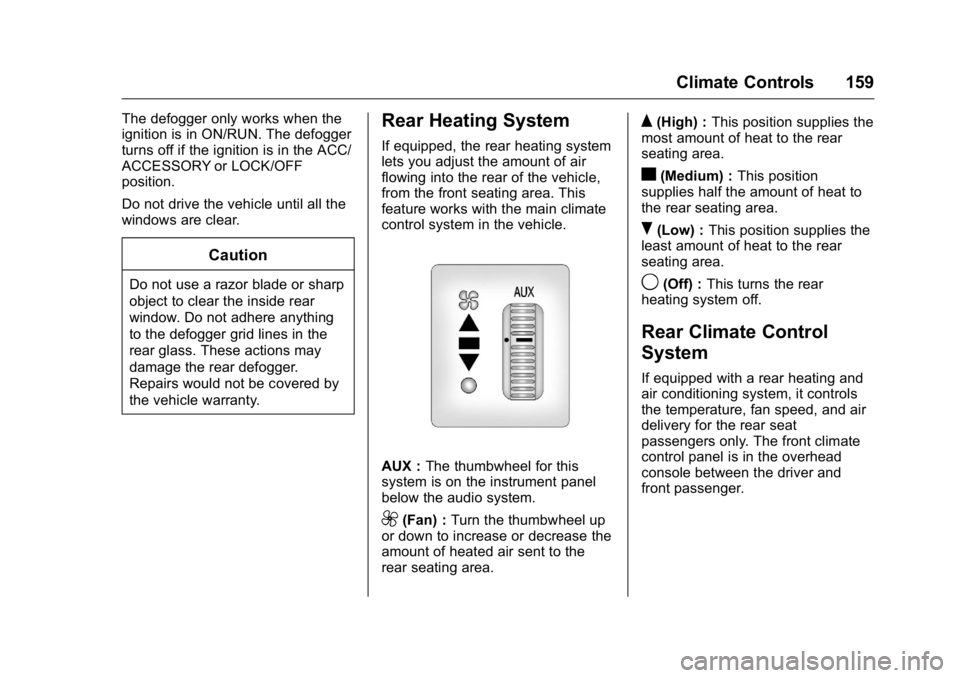
AUX :The thumbwheel for this
system is on the instrument panel
below the audio system.
9(Fan) : Turn the thumbwheel up
or down to increase or decrease the
amount of heated air sent to the
rear seating area.
Q(High) : This position supplies the
most amount of heat to the rear
seating area.
c(Medium) : This position
supplies half the amount of heat to
the rear seating area.
R(Low) : This position supplies the
least amount of heat to the rear
seating area.
9(Off) : This turns the rear
heating system off.
Rear Climate Control
System
If equipped with a rear heating and
air conditioning system, it controls
the temperature, fan speed, and air
delivery for the rear seat
passengers only. The front climate
control panel is in the overhead
console between the driver and
front passenger.
Page 164 of 343

GMC Savana Owner Manual (GMNA-Localizing-U.S./Canada-9159232) -
2016 - crc - 11/11/15
Driving and Operating 163
Driving and
Operating
Driving Information
Distracted Driving . . . . . . . . . . . . 164
Defensive Driving . . . . . . . . . . . . . 164
Drunk Driving . . . . . . . . . . . . . . . . . 164
Control of a Vehicle . . . . . . . . . . . 165
Braking . . . . . . . . . . . . . . . . . . . . . . . 165
Steering . . . . . . . . . . . . . . . . . . . . . . 165
Off-Road Recovery . . . . . . . . . . . 166
Loss of Control . . . . . . . . . . . . . . . 166
Driving on Wet Roads . . . . . . . . 167
Hill and Mountain Roads . . . . . 168
Winter Driving . . . . . . . . . . . . . . . . 168
If the Vehicle Is Stuck . . . . . . . . 169
Vehicle Load Limits . . . . . . . . . . . 170
Starting and Operating
New Vehicle Break-In . . . . . . . . . 174
Ignition Positions . . . . . . . . . . . . . 174
Starting the Engine . . . . . . . . . . . 176
Fast Idle System . . . . . . . . . . . . . 177
Engine Heater . . . . . . . . . . . . . . . . 178
Retained AccessoryPower (RAP) . . . . . . . . . . . . . . . . 179
Shifting Into Park . . . . . . . . . . . . . 179
Shifting out of Park . . . . . . . . . . . 180 Parking over Things
That Burn . . . . . . . . . . . . . . . . . . . 181
Engine Exhaust
Engine Exhaust . . . . . . . . . . . . . . 181
Running the Vehicle WhileParked . . . . . . . . . . . . . . . . . . . . . . 182
Automatic Transmission
Automatic Transmission . . . . . . 182
Manual Mode . . . . . . . . . . . . . . . . . 185
Tow/Haul Mode . . . . . . . . . . . . . . . 186
Brakes
Antilock BrakeSystem (ABS) . . . . . . . . . . . . . . . 187
Parking Brake . . . . . . . . . . . . . . . . 188
Ride Control Systems
Traction Control/Electronic Stability Control . . . . . . . . . . . . . 188
Locking Rear Axle . . . . . . . . . . . . 190
Cruise Control
Cruise Control . . . . . . . . . . . . . . . . 190
Driver Assistance Systems
Rear Vision Camera (RVC) . . . 193
Parking Assist . . . . . . . . . . . . . . . . 195
Fuel
Fuel . . . . . . . . . . . . . . . . . . . . . . . . . . 197 California Fuel
Requirements . . . . . . . . . . . . . . . 198
Fuels in Foreign Countries . . . 198
Fuel Additives . . . . . . . . . . . . . . . . 198
E85 or FlexFuel . . . . . . . . . . . . . . 198
Filling the Tank . . . . . . . . . . . . . . . 199
Filling a Portable Fuel Container . . . . . . . . . . . . . . . . . . . 201
Trailer Towing
General TowingInformation . . . . . . . . . . . . . . . . . . 201
Driving Characteristics and Towing Tips . . . . . . . . . . . . . . . . . 201
Trailer Towing . . . . . . . . . . . . . . . . 204
Towing Equipment . . . . . . . . . . . . 208
Conversions and Add-Ons
Add-On Electrical Equipment . . . . . . . . . . . . . . . . . . 211
Page 169 of 343

GMC Savana Owner Manual (GMNA-Localizing-U.S./Canada-9159232) -
2016 - crc - 11/11/15
168 Driving and Operating
Hill and Mountain Roads
Driving on steep hills or through
mountains is different than driving
on flat or rolling terrain. Tips include:
.Keep the vehicle serviced and in
good shape.
. Check all fluid levels and brakes,
tires, cooling system, and
transmission.
. Shift to a lower gear when going
down steep or long hills.
{Warning
Using the brakes to slow the
vehicle on a long downhill slope
can cause brake overheating, can
reduce brake performance, and
could result in a loss of braking.
Shift the transmission to a lower
gear to let the engine assist the
brakes on a steep downhill slope.
{Warning
Coasting downhill in N (Neutral)
or with the ignition off is
dangerous. This can cause
overheating of the brakes and
loss of steering. Always have the
engine running and the vehicle
in gear.
. Drive at speeds that keep the
vehicle in its own lane. Do not
swing wide or cross the
center line.
. Be alert on top of hills;
something could be in your lane
(e.g., stalled car, accident).
. Pay attention to special road
signs (e.g., falling rocks area,
winding roads, long grades,
passing or no-passing zones)
and take appropriate action.
Winter Driving
Driving on Snow or Ice
Snow or ice between the tires and
the road creates less traction or
grip, so drive carefully. Wet ice can
occur at about 0 °C (32 °F) when
freezing rain begins to fall. Avoid
driving on wet ice or in freezing rain
until roads can be treated.
For slippery road driving:
.Accelerate gently. Accelerating
too quickly causes the wheels to
spin and makes the surface
under the tires slick.
. Turn on Traction Control. See
Traction Control/Electronic
Stability Control 0188.
. Antilock Brake System (ABS)
improves vehicle stability during
hard stops, but the brakes
should be applied sooner than
when on dry pavement. See
Antilock Brake System
(ABS) 0187.
Page 175 of 343

GMC Savana Owner Manual (GMNA-Localizing-U.S./Canada-9159232) -
2016 - crc - 11/11/15
174 Driving and Operating
Starting and
Operating
New Vehicle Break-In
Caution
The vehicle does not need an
elaborate break-in. But it will
perform better in the long run if
you follow these guidelines:. Keep the vehicle speed at
88 km/h (55 mph) or less for
the first 805 km (500 mi).
. Do not drive at any one
constant speed, fast or slow,
for the first 805 km (500 mi).
Do not make full-throttle
starts. Avoid downshifting to
brake or slow the vehicle.
. Avoid making hard stops for
the first 322 km (200 mi) or
so. During this time the new
brake linings are not yet
broken in. Hard stops with
new linings can mean
(Continued)
Caution (Continued)
premature wear and earlier
replacement. Follow this
breaking-in guideline every
time you get new brake
linings.
. Do not tow a trailer during
break-in. See Trailer Towing
0 204 for the trailer towing
capabilities of the vehicle
and more information.
Following break-in, engine speed
and load can be gradually
increased.
Ignition Positions
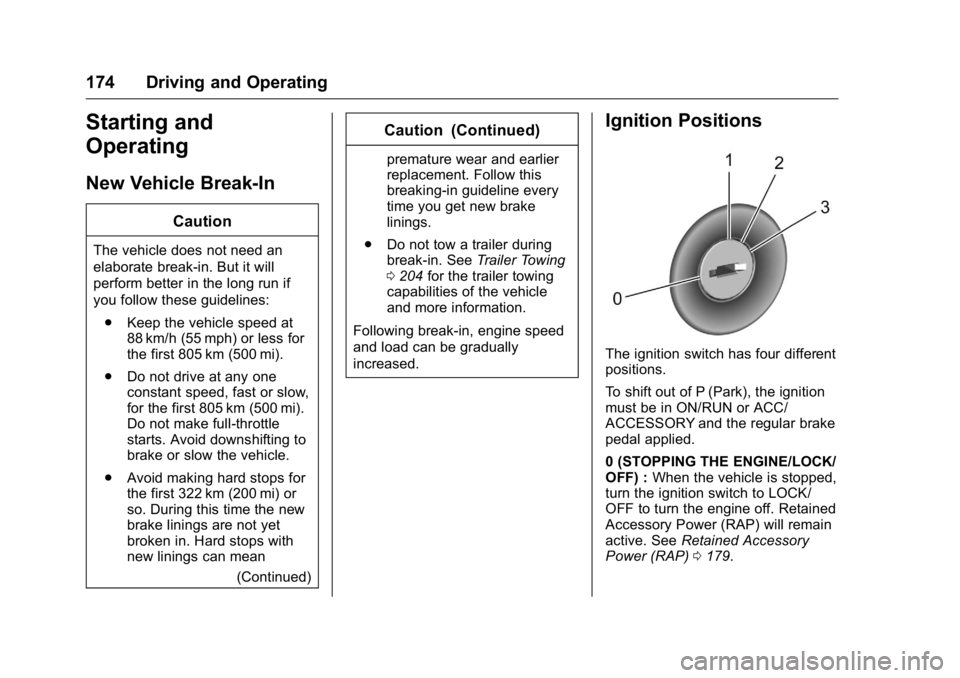
The ignition switch has four different
positions.
To shift out of P (Park), the ignition
must be in ON/RUN or ACC/
ACCESSORY and the regular brake
pedal applied.
0 (STOPPING THE ENGINE/LOCK/
OFF) : When the vehicle is stopped,
turn the ignition switch to LOCK/
OFF to turn the engine off. Retained
Accessory Power (RAP) will remain
active. See Retained Accessory
Power (RAP) 0179.
Page 176 of 343

GMC Savana Owner Manual (GMNA-Localizing-U.S./Canada-9159232) -
2016 - crc - 11/11/15
Driving and Operating 175
This position locks the ignition and
transmission.
Do not turn the engine off when the
vehicle is moving. This will cause a
loss of power assist in the brake
and steering systems and disable
the airbags.
If the vehicle must be shut off in an
emergency:1. Brake using a firm and steady pressure. Do not pump the
brakes repeatedly. This may
deplete power assist, requiring
increased brake pedal force.
2. Shift the vehicle to N (Neutral). This can be done while the
vehicle is moving. After shifting
to N (Neutral), firmly apply the
brakes and steer the vehicle to
a safe location.
3. Come to a complete stop, shift to P (Park), and turn the
ignition to LOCK/OFF. On
vehicles with an automatic
transmission, the shift lever
must be in P (Park) to turn the
ignition switch to the LOCK/
OFF position. 4. Set the parking brake. See
Parking Brake 0188.
{Warning
Turning off the vehicle while
moving may cause loss of power
assist in the brake and steering
systems and disable the airbags.
While driving, only shut the
vehicle off in an emergency.
If the vehicle cannot be pulled over,
and must be shut off while driving,
turn the ignition to ACC/
ACCESSORY.
Caution
Using a tool to force the key to
turn in the ignition could cause
damage to the switch or break the
key. Use the correct key, make
sure it is all the way in, and turn it
only with your hand. If the key
cannot be turned by hand, see
your dealer. 1 (ACC/ACCESSORY) :
This is the
position in which you can operate
things like the radio and the
windshield wipers when the engine
is off.
2 (ON/RUN) : This position can be
used to operate the electrical
accessories and to display some
instrument cluster warning and
indicator lights. This position can
also be used for service and
diagnostics, and to verify the proper
operation of the malfunction
indicator lamp as may be required
for emission inspection purposes.
The switch stays in this position
when the engine is running.
If you leave the key in the ACC/
ACCESSORY or ON/RUN position
with the engine off, the battery could
be drained. You may not be able to
start the vehicle if the battery is
allowed to drain for an extended
period of time.
3 (START) : This is the position that
starts the engine. When the engine
starts, release the key. The ignition
switch returns to ON/RUN for
driving.