2016 GMC ACADIA Rear seat ac
[x] Cancel search: Rear seat acPage 94 of 371

GMC Acadia/Acadia Denali Owner Manual (GMNA-Localizing-U.S./Canada/
Mexico-9159268) - 2016 - crc - 7/31/15
Seats and Restraints 93
Do not secure a child seat in a
position without a top tether anchor
if a national or local law requires
that the top tether be anchored, or if
the instructions that come with the
child restraint say that the top strap
must be anchored.
In Canada, the law requires that
forward-facing child restraints have
a top tether, and that the tether be
attached.
If the child restraint or vehicle seat
position does not have the LATCH
system, you will be using the safety
belt to secure the child restraint in
this position. Be sure to follow the
instructions that came with the child
restraint. Secure the child in the
child restraint when and as the
instructions say.
If more than one child restraint
needs to be installed in the rear
seat, be sure to readWhere to Put
the Restraint 084.
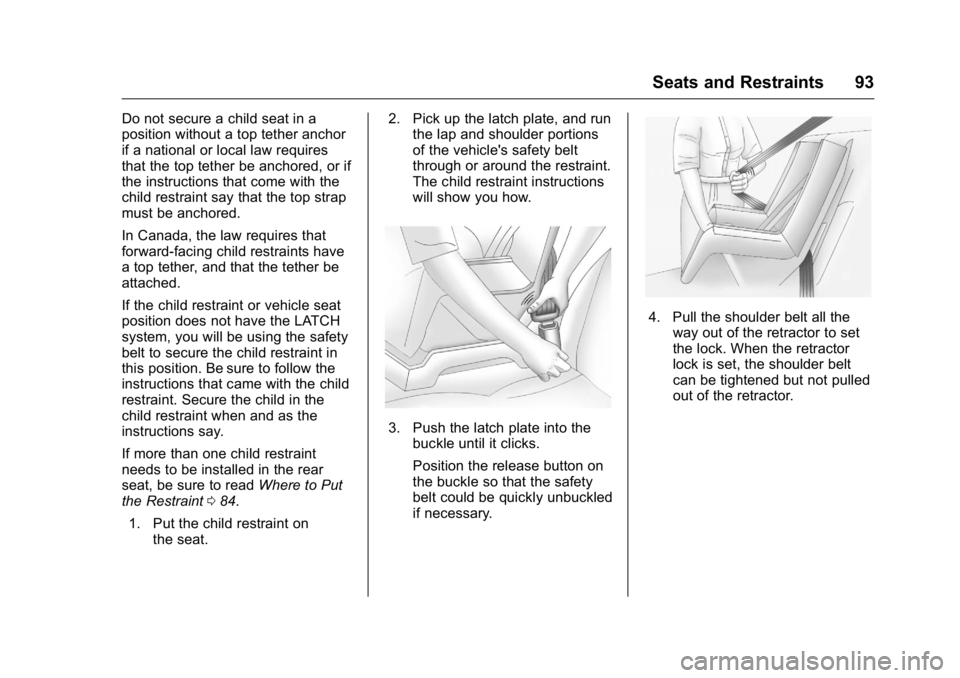
1. Put the child restraint on the seat. 2. Pick up the latch plate, and run
the lap and shoulder portions
of the vehicle's safety belt
through or around the restraint.
The child restraint instructions
will show you how.
3. Push the latch plate into thebuckle until it clicks.
Position the release button on
the buckle so that the safety
belt could be quickly unbuckled
if necessary.
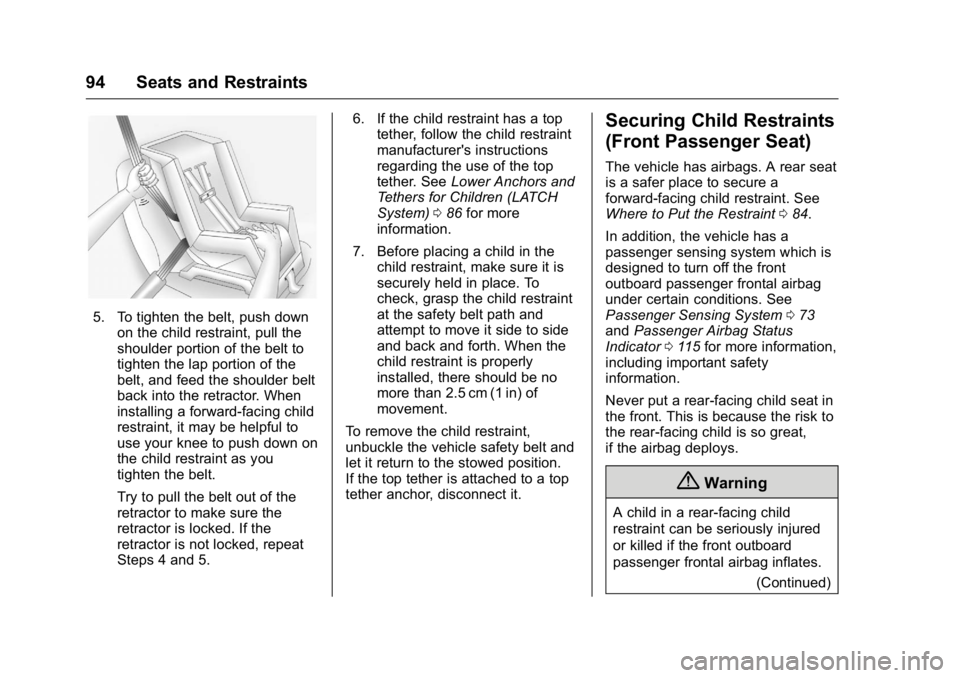
4. Pull the shoulder belt all the
way out of the retractor to set
the lock. When the retractor
lock is set, the shoulder belt
can be tightened but not pulled
out of the retractor.
Page 95 of 371

GMC Acadia/Acadia Denali Owner Manual (GMNA-Localizing-U.S./Canada/
Mexico-9159268) - 2016 - crc - 7/31/15
94 Seats and Restraints
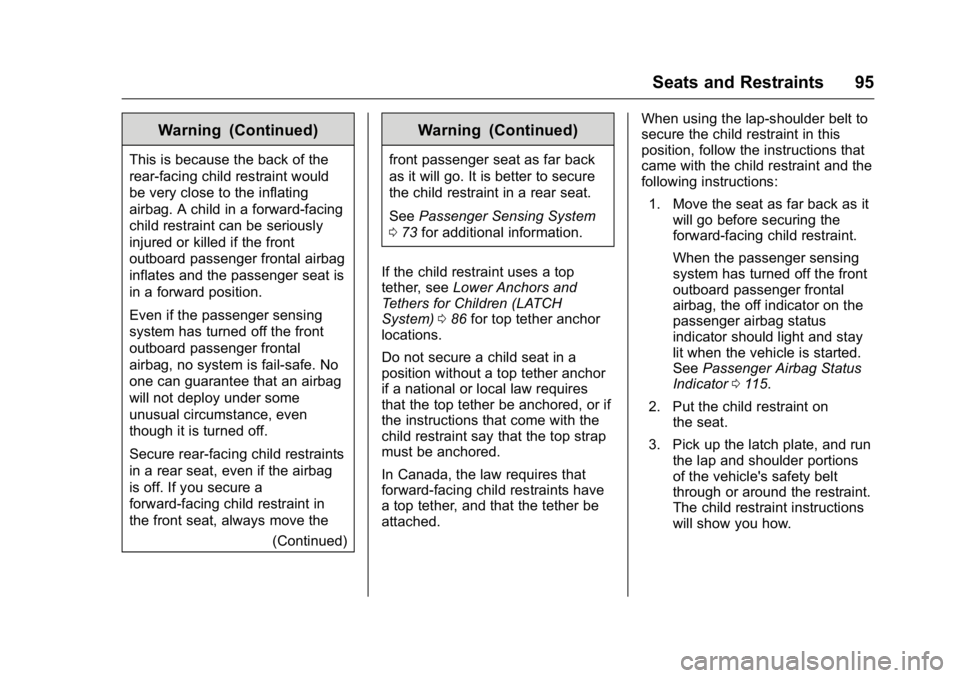
5. To tighten the belt, push downon the child restraint, pull the
shoulder portion of the belt to
tighten the lap portion of the
belt, and feed the shoulder belt
back into the retractor. When
installing a forward-facing child
restraint, it may be helpful to
use your knee to push down on
the child restraint as you
tighten the belt.
Try to pull the belt out of the
retractor to make sure the
retractor is locked. If the
retractor is not locked, repeat
Steps 4 and 5. 6. If the child restraint has a top
tether, follow the child restraint
manufacturer's instructions
regarding the use of the top
tether. See Lower Anchors and
Tethers for Children (LATCH
System) 086 for more
information.
7. Before placing a child in the child restraint, make sure it is
securely held in place. To
check, grasp the child restraint
at the safety belt path and
attempt to move it side to side
and back and forth. When the
child restraint is properly
installed, there should be no
more than 2.5 cm (1 in) of
movement.
To remove the child restraint,
unbuckle the vehicle safety belt and
let it return to the stowed position.
If the top tether is attached to a top
tether anchor, disconnect it.
Securing Child Restraints
(Front Passenger Seat)
The vehicle has airbags. A rear seat
is a safer place to secure a
forward-facing child restraint. See
Where to Put the Restraint 084.
In addition, the vehicle has a
passenger sensing system which is
designed to turn off the front
outboard passenger frontal airbag
under certain conditions. See
Passenger Sensing System 073
and Passenger Airbag Status
Indicator 0115 for more information,
including important safety
information.
Never put a rear-facing child seat in
the front. This is because the risk to
the rear-facing child is so great,
if the airbag deploys.
{Warning
A child in a rear-facing child
restraint can be seriously injured
or killed if the front outboard
passenger frontal airbag inflates.
(Continued)
Page 96 of 371

GMC Acadia/Acadia Denali Owner Manual (GMNA-Localizing-U.S./Canada/
Mexico-9159268) - 2016 - crc - 7/31/15
Seats and Restraints 95
Warning (Continued)
This is because the back of the
rear-facing child restraint would
be very close to the inflating
airbag. A child in a forward-facing
child restraint can be seriously
injured or killed if the front
outboard passenger frontal airbag
inflates and the passenger seat is
in a forward position.
Even if the passenger sensing
system has turned off the front
outboard passenger frontal
airbag, no system is fail-safe. No
one can guarantee that an airbag
will not deploy under some
unusual circumstance, even
though it is turned off.
Secure rear-facing child restraints
in a rear seat, even if the airbag
is off. If you secure a
forward-facing child restraint in
the front seat, always move the(Continued)
Warning (Continued)
front passenger seat as far back
as it will go. It is better to secure
the child restraint in a rear seat.
SeePassenger Sensing System
0 73 for additional information.
If the child restraint uses a top
tether, see Lower Anchors and
Tethers for Children (LATCH
System) 086 for top tether anchor
locations.
Do not secure a child seat in a
position without a top tether anchor
if a national or local law requires
that the top tether be anchored, or if
the instructions that come with the
child restraint say that the top strap
must be anchored.
In Canada, the law requires that
forward-facing child restraints have
a top tether, and that the tether be
attached. When using the lap-shoulder belt to
secure the child restraint in this
position, follow the instructions that
came with the child restraint and the
following instructions:
1. Move the seat as far back as it will go before securing the
forward-facing child restraint.
When the passenger sensing
system has turned off the front
outboard passenger frontal
airbag, the off indicator on the
passenger airbag status
indicator should light and stay
lit when the vehicle is started.
See Passenger Airbag Status
Indicator 0115.
2. Put the child restraint on the seat.
3. Pick up the latch plate, and run the lap and shoulder portions
of the vehicle's safety belt
through or around the restraint.
The child restraint instructions
will show you how.
Page 100 of 371

GMC Acadia/Acadia Denali Owner Manual (GMNA-Localizing-U.S./Canada/
Mexico-9159268) - 2016 - crc - 7/31/15
Storage 99
Armrest Storage
If equipped, the rear seat armrest
may have two cupholders. Pull the
armrest down to access the
cupholders.
Center Console Storage
Pull up the lever on the front of the
center console armrest to slide it
forward and backward. To open the
armrest storage area, press the
button on the front of the armrest.
There is additional storage under
the armrest. Move the armrest all
the way to the rear position, then
slide the storage cover back to
access.
There is a removable tray in the
storage area. Pull up on the tray to
remove and access the lower
storage area and power outlet. See
Power Outlets0108.
There may be two charging USB
ports on the rear of the console.
See Auxiliary Devices 0169.
Page 109 of 371

GMC Acadia/Acadia Denali Owner Manual (GMNA-Localizing-U.S./Canada/
Mexico-9159268) - 2016 - crc - 7/31/15
108 Instruments and Controls
To calibrate the compass, use the
following procedure:
Compass Calibration Procedure1. Before calibrating the compass, make sure the compass zone
is set to the variance zone in
which the vehicle is located.
See “Compass Variance (Zone)
Procedure” earlier in this
section.
Do not operate any switches
such as window, sunroof,
climate controls, seats, etc.
during the calibration
procedure.
2. Press the vehicle information button until PRESS
VTO
CALIBRATE COMPASS
displays.
3. Press the set/reset button to start the compass calibration.
4. The DIC will display CALIBRATING: DRIVE IN
CIRCLES. Drive the vehicle in
tight circles at less than 8 km/h
(5 mph) to complete the
calibration. The DIC will display
CALIBRATION COMPLETE for a few seconds when the
calibration is complete. The
DIC display will then return to
the previous menu.
Clock
Press Settings on the Home Page
Menu, then press the Set Time or
Set Date settings screen button to
display the different options for
setting the time and date.
Set Time:
.
Press the up or down arrows to
increase or decrease the Hours,
Minutes, AM, PM, or the 24 hour
setting on the clock.
. Press and hold to quickly
increase or decrease the time
settings.
. Press OK to save the
adjustments.
. Press the Back or Cancel screen
button to cancel the
adjustments. Set Date:
.
Press the up or down arrows to
increase or decrease the Month,
Day, and Year settings.
. Press and hold to quickly
increase or decrease the date
settings.
. Press OK to save the
adjustments.
. Press the Back or Cancel screen
button to cancel the
adjustments.
Power Outlets
The vehicle has 12-volt outlets that
can be used to plug in electrical
equipment, such as a cell phone or
MP3 player.
The power outlets are located:
.On the center stack below the
climate controls.
. Inside the center console.
. At the rear of the center console.
. In the rear cargo area.
Lift the cover to access the outlet
and replace when not in use.
Page 110 of 371

GMC Acadia/Acadia Denali Owner Manual (GMNA-Localizing-U.S./Canada/
Mexico-9159268) - 2016 - crc - 7/31/15
Instruments and Controls 109
{Warning
Power is always supplied to the
outlets. Do not leave electrical
equipment plugged in when the
vehicle is not in use because the
vehicle could catch fire and cause
injury or death.
Caution
Leaving electrical equipment
plugged in for an extended period
of time while the vehicle is off will
drain the battery. Always unplug
electrical equipment when not in
use and do not plug in equipment
that exceeds the maximum
20 amp rating.
Certain accessory plugs may not be
compatible with the accessory
power outlet and could overload
vehicle and adapter fuses. If a
problem is experienced, see your
dealer. When adding electrical equipment,
be sure to follow the proper
installation instructions included with
the equipment. See
Add-On
Electrical Equipment 0240.
Caution
Hanging heavy equipment from
the power outlet can cause
damage not covered by the
vehicle warranty. The power
outlets are designed for
accessory power plugs only, such
as cell phone charge cords.
Power Outlet 110V/120V
Alternating Current
If equipped with this power outlet it
can be used to plug in electrical
equipment that uses a maximum
limit of 150 watts.
The power outlet is on the rear of
the center console.
An indicator light on the outlet turns
on to show it is in use. The light
comes on when the ignition is in
ON/RUN, equipment requiring less
than 150 watts is plugged into the
outlet, and no system fault is
detected.
The indicator light does not come on
when the ignition is in LOCK/OFF or
if the equipment is not fully seated
into the outlet.
If equipment is connected using
more than 150 watts or a system
fault is detected, a protection circuit
shuts off the power supply and the
indicator light turns off. To reset the
circuit, unplug the item and plug it
back in or turn the Retained
Page 154 of 371

GMC Acadia/Acadia Denali Owner Manual (GMNA-Localizing-U.S./Canada/
Mexico-9159268) - 2016 - crc - 7/31/15
Lighting 153
The fog lamp button is on the
exterior lamp control to the left of
the steering column.
#(Fog Lamps) :Press this button
to turn the fog lamps on or off.
A light comes on in the instrument
cluster when the fog lamps are in
use. The ignition must be on for the
fog lamps to work.
When the headlamps are changed
to high beam, the fog lamps turn off.
The fog lamps come back on again
when the high-beam headlamps are
turned off.
Some localities have laws that
require the headlamps to be on
along with the fog lamps.
Interior Lighting
Instrument Panel
Illumination Control
The instrument panel brightness
knob is located on the instrument
panel to the left of the steering
column.
D(Instrument Panel
Brightness) : Push the knob in all
the way until it extends out and then
turn the knob clockwise or
counterclockwise to brighten or dim
the lights. Push the knob back in
when finished.
Courtesy Lamps
The courtesy lamps automatically
come on when a door is opened.
The lamps can also be turned on
manually by fully turning the
instrument panel brightness control
clockwise.
The reading lamps, located on the
headliner above the rearview mirror,
can be turned on or off
independently of the automatic
courtesy lamps, when the doors are
closed.
Dome Lamps
The dome lamps are in the
overhead console and above the
rear seat passengers.
The dome lamps come on when a
door is opened, unless the dome
lamp override button is pressed in.
The lamps can also be turned on
and off by turning the instrument
panel brightness control clockwise
to the farthest position.
Page 157 of 371

GMC Acadia/Acadia Denali Owner Manual (GMNA-Localizing-U.S./Canada/
Mexico-9159268) - 2016 - crc - 7/31/15
156 Lighting
A high electrical load occurs when
several of the following are on, such
as: headlamps, high beams, rear
window defogger, climate control fan
at high speed, heated seats, engine
cooling fans, trailer loads, and loads
plugged into accessory power
outlets.
EPM works to prevent excessive
discharge of the battery. It does this
by balancing the generator's output
and the vehicle's electrical needs.
It can increase engine idle speed to
generate more power whenever
needed. It can temporarily reduce
the power demands of some
accessories.
Normally, these actions occur in
steps or levels, without being
noticeable. In rare cases at the
highest levels of corrective action,
this action may be noticeable to the
driver. If so, a DIC battery voltage
and charging message displays, it is
recommended that the driver reduce
the electrical loads as much as
possible. SeeBattery Voltage and
Charging Messages 0131
andDriver Information Center (DIC)
0 123.Battery Power Protection
This feature helps prevent the
battery from being drained, if the
interior courtesy lamps or reading
lamps are accidentally left on. If any
of these lamps are left on, they
automatically turn off after
10 minutes, if the ignition is off. The
lamps will not come back on again
until one of the following occurs:
.
The ignition is turned on.
. The exterior lamps control is
turned off, then on again.
The headlamps will time out after
10 minutes, if they are manually
turned on while the ignition is on
or off.