2016 FORD TAURUS stop start
[x] Cancel search: stop startPage 161 of 424
Should you start to slide while driving on
snowy or icy roads, turn the steering wheel
in the direction of the slide until you regain
control.
Avoid sudden applications of power and
quick changes of direction on snow and
ice. Apply the accelerator slowly and
steadily when starting from a full stop.
Avoid sudden braking as well. Although an
AWD vehicle may accelerate better than
a two-wheel drive vehicle in snow and ice,
it won
’t stop any faster, because as in other
vehicles, braking occurs at all four wheels.
Do not become overconfident as to road
conditions.
Make sure you allow sufficient distance
between you and other vehicles for
stopping. Drive slower than usual and
consider using one of the lower gears. In
emergency stopping situations, apply the
brake steadily. Since your vehicle is
equipped with a four wheel (ABS), do not
“pump ” the brakes. See Hints on Driving
With Anti-Lock Brakes (page 159).
Maintenance and Modifications
The suspension and steering systems on
your vehicle have been designed and
tested to provide predictable performance
whether loaded or empty and durable load
carrying capability. For this reason, Ford
Motor Company strongly recommends that
you do not make modifications such as
adding or removing parts (such as lowering
kits or stabilizer bars) or by using
replacement parts not equivalent to the
original factory equipment.
Any modifications to a vehicle that raise
the center of gravity can make it more likely
the vehicle will rollover as a result of a loss
of control. Ford Motor Company
recommends that caution be used with
any vehicle equipped with a high load or
device (such as ladder or luggage racks). Failure to maintain your vehicle properly
may void the warranty, increase your repair
cost, reduce vehicle performance and
operational capabilities and adversely
affect driver and passenger safety.
Frequent inspection of vehicle chassis
components is recommended if the vehicle
is subjected to off-highway usage.
158
Taurus (CPH) Canada/United States of America, enUSA, First Printing All-Wheel Drive
(If Equipped)
Page 162 of 424
GENERAL INFORMATION
Note:
Occasional brake noise is normal. If
a metal-to-metal, continuous grinding or
continuous squeal sound is present, the
brake linings may be worn-out. Have the
system checked by an authorized dealer. If
your vehicle has continuous vibration or
shudder in the steering wheel while braking,
have it checked by an authorized dealer.
Note: Brake dust may accumulate on the
wheels, even under normal driving
conditions. Some dust is inevitable as the
brakes wear and does not contribute to
brake noise. See Cleaning the Alloy
Wheels (page 261).
Note: Depending on applicable laws and
regulations in the country for which your
vehicle was originally built, your brake lamps
may flash during heavy braking. Following
this, your hazard lights may also flash when
your vehicle comes to a stop. See
Warning Lamps and
Indicators (page 82).
Wet brakes result in reduced braking
efficiency. Gently press the brake pedal a
few times when driving from a car wash or
standing water to dry the brakes.
Brake Over Accelerator
In the event the accelerator pedal
becomes stuck or entrapped, apply steady
and firm pressure to the brake pedal to
slow the vehicle and reduce engine power.
If you experience this condition, apply the
brakes and bring your vehicle to a safe
stop. Move the transmission to park (P),
switch the engine off and apply the parking
brake. Inspect the accelerator pedal for
any interference. If none are found and the
condition persists, have your vehicle towed
to the nearest authorized dealer. Brake Assist
Brake assist detects when you brake
rapidly by measuring the rate at which you
press the brake pedal. It provides
maximum braking efficiency as long as you
press the pedal, and can reduce stopping
distances in critical situations.
Anti-lock Brake System
This system helps you maintain steering
control during emergency stops by keeping
the brakes from locking.
This lamp momentarily
illuminates when you turn the
ignition on. If the light does not
illuminate during start up, remains on or
flashes, the system may be disabled. Have
the system checked by an authorized
dealer. If the anti-lock brake system is
disabled, normal braking is still effective. If the brake warning lamp
illuminates when you release the
parking brake, have the system
checked by an authorized dealer.
HINTS ON DRIVING WITH
ANTI-LOCK BRAKES
Note: When the system is operating, the
brake pedal may pulse and may travel
further. Maintain pressure on the brake
pedal. You may also hear a noise from the
system. This is normal.
The anti-lock braking system will not
eliminate the risks when:
• You drive too closely to the vehicle in
front of you.
• Your vehicle is hydroplaning.
• You take corners too fast.
• The road surface is poor.
159
Taurus (CPH) Canada/United States of America, enUSA, First Printing BrakesE144522 E144522
Page 191 of 424

If the system detects a degraded
performance condition, a message warning
of a blocked sensor will appear in the
information display. Also the system alert
indicators will remain ON and the system
will no longer provide any vehicle warnings.
You can clear the information display
warning but the alert indicators will remain
illuminated.
A "blocked" condition can be cleared in
two ways:
•
After the blockage in front of the
sensors is removed or the
rainfall/snowfall rate decreases or
stops, drive for a few minutes in traffic
to allow the sensors to detect passing
vehicles.
• By cycling the ignition from ON to OFF
and then back ON.
Note: When towing a trailer, the sensors
may detect the trailer thus causing a false
alert. It may be desirable to turn the Blind
Spot Information System off if the false
alerts become annoying.
System Errors
If the system senses a problem with the
left or right sensor, the telltale will
illuminate and a message will appear in
the information display. See Information
Messages (page 95).
Switching the System Off and On
You can temporarily switch the Blind Spot
Information System off in the information
display. See
General Information (page
86). When the Blind Spot Information
System switches off, you will not receive
alerts and the information display shows
a system off message. The telltale in the
cluster also illuminates. When you switch
the Blind Spot Information System on or
off, the alert indicators flash twice. Note:
The system switches back on every
time you start your vehicle.
You can also have the Blind Spot
Information System switched off
permanently at an authorized dealer. Once
switched off permanently, the system can
only be switched back on at an authorized
dealer.
CROSS TRAFFIC ALERT WARNING
To help avoid personal injury, NEVER
use the Cross Traffic Alert system as
a replacement for using the interior
and exterior mirrors and looking over your
shoulder before backing out of a parking
space. Cross Traffic Alert is not a
replacement for careful driving. Cross Traffic Alert is designed to warn you
of vehicles approaching from the sides
when the transmission is in reverse (R).
Using the System
Cross Traffic Alert turns on when you start
the engine and you shift into reverse (R).
Once shifted out of reverse (R), Cross
Traffic Alert turns off.
Note:
Cross Traffic Alert only functions
while your transmission is in reverse (R).
Cross Traffic Alert is designed to alert the
driver of certain collision risks. Coverage
decreases when the sensors are partially,
mostly or fully obstructed. Reversing slowly
helps increase the coverage area and
effectiveness.
188
Taurus (CPH) Canada/United States of America, enUSA, First Printing Driving Aids
Page 209 of 424
Before Towing a Trailer
Practice turning, stopping and backing up
to get the feel of your vehicle-trailer
combination before starting on a trip.
When turning, make wider turns so the
trailer wheels clear curbs and other
obstacles.
When Towing a Trailer
•
Do not drive faster than 70 mph
(113 km/h) during the first 500 mi
(800 km).
• Do not make full-throttle starts.
• Check your hitch, electrical connections
and trailer wheel lug nuts thoroughly
after you have traveled 50 mi (80 km).
• When stopped in congested or heavy
traffic during hot weather, place the
gearshift in position P to aid engine and
transmission cooling and to help A/C
performance.
• Turn off the speed control with heavy
loads or in hilly terrain. The speed
control may turn off automatically
when you are towing on long, steep
grades.
• Shift to a lower gear when driving down
a long or steep hill. Do not apply the
brakes continuously, as they may
overheat and become less effective.
• If your transmission is equipped with a
Grade Assist or Tow/Haul feature, use
this feature when towing. This provides
engine braking and helps eliminate
excessive transmission shifting for
optimum fuel economy and
transmission cooling.
• Allow more distance for stopping with
a trailer attached. Anticipate stops and
brake gradually.
• Avoid parking on a grade. However, if
you must park on a grade:
1. Turn the steering wheel to point your vehicle tires away from traffic flow. 2. Set your vehicle parking brake.
3. Place the automatic transmission in
position
P.
4. Place wheel chocks in front and back of the trailer wheels. (Chocks not
included with vehicle.)
Launching or Retrieving a Boat or
Personal Watercraft (PWC)
Note: Disconnect the wiring to the trailer
before
backing the trailer into the water.
Note: Reconnect the wiring to the trailer
after
removing the trailer from the water.
When backing down a ramp during boat
launching or retrieval:
• Do not allow the static water level to
rise above the bottom edge of the rear
bumper.
• Do not allow waves to break higher
than
6 in (15 cm) above the bottom
edge of the rear bumper.
Exceeding these limits may allow water to
enter vehicle components:
• Causing internal damage to the
components.
• Affecting driveability, emissions, and
reliability.
Replace the rear axle lubricant anytime
the rear axle has been submerged in water.
Water may have contaminated the rear
axle lubricant, which is not normally
checked or changed unless a leak is
suspected or other axle repair is required.
206
Taurus (CPH) Canada/United States of America, enUSA, First Printing Towing
Page 216 of 424
This program is separate from the New
Vehicle Limited Warranty, but the coverage
is concurrent with the powertrain coverage
period of your vehicle.
Canadian customers who require roadside
assistance, call 1-800-665-2006.
Vehicles Sold in Canada: Using
Roadside Assistance
Complete the roadside assistance
identification card and place it in your
wallet for quick reference.
In Canada, this card is found in the
Warranty Guide in the glove compartment
of your vehicle.
Vehicles Sold in Canada: Roadside
Assistance Program Coverage
The service is available 24 hours a day,
seven days a week.
Canadian roadside coverage and benefits
may differ from the U.S. coverage.
For complete program coverage details
you may contact your dealer, you can call
us in Canada at 1-800-665-2006, or visit
our website at www.ford.ca.
HAZARD WARNING FLASHERS
Note:
If used when the vehicle is not
running, the battery will lose charge. There
may be insufficient power to restart your
vehicle. The hazard warning button is
located on the instrument panel.
Use it when your vehicle is
creating a safety hazard for other
motorists.
• Press the button to turn on the hazard
warning function, and the front and
rear direction indicators will flash.
• Press the button again to turn them
off. FUEL SHUTOFF WARNING
Failure to inspect and, if necessary,
repair fuel leaks after a collision may
increase the risk of fire and serious
injury. Ford Motor Company recommends
that the fuel system be inspected by an
authorized dealer after any collision. In the event of a moderate to severe
collision, this vehicle includes a fuel pump
shutoff feature that stops the flow of fuel
to the engine. Not every impact will cause
a shutoff.
Should your vehicle shut off after a
collision, you may restart your vehicle. For
vehicles equipped with a key system:
1. Switch off the ignition.
2. Switch on the ignition.
3. Repeat Steps 1 and 2 to re-enable the
fuel pump.
For vehicles equipped with a push button
start system:
1. Press the START/STOP button to
switch off the ignition.
2. Press the brake pedal and press the START/STOP
button to switch on the
ignition.
3. Remove your foot from the brake pedal
and press the
START/STOP button
to switch off the ignition.
4. You can either attempt to start the engine by pressing the brake pedal and
the
START/STOP button, or switch
on the ignition only by pressing the
START/STOP
button without
pressing the brake pedal. Both ways
re-enable the fuel system.
213
Taurus (CPH) Canada/United States of America, enUSA, First Printing Roadside Emergencies
Page 233 of 424
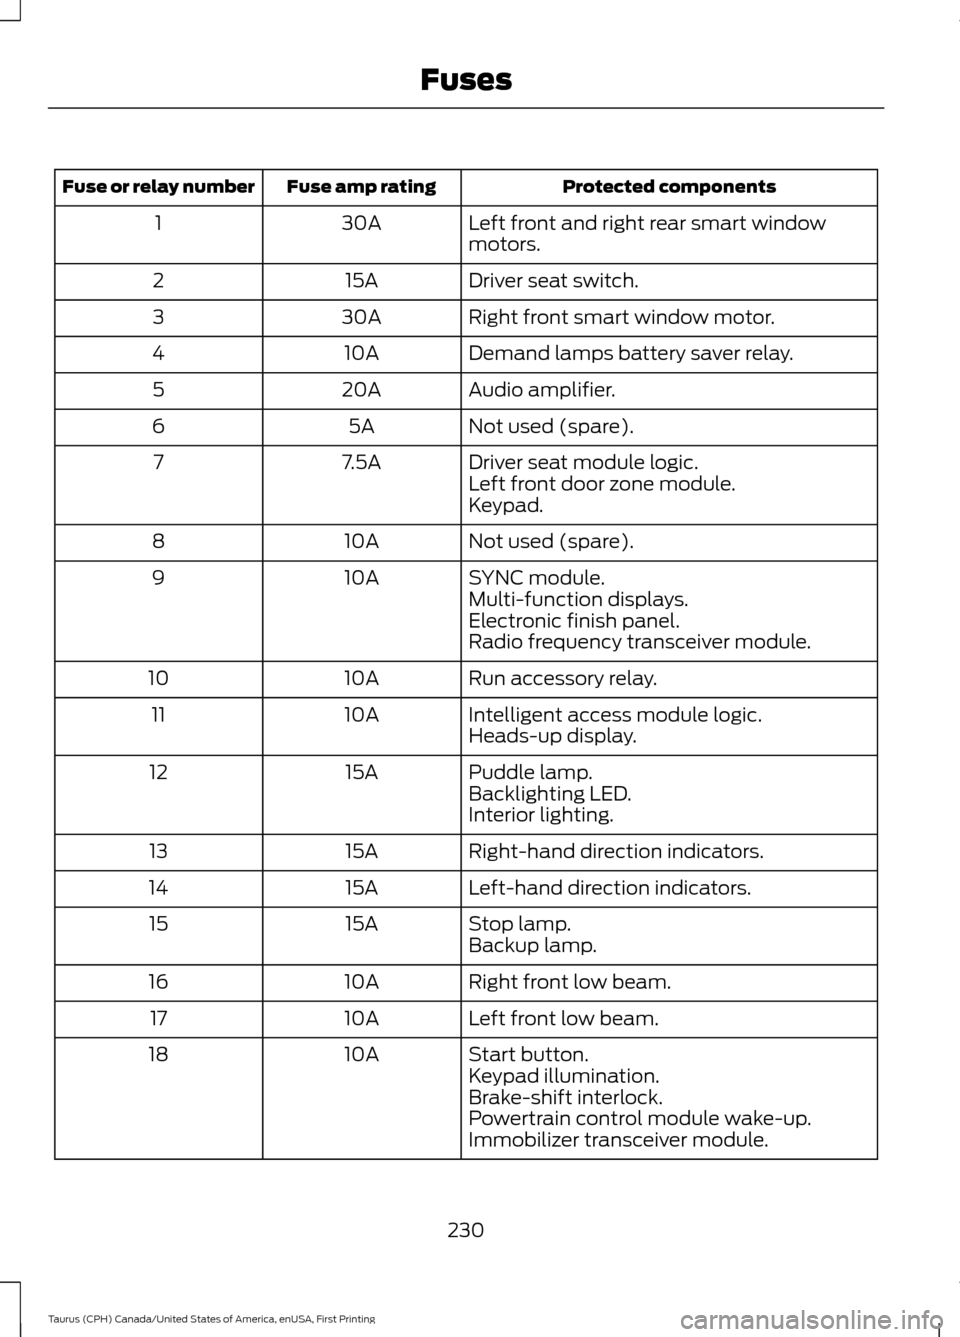
Protected components
Fuse amp rating
Fuse or relay number
Left front and right rear smart window
motors.
30A
1
Driver seat switch.
15A
2
Right front smart window motor.
30A
3
Demand lamps battery saver relay.
10A
4
Audio amplifier.
20A
5
Not used (spare).
5A
6
Driver seat module logic.
7.5A
7
Left front door zone module.
Keypad.
Not used (spare).
10A
8
SYNC module.
10A
9
Multi-function displays.
Electronic finish panel.
Radio frequency transceiver module.
Run accessory relay.
10A
10
Intelligent access module logic.
10A
11
Heads-up display.
Puddle lamp.
15A
12
Backlighting LED.
Interior lighting.
Right-hand direction indicators.
15A
13
Left-hand direction indicators.
15A
14
Stop lamp.
15A
15
Backup lamp.
Right front low beam.
10A
16
Left front low beam.
10A
17
Start button.
10A
18
Keypad illumination.
Brake-shift interlock.
Powertrain control module wake-up.
Immobilizer transceiver module.
230
Taurus (CPH) Canada/United States of America, enUSA, First Printing Fuses
Page 269 of 424
•
When inflating a tire or other objects,
use the black air hose only. Do not use
the transparent hose which is designed
for sealant application only.
• Operating the kit could cause an
electrical disturbance in radio, CD, and
DVD player operation.
What to do when a Tire Is
Punctured
A tire puncture within the tire tread area
can be repaired in two stages with the kit.
• In the first stage, the tire will be
reinflated with a sealing compound
and air. After the tire has been
reinflated, you will need to drive the
vehicle a short distance 4 mi (6 km) to
distribute the sealant in the tire.
• In the second stage, you will need to
check the tire pressure and adjust, if
necessary, to the vehicle tire inflation
pressure.
First Stage: Reinflating the Tire
with Sealing Compound and Air WARNINGS
Do not stand directly over the kit
while inflating the tire. If you notice
any unusual bulges or deformations
in the tire sidewall during inflation, stop
and call roadside assistance. If the tire does not inflate to the
recommended tire pressure within
15 minutes, stop and call roadside
assistance. Preparation: Park the vehicle in a safe, level
and secure area, away from moving traffic.
Turn the hazard lights on. Apply the parking
brake and turn the engine off. Inspect the
flat tire for visible damage. Sealant compound contains latex. To
avoid any allergic reactions, use the
non-latex gloves located in the accessory
box on the underside of the kit housing.
Do not remove any foreign object that has
pierced the tire. If a puncture is located in
the tire sidewall, stop and call roadside
assistance.
1. Remove the valve cap from the tire
valve.
2. Unwrap the clear tube from the compressor housing.
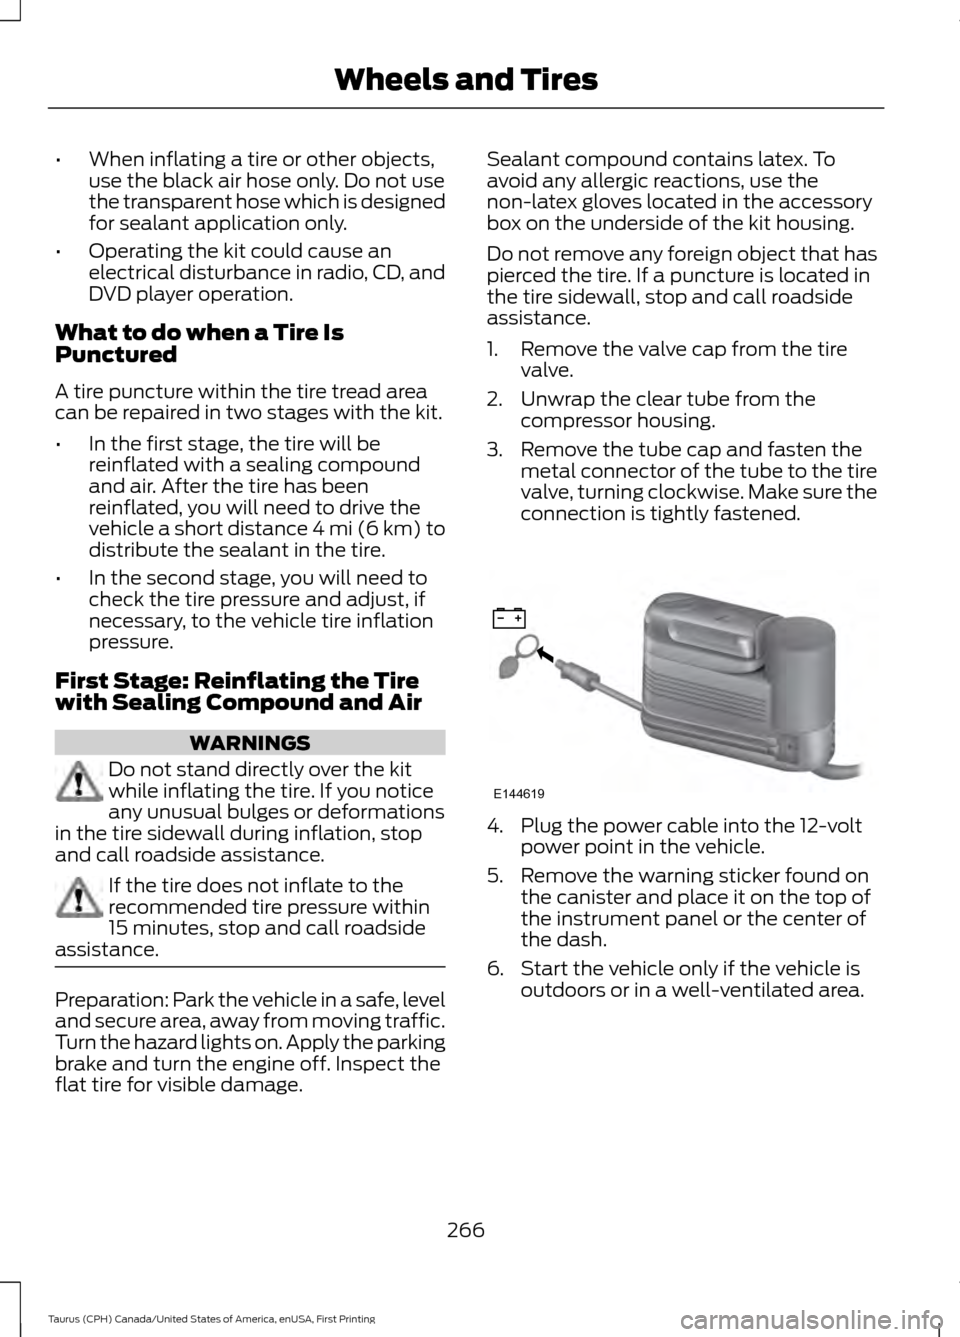
3. Remove the tube cap and fasten the metal connector of the tube to the tire
valve, turning clockwise. Make sure the
connection is tightly fastened. 4. Plug the power cable into the 12-volt
power point in the vehicle.
5. Remove the warning sticker found on the canister and place it on the top of
the instrument panel or the center of
the dash.
6. Start the vehicle only if the vehicle is outdoors or in a well-ventilated area.
266
Taurus (CPH) Canada/United States of America, enUSA, First Printing Wheels and TiresE144619
Page 284 of 424

WARNINGS
1. Make sure that you have the
correct tire and wheel size.
2. Lubricate the tire bead and
wheel bead seat area again.
3. Stand at a minimum of 12 feet
(3.66 meters) away from the
wheel and tire assembly.
4. Use both eye and ear
protection.
For a mounting pressure more
than 20 psi (1.38 bar) greater than
the maximum pressure, a Ford
dealer or other tire service
professional should do the
mounting.
Always inflate steel carcass tires
with a remote air fill with the
person inflating standing at a
minimum of 12 feet (3.66 meters)
away from the wheel and tire
assembly. Important: Remember to replace
the wheel valve stems when the
road tires are replaced on your
vehicle.
It is recommended that the two
front tires or two rear tires
generally be replaced as a pair.
The tire pressure sensors mounted
in the wheels (originally installed
on your vehicle) are not designed
to be used in aftermarket wheels. The use of wheels or tires not
recommended by Ford Motor
Company may affect the
operation of your tire pressure
monitoring system.
If the tire pressure monitoring
system indicator is flashing, your
system is malfunctioning. Your
replacement tire might be
incompatible with your tire
pressure monitoring system, or
some component of the system
may be damaged.
Safety Practices
WARNINGS
If your vehicle is stuck in
snow, mud, or sand, do not
rapidly spin the tires. Spinning the
tires can tear the tire and cause
an explosion. A tire can explode in
as little as three to five seconds. Do not spin the wheels at
over 35 mph (56 km/h). The
tires may fail and injure a
passenger or bystander. Driving habits have a great deal
to do with your tire mileage and
safety.
*Observe posted speed limits
*Avoid fast starts, stops and turns
*Avoid potholes and objects on
the road
*Do not run over curbs or hit the
tire against a curb when parking
281
Taurus (CPH) Canada/United States of America, enUSA, First Printing Wheels and Tires