2016 FORD SUPER DUTY remote control
[x] Cancel search: remote controlPage 100 of 510
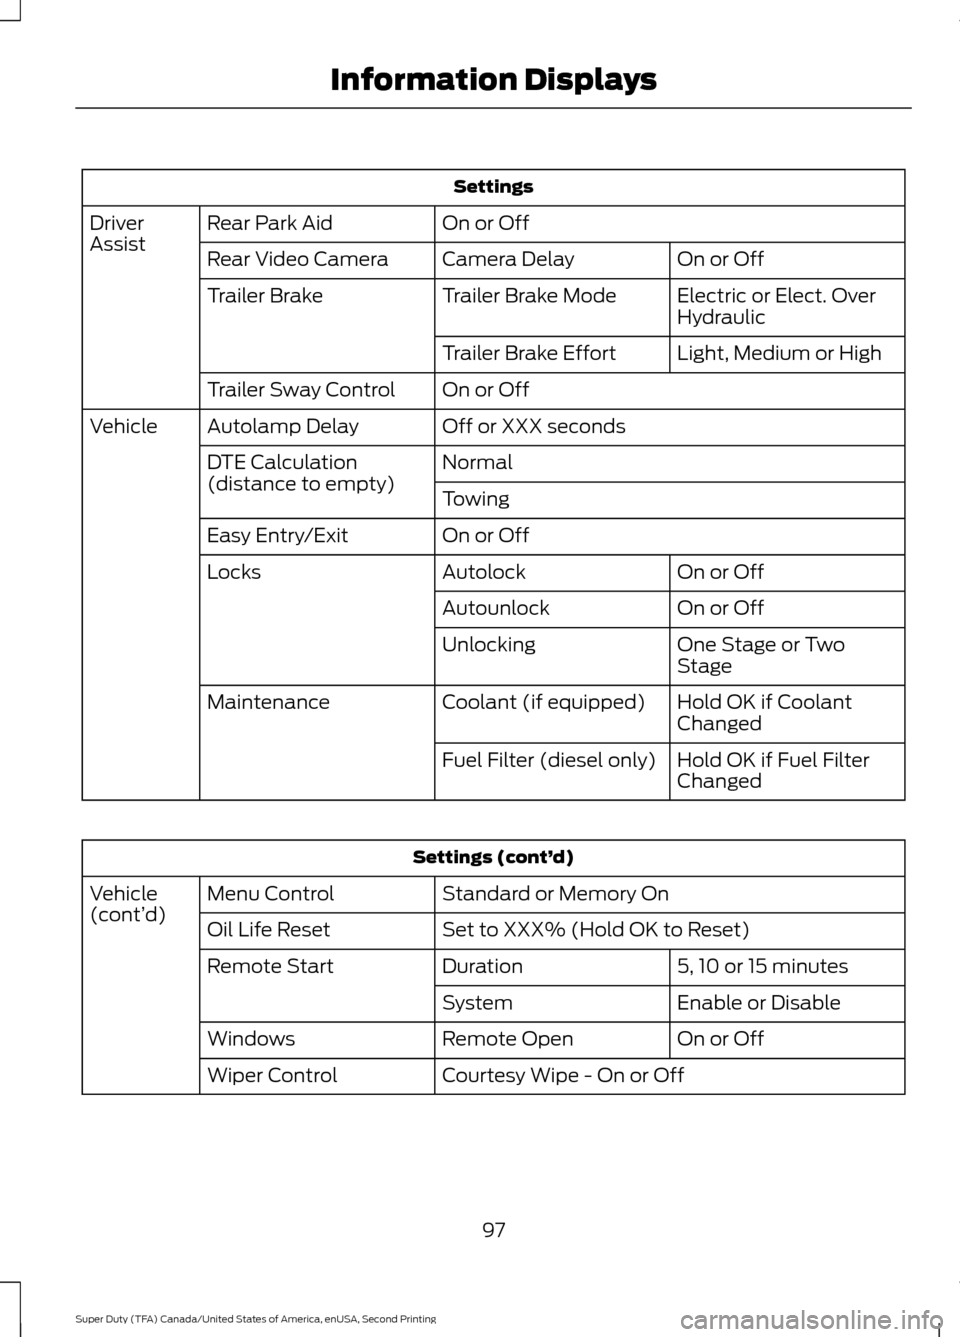
Settings
On or Off
Rear Park Aid
Driver
Assist
On or Off
Camera Delay
Rear Video Camera
Electric or Elect. Over
Hydraulic
Trailer Brake Mode
Trailer Brake
Light, Medium or High
Trailer Brake Effort
On or Off
Trailer Sway Control
Off or XXX seconds
Autolamp Delay
Vehicle
Normal
DTE Calculation
(distance to empty)
Towing
On or Off
Easy Entry/Exit
On or Off
Autolock
Locks
On or Off
Autounlock
One Stage or Two
Stage
Unlocking
Hold OK if Coolant
Changed
Coolant (if equipped)
Maintenance
Hold OK if Fuel Filter
Changed
Fuel Filter (diesel only) Settings (cont’
d)
Standard or Memory On
Menu Control
Vehicle
(cont’ d)
Set to XXX% (Hold OK to Reset)
Oil Life Reset
5, 10 or 15 minutes
Duration
Remote Start
Enable or Disable
System
On or Off
Remote Open
Windows
Courtesy Wipe - On or Off
Wiper Control
97
Super Duty (TFA) Canada/United States of America, enUSA, Second Printing Information Displays
Page 107 of 510
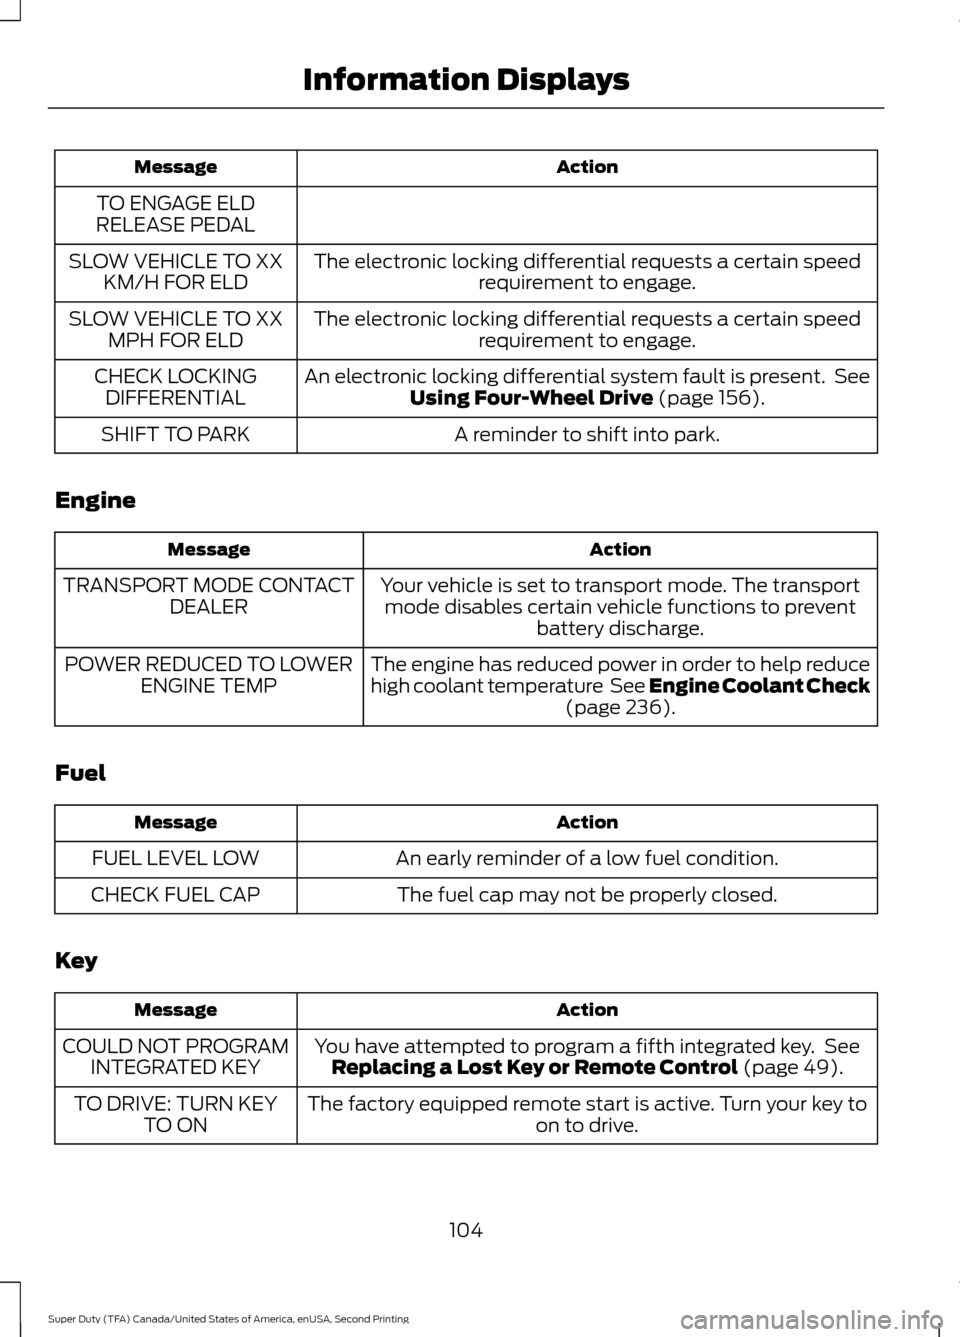
Action
Message
TO ENGAGE ELD
RELEASE PEDAL
The electronic locking differential requests a certain speedrequirement to engage.
SLOW VEHICLE TO XX
KM/H FOR ELD
The electronic locking differential requests a certain speedrequirement to engage.
SLOW VEHICLE TO XX
MPH FOR ELD
An electronic locking differential system fault is present. SeeUsing Four-Wheel Drive (page 156).
CHECK LOCKING
DIFFERENTIAL
A reminder to shift into park.
SHIFT TO PARK
Engine Action
Message
Your vehicle is set to transport mode. The transportmode disables certain vehicle functions to prevent battery discharge.
TRANSPORT MODE CONTACT
DEALER
The engine has reduced power in order to help reduce
high coolant temperature See Engine Coolant Check(page
236).
POWER REDUCED TO LOWER
ENGINE TEMP
Fuel Action
Message
An early reminder of a low fuel condition.
FUEL LEVEL LOW
The fuel cap may not be properly closed.
CHECK FUEL CAP
Key Action
Message
You have attempted to program a fifth integrated key. SeeReplacing a Lost Key or Remote Control
(page 49).
COULD NOT PROGRAM
INTEGRATED KEY
The factory equipped remote start is active. Turn your key to on to drive.
TO DRIVE: TURN KEY
TO ON
104
Super Duty (TFA) Canada/United States of America, enUSA, Second Printing Information Displays
Page 117 of 510
HEATED WINDOWS AND
MIRRORS
Heated Rear Window (If Equipped)
Note: Make sure the engine is running
before operating the heated windows.
Note: If your vehicle is equipped with a
sliding rear window, the feature still
operates when you open the window. Press the button to clear the
heated rear window of thin ice
and fog. The heated rear window
will automatically turn off after a short
period of time. Start the engine before you
switch the heated rear window on.
Do not use razor blades or other sharp
objects to clean or remove decals from
the inside of the heated rear window.
The vehicle warranty does not cover
damage caused to the heated rear
window grid lines.
Heated Exterior Mirror
When you switch the heated rear window
on, the heated exterior mirrors will
automatically turn on.
Note: Do not remove ice from the mirrors
with a scraper or adjust the mirror glass
when it is frozen in place.
Note: Do not clean the mirror housing or
glass with harsh abrasives, fuel or other
petroleum-based cleaning products.
REMOTE START
(If Equipped)
The remote start feature allows you to
pre-condition the interior of your vehicle.
The climate control system works to
achieve comfort according to your previous
settings.
Note: You cannot adjust the system during
remote start operation. Turn the ignition on to return the system
to its previous settings. You can now make
adjustments normally, but you need to turn
certain vehicle-dependent features back
on, such as:
•
Heated seats.
• Cooled seats.
• Heated steering wheel.
• Heated mirrors.
• Heated rear window.
You can adjust the default remote start
settings using the information display
controls. See
Information Displays
(page 88).
Automatic Settings
In hot weather, the system is set to
72°F
(22°C). The cooled seats are set to high
(if available, and selected to AUTO in the
information display).
In moderate weather, the system either
heats or cools (based on previous
settings). The rear defroster, heated
mirrors and heated seats do not
automatically turn on.
In cold weather, the system is set to
72°F
(22°C). The heated seats are set to high
(if available, and selected to AUTO in the
information display). The rear defroster
and heated mirrors automatically turn on.
114
Super Duty (TFA) Canada/United States of America, enUSA, Second Printing Climate ControlE184884
Page 122 of 510
WARNINGS
Do not use the memory function
when your vehicle is moving.
This feature automatically recalls the
position of the following:
•
Driver seat.
• Power mirrors.
• Optional adjustable pedals.
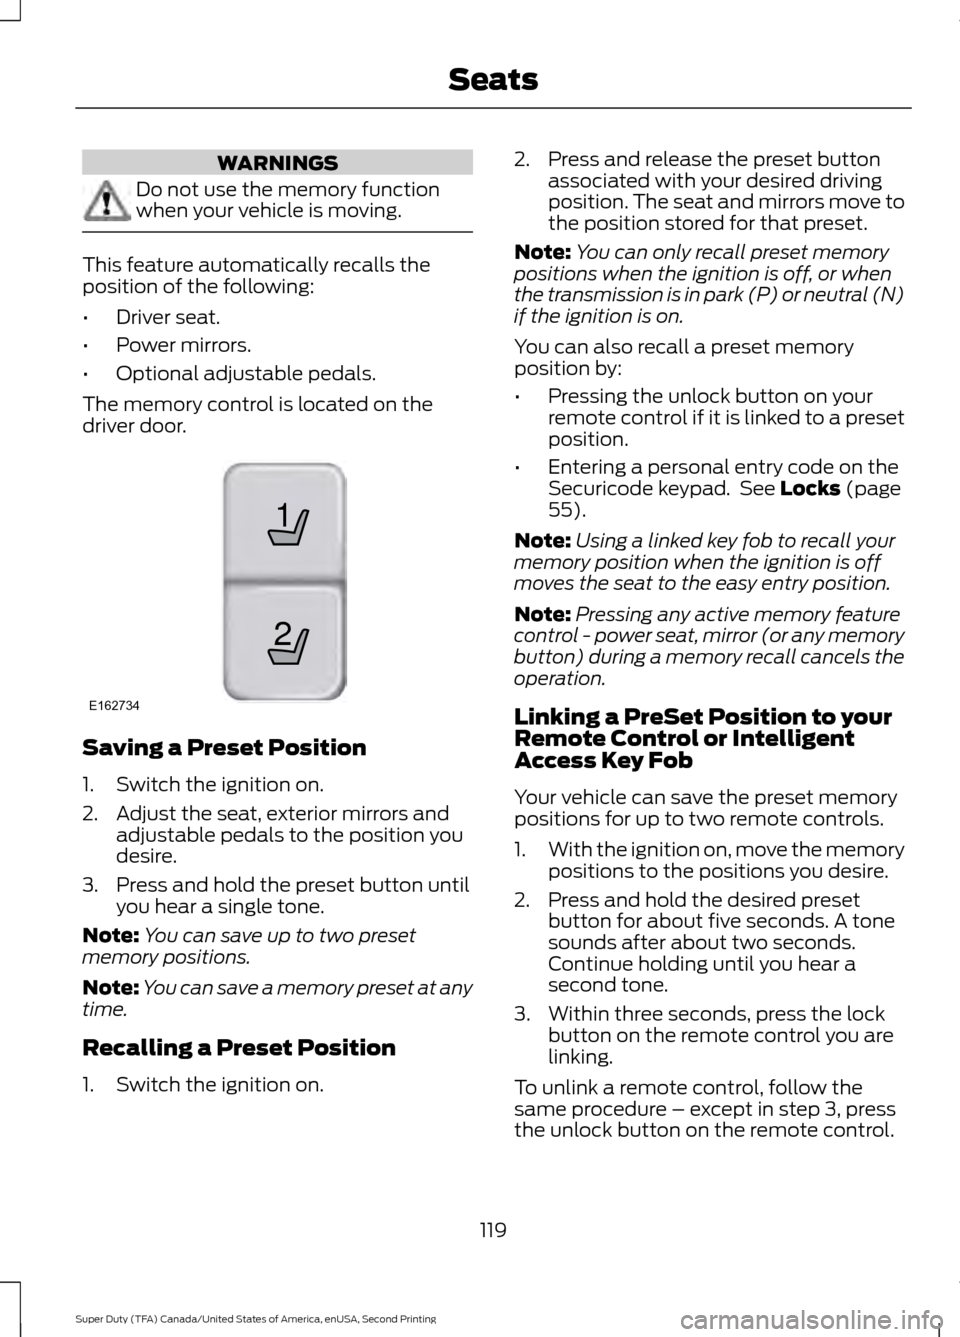
The memory control is located on the
driver door. Saving a Preset Position
1. Switch the ignition on.
2. Adjust the seat, exterior mirrors and
adjustable pedals to the position you
desire.
3. Press and hold the preset button until you hear a single tone.
Note: You can save up to two preset
memory positions.
Note: You can save a memory preset at any
time.
Recalling a Preset Position
1. Switch the ignition on. 2. Press and release the preset button
associated with your desired driving
position. The seat and mirrors move to
the position stored for that preset.
Note: You can only recall preset memory
positions when the ignition is off, or when
the transmission is in park (P) or neutral (N)
if the ignition is on.
You can also recall a preset memory
position by:
• Pressing the unlock button on your
remote control if it is linked to a preset
position.
• Entering a personal entry code on the
Securicode keypad. See Locks (page
55).
Note: Using a linked key fob to recall your
memory position when the ignition is off
moves the seat to the easy entry position.
Note: Pressing any active memory feature
control - power seat, mirror (or any memory
button) during a memory recall cancels the
operation.
Linking a PreSet Position to your
Remote Control or Intelligent
Access Key Fob
Your vehicle can save the preset memory
positions for up to two remote controls.
1. With the ignition on, move the memory
positions to the positions you desire.
2. Press and hold the desired preset button for about five seconds. A tone
sounds after about two seconds.
Continue holding until you hear a
second tone.
3. Within three seconds, press the lock button on the remote control you are
linking.
To unlink a remote control, follow the
same procedure – except in step 3, press
the unlock button on the remote control.
119
Super Duty (TFA) Canada/United States of America, enUSA, Second Printing Seats21
E162734
Page 123 of 510
Note:
If more than one linked remote
control or intelligent access key is in range,
the memory function moves to the settings
of the first key to initiate a memory recall.
Easy Entry and Exit Feature (If
Equipped)
If you enable the easy entry and exit
feature, it automatically moves the driver
seat rearward up to 2 inches (5
centimeters) when you put the
transmission in park (P) and remove the
key from the ignition.
The driver seat returns to the previous
position when you put the key in the
ignition.
You can enable or disable this feature
through the information display. See
Information Displays
(page 88).
REAR SEATS
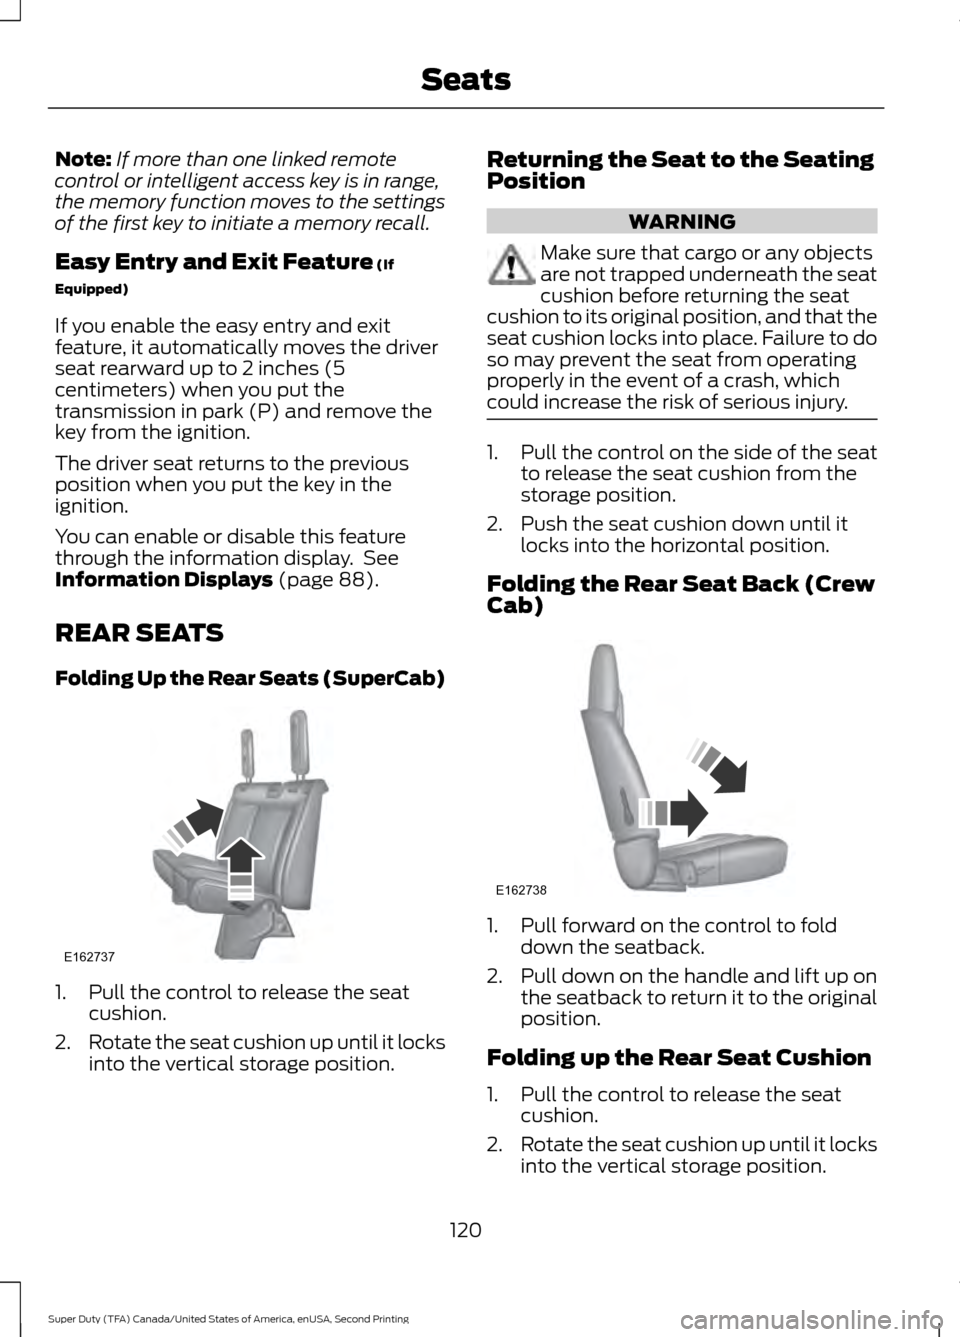
Folding Up the Rear Seats (SuperCab) 1. Pull the control to release the seat
cushion.
2. Rotate the seat cushion up until it locks
into the vertical storage position. Returning the Seat to the Seating
Position WARNING
Make sure that cargo or any objects
are not trapped underneath the seat
cushion before returning the seat
cushion to its original position, and that the
seat cushion locks into place. Failure to do
so may prevent the seat from operating
properly in the event of a crash, which
could increase the risk of serious injury. 1. Pull the control on the side of the seat
to release the seat cushion from the
storage position.
2. Push the seat cushion down until it locks into the horizontal position.
Folding the Rear Seat Back (Crew
Cab) 1. Pull forward on the control to fold
down the seatback.
2. Pull down on the handle and lift up on
the seatback to return it to the original
position.
Folding up the Rear Seat Cushion
1. Pull the control to release the seat cushion.
2. Rotate the seat cushion up until it locks
into the vertical storage position.
120
Super Duty (TFA) Canada/United States of America, enUSA, Second Printing SeatsE162737 E162738
Page 130 of 510
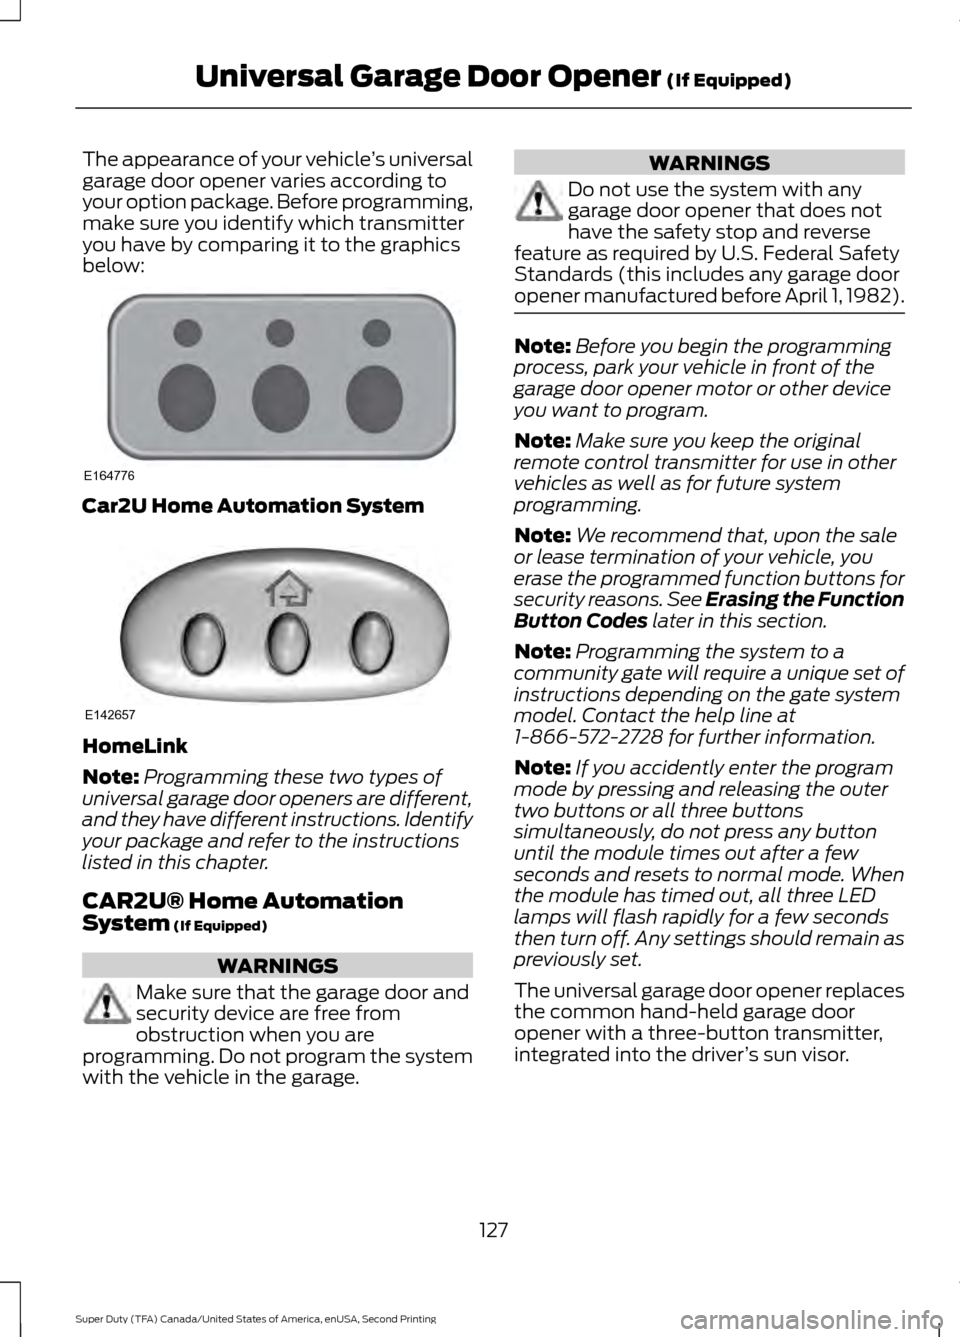
The appearance of your vehicle
’s universal
garage door opener varies according to
your option package. Before programming,
make sure you identify which transmitter
you have by comparing it to the graphics
below: Car2U Home Automation System
HomeLink
Note:
Programming these two types of
universal garage door openers are different,
and they have different instructions. Identify
your package and refer to the instructions
listed in this chapter.
CAR2U® Home Automation
System (If Equipped) WARNINGS
Make sure that the garage door and
security device are free from
obstruction when you are
programming. Do not program the system
with the vehicle in the garage. WARNINGS
Do not use the system with any
garage door opener that does not
have the safety stop and reverse
feature as required by U.S. Federal Safety
Standards (this includes any garage door
opener manufactured before April 1, 1982). Note:
Before you begin the programming
process, park your vehicle in front of the
garage door opener motor or other device
you want to program.
Note: Make sure you keep the original
remote control transmitter for use in other
vehicles as well as for future system
programming.
Note: We recommend that, upon the sale
or lease termination of your vehicle, you
erase the programmed function buttons for
security reasons. See Erasing the Function
Button Codes
later in this section.
Note: Programming the system to a
community gate will require a unique set of
instructions depending on the gate system
model. Contact the help line at
1-866-572-2728 for further information.
Note: If you accidently enter the program
mode by pressing and releasing the outer
two buttons or all three buttons
simultaneously, do not press any button
until the module times out after a few
seconds and resets to normal mode. When
the module has timed out, all three LED
lamps will flash rapidly for a few seconds
then turn off. Any settings should remain as
previously set.
The universal garage door opener replaces
the common hand-held garage door
opener with a three-button transmitter,
integrated into the driver ’s sun visor.
127
Super Duty (TFA) Canada/United States of America, enUSA, Second Printing Universal Garage Door Opener
(If Equipped)E164776 E142657
Page 131 of 510
The system includes two primary features,
a garage door opener and a platform for
remote activation of devices within the
home. This functionality allows you to
program garage door openers as well as
security devices and home lighting
systems.
You can find additional system information
online at www.learcar2U.com or by calling
the toll-free help line on 1-866-572-2728.
Rolling Code Programming
Note:
If you do not follow the time-sensitive
instructions, the device will time out and
you will have to repeat the complete
procedure.
Note: It may be helpful to have another
person assist you in programming the
transmitter.
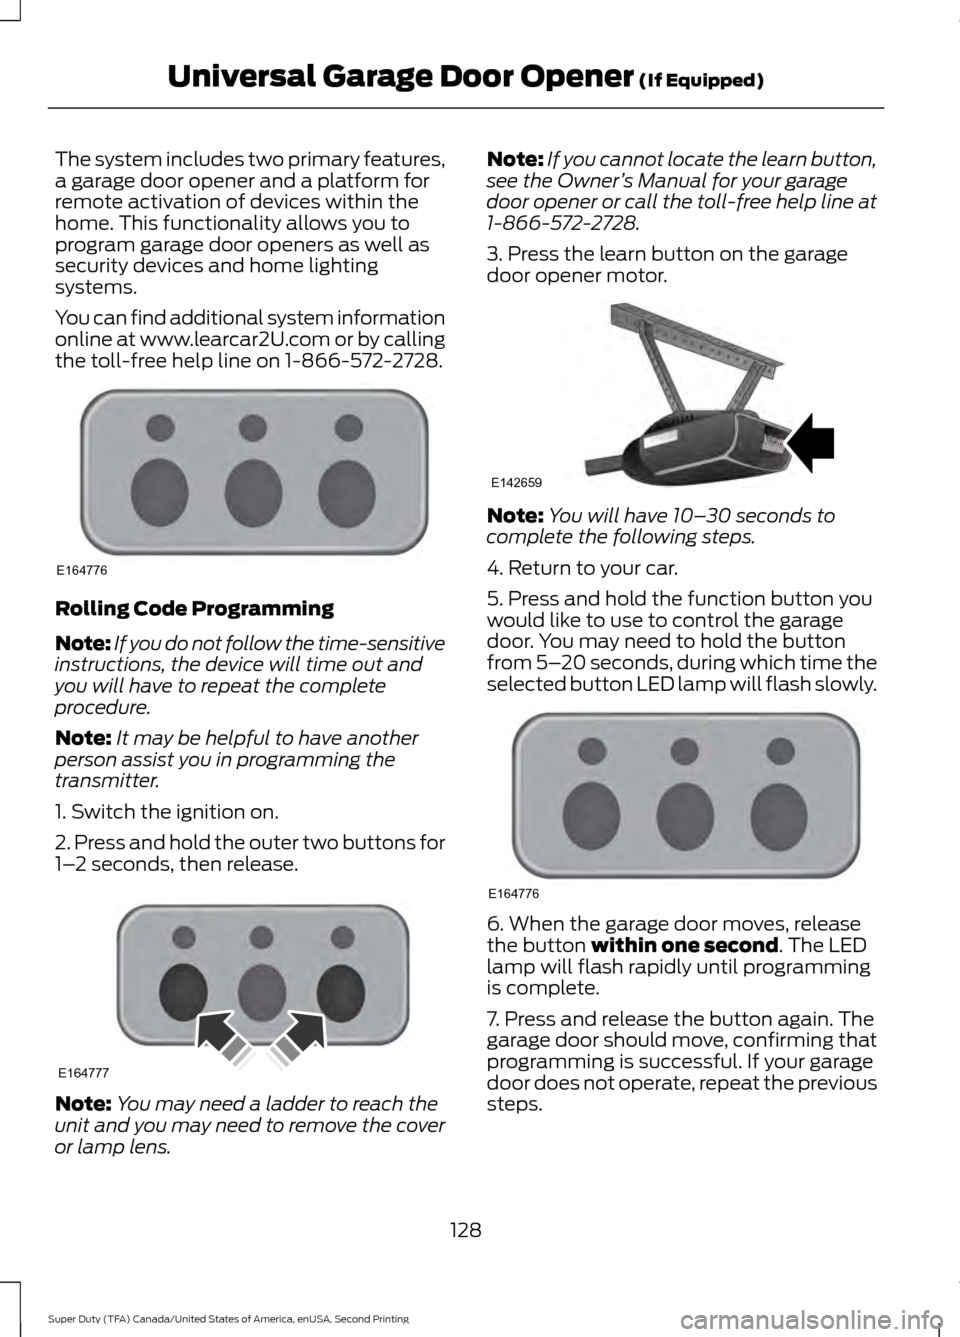
1. Switch the ignition on.
2. Press and hold the outer two buttons for
1– 2 seconds, then release. Note:
You may need a ladder to reach the
unit and you may need to remove the cover
or lamp lens. Note:
If you cannot locate the learn button,
see the Owner ’s Manual for your garage
door opener or call the toll-free help line at
1-866-572-2728.
3. Press the learn button on the garage
door opener motor. Note:
You will have 10– 30 seconds to
complete the following steps.
4. Return to your car.
5. Press and hold the function button you
would like to use to control the garage
door. You may need to hold the button
from 5– 20 seconds, during which time the
selected button LED lamp will flash slowly. 6. When the garage door moves, release
the button within one second. The LED
lamp will flash rapidly until programming
is complete.
7. Press and release the button again. The
garage door should move, confirming that
programming is successful. If your garage
door does not operate, repeat the previous
steps.
128
Super Duty (TFA) Canada/United States of America, enUSA, Second Printing Universal Garage Door Opener
(If Equipped)E164776 E164777 E142659 E164776
Page 133 of 510
The LED lamp above the selected button
will illuminate to confirm that the system
is responding to the button command.
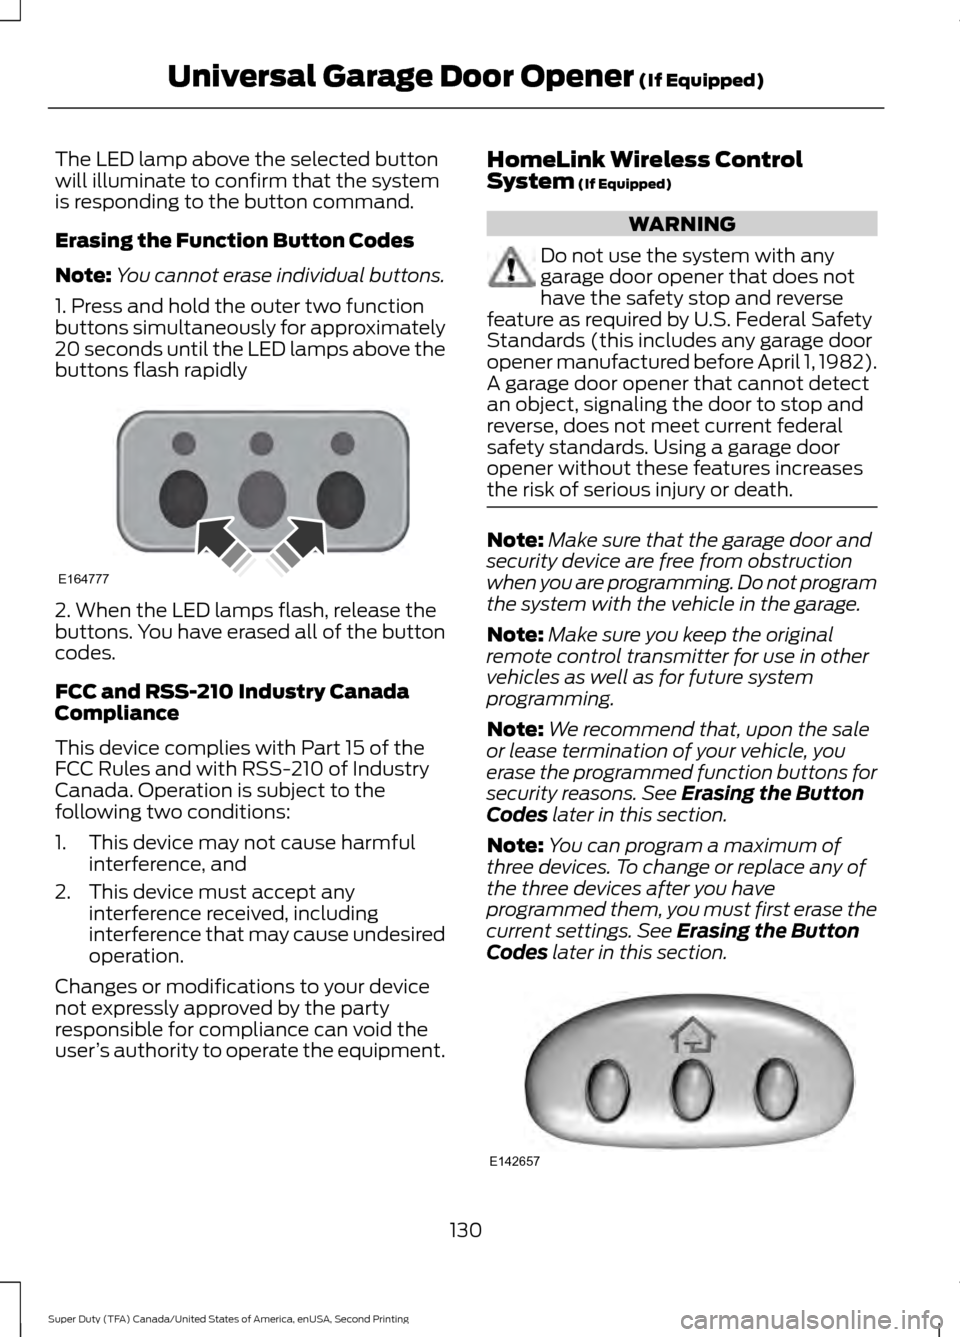
Erasing the Function Button Codes
Note:
You cannot erase individual buttons.
1. Press and hold the outer two function
buttons simultaneously for approximately
20 seconds until the LED lamps above the
buttons flash rapidly 2. When the LED lamps flash, release the
buttons. You have erased all of the button
codes.
FCC and RSS-210 Industry Canada
Compliance
This device complies with Part 15 of the
FCC Rules and with RSS-210 of Industry
Canada. Operation is subject to the
following two conditions:
1. This device may not cause harmful
interference, and
2. This device must accept any interference received, including
interference that may cause undesired
operation.
Changes or modifications to your device
not expressly approved by the party
responsible for compliance can void the
user ’s authority to operate the equipment. HomeLink Wireless Control
System (If Equipped) WARNING
Do not use the system with any
garage door opener that does not
have the safety stop and reverse
feature as required by U.S. Federal Safety
Standards (this includes any garage door
opener manufactured before April 1, 1982).
A garage door opener that cannot detect
an object, signaling the door to stop and
reverse, does not meet current federal
safety standards. Using a garage door
opener without these features increases
the risk of serious injury or death. Note:
Make sure that the garage door and
security device are free from obstruction
when you are programming. Do not program
the system with the vehicle in the garage.
Note: Make sure you keep the original
remote control transmitter for use in other
vehicles as well as for future system
programming.
Note: We recommend that, upon the sale
or lease termination of your vehicle, you
erase the programmed function buttons for
security reasons. See
Erasing the Button
Codes later in this section.
Note: You can program a maximum of
three devices. To change or replace any of
the three devices after you have
programmed them, you must first erase the
current settings. See
Erasing the Button
Codes later in this section. 130
Super Duty (TFA) Canada/United States of America, enUSA, Second Printing Universal Garage Door Opener
(If Equipped)E164777 E142657