2016 FORD FUSION (AMERICAS) start stop button
[x] Cancel search: start stop buttonPage 155 of 518
AUTO-START-STOP (If Equipped)
The system helps reduce fuel consumption
by automatically shutting off and restarting
the engine while your vehicle is stopped.
The engine will restart automatically when
you release the brake pedal. In some
situations, your vehicle may restart
automatically, for example:
• To maintain interior comfort
• To recharge the battery
Note: Power assist steering is turned off
when the engine is off. WARNINGS
The engine may restart
automatically if required by the
system.
Switch the ignition off before
opening the hood or performing any
maintenance. Failure to do so may
result in serious injuries due to automatic
engine restart. Always switch the ignition off before
leaving your vehicle, as the system
may have turned the engine off, but
the ignition will still be on and automatic
restart may occur. The Auto StartStop system status is
available at a glance within the information
display. See Information Displays (page
96
).
Enabling Auto StartStop
The system is automatically enabled every
time you start your vehicle if the following
conditions are met:
• The Auto StartStop button is not
pressed (not illuminated).
• Your vehicle exceeds an initial speed
of 3 mph (4 km/h) after the vehicle has
been initially started.
• Your vehicle is stopped. •
Your foot is on the brake pedal.
• The transmission is in drive (D).
• The driver's door is closed.
• There is adequate brake vacuum.
• The interior compartment has been
cooled or warmed to an acceptable
level.
• The front windshield defroster is off.
• The steering wheel is not turned rapidly
or is not at a sharp angle.
• The vehicle is not on a steep road
grade.
• The battery is within optimal operating
conditions (battery state of charge and
temperature in range).
• The engine coolant is at operating
temperature.
• Elevation is below approximately
10000 feet (3048 meters).
• Ambient temperature is moderate.
Note: The system allows multiple
successive Auto StartStop events, but it
may not operate in conditions of heavy
traffic or in extended low speed operation. Note: The green Auto StartStop
indicator light on the instrument
cluster will illuminate to indicate
when the automatic engine stop occurs. Note:
If the instrument cluster
is equipped with a grey Auto
StartStop indicator light, it is
illuminated when automatic engine stop
is not available due to one of the above
noted conditions not being met.
Automatic Engine Restart
Any of the following conditions will result
in an automatic restart of the engine:
• Your foot is removed from the brake
pedal.
• You press the accelerator pedal.
152
Fusion/Mondeo (CC7) Canada/United States of America, enUSA, First Printing Unique Driving Characteristics E146361
Page 156 of 518
•
You press the accelerator and the
brake pedal at the same time.
• The driver safety belt becomes
unfastened or the driver door is ajar.
• The transmission is moved from drive
(D).
• Your vehicle is moving.
• The interior compartment does not
meet customer comfort when air
conditioning or heat is on.
• Fogging of the windows could occur
and the air conditioning is on.
• The battery is not within optimal
operating conditions.
• The maximum engine off time is
exceeded.
• When you press the Auto StartStop
button while the engine is stopped
automatically.
• The heated windshield is turned on.
Any of the following conditions may result
in an automatic restart of the engine:
• The blower fan speed is increased or
the climate control temperature is
changed.
• An electrical accessory is turned on or
plugged in.
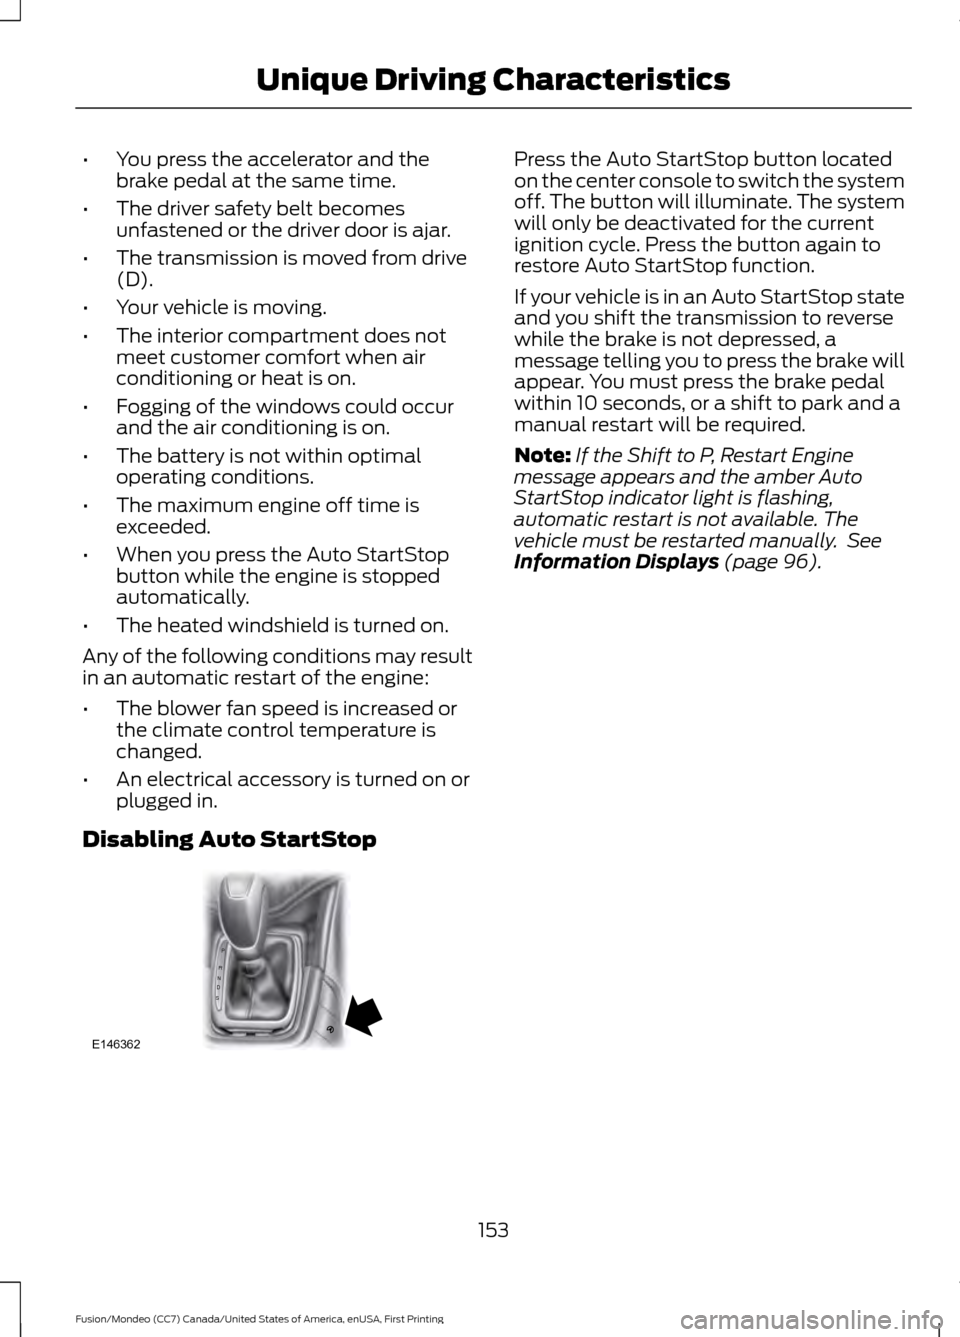
Disabling Auto StartStop Press the Auto StartStop button located
on the center console to switch the system
off. The button will illuminate. The system
will only be deactivated for the current
ignition cycle. Press the button again to
restore Auto StartStop function.
If your vehicle is in an Auto StartStop state
and you shift the transmission to reverse
while the brake is not depressed, a
message telling you to press the brake will
appear. You must press the brake pedal
within 10 seconds, or a shift to park and a
manual restart will be required.
Note:
If the Shift to P, Restart Engine
message appears and the amber Auto
StartStop indicator light is flashing,
automatic restart is not available. The
vehicle must be restarted manually. See
Information Displays (page 96).
153
Fusion/Mondeo (CC7) Canada/United States of America, enUSA, First Printing Unique Driving CharacteristicsP
R
N
D
S
E146362
Page 171 of 518

If Your Vehicle Goes Off the Edge of the
Pavement
•
If your vehicle goes off the edge of the
pavement, slow down, but avoid severe
brake application, ease the vehicle
back onto the pavement only after
reducing your speed. Do not turn the
steering wheel too sharply while
returning to the road surface.
• It may be safer to stay on the apron or
shoulder of the road and slow down
gradually before returning to the
pavement. You may lose control if you
do not slow down or if you turn the
steering wheel too sharply or abruptly.
• It often may be less risky to strike small
objects, such as highway reflectors,
with minor damage to your vehicle
rather than attempt a sudden return to
the pavement which could cause the
vehicle to slide sideways out of control
or rollover. Remember, your safety and
the safety of others should be your
primary concern.
If Your Vehicle Gets Stuck WARNINGS
Always set the parking brake fully
and make sure the transmission is in
P (Park). Turn the ignition to the lock
position or turn the vehicle off using the
start/stop button and remove the key
whenever you leave your vehicle. If the parking brake is fully released,
but the brake warning lamp remains
illuminated, the brakes may not be
working properly. See your authorized
dealer. Do not spin the wheels at over 35
mph (56 km/h). The tires may fail
and injure a passenger or bystander.
Note:
Do not rock the vehicle if the engine
is not at normal operating temperature or
damage to the transmission may occur. Note:
Do not rock the vehicle for more than
a few minutes or damage to the
transmission and tires may occur or the
engine may overheat.
If your vehicle gets stuck in mud or snow it
may be rocked out by shifting between
forward and reverse gears, stopping
between shifts, in a steady pattern. Press
lightly on the accelerator in each gear.
If your vehicle is equipped with
AdvanceTrac® with Roll Stability
Control ™, it may be beneficial to
disengage the AdvanceTrac® with Roll
Stability Control ™ system while
attempting to rock the vehicle.
Emergency Maneuvers
• In an unavoidable emergency situation
where a sudden sharp turn must be
made, remember to avoid
"over-driving" your vehicle (i.e., turn the
steering wheel only as rapidly and as
far as required to avoid the
emergency). Excessive steering will
result in less vehicle control, not more.
Additionally, smooth variations of the
accelerator and/or brake pedal
pressure should be utilized if changes
in vehicle speed are called for. Avoid
abrupt steering, acceleration or braking
which could result in an increased risk
of loss of vehicle control, vehicle
rollover and/or personal injury. Use all
available road surface to return the
vehicle to a safe direction of travel.
• In the event of an emergency stop,
avoid skidding the tires and do not
attempt any sharp steering wheel
movements.
• If the vehicle goes from one type of
surface to another (i.e., from concrete
to gravel) there will be a change in the
way the vehicle responds to a
maneuver (steering, acceleration or
braking). Again, avoid these abrupt
inputs.
168
Fusion/Mondeo (CC7) Canada/United States of America, enUSA, First Printing All-Wheel Drive (If Equipped)
Page 230 of 518
Canadian roadside coverage and benefits
may differ from the U.S. coverage. If you
require more information, please refer to
the coverage section of your warranty
guide, call us in Canada at
1-800-665-2006, or visit our website at
www.ford.ca.
Sykes Assistance Services Corporation
administers the Roadside Assistance
program. You must receive covered
services in Canada or the continental
United States. Coverage extends to
vehicles that use public, non-seasonal,
annually traveled roadways. Roadside
Assistance coverage does not extend to
vehicles involved in cross-country driving,
logging, autocross and any other form of
off-road use. Well maintained roads and
surfaces help ensure safe travel for the
supplier, and allow their representatives
to perform service as per the standard
operating procedures.
In Remote Locations
If our supplier cannot take your vehicle by
road to the nearest authorized dealership,
transportation by rail or water may be
necessary. The program covers a tow to
the dock or rail terminal and also to the
dealership at the end of the trip.
For rail or water transportation, however,
contact your authorized dealer to confirm
if you are eligible for additional coverage
before you authorize or pay for the service.
Call the Ford Roadside Assistance at
1-800-665-2006 for additional
information.
HAZARD WARNING FLASHERS
Note:
If used when the vehicle is not
running, the battery will lose charge. There
may be insufficient power to restart your
vehicle. The hazard warning button is
located on the instrument panel.
Use it when your vehicle is
creating a safety hazard for other
motorists.
• Press the button to turn on the hazard
warning function, and the front and
rear direction indicators will flash.
• Press the button again to turn them
off.
FUEL SHUTOFF WARNING
Failure to inspect and, if necessary,
repair fuel leaks after a collision may
increase the risk of fire and serious
injury. Ford Motor Company recommends
that the fuel system be inspected by an
authorized dealer after any collision. In the event of a moderate to severe
collision, this vehicle includes a fuel pump
shutoff feature that stops the flow of fuel
to the engine. Not every impact will cause
a shutoff.
Should your vehicle shut off after a
collision, you may restart your vehicle. For
vehicles equipped with a key system:
1. Switch off the ignition.
2. Switch on the ignition.
3. Repeat Steps 1 and 2 to re-enable the
fuel pump.
For vehicles equipped with a push button
start system:
1. Press the START/STOP button to
switch off the ignition.
2. Press the brake pedal and press the START/STOP
button to switch on the
ignition.
227
Fusion/Mondeo (CC7) Canada/United States of America, enUSA, First Printing Roadside Emergencies
Page 231 of 518
3.
Remove your foot from the brake pedal
and press the START/STOP button
to switch off the ignition.
4. You can either attempt to start the engine by pressing the brake pedal and
the
START/STOP button, or switch
on the ignition only by pressing the
START/STOP
button without
pressing the brake pedal. Both ways
re-enable the fuel system.
Note: When you try to restart your vehicle
after a fuel shutoff, the vehicle makes sure
that various systems are safe to restart.
Once your vehicle determines that the
systems are safe, then the vehicle will allow
you to restart.
Note: In the event that your vehicle does
not restart after your third attempt, contact
an authorized dealer.
JUMP STARTING THE VEHICLE WARNINGS
Batteries normally produce explosive
gases which can cause personal
injury. Therefore, do not allow
flames, sparks or lighted substances to
come near the battery. When working near
the battery, always shield your face and
protect your eyes. Always provide correct
ventilation. Keep batteries out of reach of
children. Batteries contain sulfuric
acid. Avoid contact with skin, eyes or
clothing. Shield your eyes when working
near the battery to protect against possible
splashing of acid solution. In case of acid
contact with skin or eyes, flush
immediately with water for a minimum of
15 minutes and get prompt medical
attention. If acid is swallowed, call a
physician immediately. Use only adequately sized cables
with insulated clamps. Preparing Your Vehicle
Do not attempt to push-start your
automatic transmission vehicle.
Note:
Attempting to push-start a vehicle
with an automatic transmission may cause
transmission damage.
Note: Use only a 12-volt supply to start your
vehicle.
Note: Do not disconnect the battery of the
disabled vehicle as this could damage the
vehicle electrical system.
Park the booster vehicle close to the hood
of the disabled vehicle, making sure the
two vehicles do not touch.
Connecting the Jumper Cables WARNINGS
Do not attach the cables to fuel lines,
engine rocker covers, the intake
manifold or electrical components
as grounding points. Stay clear of moving
parts. To avoid reverse polarity
connections, make sure that you correctly
identify the positive (+) and negative (-)
terminals on both the disabled and booster
vehicles before connecting the cables. Do not attach the end of the positive
cable to the studs or L-shaped eyelet
located above the positive (+)
terminal of your vehicle ’s battery. High
current may flow through and cause
damage to the fuses. Do not connect the end of the
second cable to the negative (-)
terminal of the battery to be jumped.
A spark may cause an explosion of the
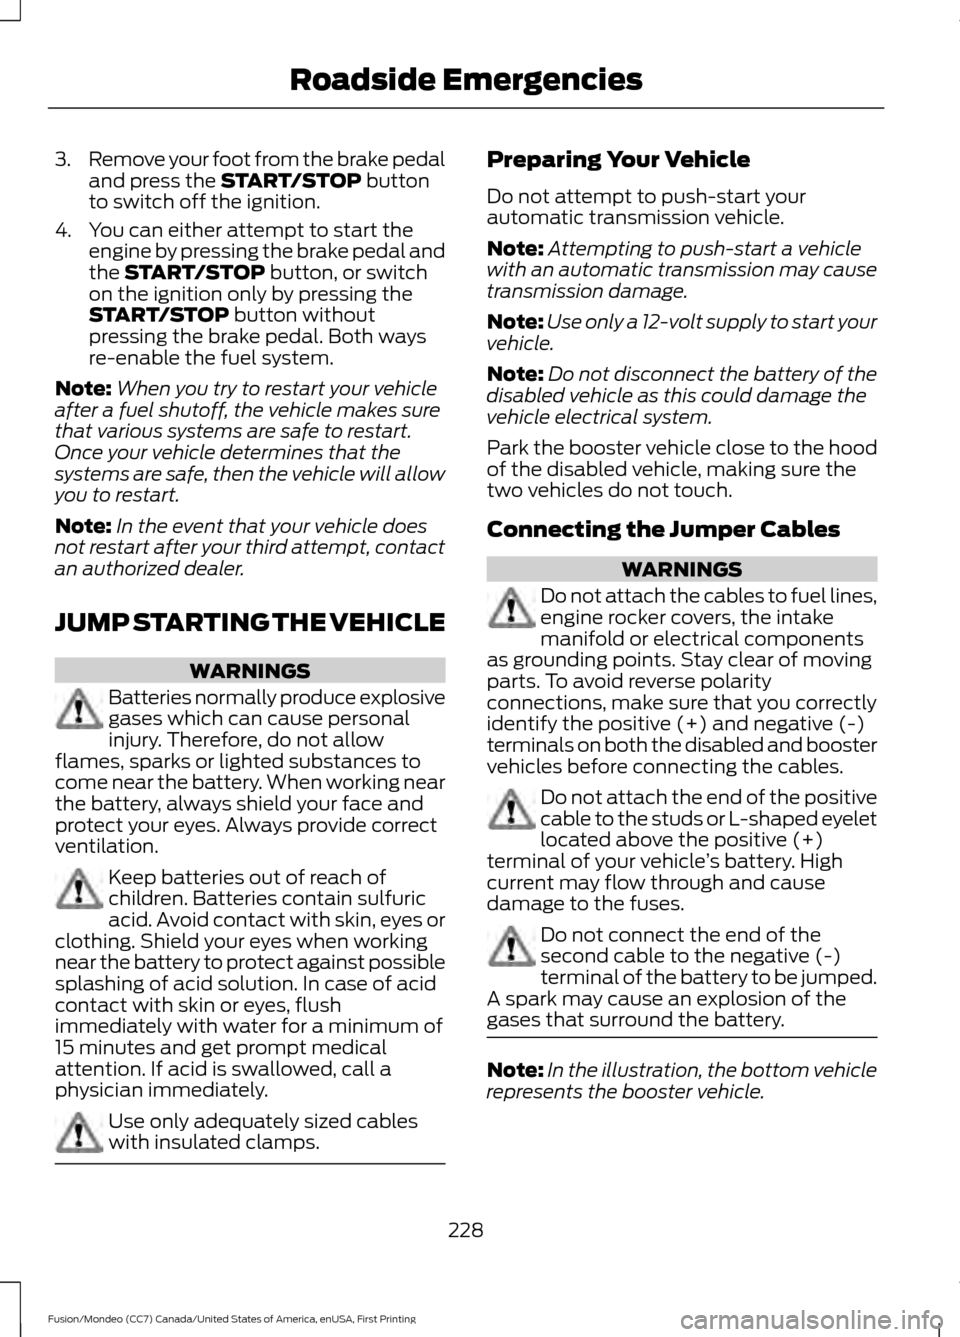
gases that surround the battery. Note:
In the illustration, the bottom vehicle
represents the booster vehicle.
228
Fusion/Mondeo (CC7) Canada/United States of America, enUSA, First Printing Roadside Emergencies
Page 247 of 518

Protected components
Fuse amp rating
Fuse or relay number
Lighting (ambient, glove box, vanity, dome,
trunk).
10A
1
1
Memory seats, lumbar, power mirror.
7.5A 1
2
Driver door unlock.
20A 1
3
Not used (spare).
5A 1
4
Subwoofer amplifier.
20A 1
5
Heated seat relay coil.
10A 2
6
Not used (spare).
10A 2
7
Not used (spare).
10A 2
8
Not used (spare).
10A 2
9
Keypad.
5A 2
10
Power decklid module.
Cellphone passport module.
Not used (spare).
5A 2
11
Climate control.
7.5A 2
12
Gear shift
Steering wheel column lock.
7.5A 2
13
Cluster.
Datelink logic.
Battery electronic control module.
10A 2
14
Datalink gateway module.
10A 2
15
Child lock.
15A 1
16
Decklid-liftglass release.
Tracking and blocking.
5A 2
17
Ignition.
5A 2
18
Push button stop start switch.
Passenger airbag disabled indicator.
7.5A 2
19
244
Fusion/Mondeo (CC7) Canada/United States of America, enUSA, First Printing Fuses
Page 278 of 518
What to do when a Tire Is
Punctured
A tire puncture within the tire tread area
can be repaired in two stages with the kit.
•
In the first stage, the tire will be
reinflated with a sealing compound
and air. After the tire has been
reinflated, you will need to drive the
vehicle a short distance 4 mi (6 km) to
distribute the sealant in the tire.
• In the second stage, you will need to
check the tire pressure and adjust, if
necessary, to the vehicle tire inflation
pressure.
First Stage: Reinflating the Tire
with Sealing Compound and Air WARNINGS
Do not stand directly over the kit
while inflating the tire. If you notice
any unusual bulges or deformations
in the tire sidewall during inflation, stop
and call roadside assistance. If the tire does not inflate to the
recommended tire pressure within
15 minutes, stop and call roadside
assistance. Preparation: Park the vehicle in a safe, level
and secure area, away from moving traffic.
Turn the hazard lights on. Apply the parking
brake and turn the engine off. Inspect the
flat tire for visible damage.
Sealant compound contains latex. To
avoid any allergic reactions, use the
non-latex gloves located in the accessory
box on the underside of the kit housing.
Do not remove any foreign object that has
pierced the tire. If a puncture is located in
the tire sidewall, stop and call roadside
assistance.
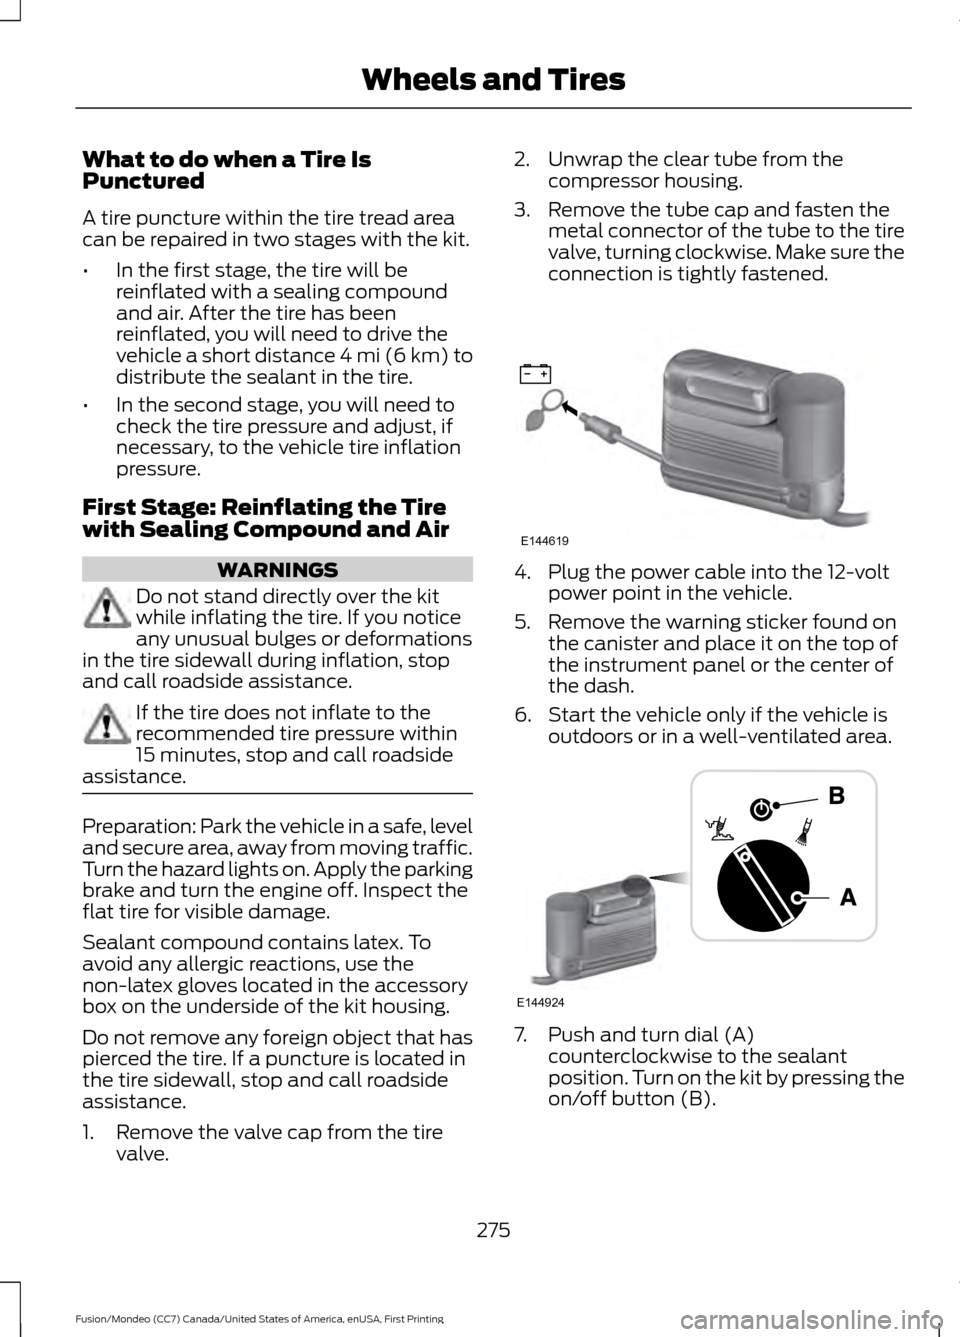
1. Remove the valve cap from the tire
valve. 2. Unwrap the clear tube from the
compressor housing.
3. Remove the tube cap and fasten the metal connector of the tube to the tire
valve, turning clockwise. Make sure the
connection is tightly fastened. 4. Plug the power cable into the 12-volt
power point in the vehicle.
5. Remove the warning sticker found on the canister and place it on the top of
the instrument panel or the center of
the dash.
6. Start the vehicle only if the vehicle is outdoors or in a well-ventilated area. 7. Push and turn dial (A)
counterclockwise to the sealant
position. Turn on the kit by pressing the
on/off button (B).
275
Fusion/Mondeo (CC7) Canada/United States of America, enUSA, First Printing Wheels and TiresE144619 E144924
Page 284 of 518

Preparation: Park the vehicle in a safe, level
and secure area, away from moving traffic.
Turn the hazard lights on. Apply the parking
brake and turn the engine off. Inspect the
flat tire for visible damage.
Sealant compound contains latex. Use
appropriate precautions to avoid any
allergic reactions.
Do not remove any foreign object that has
pierced the tire. If a puncture is located in
the tire sidewall, stop and call roadside
assistance.
1. Remove the valve cap from the tire
valve.
2. Unwrap the dual purpose hose (black tube) from the back of the compressor
housing.
3. Fasten the hose to the tire valve by turning the connector clockwise.
Tighten the connection securely. 4. Plug the power cable into the 12-volt
power point in the vehicle.
5. Remove the warning sticker found on the casing/housing and place it on the
top of the instrument panel or the
center of the dash.
6. Start the vehicle leave the engine running so the compressor does not
drain the vehicle ’s battery. 7. Turn dial (A) clockwise to the sealant
position. Turn the kit on by pressing the
on/off button (B).
8. Inflate the tire to the pressure listed on
the tire label located on the driver's
door or the door jamb area. The initial
air pressure gauge reading may indicate
a value higher than the label pressure
while the sealing compound is being
pumped into the tire. This is normal and
should be no reason for concern. The
281
Fusion/Mondeo (CC7) Canada/United States of America, enUSA, First Printing Wheels and TiresE175979 E175981