2016 FORD FUSION (AMERICAS) manual transmission
[x] Cancel search: manual transmissionPage 189 of 518
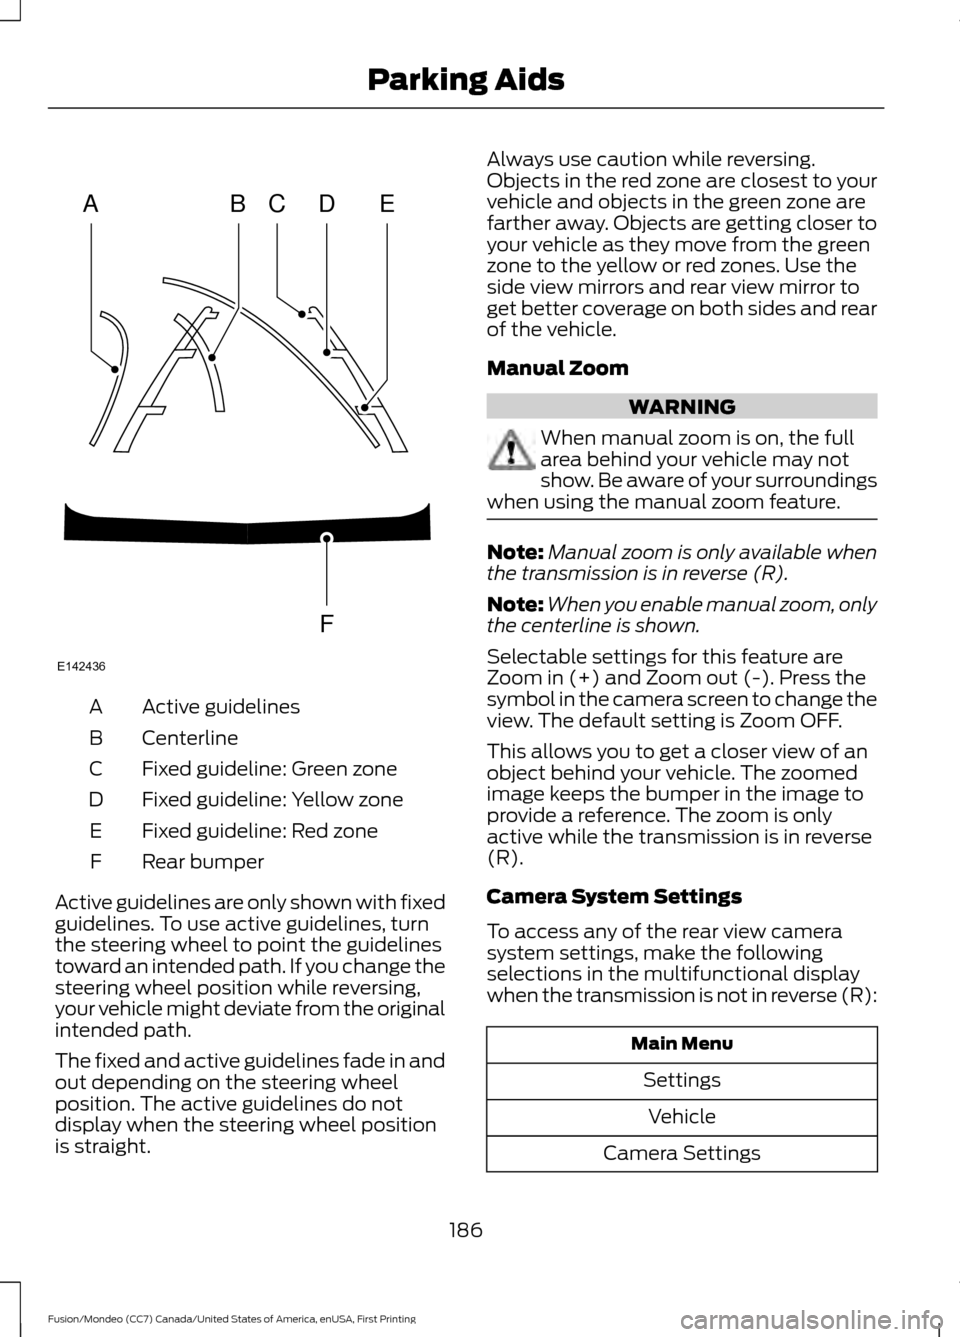
Active guidelines
A
Centerline
B
Fixed guideline: Green zone
C
Fixed guideline: Yellow zone
D
Fixed guideline: Red zone
E
Rear bumper
F
Active guidelines are only shown with fixed
guidelines. To use active guidelines, turn
the steering wheel to point the guidelines
toward an intended path. If you change the
steering wheel position while reversing,
your vehicle might deviate from the original
intended path.
The fixed and active guidelines fade in and
out depending on the steering wheel
position. The active guidelines do not
display when the steering wheel position
is straight. Always use caution while reversing.
Objects in the red zone are closest to your
vehicle and objects in the green zone are
farther away. Objects are getting closer to
your vehicle as they move from the green
zone to the yellow or red zones. Use the
side view mirrors and rear view mirror to
get better coverage on both sides and rear
of the vehicle.
Manual Zoom
WARNING
When manual zoom is on, the full
area behind your vehicle may not
show. Be aware of your surroundings
when using the manual zoom feature. Note:
Manual zoom is only available when
the transmission is in reverse (R).
Note: When you enable manual zoom, only
the centerline is shown.
Selectable settings for this feature are
Zoom in (+) and Zoom out (-). Press the
symbol in the camera screen to change the
view. The default setting is Zoom OFF.
This allows you to get a closer view of an
object behind your vehicle. The zoomed
image keeps the bumper in the image to
provide a reference. The zoom is only
active while the transmission is in reverse
(R).
Camera System Settings
To access any of the rear view camera
system settings, make the following
selections in the multifunctional display
when the transmission is not in reverse (R): Main Menu
SettingsVehicle
Camera Settings
186
Fusion/Mondeo (CC7) Canada/United States of America, enUSA, First Printing Parking AidsABCD
F
E
E142436
Page 195 of 518
Disengaging the System
Press the brake pedal or press CNCL. The
last set speed displays in grey but does not
erase.
Overriding the System WARNING
Whenever the driver presses the
accelerator pedal and overrides the
system, the system does not
automatically apply the brakes to maintain
the set distance from any vehicle ahead. Press the accelerator pedal to override the
set speed and gap distance.
When you override the system,
the green indicator light
illuminates and the lead vehicle
graphic does not show in the
information display.
The system resumes operation when you
release the accelerator pedal. The vehicle
speed decreases to the set speed, or a
slower speed if following a slower vehicle.
Changing the Set Speed
• Press and release
SET+ or SET-. The
set speed changes in approximately
1 mph (2 km/h)
increments.
• Press the accelerator or brake pedal
until you reach the desired speed. Press
and release
SET+.
• Press and hold SET+ or SET-. Release
the control when you reach the desired
speed.
The system may apply the brakes to slow
the vehicle to the new set speed. The set
speed displays continuously in the
information display when the system is
active. Canceling the Set Speed
Press the brake pedal or press and release
CNCL
. The last set speed displays with a
strikethrough.
Resuming the Set Speed
Note: Only use resume if you are aware of
the set speed and intend to return to it.
Press and release RES. The vehicle returns
to the previously set speed. The set speed
displays continuously in the information
display while the system is active.
Automatic Cancellation
The system does not operate below
12 mph (20 km/h)
. An audible warning
sounds and the automatic braking releases
if the vehicle drops below this speed.
Automatic cancellation can also occur if:
• The tires lose traction.
• The engine speed is too low.
• You apply the parking brake.
Note: If the engine speed drops too low,
the information display indicates low engine
speed. Shift to a lower gear (manual
transmission only) to avoid automatic
cancellation.
Hilly Condition Usage
Note: An audible alarm sounds and the
system shuts down if it is applying brakes
for an extended period of time. This allows
the brakes to cool. The system functions
normally again when the brakes cool.
Select a lower gear during prolonged
downhill driving on steep slopes, such as
mountainous areas, when the system is
active. In such situations, the system needs
additional engine braking to reduce the
load on the vehicle ’s regular brake system
to prevent the brakes from overheating.
192
Fusion/Mondeo (CC7) Canada/United States of America, enUSA, First Printing Cruise ControlE144529
Page 204 of 518
BLIND SPOT INFORMATION
SYSTEM
Blind Spot Information System
(BLIS
™) with Cross Traffic Alert
(If Equipped) WARNING
To help avoid injuries, NEVER use the
Blind Spot Information System as a
replacement for using the interior
and exterior mirrors and looking over your
shoulder before changing lanes. The Blind
Spot Information System is not a
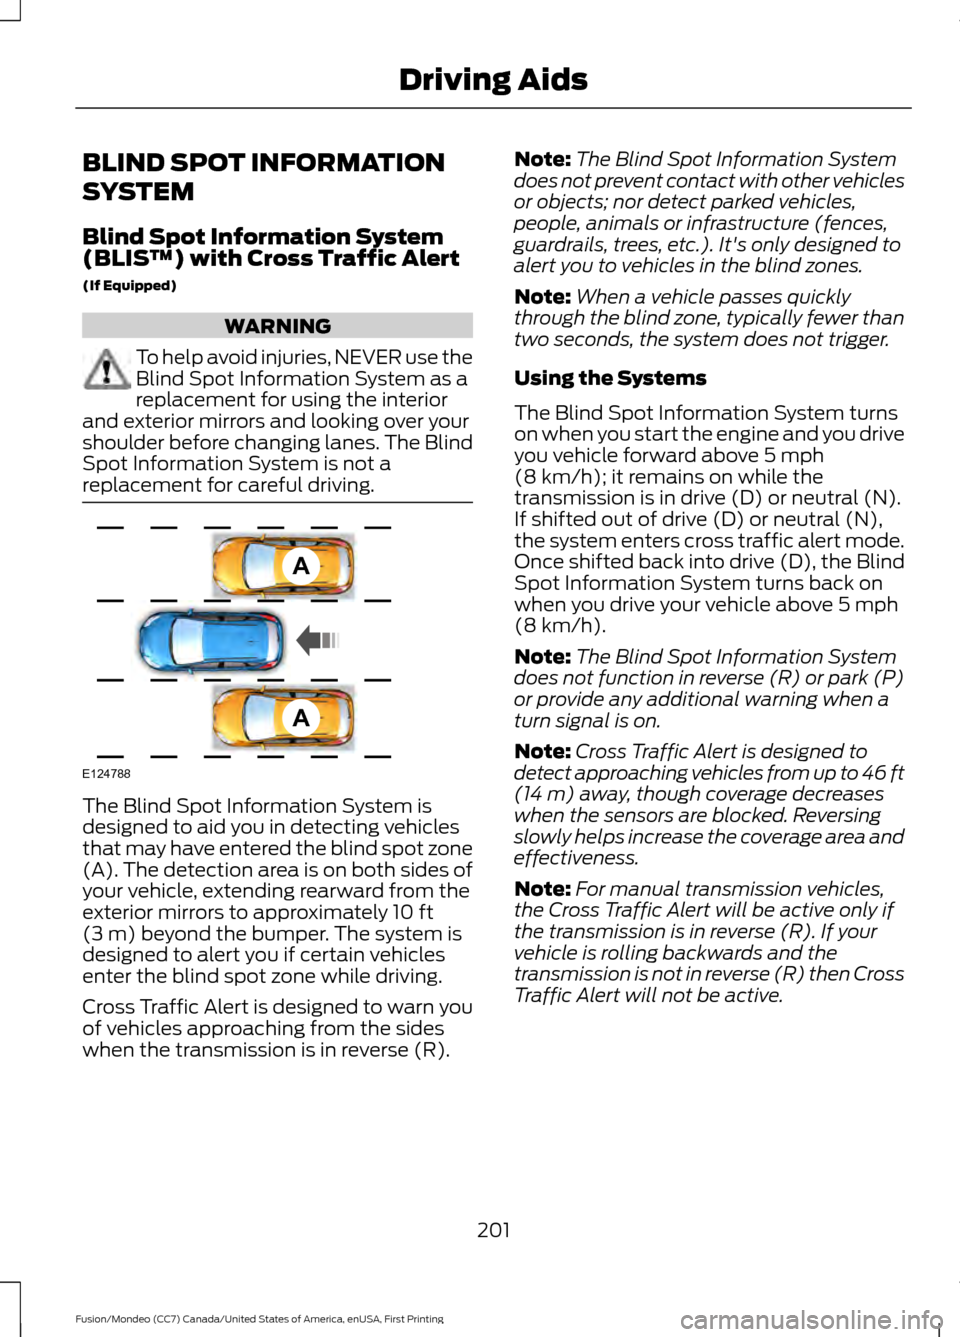
replacement for careful driving. The Blind Spot Information System is
designed to aid you in detecting vehicles
that may have entered the blind spot zone
(A). The detection area is on both sides of
your vehicle, extending rearward from the
exterior mirrors to approximately 10 ft
(3 m) beyond the bumper. The system is
designed to alert you if certain vehicles
enter the blind spot zone while driving.
Cross Traffic Alert is designed to warn you
of vehicles approaching from the sides
when the transmission is in reverse (R). Note:
The Blind Spot Information System
does not prevent contact with other vehicles
or objects; nor detect parked vehicles,
people, animals or infrastructure (fences,
guardrails, trees, etc.). It's only designed to
alert you to vehicles in the blind zones.
Note: When a vehicle passes quickly
through the blind zone, typically fewer than
two seconds, the system does not trigger.
Using the Systems
The Blind Spot Information System turns
on when you start the engine and you drive
you vehicle forward above
5 mph
(8 km/h); it remains on while the
transmission is in drive (D) or neutral (N).
If shifted out of drive (D) or neutral (N),
the system enters cross traffic alert mode.
Once shifted back into drive (D), the Blind
Spot Information System turns back on
when you drive your vehicle above
5 mph
(8 km/h).
Note: The Blind Spot Information System
does not function in reverse (R) or park (P)
or provide any additional warning when a
turn signal is on.
Note: Cross Traffic Alert is designed to
detect approaching vehicles from up to 46 ft
(14 m)
away, though coverage decreases
when the sensors are blocked. Reversing
slowly helps increase the coverage area and
effectiveness.
Note: For manual transmission vehicles,
the Cross Traffic Alert will be active only if
the transmission is in reverse (R). If your
vehicle is rolling backwards and the
transmission is not in reverse (R) then Cross
Traffic Alert will not be active.
201
Fusion/Mondeo (CC7) Canada/United States of America, enUSA, First Printing Driving AidsA
A
E124788
Page 310 of 518

WARNINGS
Never get underneath a vehicle that
is supported only by a jack. If your
vehicle slips off the jack, you or
someone else could be seriously injured. Do not attempt to change a tire on
the side of the vehicle close to
moving traffic. Pull far enough off the
road to avoid the danger of being hit when
operating the jack or changing the wheel. Always use the jack provided as
original equipment with your vehicle.
If using a jack other than the one
provided as original equipment with your
vehicle, make sure the jack capacity is
adequate for the vehicle weight, including
any vehicle cargo or modifications. Note:
Passengers should not remain in your
vehicle when the vehicle is being jacked.
Type 1
1. Park on a level surface, set the parking
brake and activate the hazard flashers.
2. Place the transmission in park (P) and
turn the engine off. For vehicles with a
manual transmission, place the
transmission in reverse (R) after the
engine is turned off. 3. Block both the front and rear of the
wheel diagonally opposite the flat tire.
For example, if the left front tire is flat,
block the right rear wheel.
4. Remove the carpeted wheel cover.
5. Remove the spare tire bolt securing the
spare tire by turning it
counterclockwise.
6. Remove the spare tire from the spare tire compartment. 7. Remove the lug wrench and jack from
the foam holder.
8. Loosen each wheel lug nut one-half turn counterclockwise, but do not
remove them until the wheel is raised
off the ground. 307
Fusion/Mondeo (CC7) Canada/United States of America, enUSA, First Printing Wheels and TiresE175447 E142550 E145908
Page 311 of 518
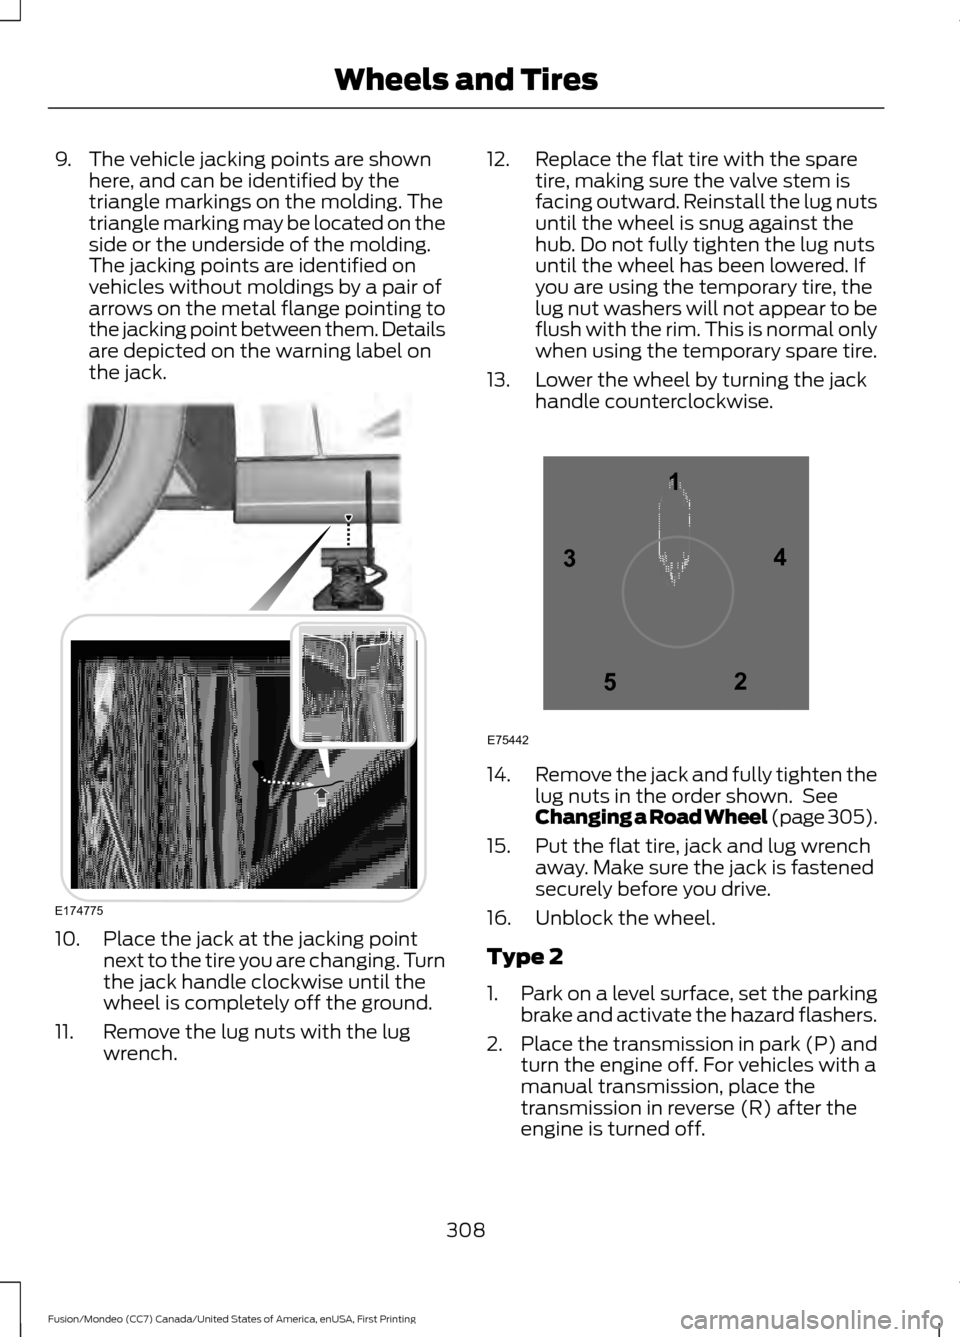
9. The vehicle jacking points are shown
here, and can be identified by the
triangle markings on the molding. The
triangle marking may be located on the
side or the underside of the molding.
The jacking points are identified on
vehicles without moldings by a pair of
arrows on the metal flange pointing to
the jacking point between them. Details
are depicted on the warning label on
the jack. 10. Place the jack at the jacking point
next to the tire you are changing. Turn
the jack handle clockwise until the
wheel is completely off the ground.
11. Remove the lug nuts with the lug wrench. 12. Replace the flat tire with the spare
tire, making sure the valve stem is
facing outward. Reinstall the lug nuts
until the wheel is snug against the
hub. Do not fully tighten the lug nuts
until the wheel has been lowered. If
you are using the temporary tire, the
lug nut washers will not appear to be
flush with the rim. This is normal only
when using the temporary spare tire.
13. Lower the wheel by turning the jack handle counterclockwise. 14.
Remove the jack and fully tighten the
lug nuts in the order shown. See
Changing a Road Wheel (page 305).
15. Put the flat tire, jack and lug wrench away. Make sure the jack is fastened
securely before you drive.
16. Unblock the wheel.
Type 2
1. Park on a level surface, set the parking
brake and activate the hazard flashers.
2. Place the transmission in park (P) and
turn the engine off. For vehicles with a
manual transmission, place the
transmission in reverse (R) after the
engine is turned off.
308
Fusion/Mondeo (CC7) Canada/United States of America, enUSA, First Printing Wheels and TiresE174775 12
3
4
5
E75442
Page 349 of 518
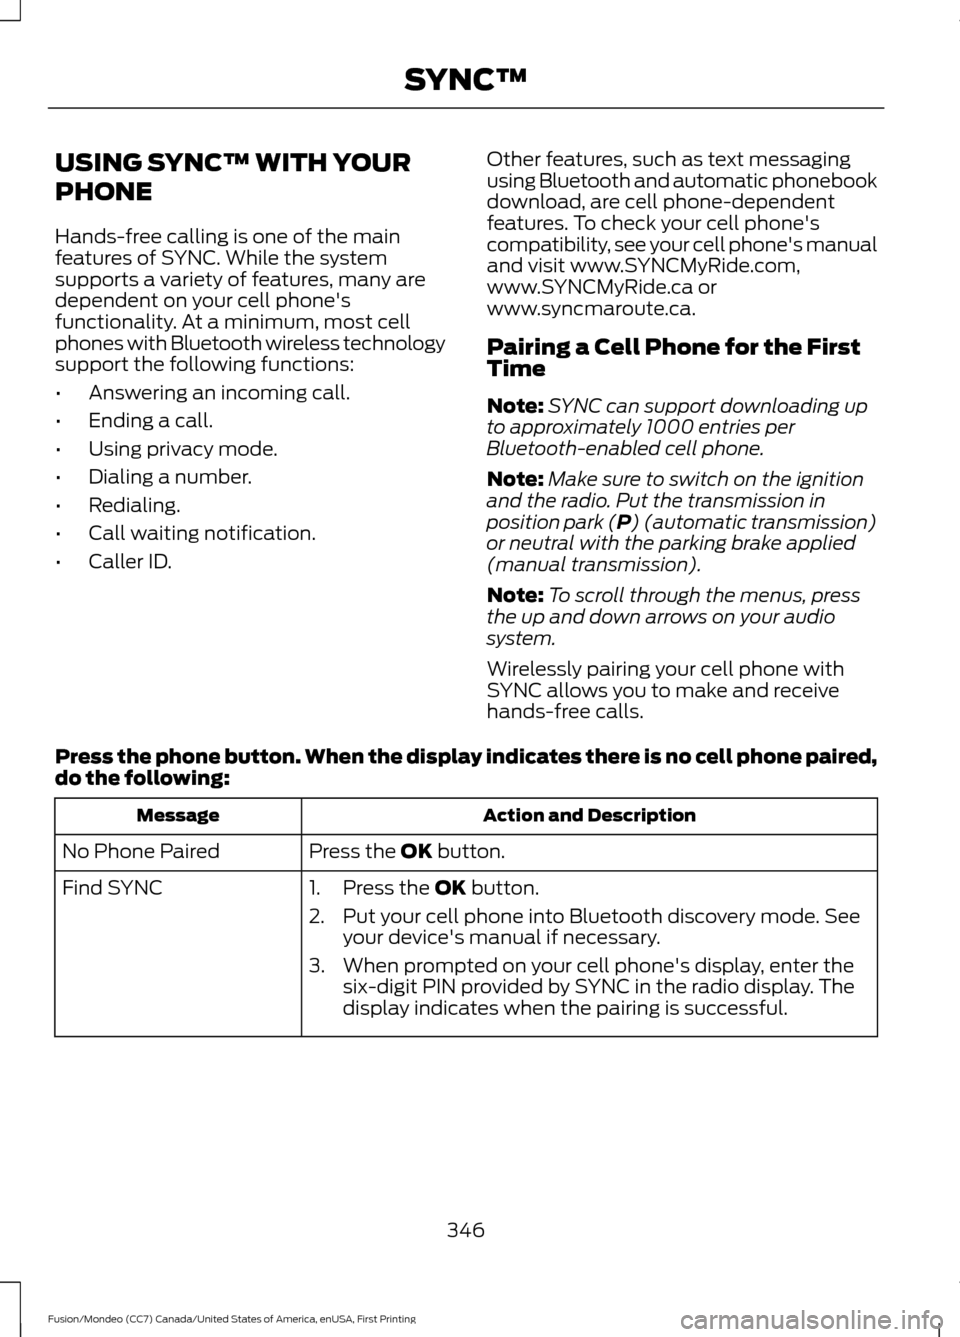
USING SYNC™ WITH YOUR
PHONE
Hands-free calling is one of the main
features of SYNC. While the system
supports a variety of features, many are
dependent on your cell phone's
functionality. At a minimum, most cell
phones with Bluetooth wireless technology
support the following functions:
•
Answering an incoming call.
• Ending a call.
• Using privacy mode.
• Dialing a number.
• Redialing.
• Call waiting notification.
• Caller ID. Other features, such as text messaging
using Bluetooth and automatic phonebook
download, are cell phone-dependent
features. To check your cell phone's
compatibility, see your cell phone's manual
and visit www.SYNCMyRide.com,
www.SYNCMyRide.ca or
www.syncmaroute.ca.
Pairing a Cell Phone for the First
Time
Note:
SYNC can support downloading up
to approximately 1000 entries per
Bluetooth-enabled cell phone.
Note: Make sure to switch on the ignition
and the radio. Put the transmission in
position park (P) (automatic transmission)
or neutral with the parking brake applied
(manual transmission).
Note: To scroll through the menus, press
the up and down arrows on your audio
system.
Wirelessly pairing your cell phone with
SYNC allows you to make and receive
hands-free calls.
Press the phone button. When the display indicates there is no cell phone paired,
do the following: Action and Description
Message
Press the
OK button.
No Phone Paired
Find SYNC 1. Press the
OK button.
2. Put your cell phone into Bluetooth discovery mode. See your device's manual if necessary.
3. When prompted on your cell phone's display, enter the six-digit PIN provided by SYNC in the radio display. The
display indicates when the pairing is successful.
346
Fusion/Mondeo (CC7) Canada/United States of America, enUSA, First Printing SYNC™
Page 350 of 518
Depending on your cell phone's capability
and your market, the system may prompt
you with questions, such as setting the
current cell phone as the primary cell
phone (the cell phone SYNC automatically
tries to connect with first upon vehicle
start-up) and downloading your
phonebook.
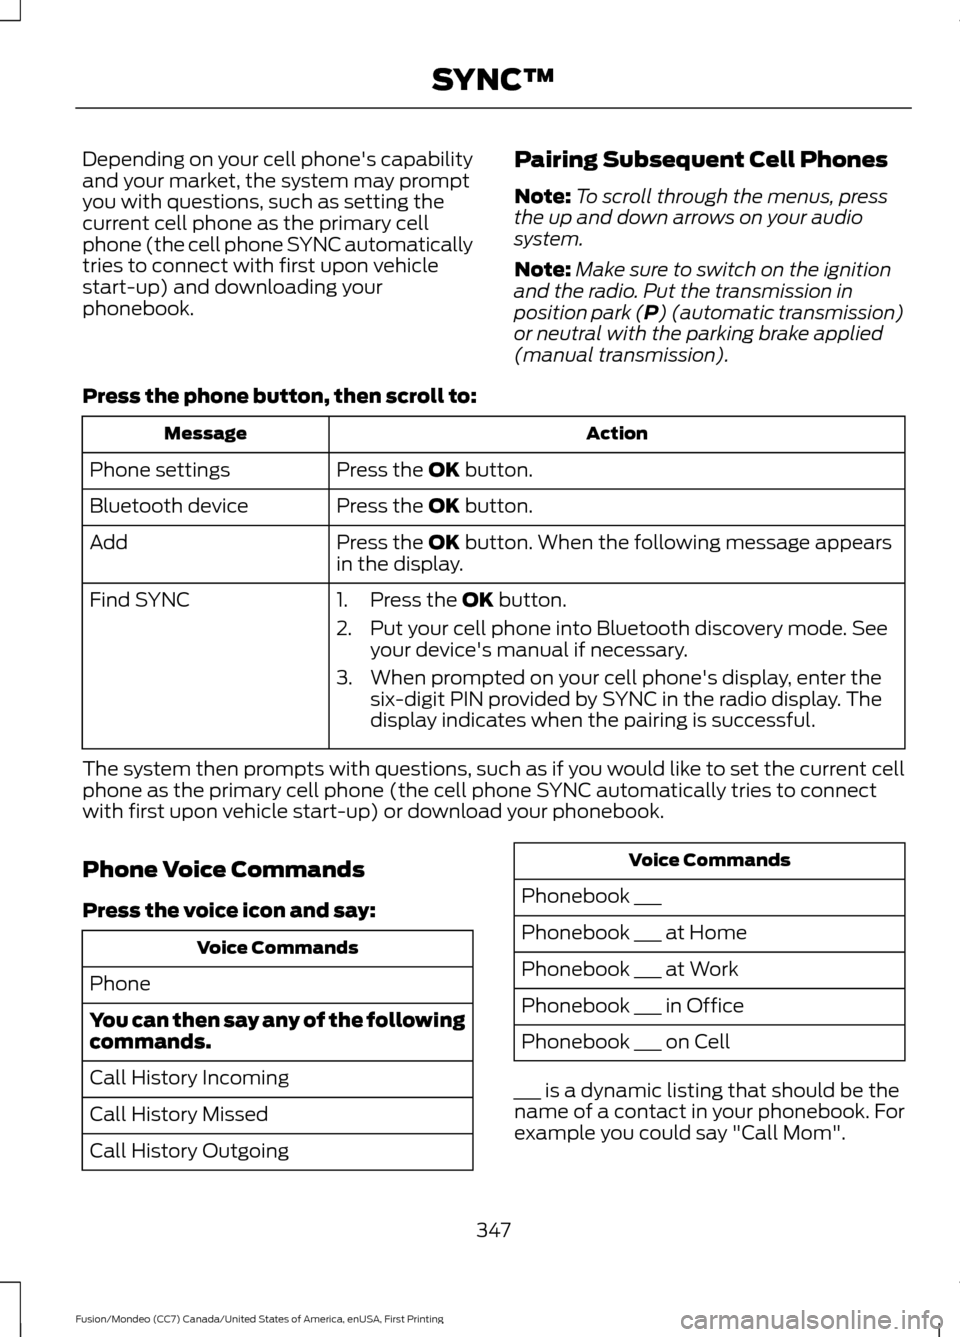
Pairing Subsequent Cell Phones
Note:
To scroll through the menus, press
the up and down arrows on your audio
system.
Note: Make sure to switch on the ignition
and the radio. Put the transmission in
position park (P) (automatic transmission)
or neutral with the parking brake applied
(manual transmission).
Press the phone button, then scroll to: Action
Message
Press the
OK button.
Phone settings
Press the
OK button.
Bluetooth device
Press the
OK button. When the following message appears
in the display.
Add
Find SYNC
1. Press the
OK button.
2. Put your cell phone into Bluetooth discovery mode. See your device's manual if necessary.
3. When prompted on your cell phone's display, enter the six-digit PIN provided by SYNC in the radio display. The
display indicates when the pairing is successful.
The system then prompts with questions, such as if you would like to set the current cell
phone as the primary cell phone (the cell phone SYNC automatically tries to connect
with first upon vehicle start-up) or download your phonebook.
Phone Voice Commands
Press the voice icon and say: Voice Commands
Phone
You can then say any of the following
commands.
Call History Incoming
Call History Missed
Call History Outgoing Voice Commands
Phonebook ___
Phonebook ___ at Home
Phonebook ___ at Work
Phonebook ___ in Office
Phonebook ___ on Cell
___ is a dynamic listing that should be the
name of a contact in your phonebook. For
example you could say "Call Mom".
347
Fusion/Mondeo (CC7) Canada/United States of America, enUSA, First Printing SYNC™
Page 508 of 518

A
A/C
See: Climate Control......................................... 120
About This Manual...........................................7
ABS See: Brakes............................................................ 172
ABS driving hints See: Hints on Driving With Anti-Lock
Brakes................................................................. 172
Accessories...................................................460 Exterior style....................................................... 460
Interior style........................................................ 460
Lifestyle................................................................ 460
Peace of mind.................................................... 460
Accessories See: Replacement Parts
Recommendation............................................. 11
ACC See: Using Adaptive Cruise Control............189
Active Park Assist..........................................181 Automatic Steering into Parking
Space................................................................. 182
Deactivating the Park Assist Feature..........183
Troubleshooting the System.......................... 183
Using Active Park Assist.................................... 181
Adjusting the Headlamps........................258 Horizontal Aim Adjustment........................... 259
Vertical Aim Adjustment................................ 258
Adjusting the Steering Wheel.....................71
Airbag Disposal
..............................................46
Air Conditioning See: Climate Control......................................... 120
Alarm See: Anti-Theft Alarm........................................ 70
All-Wheel Drive
..............................................167
Ambient Lighting............................................83
Anti-Theft Alarm............................................70 Arming the Alarm................................................. 70
Disarming the Alarm........................................... 70
Appendices...................................................480
Audible Warnings and Indicators.............95 Headlamps On Warning Chime...................... 95
Key in Ignition Warning Chime........................ 95
Keyless Warning Alert........................................ 95
Parking Brake On Warning Chime.................95 Audio Control....................................................71
MEDIA........................................................................\
71
Seek, Next or Previous......................................... 71
Audio System.................................................327 General Information.......................................... 327
Audio Unit - Vehicles With: AM/FM/CD/ SYNC/Satellite Radio.............................329
Audio Unit - Vehicles With: AM/FM/CD/ SYNC.............................................................328
Audio Unit - Vehicles With: Sony AM/ FM/CD
...........................................................332
Menu Structure................................................... 333
Autolamps........................................................78 Windshield Wiper Activated
Headlamps........................................................ 78
Automatic Climate Control - Vehicles With: Sony Audio System/Sony Audio
System...........................................................123
Automatic Climate Control - Vehicles Without: Sony Audio System
................122
Automatic High Beam Control.................80 Activating the System......................................... 81
Manually Overriding the System..................... 81
Automatic Transmission............................163 Automatic Transmission Adaptive
Learning............................................................ 166
Brake-Shift Interlock......................................... 164
If Your Vehicle Gets Stuck In Mud or Snow.................................................................. 166
SelectShift Automatic ™
Transmission................................................... 163
Understanding the Positions of Your Automatic Transmission............................. 163
Automatic Transmission Fluid Check.............................................................255
Auto-Start-Stop
............................................152
Disabling Auto StartStop................................. 153
Enabling Auto StartStop.................................. 152
Autowipers........................................................74
Auxiliary Power Points................................143 110 Volt AC Power Point................................... 143
12 Volt DC Power Point..................................... 143
Locations............................................................... 143
AWD See: All-Wheel Drive.......................................... 167
505
Fusion/Mondeo (CC7) Canada/United States of America, enUSA, First Printing Index