2016 FORD F450 SUPER DUTY transmission
[x] Cancel search: transmissionPage 214 of 507
•If you are driving more than 15 mi(24 km) at temperatures abovefreezing, angle the plow blade eitherfull left or full right to providemaximum airflow to the radiator.
•If you are driving less than 15 mi(24 km) at speeds up to 45 mph(72 km/h) in cold weather, you will notneed to worry about blade position toprovide maximum airflow.
Transmission operation whileplowing
WARNING
Do not spin the wheels at over34 mph (55 km/h). The tires may failand injure a passenger or bystander.
•Shift transfer case to 4L (4WD Low)when plowing in small areas at speedsbelow 5 mph (8 km/h).
•Shift transfer case to 4H (4WD High)when plowing larger areas or light snowat higher speeds. Do not exceed 15 mph(24 km/h).
•Do not shift the transmission from aforward gear to R (Reverse) until theengine is at idle and the wheels havestopped.
211
Super Duty (TFA) Canada/United States of America, enUSA, First Printing
Driving Hints
Page 217 of 507
In the event of a moderate to severecollision, this vehicle is equipped with afuel pump shut-off feature that stops theflow of fuel to the engine. Not every impactwill cause a shut-off.
Should your vehicle shut off after acollision, you may restart your vehicle bydoing the following:
1. Turn the ignition off.
2. Turn the ignition to crank.
3. Turn the ignition off.
4.Turn the ignition on again to re-enablethe fuel pump.
JUMP STARTING THE VEHICLE
WARNINGS
Batteries normally produce explosivegases which can cause personalinjury. Therefore, do not allowflames, sparks or lighted substances tocome near the battery. When working nearthe battery, always shield your face andprotect your eyes. Always provide correctventilation.
Keep batteries out of reach ofchildren. Batteries contain sulfuricacid. Avoid contact with skin, eyes orclothing. Shield your eyes when workingnear the battery to protect against possiblesplashing of acid solution. In case of acidcontact with skin or eyes, flushimmediately with water for a minimum of15 minutes and get prompt medicalattention. If acid is swallowed, call aphysician immediately.
Use only adequately sized cableswith insulated clamps.
Preparing Your Vehicle
Do not attempt to push-start yourautomatic transmission vehicle.
Note:Attempting to push-start a vehiclewith an automatic transmission may causetransmission damage.
Note:Use only a 12-volt supply to start yourvehicle.
Note:Do not disconnect the battery of thedisabled vehicle as this could damage thevehicle electrical system.
Park the booster vehicle close to the hoodof the disabled vehicle, making sure thetwo vehicles do not touch.
Connecting the Jumper Cables
WARNINGS
Do not attach the cables to fuel lines,engine rocker covers, the intakemanifold or electrical componentsas grounding points. Stay clear of movingparts. To avoid reverse polarityconnections, make sure that you correctlyidentify the positive (+) and negative (-)terminals on both the disabled and boostervehicles before connecting the cables.
Do not attach the end of the positivecable to the studs or L-shaped eyeletlocated above the positive (+)terminal of your vehicle’s battery. Highcurrent may flow through and causedamage to the fuses.
Do not connect the end of thesecond cable to the negative (-)terminal of the battery to be jumped.A spark may cause an explosion of thegases that surround the battery.
Note:In the illustration, the bottom vehiclerepresents the booster vehicle.
214
Super Duty (TFA) Canada/United States of America, enUSA, First Printing
Roadside Emergencies
Page 228 of 507
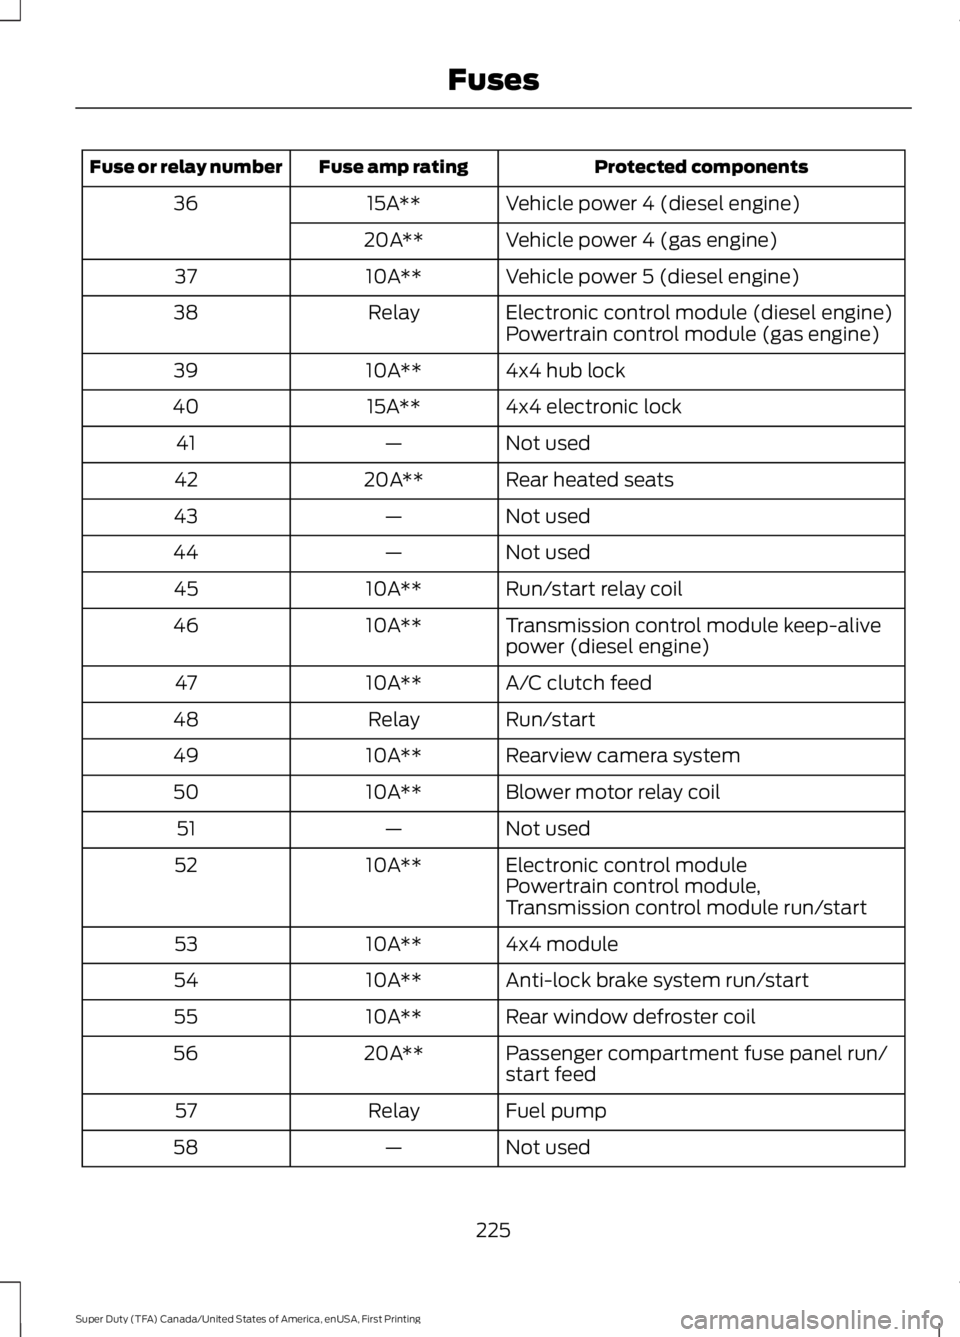
Protected componentsFuse amp ratingFuse or relay number
Vehicle power 4 (diesel engine)15A**36
Vehicle power 4 (gas engine)20A**
Vehicle power 5 (diesel engine)10A**37
Electronic control module (diesel engine)Relay38Powertrain control module (gas engine)
4x4 hub lock10A**39
4x4 electronic lock15A**40
Not used—41
Rear heated seats20A**42
Not used—43
Not used—44
Run/start relay coil10A**45
Transmission control module keep-alivepower (diesel engine)10A**46
A/C clutch feed10A**47
Run/startRelay48
Rearview camera system10A**49
Blower motor relay coil10A**50
Not used—51
Electronic control module10A**52Powertrain control module,Transmission control module run/start
4x4 module10A**53
Anti-lock brake system run/start10A**54
Rear window defroster coil10A**55
Passenger compartment fuse panel run/start feed20A**56
Fuel pumpRelay57
Not used—58
225
Super Duty (TFA) Canada/United States of America, enUSA, First Printing
Fuses
Page 236 of 507
2. Go to the front of the vehicle andlocate the secondary release lever,which is located under the front of thehood, to your right of the center of thevehicle (driver's side), toward theheadlight.
3. Release the hood latch by pushing thesecondary release lever to your left,toward the center of the vehicle.
4. Raise the hood.
5.To close the hood, lower the hood andallow it to drop the last 8 to 11 inches(20 to 30 centimeters).
Note:Make sure that the hood is closedproperly.
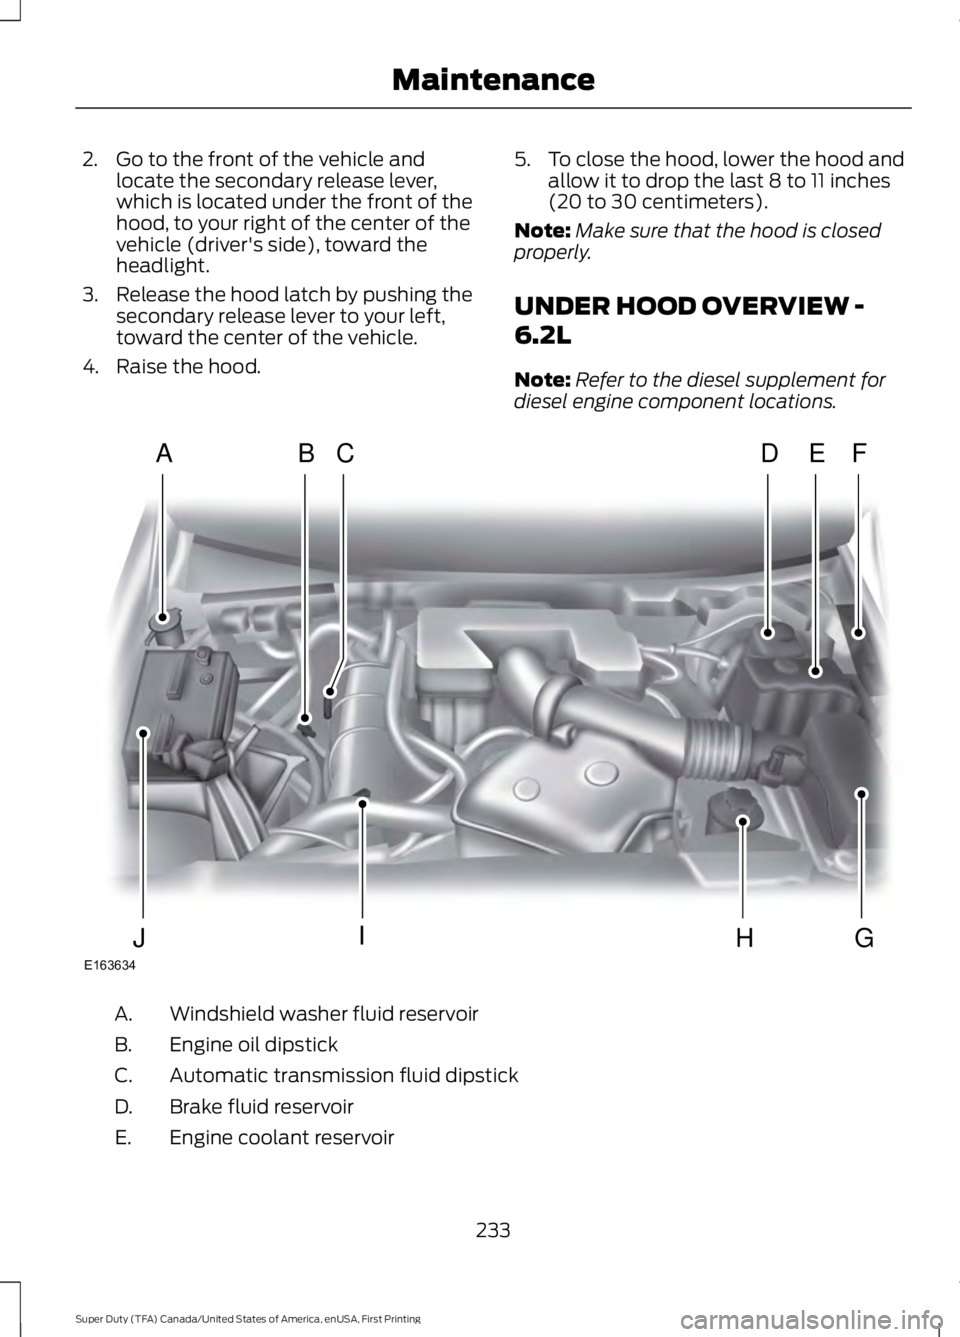
UNDER HOOD OVERVIEW -
6.2L
Note:Refer to the diesel supplement fordiesel engine component locations.
Windshield washer fluid reservoirA.
Engine oil dipstickB.
Automatic transmission fluid dipstickC.
Brake fluid reservoirD.
Engine coolant reservoirE.
233
Super Duty (TFA) Canada/United States of America, enUSA, First Printing
MaintenanceE163634
ADFEBC
GHIJ
Page 237 of 507
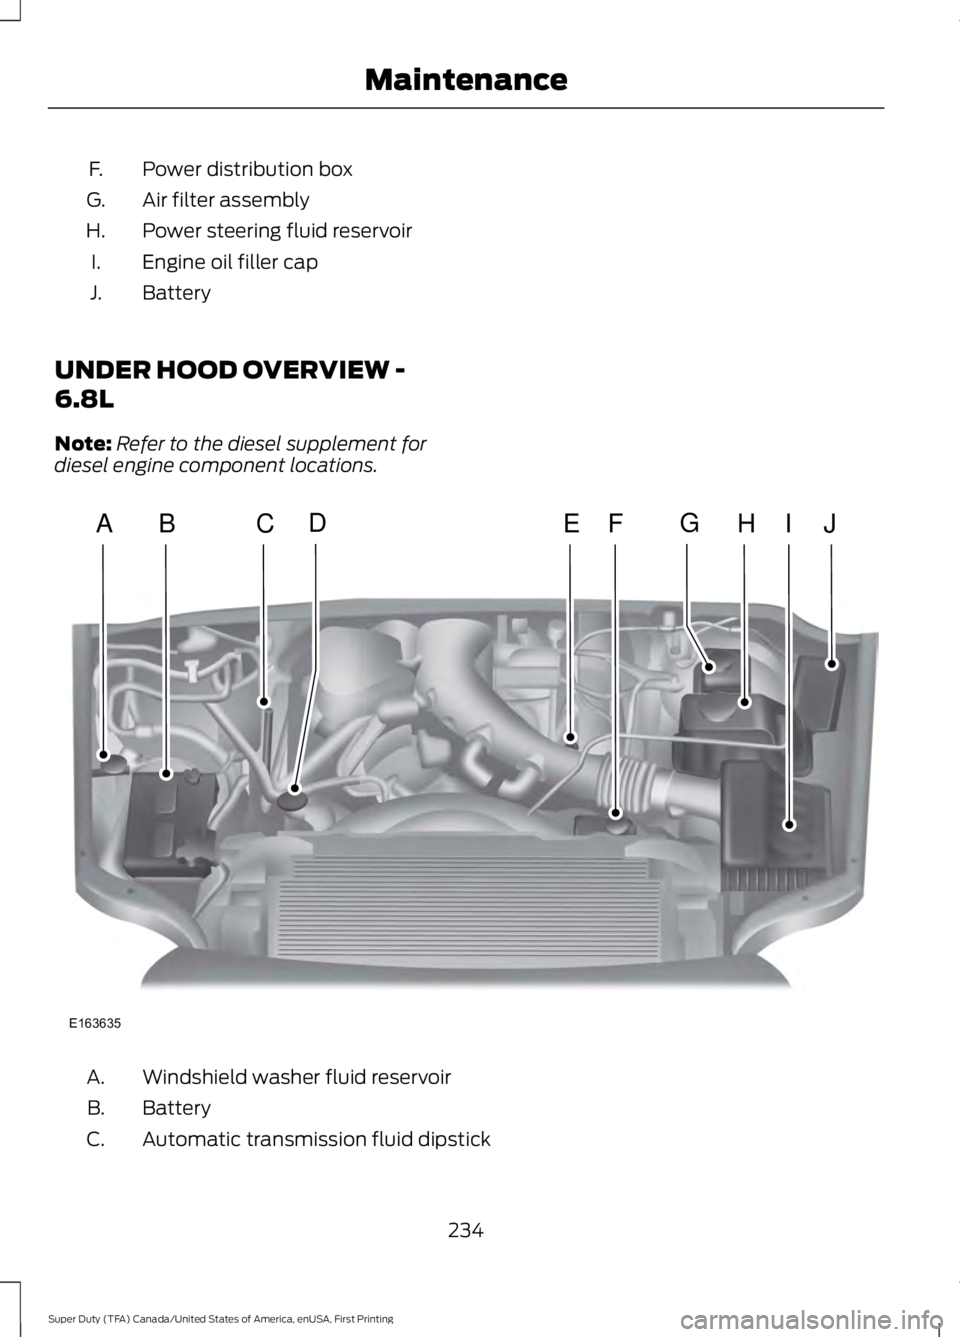
Power distribution boxF.
Air filter assemblyG.
Power steering fluid reservoirH.
Engine oil filler capI.
BatteryJ.
UNDER HOOD OVERVIEW -
6.8L
Note:Refer to the diesel supplement fordiesel engine component locations.
Windshield washer fluid reservoirA.
BatteryB.
Automatic transmission fluid dipstickC.
234
Super Duty (TFA) Canada/United States of America, enUSA, First Printing
MaintenanceE163635
ABCEHIJFDG
Page 243 of 507
Engine Fluid TemperatureManagement (If Equipped)
WARNINGS
To reduce the risk of collision andinjury, be prepared that the vehiclespeed may reduce and the vehiclemay not be able to accelerate with fullpower until the fluid temperatures reduce.
Never remove the coolant reservoircap while the engine is running or hot.
Your vehicle has been designed to pull atrailer, but because of the added load, thevehicle’s engine may temporarily reachhigher temperatures during severeoperating conditions such as ascending along or steep grade while pulling a trailerin hot ambient temperatures.
At this time, you may notice your enginecoolant temperature gauge needle movetoward the H and the POWER REDUCEDTO LOWER TEMP message may appearin the information display.
You may notice a reduction in the vehicle’sspeed caused by reduced engine power.In order to manage the engine fluidtemperatures, your vehicle may enter thismode if certain high-temperature andhigh-load conditions take place. Theamount of speed reduction will depend onthe vehicle loading, towing, grade, ambienttemperature, and other factors. If thisoccurs, there is no need to pull off the road.The vehicle can continue to be driven whilethis message is active.
The air conditioning may turn on and offduring severe operating conditions toprotect the engine from overheating. Whenthe engine coolant temperature decreasesto a more normal operating temperature,the air conditioning will turn on once again.
If the engine coolant temperature gaugemoves fully into the red (hot) area, or if thecoolant temperature warning or serviceengine soon messages appear in yourinformation display:
1. Stop your vehicle as soon as safelypossible and shift the transmission intopark (P).
2. Leave the engine running until thecoolant temperature gauge needlemoves away from the H range. Afterseveral minutes, if this does nothappen, follow the remaining steps.
3.Switch the engine off and wait for it tocool before checking the coolant level.
4. If the coolant level is normal, you mayrestart your engine and continue on.
5. If the coolant is low, add coolant,restart the engine and take your vehicleto an authorized dealer. See Addingengine coolant in this chapter for moreinformation. Refer to fail-safe coolingfor additional information.
AUTOMATIC TRANSMISSION
FLUID CHECK
Have an authorized dealer check andchange the transmission fluid and filter atthe correct service interval. SeeScheduled Maintenance (page 453).
Do not use supplemental transmissionfluid additives, treatments or cleaningagents. The use of these materials mayaffect transmission operation and resultin damage to internal transmissioncomponents.
240
Super Duty (TFA) Canada/United States of America, enUSA, First Printing
Maintenance
Page 244 of 507
Checking Automatic TransmissionFluid
For scheduled intervals of the fluid checksand changes, See ScheduledMaintenance (page 453). Yourtransmission does not consume fluid.However, the fluid level should be checkedif the transmission is not working properly,i.e., if the transmission slips or shifts slowlyor if you notice some sign of fluid leakage.
Automatic transmission fluid expandswhen warmed. To obtain an accurate fluidcheck, drive the vehicle until it is at normaloperating temperature (approximately19 mi (30 km)). Verify that thetransmission fluid temperature gauge,located on the instrument cluster, is withinnormal range.
1. Drive the vehicle 19 (30 km)until itreaches normal operating temperature.
2.Park the vehicle on a level surface andengage the parking brake.
3.With the engine running, parking brakeengaged and your foot on the brakepedal, move the gearshift lever throughall of the gear ranges. Allow sufficienttime for each gear to engage.
4.Latch the gearshift lever in P and leavethe engine running.
5. Remove the dipstick, wiping it cleanwith a clean, dry lint free rag. Ifnecessary, refer to the Under HoodOverview in this chapter for thelocation of the dipstick.
6.Install the dipstick making sure it is fullyseated in the filler tube.
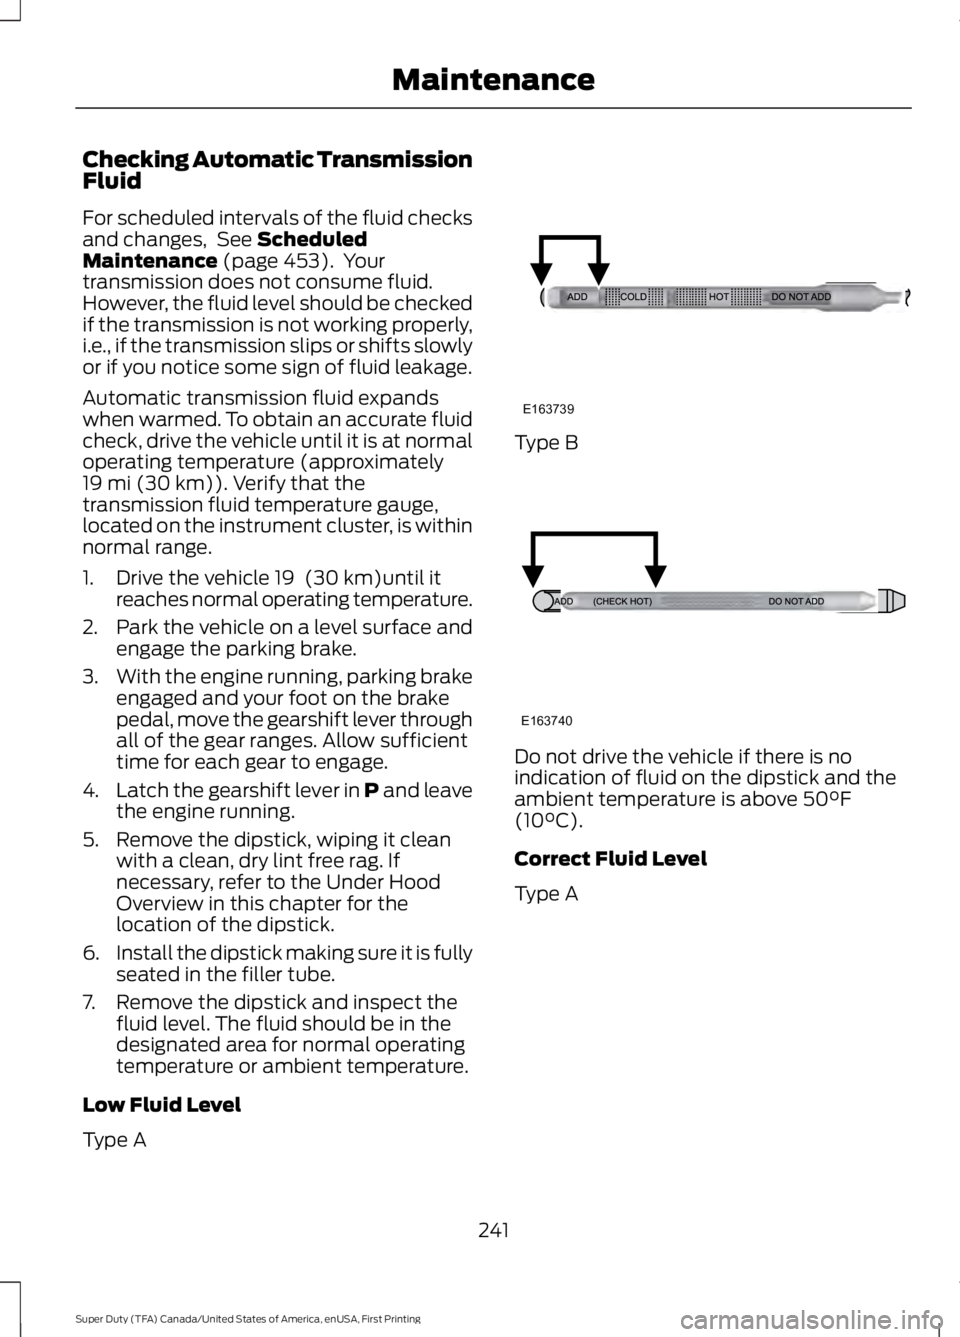
7. Remove the dipstick and inspect thefluid level. The fluid should be in thedesignated area for normal operatingtemperature or ambient temperature.
Low Fluid Level
Type A
Type B
Do not drive the vehicle if there is noindication of fluid on the dipstick and theambient temperature is above 50°F(10°C).
Correct Fluid Level
Type A
241
Super Duty (TFA) Canada/United States of America, enUSA, First Printing
MaintenanceE163739 E163740
Page 245 of 507
Type B
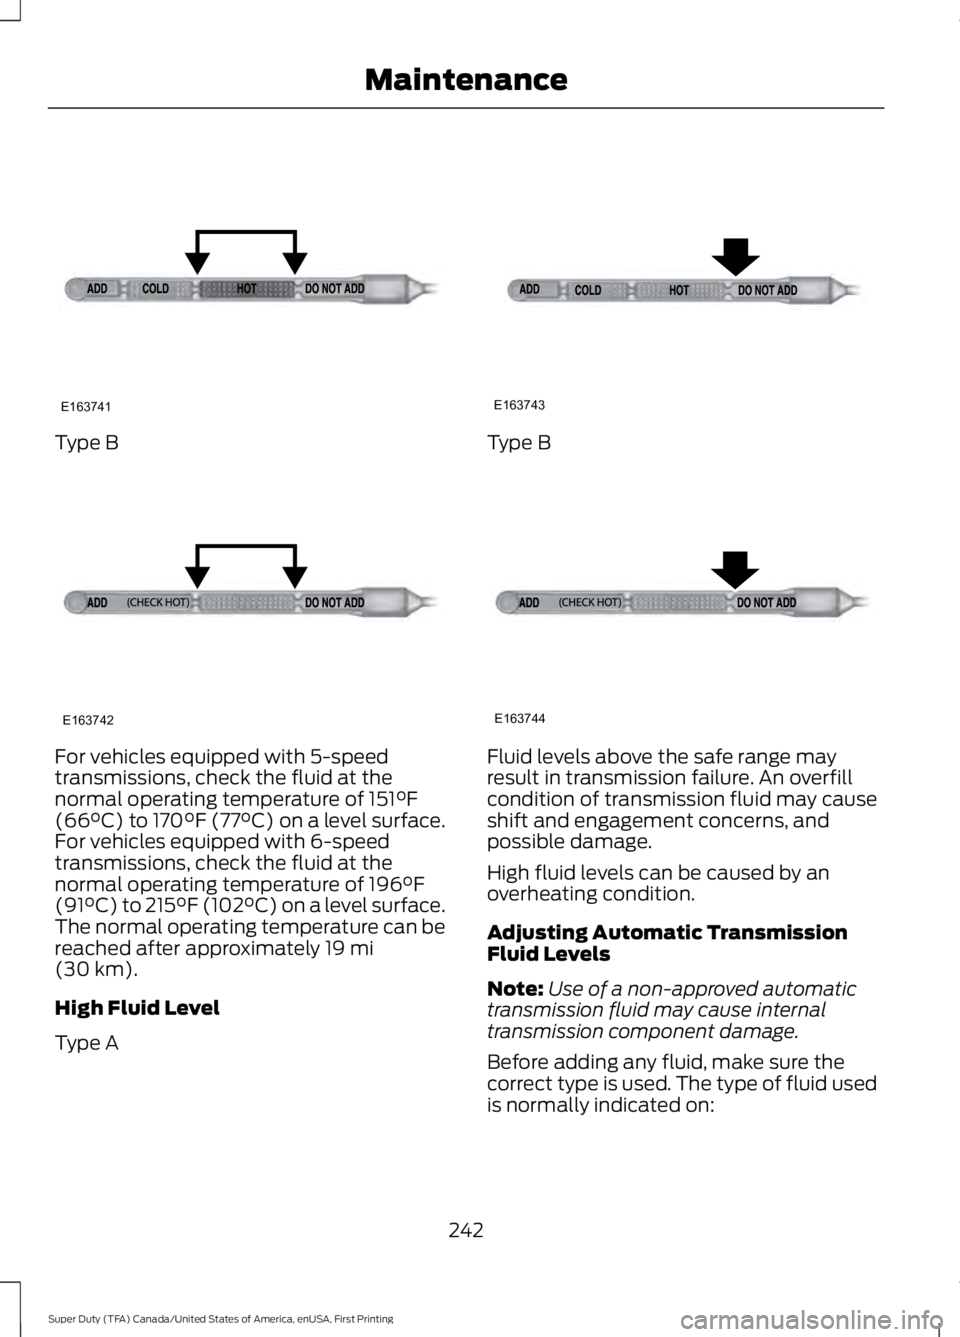
For vehicles equipped with 5-speedtransmissions, check the fluid at thenormal operating temperature of 151°F(66°C) to 170°F (77°C) on a level surface.For vehicles equipped with 6-speedtransmissions, check the fluid at thenormal operating temperature of 196°F(91°C) to 215°F (102°C) on a level surface.The normal operating temperature can bereached after approximately 19 mi(30 km).
High Fluid Level
Type A
Type B
Fluid levels above the safe range mayresult in transmission failure. An overfillcondition of transmission fluid may causeshift and engagement concerns, andpossible damage.
High fluid levels can be caused by anoverheating condition.
Adjusting Automatic TransmissionFluid Levels
Note:Use of a non-approved automatictransmission fluid may cause internaltransmission component damage.
Before adding any fluid, make sure thecorrect type is used. The type of fluid usedis normally indicated on:
242
Super Duty (TFA) Canada/United States of America, enUSA, First Printing
MaintenanceE163741 E163742 E163743 E163744