2016 FORD F450 SUPER DUTY mirror
[x] Cancel search: mirrorPage 113 of 507
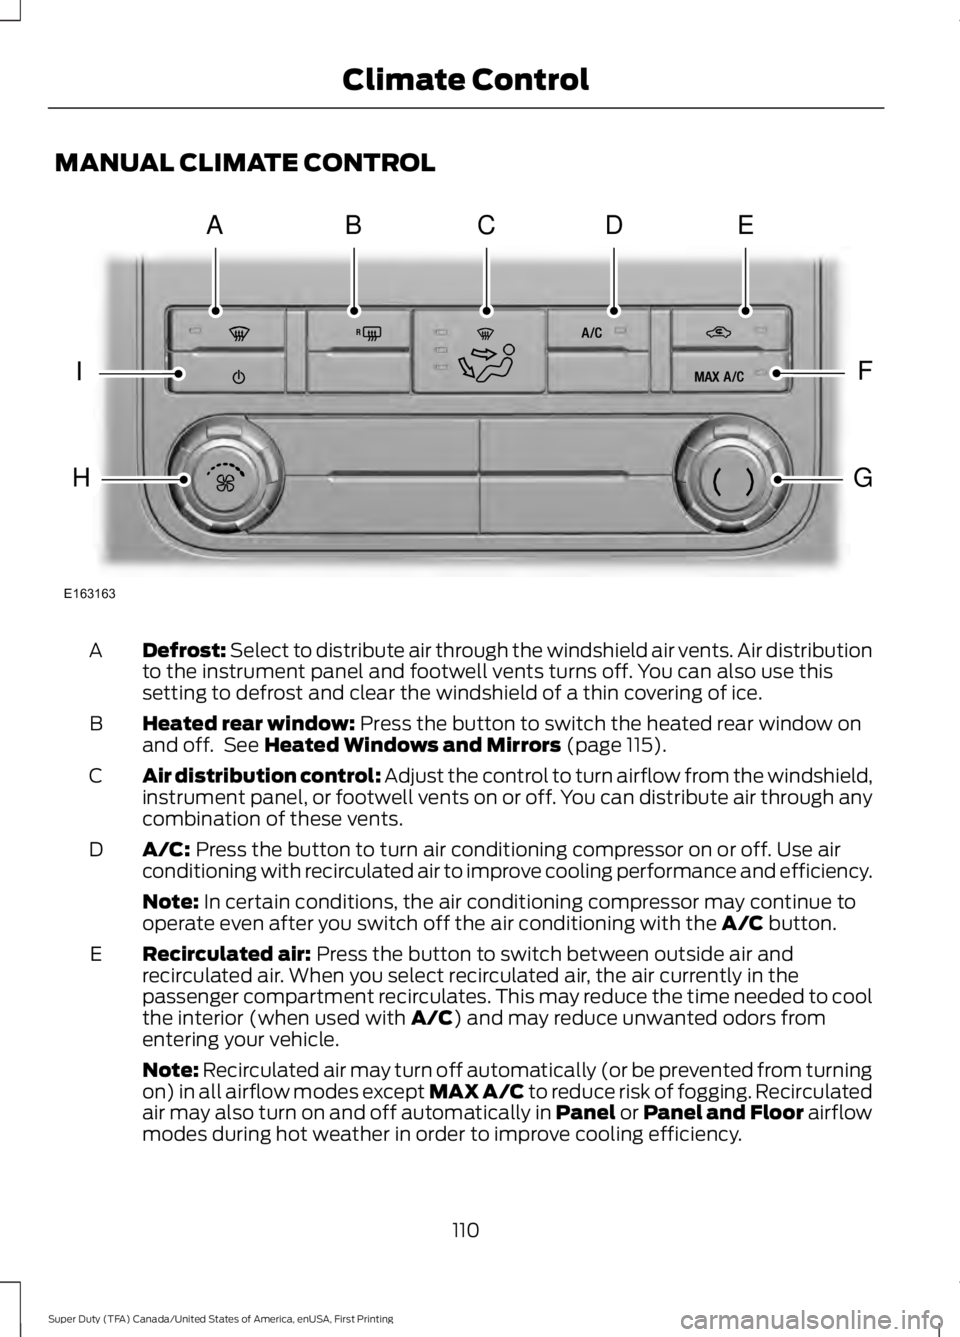
MANUAL CLIMATE CONTROL
Defrost: Select to distribute air through the windshield air vents. Air distributionto the instrument panel and footwell vents turns off. You can also use thissetting to defrost and clear the windshield of a thin covering of ice.
A
Heated rear window: Press the button to switch the heated rear window onand off. See Heated Windows and Mirrors (page 115).B
Air distribution control: Adjust the control to turn airflow from the windshield,instrument panel, or footwell vents on or off. You can distribute air through anycombination of these vents.
C
A/C: Press the button to turn air conditioning compressor on or off. Use airconditioning with recirculated air to improve cooling performance and efficiency.D
Note: In certain conditions, the air conditioning compressor may continue tooperate even after you switch off the air conditioning with the A/C button.
Recirculated air: Press the button to switch between outside air andrecirculated air. When you select recirculated air, the air currently in thepassenger compartment recirculates. This may reduce the time needed to coolthe interior (when used with A/C) and may reduce unwanted odors fromentering your vehicle.
E
Note: Recirculated air may turn off automatically (or be prevented from turningon) in all airflow modes except MAX A/C to reduce risk of fogging. Recirculatedair may also turn on and off automatically in Panel or Panel and Floor airflowmodes during hot weather in order to improve cooling efficiency.
110
Super Duty (TFA) Canada/United States of America, enUSA, First Printing
Climate ControlE163163
ABDCE
F
G
I
H
Page 114 of 507
MAX A/C: Press the button to maximize cooling. Recirculated air flows throughthe instrument panel vents, air conditioning automatically turns on, and the fanautomatically adjusts to the highest speed.
F
Note: Recirculated air may turn off automatically (or be prevented from turningon) in all airflow modes except MAX A/C to reduce risk of fogging.
Temperature control: Controls the temperature of the air circulated in yourvehicle.G
Fan speed control: Adjusts the volume of air circulated in the vehicle.H
Power: Press the button to switch the system on and off. When the system isoff, it prevents outside air from entering the vehicle.I
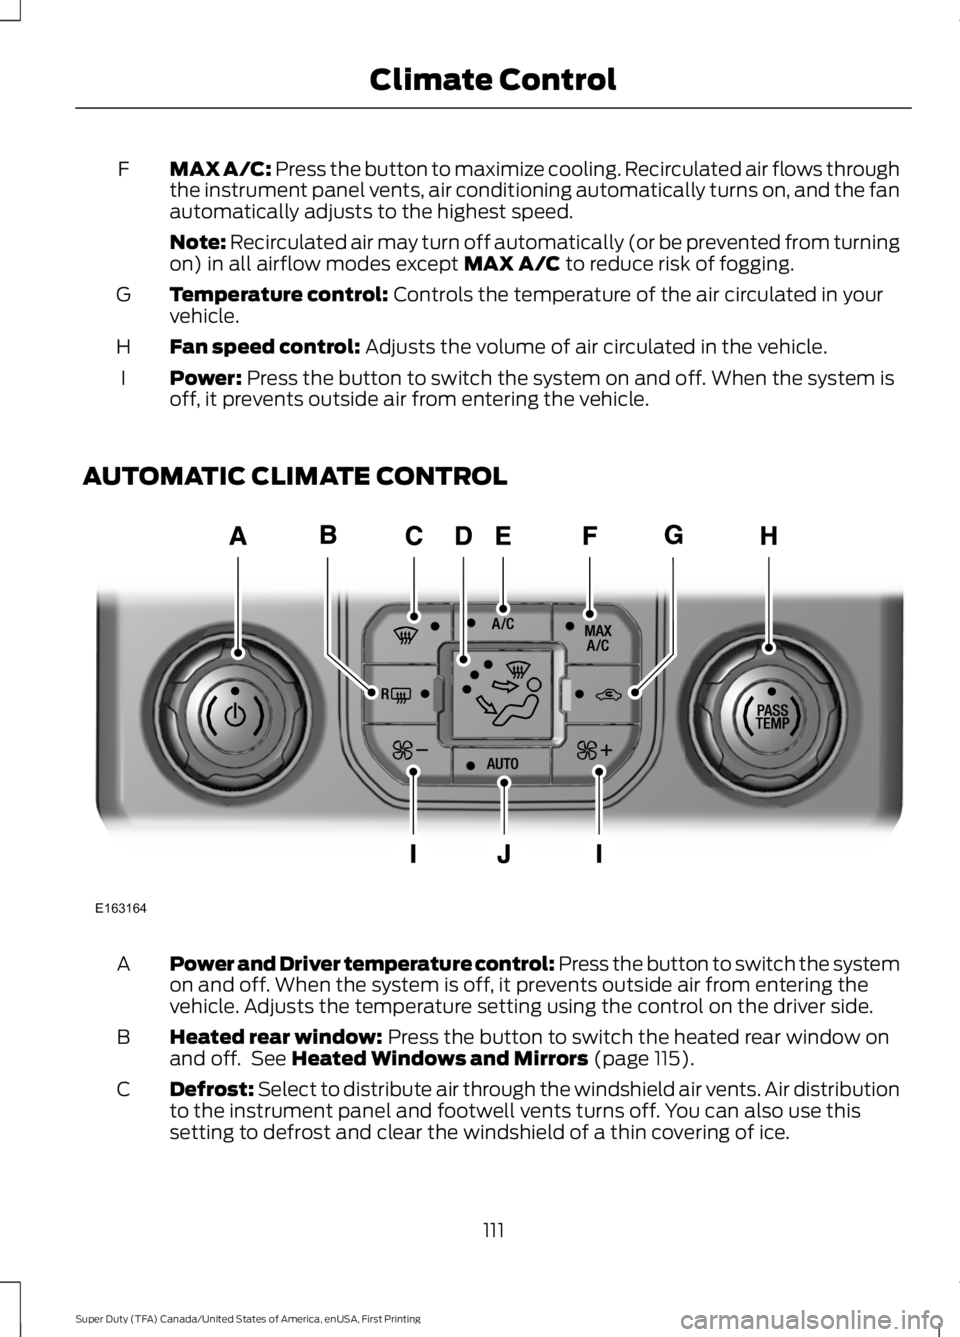
AUTOMATIC CLIMATE CONTROL
Power and Driver temperature control: Press the button to switch the systemon and off. When the system is off, it prevents outside air from entering thevehicle. Adjusts the temperature setting using the control on the driver side.
A
Heated rear window: Press the button to switch the heated rear window onand off. See Heated Windows and Mirrors (page 115).B
Defrost: Select to distribute air through the windshield air vents. Air distributionto the instrument panel and footwell vents turns off. You can also use thissetting to defrost and clear the windshield of a thin covering of ice.
C
111
Super Duty (TFA) Canada/United States of America, enUSA, First Printing
Climate ControlE163164
Page 118 of 507
Side Window Defogging in Cold Weather
Vehicle With Automatic Climate ControlVehicle With Manual Climate Control
Press the defrost button.Select the instrument panel and footwellair vents positions through the air distri-bution control.
1
Adjust the temperature control to thedesired setting. Use 72°F (22°C) as astarting point, then adjust the setting asnecessary.
Press the A/C button.2
Direct the instrument panel side air ventstoward the side windows.Adjust the temperature control to thedesired setting.3
Close the instrument panel center vents.Adjust the fan speed to the highestsetting.4
Direct the instrument panel side air ventstoward the side windows.5
Close the instrument panel center vents.6
HEATED WINDOWS AND
MIRRORS
Heated Rear Window (If Equipped)
Note:Make sure the engine is runningbefore operating the heated windows.
Note:If your vehicle is equipped with asliding rear window, the feature stilloperates when you open the window.
Press the button to clear theheated rear window of thin iceand fog. The heated rear windowwill automatically turn off after a shortperiod of time. Start the engine before youswitch the heated rear window on.
Do not use razor blades or other sharpobjects to clean or remove decals fromthe inside of the heated rear window.The vehicle warranty does not coverdamage caused to the heated rearwindow grid lines.
Heated Exterior Mirror
When you switch the heated rear windowon, the heated exterior mirrors willautomatically turn on.
Note:Do not remove ice from the mirrorswith a scraper or adjust the mirror glasswhen it is frozen in place.
Note:Do not clean the mirror housing orglass with harsh abrasives, fuel or otherpetroleum-based cleaning products.
115
Super Duty (TFA) Canada/United States of America, enUSA, First Printing
Climate ControlE184884
Page 119 of 507
REMOTE START (If Equipped)
The remote start feature allows you topre-condition the interior of your vehicle.The climate control system works toachieve comfort according to your previoussettings.
Note:You cannot adjust the system duringremote start operation.
Turn the ignition on to return the systemto its previous settings. You can now makeadjustments normally, but you need to turncertain vehicle-dependent features backon, such as:
•Heated seats.
•Cooled seats.
•Heated steering wheel.
•Heated mirrors.
•Heated rear window.
You can adjust the default remote startsettings using the information displaycontrols. See Information Displays(page 89).
Automatic Settings
In hot weather, the system is set to 72°F(22°C). The cooled seats are set to high(if available, and selected to AUTO in theinformation display).
In moderate weather, the system eitherheats or cools (based on previoussettings). The rear defroster, heatedmirrors and heated seats do notautomatically turn on.
In cold weather, the system is set to 72°F(22°C). The heated seats are set to high(if available, and selected to AUTO in theinformation display). The rear defrosterand heated mirrors automatically turn on.
116
Super Duty (TFA) Canada/United States of America, enUSA, First Printing
Climate Control
Page 124 of 507
WARNINGS
Do not use the memory functionwhen your vehicle is moving.
This feature automatically recalls theposition of the following:
•Driver seat.
•Power mirrors.
•Optional adjustable pedals.
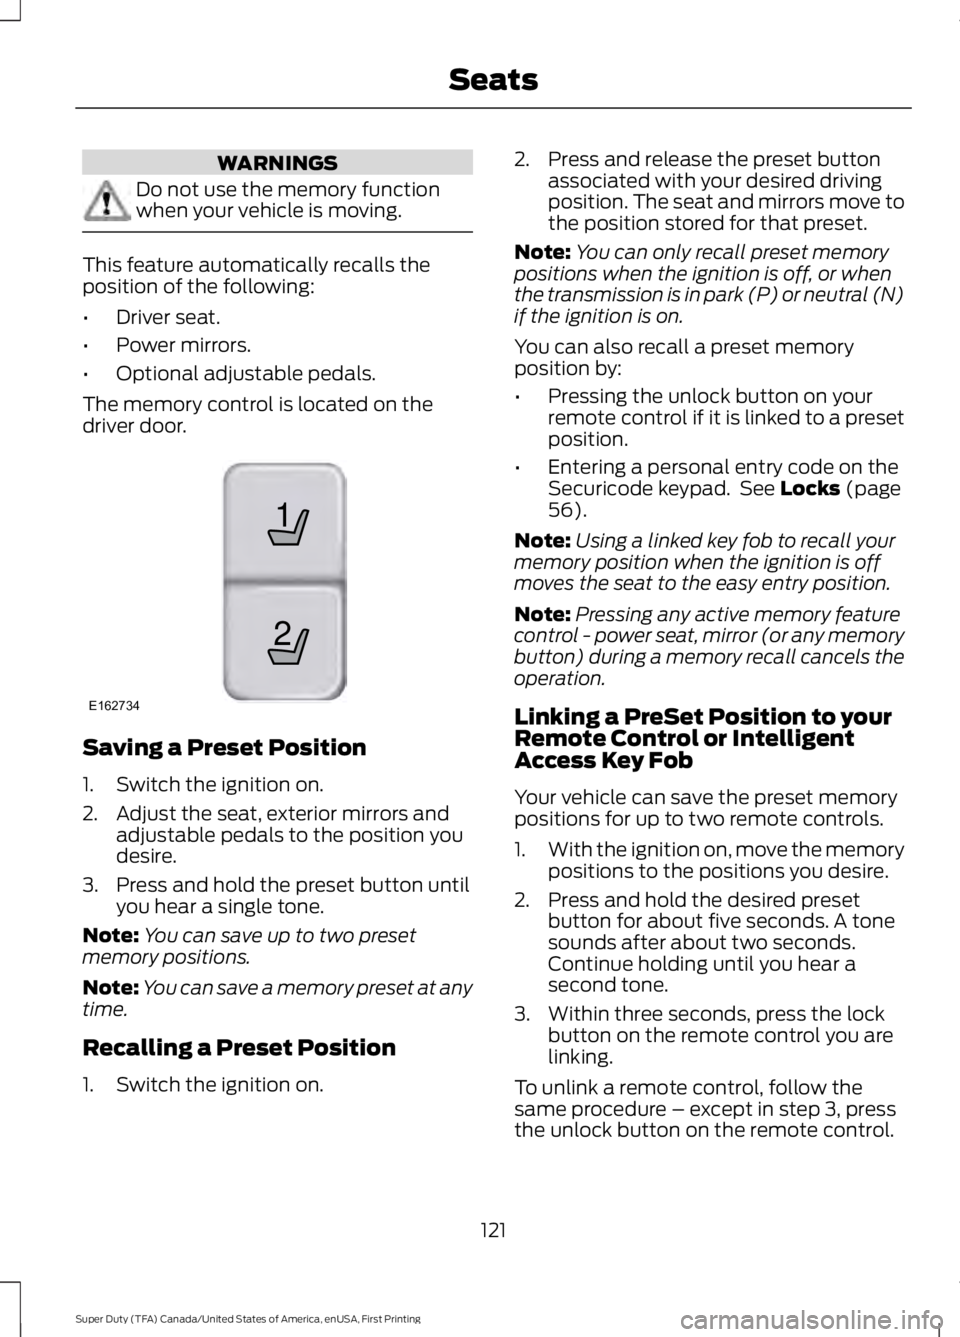
The memory control is located on thedriver door.
Saving a Preset Position
1. Switch the ignition on.
2. Adjust the seat, exterior mirrors andadjustable pedals to the position youdesire.
3. Press and hold the preset button untilyou hear a single tone.
Note:You can save up to two presetmemory positions.
Note:You can save a memory preset at anytime.
Recalling a Preset Position
1. Switch the ignition on.
2. Press and release the preset buttonassociated with your desired drivingposition. The seat and mirrors move tothe position stored for that preset.
Note:You can only recall preset memorypositions when the ignition is off, or whenthe transmission is in park (P) or neutral (N)if the ignition is on.
You can also recall a preset memoryposition by:
•Pressing the unlock button on yourremote control if it is linked to a presetposition.
•Entering a personal entry code on theSecuricode keypad. See Locks (page56).
Note:Using a linked key fob to recall yourmemory position when the ignition is offmoves the seat to the easy entry position.
Note:Pressing any active memory featurecontrol - power seat, mirror (or any memorybutton) during a memory recall cancels theoperation.
Linking a PreSet Position to yourRemote Control or IntelligentAccess Key Fob
Your vehicle can save the preset memorypositions for up to two remote controls.
1.With the ignition on, move the memorypositions to the positions you desire.
2. Press and hold the desired presetbutton for about five seconds. A tonesounds after about two seconds.Continue holding until you hear asecond tone.
3. Within three seconds, press the lockbutton on the remote control you arelinking.
To unlink a remote control, follow thesame procedure – except in step 3, pressthe unlock button on the remote control.
121
Super Duty (TFA) Canada/United States of America, enUSA, First Printing
Seats21
E162734
Page 183 of 507
The system detects certain objects whilethe transmission is in reverse (R):
•Your vehicle is moving toward astationary object at a speed of 3 mph(5 km/h) or less.
•Your vehicle is not moving, but amoving object is approaching the rearof your vehicle at a speed of 3 mph(5 km/h) or less.
•Your vehicle is moving at a speed ofless than 3 mph (5 km/h) and a movingobject is approaching the rear of yourvehicle at a speed of less than 3 mph(5 km/h).
REAR VIEW CAMERA (If Equipped)
WARNINGS
The rear view camera system is areverse aid supplement device thatstill requires the driver to use it inconjunction with the interior and exteriormirrors for maximum coverage.
Objects that are close to eithercorner of the bumper or under thebumper, might not be seen on thescreen due to the limited coverage of thecamera system.
Back up as slow as possible sincehigher speeds might limit yourreaction time to stop the vehicle.
Use caution when using the rearvideo camera and the tailgate is ajar.If the tailgate is ajar, the camera willbe out of position and the video image maybe incorrect. All guidelines will be removedwhen the tailgate is ajar.
Use caution when turning camerafeatures on or off while in reverse(R). Make sure your vehicle is notmoving.
WARNINGS
When manual zoom is enabled(Level 1, Level 2 or Level 3), the fullarea behind your vehicle will not beshown. Be aware of your surroundingswhen using the manual zoom feature.
The rear view camera system provides avideo image of the area behind yourvehicle.
During operation, lines appear in thedisplay which represent your vehicle’s pathand proximity to objects behind yourvehicle.
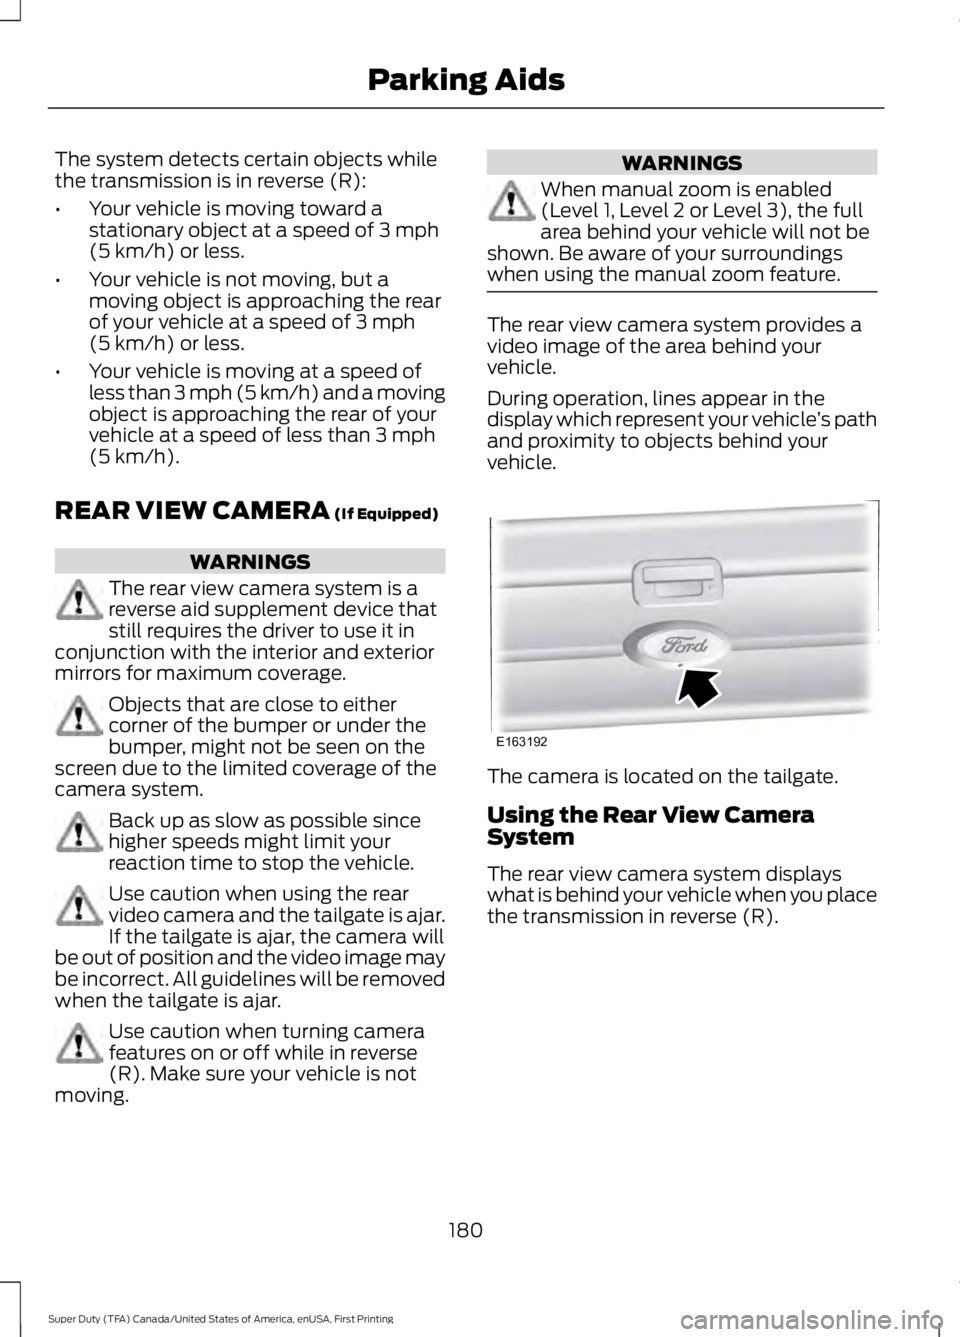
The camera is located on the tailgate.
Using the Rear View CameraSystem
The rear view camera system displayswhat is behind your vehicle when you placethe transmission in reverse (R).
180
Super Duty (TFA) Canada/United States of America, enUSA, First Printing
Parking AidsE163192
Page 185 of 507
Fixed guidelines are always shown in thedisplay, but the active guidelines onlydisplay when the steering wheel is turned.To use active guidelines, turn the steeringwheel to point the guidelines toward anintended path. If the steering wheelposition is changed while reversing, thevehicle might deviate from the originalintended path.
The active guidelines fade in and outdepending on the steering wheel position.The active guidelines are not shown whenthe steering wheel position is straight.
Always use caution while reversing.Objects in the red zone are closest to yourvehicle and objects in the green zone arefarther away. Objects are getting closer toyour vehicle as they move from the greenzone to the yellow or red zones. Use theside view mirrors and rear view mirror toget better coverage on both sides and rearof your vehicle.
Enhanced Park Aids
Note:Enhanced park aids is only availablewhen the transmission is in reverse (R).
Note:The reverse sensing system is noteffective at speeds above 3 mph (5 km/h)and may not detect certain angular ormoving objects.
The system uses red, yellow and greenhighlights which appear on top of the videoimage when an object is detected by thereverse sensing system. The alert highlightsthe closest object detected. The reversesensing alert can be disabled and if visualpark aid alert is enabled, highlighted areasare still displayed.
Selectable settings for this feature are ONand OFF.
Manual Zoom
WARNING
When manual zoom is on, the fullarea behind your vehicle is notshown. Be aware of yoursurroundings when using the manual zoomfeature.
Note:Manual zoom is only available whenthe transmission is in reverse (R).
Note:When manual zoom is enabled, onlythe centerline is shown.
This feature allows you to get a closer viewof an object behind your vehicle (forexample, a trailer). The zoomed imagekeeps the bumper in the image to providea reference. The zoom is only active whilethe transmission is in reverse (R). Whenthe transmission is shifted out of reverse(R), the feature automatically turns offand must be reset when it is used again.
Selectable settings for this feature is OFF,Level 1, Level 2 and Level 3. The selectedlevel will appear between the buttons (forexample, Level 1) The default setting forthe manual zoom is OFF.
Rear Camera Delay
When shifting the transmission out ofreverse (R) and into any gear other thanpark (P), the camera image remains in thedisplay until your vehicle speed reaches5 mph (8 km/h). This occurs when the rearcamera delay feature is on or until a radiobutton is selected.
Selectable settings for this feature are ONand OFF. The default setting for the rearcamera delay is ON.
182
Super Duty (TFA) Canada/United States of America, enUSA, First Printing
Parking Aids
Page 201 of 507
Fixed guidelines are always shown in thedisplay, but the active guidelines onlydisplay when the steering wheel is turned.To use active guidelines, turn the steeringwheel to point the guidelines toward anintended path. If the steering wheelposition is changed while reversing, yourvehicle might deviate from the originalintended path.
The active guidelines fade in and outdepending on the steering wheel position.The active guidelines are not shown whenthe steering wheel position is straight.
Always use caution while reversing.Objects in the red zone are closest to yourvehicle and objects in the green zone arefarther away. Objects are getting closer toyour vehicle as they move from the greenzone to the yellow or red zones. Use theside view mirrors and rear view mirror toget better coverage on both sides and rearof your vehicle.
Refer to the Rear View Camera section foradditional information. See Rear ViewCamera (page 180).
Hitches
WARNING
On pick-up trucks, the trailer hitchprovided on this vehicle enhancescrash protection for the fuel system.Do not remove!
Do not use a hitch that either clamps ontothe bumper or attaches to the axle. Youmust distribute the load in your trailer sothat 10-15% for conventional towing or15-25% for fifth wheel towing of the totalweight of the trailer is on the tongue.
Weight-distributing Hitches
WARNING
Do not adjust a weight-distributinghitch to any position where the rearbumper of the vehicle is higher thanit was before attaching the trailer. Doingso will defeat the function of theweight-distributing hitch, which may causeunpredictable handling, and could resultin serious personal injury.
When hooking-up a trailer using aweight-distributing hitch, always use thefollowing procedure:
1. Park the loaded vehicle, without thetrailer, on a level surface.
2. Measure the height to the top of yourvehicle's front wheel opening on thefender. This is H1.
3.Attach the loaded trailer to your vehiclewithout the weight-distributing barsconnected.
4. Measure the height to the top of yourvehicle's front wheel opening on thefender a second time. This is H2.
5. Install and adjust the tension in theweight-distributing bars so that theheight of your vehicle's front wheelopening on the fender is approximatelyhalfway between H1 and H2.
6.Check that the trailer is level or slightlynose down toward your vehicle. If not,adjust the ball height accordingly andrepeat Steps 2-6.
Once the trailer is level or slightly nosedown toward the vehicle:
•Lock the bar tension adjuster in place.
•Check that the trailer tongue securelyattaches and locks onto the hitch.
•Install safety chains, lighting, and trailerbrake controls as required by law or thetrailer manufacturer.
198
Super Duty (TFA) Canada/United States of America, enUSA, First Printing
Towing