2016 FORD F450 SUPER DUTY turn signal
[x] Cancel search: turn signalPage 51 of 507

Note:Replacing the battery will not deletethe transmitter from the vehicle. Thetransmitter should operate normally.
The remote control uses one coin-typethree-volt lithium battery CR2032 orequivalent.
Integrated Keyhead Transmitter
1. Twist a thin coin in the slot of thetransmitter near the key ring to removethe battery cover.
2. Carefully peel up the rubber gasketfrom the transmitter. It may come offwith the battery cover.
3. Remove the old battery
4. Insert the new battery. Refer to theinstructions inside the transmitter forthe correct orientation of the battery.Press the battery down to make sureit is fully in the housing.
5. Reinstall the rubber gasket.
6. Snap the battery cover back onto thetransmitter.
Memory Feature (If Equipped)
You can program your integrated keyheadtransmitter to recall memory settings forthe driver seat, power mirrors and powerfoot pedals. See Memory Function (page120).
Car Finder
Press the button twice withinthree seconds. The horn willsound and the turn signals willflash. We recommend you use this methodto locate your vehicle, rather than usingthe panic alarm.
Sounding a Panic Alarm
Note:The panic alarm will only operatewhen the ignition is off.
Press the button to activate thealarm. Press the button again orturn the ignition on to deactivateit.
Remote Start (If Equipped)
WARNING
To avoid exhaust fumes, do not useremote start if your vehicle is parkedindoors or areas that are not wellventilated.
Note:Do not use remote start if your vehicleis low on fuel.
The remote start button is on thetransmitter.
This feature allows you to start yourvehicle from outside the vehicle. Thetransmitter has an extended operatingrange.
Vehicles with automatic climate controlcan be set to operate when you remotestart the vehicle. See Climate Control(page 110). A manual climate controlsystem will run at the setting it was set towhen you switch the vehicle off.
48
Super Duty (TFA) Canada/United States of America, enUSA, First Printing
Keys and Remote ControlsE163048
3
2
1 E138623 E138624 E138625
Page 59 of 507

LOCKING AND UNLOCKING
You can use the power door lock controlor the remote control to lock and unlockyour vehicle.
Power Door Locks (If Equipped)
The power door lock control is on the driverand front passenger door panels.
UnlockA
LockB
Remote Control (If Equipped)
Unlocking the Doors (Two-StageUnlock)
Press the button to unlock thedriver door.
Press the button again withinthree seconds to unlock all doors. The turnsignals will flash.
Press and hold both the lock and unlockbuttons on the remote control for fourseconds to disable or enable two-stageunlocking. Disabling two-stage unlockingallows all vehicle doors to unlock with onepress of the button. The turn signals willflash twice to indicate a change to theunlocking mode. The unlocking modeapplies to the remote control and keylessentry keypad.
Locking the Doors
Press the button to lock all thedoors. The turn signals willilluminate.
Press the button again within threeseconds to confirm that all the doors areclosed. The doors will lock again, the hornwill sound and the turn signals willilluminate if all the doors are closed.
Mislock
If any door is open or if the hood is open onvehicles with an anti-theft alarm or remotestart, the horn will sound twice and thelamps will not flash.
Smart Unlocks (If Equipped)
This feature helps to prevent you fromlocking yourself out of your vehicle if yourkey is still in the ignition.
When you open the driver door and lockyour vehicle with the power door lockcontrol, all the doors will lock then unlockif your key is still in the ignition.
Your can still lock your vehicle with the keyin the ignition by:
•using the manual lock on the door
•locking the driver door with a key
•using the keyless entry keypad
•using the lock button on the remotecontrol
Autolock and Autounlock (If Equipped)
The autolock feature will lock all the doorswhen:
•all doors are closed, and
•the ignition is on, and
•you shift into any gear putting yourvehicle in motion, and
•your vehicle attains a speed greaterthan 12 mph (20 km/h).
56
Super Duty (TFA) Canada/United States of America, enUSA, First Printing
LocksABE163049 E138629 E138623
Page 88 of 507

WARNING
Driving your vehicle with the warninglamp on is dangerous. A significantdecrease in braking performancemay occur. It will take you longer to stopyour vehicle. Have your vehicle checked byyour authorized dealer immediately. Drivingextended distances with the parking brakeengaged can cause brake failure and therisk of personal injury.
Check Fuel Cap (If Equipped)
Illuminates when the fuel capmay not be properly installed.Continued driving with this lighton may cause the Service engine soonwarning indicator to come on.
Cruise Control (If Equipped)
Illuminates when you switch thisfeature on. See Using CruiseControl (page 183).
Direction Indicator
Illuminates when the left or rightturn signal or the hazard warningflasher is turned on. If theindicators stay on or flash faster, check fora burned out bulb.
Door Ajar
Displays when the ignition is onand any door is not completelyclosed.
Electronic Locking Differential
Illuminates when using theelectronic locking differential.
Engine Coolant Temperature
Illuminates when the enginecoolant temperature is high.Stop the vehicle as soon aspossible, switch off the engine and let cool.
Engine Oil
If it illuminates with the enginerunning or when you are driving,this indicates a malfunction.Stop your vehicle as soon as it is safe todo so and switch the engine off. Check theengine oil level. See Engine Oil Check(page 235).
Note:Do not resume your journey if itilluminates despite the level being correct.Have the system checked by your authorizeddealer immediately.
Fasten Safety Belt
It will illuminate and a chime willsound to remind you to fastenyour safety belt.
Front Airbag
If it fails to illuminate when youstart your vehicle, continues toflash or remains on, it indicatesa malfunction. Have the system checkedby your authorized dealer.
High Beam
Illuminates when you switch thehigh beam headlamps on. It willflash when you use theheadlamp flasher.
Hill Descent (If Equipped)
Illuminates when hill descent isswitched on.
85
Super Duty (TFA) Canada/United States of America, enUSA, First Printing
Instrument Cluster E71340 E163170 E163171
Page 136 of 507
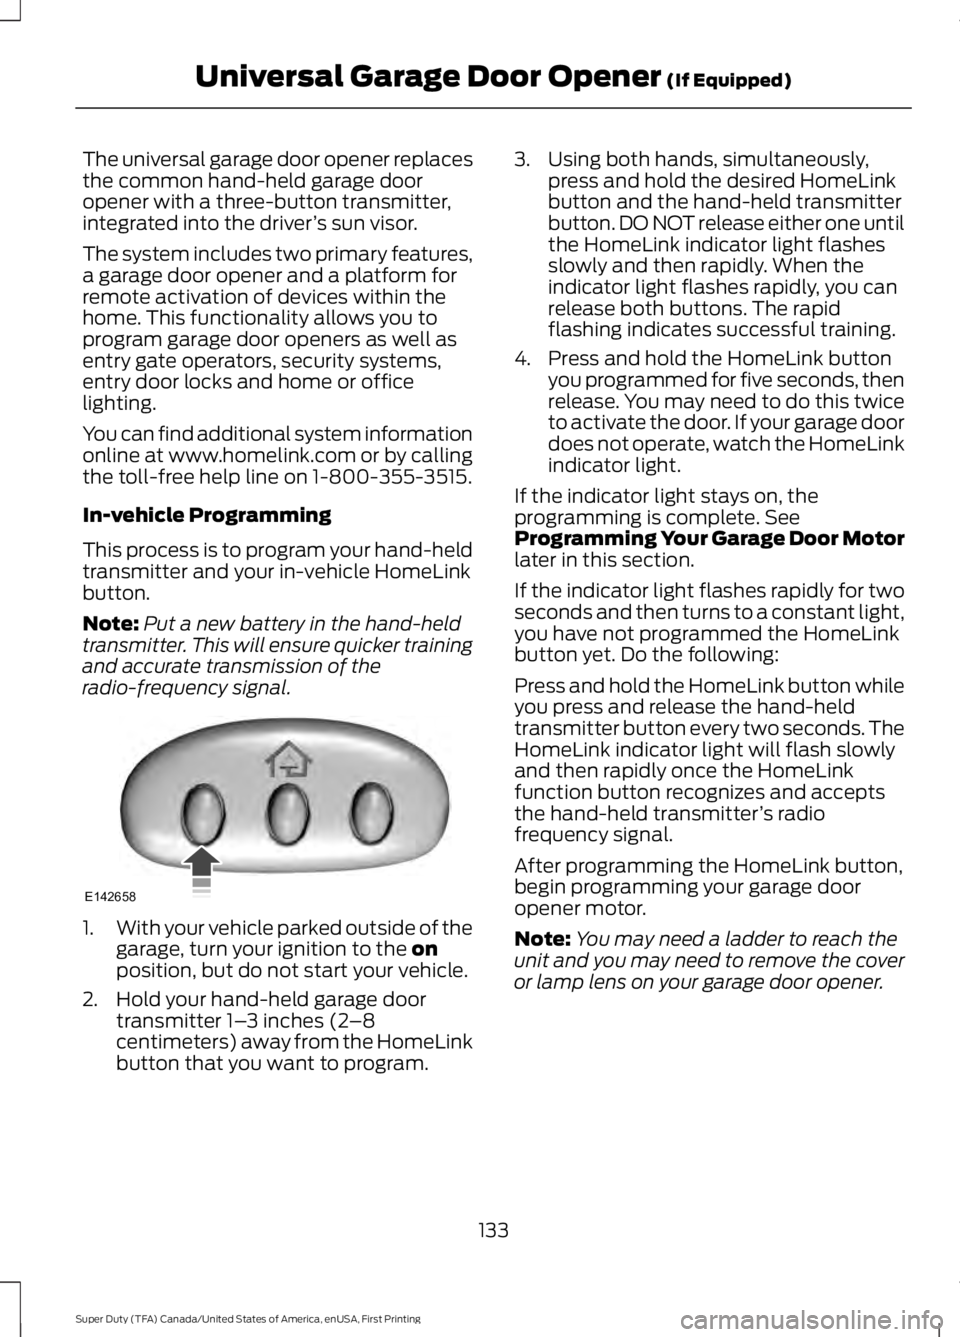
The universal garage door opener replacesthe common hand-held garage dooropener with a three-button transmitter,integrated into the driver’s sun visor.
The system includes two primary features,a garage door opener and a platform forremote activation of devices within thehome. This functionality allows you toprogram garage door openers as well asentry gate operators, security systems,entry door locks and home or officelighting.
You can find additional system informationonline at www.homelink.com or by callingthe toll-free help line on 1-800-355-3515.
In-vehicle Programming
This process is to program your hand-heldtransmitter and your in-vehicle HomeLinkbutton.
Note:Put a new battery in the hand-heldtransmitter. This will ensure quicker trainingand accurate transmission of theradio-frequency signal.
1.With your vehicle parked outside of thegarage, turn your ignition to the onposition, but do not start your vehicle.
2. Hold your hand-held garage doortransmitter 1–3 inches (2–8centimeters) away from the HomeLinkbutton that you want to program.
3. Using both hands, simultaneously,press and hold the desired HomeLinkbutton and the hand-held transmitterbutton. DO NOT release either one untilthe HomeLink indicator light flashesslowly and then rapidly. When theindicator light flashes rapidly, you canrelease both buttons. The rapidflashing indicates successful training.
4. Press and hold the HomeLink buttonyou programmed for five seconds, thenrelease. You may need to do this twiceto activate the door. If your garage doordoes not operate, watch the HomeLinkindicator light.
If the indicator light stays on, theprogramming is complete. SeeProgramming Your Garage Door Motorlater in this section.
If the indicator light flashes rapidly for twoseconds and then turns to a constant light,you have not programmed the HomeLinkbutton yet. Do the following:
Press and hold the HomeLink button whileyou press and release the hand-heldtransmitter button every two seconds. TheHomeLink indicator light will flash slowlyand then rapidly once the HomeLinkfunction button recognizes and acceptsthe hand-held transmitter’s radiofrequency signal.
After programming the HomeLink button,begin programming your garage dooropener motor.
Note:You may need a ladder to reach theunit and you may need to remove the coveror lamp lens on your garage door opener.
133
Super Duty (TFA) Canada/United States of America, enUSA, First Printing
Universal Garage Door Opener (If Equipped)E142658
Page 182 of 507
PARKING AID (If Equipped)
WARNINGS
The system does not relieve you ofyour responsibility to drive with duecare and attention.
If your vehicles has a non-Fordapproved trailer tow module thesystem may not correctly detectobjects.
The sensors may not detect objectsin heavy rain or other conditions thatcause disruptive reflections.
The sensors may not detect objectswith surfaces that absorb ultrasonicwaves.
The system does not detect objectsthat are moving away from yourvehicle. They will only be detectedshortly after they start to move towardyour vehicle.
Take particular care when reversingwith a tow ball arm or a rear fittedaccessory. For example, a bicyclecarrier. The rear parking aid will onlyindicate the approximate distance fromthe rear bumper to an object.
Note:If you use a high pressure spray towash your vehicle, only spray the sensorsbriefly from a distance not less than 8 in(20 cm).
Note:If your vehicle has a tow ball arm, thesystem is turned off automatically whentrailer lamps (or lighting boards) areconnected to the 13-pin socket through aFord approved trailer tow module.
Note:Keep the sensors free from dirt, iceor snow. Do not clean with sharp objects.
Note:The system may emit false alerts ifit detects a signal using the same frequencyas the sensors or if your vehicle is fullyloaded.
Note:The outer sensors may detect theside walls of a garage. If the distancebetween the outer sensors and the side wallremains constant for three seconds, thealert will turn off. As you continue the innersensors will detect objects directly behindyour vehicle.
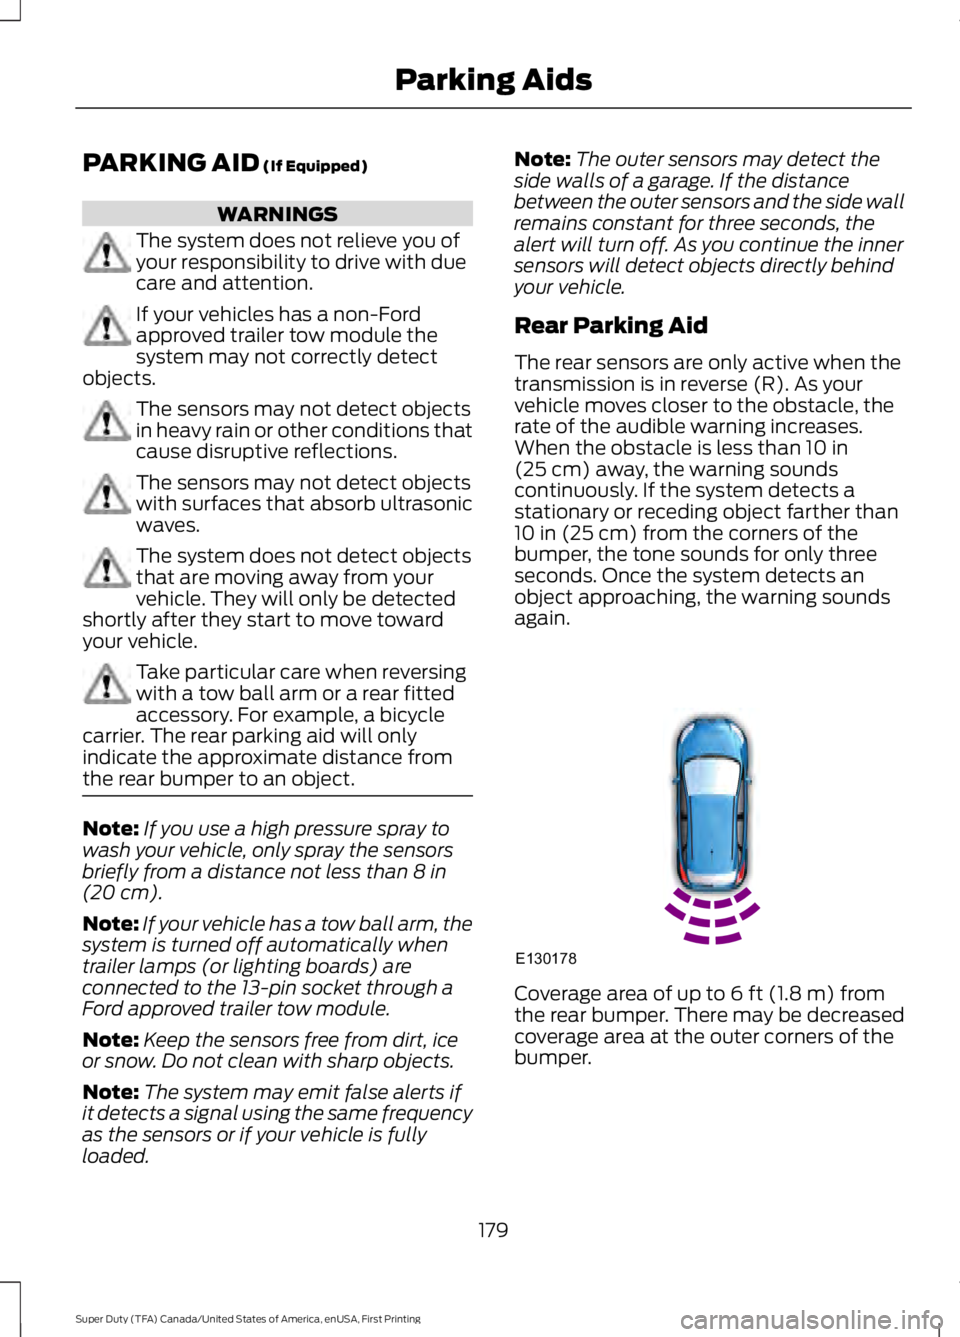
Rear Parking Aid
The rear sensors are only active when thetransmission is in reverse (R). As yourvehicle moves closer to the obstacle, therate of the audible warning increases.When the obstacle is less than 10 in(25 cm) away, the warning soundscontinuously. If the system detects astationary or receding object farther than10 in (25 cm) from the corners of thebumper, the tone sounds for only threeseconds. Once the system detects anobject approaching, the warning soundsagain.
Coverage area of up to 6 ft (1.8 m) fromthe rear bumper. There may be decreasedcoverage area at the outer corners of thebumper.
179
Super Duty (TFA) Canada/United States of America, enUSA, First Printing
Parking AidsE130178
Page 200 of 507
Remember to account for the trailertongue weight as part of your vehicle loadwhen calculating the total vehicle weight.
Trailer Towing Connector
When attaching the trailer wiring connectorto your vehicle, only use a proper fittingconnector that works with the vehicle andtrailer functions. Some seven-positionconnectors may have the SAE J2863 logo,which confirms that it is the proper wiringconnector and works correctly with yourvehicle.
FunctionColor
Left turn signal and stop lampYellow
Ground (-)White
Electric brakesBlue
Right turn signal and stoplampGreen
Battery (+)Orange
Running lightsBrown
Reverse lightsGrey
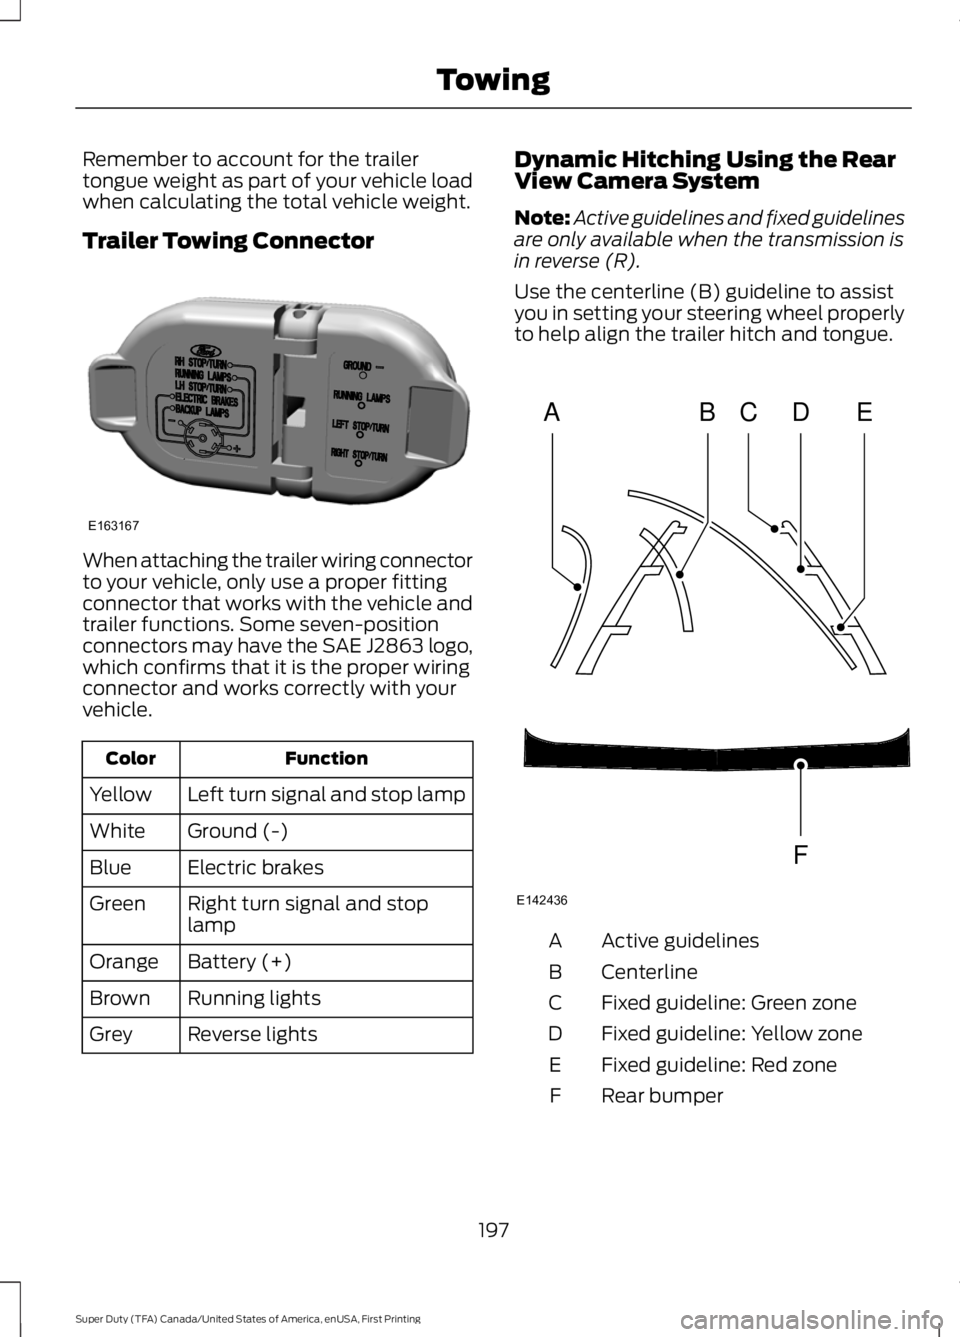
Dynamic Hitching Using the RearView Camera System
Note:Active guidelines and fixed guidelinesare only available when the transmission isin reverse (R).
Use the centerline (B) guideline to assistyou in setting your steering wheel properlyto help align the trailer hitch and tongue.
Active guidelinesA
CenterlineB
Fixed guideline: Green zoneC
Fixed guideline: Yellow zoneD
Fixed guideline: Red zoneE
Rear bumperF
197
Super Duty (TFA) Canada/United States of America, enUSA, First Printing
TowingE163167 ABCD
F
E
E142436
Page 205 of 507
If the message only displays with a trailerconnected, the problem is with the trailerwiring. Consult your trailer dealer forassistance. This can be a short to ground(such as a chaffed wire), short to voltage(such as a pulled pin on trailer emergencybreakaway battery) or the trailer brakesmay be drawing too much current.
Points to Remember
Note:Do not attempt removal of the trailerbrake controller without consulting theWorkshop Manual. Damage to the unit mayresult.
•Adjust gain setting before using thetrailer brake controller.
•Adjust gain setting, using the procedureabove, whenever road, weather, traileror vehicle loading conditions changefrom when the gain was initially set.
•Only use the manual control lever forproper adjustment of the gain duringtrailer setup. Misuse, such asapplication during trailer sway, couldcause instability of trailer or towvehicle.
•Avoid towing in adverse weatherconditions. The trailer brake controllerdoes not provide anti-lock control ofthe trailer wheels. Trailer wheels canlock up on slippery surfaces, resultingin reduced stability of trailer and towvehicle.
•The trailer brake controller is equippedwith a feature that reduces output atvehicle speeds below 11 mph (18 km/h)so trailer and vehicle braking is not jerkyor harsh. This feature is only activewhen applying the brakes using yourvehicle's brake pedal, not thecontroller.
•The controller interacts with the brakecontrol system and powertrain controlsystem of your vehicle to provide thebest performance on different roadconditions.
•Your vehicle's brake system and thetrailer brake system workindependently of each other. Changingthe gain setting on the controller doesnot affect the operation of yourvehicle's brakes.
•When you switch the engine off, thecontroller output is disabled and thedisplay and module shut down.
Trailer Lamps
WARNING
Never connect any trailer lamp wiringto the vehicle's tail lamp wiring; thismay damage the electrical systemresulting in fire. Contact your authorizeddealer as soon as possible for assistancein proper trailer tow wiring installation.Additional electrical equipment may berequired.
Trailer lamps are required on most towedvehicles. Make sure all running lights, brakelights, turn signals and hazard lights areworking.
Before Towing a Trailer
Practice turning, stopping and backing upto get the feel of your vehicle-trailercombination before starting on a trip.When turning, make wider turns so thetrailer wheels clear curbs and otherobstacles.
When Towing a Trailer
•Do not drive faster than 70 mph (113km/h) during the first 500 miles (800kilometers).
•Do not make full-throttle starts.
202
Super Duty (TFA) Canada/United States of America, enUSA, First Printing
Towing
Page 232 of 507
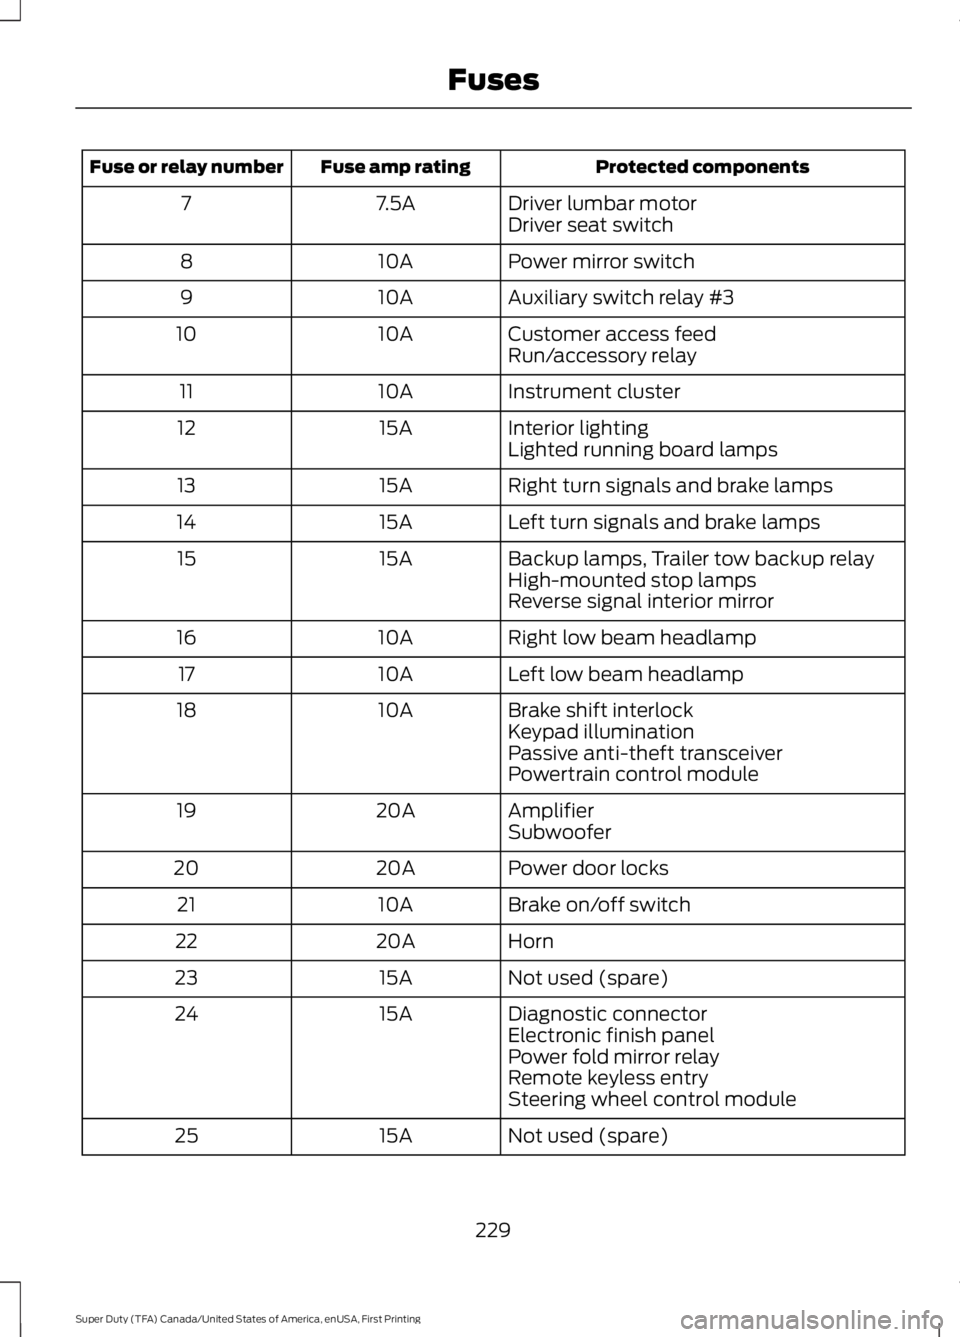
Protected componentsFuse amp ratingFuse or relay number
Driver lumbar motor7.5A7Driver seat switch
Power mirror switch10A8
Auxiliary switch relay #310A9
Customer access feed10A10Run/accessory relay
Instrument cluster10A11
Interior lighting15A12Lighted running board lamps
Right turn signals and brake lamps15A13
Left turn signals and brake lamps15A14
Backup lamps, Trailer tow backup relay15A15High-mounted stop lampsReverse signal interior mirror
Right low beam headlamp10A16
Left low beam headlamp10A17
Brake shift interlock10A18Keypad illuminationPassive anti-theft transceiverPowertrain control module
Amplifier20A19Subwoofer
Power door locks20A20
Brake on/off switch10A21
Horn20A22
Not used (spare)15A23
Diagnostic connector15A24Electronic finish panelPower fold mirror relayRemote keyless entrySteering wheel control module
Not used (spare)15A25
229
Super Duty (TFA) Canada/United States of America, enUSA, First Printing
Fuses