2016 FORD F250 SUPER DUTY spare tire location
[x] Cancel search: spare tire locationPage 215 of 507
ROADSIDE ASSISTANCE
Vehicles Sold in the United States:Getting Roadside Assistance
To fully assist you should you have avehicle concern, Ford Motor Companyoffers a complimentary roadsideassistance program. This program isseparate from the New Vehicle LimitedWarranty. The service is available:
•24 hours a day, seven days a week.
•For the coverage period listed on theRoadside Assistance Card included inyour Owner's Manual portfolio.
Roadside Assistance covers:
•A flat tire change with a good spare, ifprovided with the vehicle (exceptvehicles supplied with a tire inflationkit).
•Battery jump start.
•Lock-out assistance (key replacementcost is the customer's responsibility).
•Fuel delivery — independent servicecontractors, if not prohibited by state,local or municipal law, shall deliver upto 2 gal (7.6 L) of gasoline or 5 gal(18.9 L) of diesel fuel to a disabledvehicle. Roadside Assistance limits fueldelivery service to two no-chargeoccurrences within a 12-month period.
•Winch out — available within 100 ft(30.5 m) of a paved or countymaintained road, no recoveries.
•Towing — independent servicecontractors, if not prohibited by state,local or municipal law, shall tow Fordeligible vehicles to an authorized dealerwithin 35 mi (56 km) of thedisablement location or to the nearest
authorized dealer. If a memberrequests a tow to an authorized dealerthat is more than 35 mi (56 km) fromthe disablement location, the membershall be responsible for any mileagecosts in excess of 35 mi (56 km).
Roadside Assistance includes up to $200for a towed trailer if the disabled eligiblevehicle requires service at the nearestauthorized dealer. If the towing vehicle isoperational but the trailer is not, then thetrailer does not qualify for any roadsideservices.
Vehicles Sold in the United States:Using Roadside Assistance
Complete the roadside assistanceidentification card and place it in yourwallet for quick reference. This card is inthe owner's information portfolio in theglove compartment.
United States Ford vehicle customers whorequire Roadside Assistance, call1-800-241-3673.
If you need to arrange roadside assistancefor yourself, Ford Motor Companyreimburses a reasonable amount fortowing to the nearest dealership within35 mi (56 km). To obtain reimbursementinformation, United States Ford vehiclecustomers call 1-800-241-3673.Customers need to submit their originalreceipts.
Vehicles Sold in Canada: GettingRoadside Assistance
Canadian customers who require roadsideassistance, call 1-800-665-2006.
Vehicles Sold in Canada: UsingRoadside Assistance
For your convenience, you may completethe roadside assistance identification cardfound in the centerfold of your warrantyguide and retain for future reference.
212
Super Duty (TFA) Canada/United States of America, enUSA, First Printing
Roadside Emergencies
Page 294 of 507

•Exceed 50 mph (80 km/h)
•Load the vehicle beyond maximumvehicle load rating listed on the SafetyCompliance Label.
•Tow a trailer.
•Use snow chains on the end of thevehicle with the dissimilar spare tire.
•Use more than one dissimilar spare tireat a time.
•Use commercial car washingequipment.
•Try to repair the dissimilar spare tire.
Use of one of the dissimilar spare tireslisted above at any one wheel location canlead to impairment of the following:
•Handling, stability and brakingperformance.
•Comfort and noise.
•Ground clearance and parking at curbs.
•Winter weather driving capability.
•Wet weather driving capability.
•All-wheel driving capability.
3.Full-size dissimilar spare withoutlabel on wheel
When driving with the full-size dissimilarspare wheel and tire assembly, do not:
•Exceed 70 mph (113 km/h).
•Use more than one dissimilar sparewheel and tire assembly at a time.
•Use commercial car washingequipment.
•Use snow chains on the end of thevehicle with the dissimilar spare wheeland tire assembly.
The usage of a full-size dissimilar sparewheel and tire assembly can lead toimpairment of the following:
•Handling, stability and brakingperformance.
•Comfort and noise.
•Ground clearance and parking at curbs.
•Winter weather driving capability.
•Wet weather driving capability.
•All-wheel driving capability.
When driving with the full-size dissimilarspare wheel and tire assembly additionalcaution should be given to:
•Towing a trailer.
•Driving vehicles equipped with acamper body.
•Driving vehicles with a load on thecargo rack.
Drive cautiously when using a full-sizedissimilar spare wheel and tire assemblyand seek service as soon as possible.
Location of the Spare Tire andTools
If your vehicle is equipped with a spare tire,jack and associated tools, see thefollowing table for their locations:
LocationTool
Under the vehicle, just forward of the rearbumperSpare tire (pick-up trucks only)
Regular cab and Crew Cab: Fastened tofloor pan behind rearmost seat onpassenger side
Jack
291
Super Duty (TFA) Canada/United States of America, enUSA, First Printing
Wheels and Tires
Page 295 of 507
LocationTool
SuperCab: Under rear bench seat onpassenger side
Regular cab: Fastened to floor behind driverseatJack handle, lug wrench, lug wrench exten-sion (only available on dual rear wheelvehicles) and wheel chock (only availableon single rear wheel vehicles equipped witha diesel engine)
SuperCab: Fastened to floor under rear seatCrew Cab: Fastened to floor behind rearseat at driver side
In the glove boxKey and spare tire lock
Removing the Spare Tire (WithSpare Tire Carrier Only)
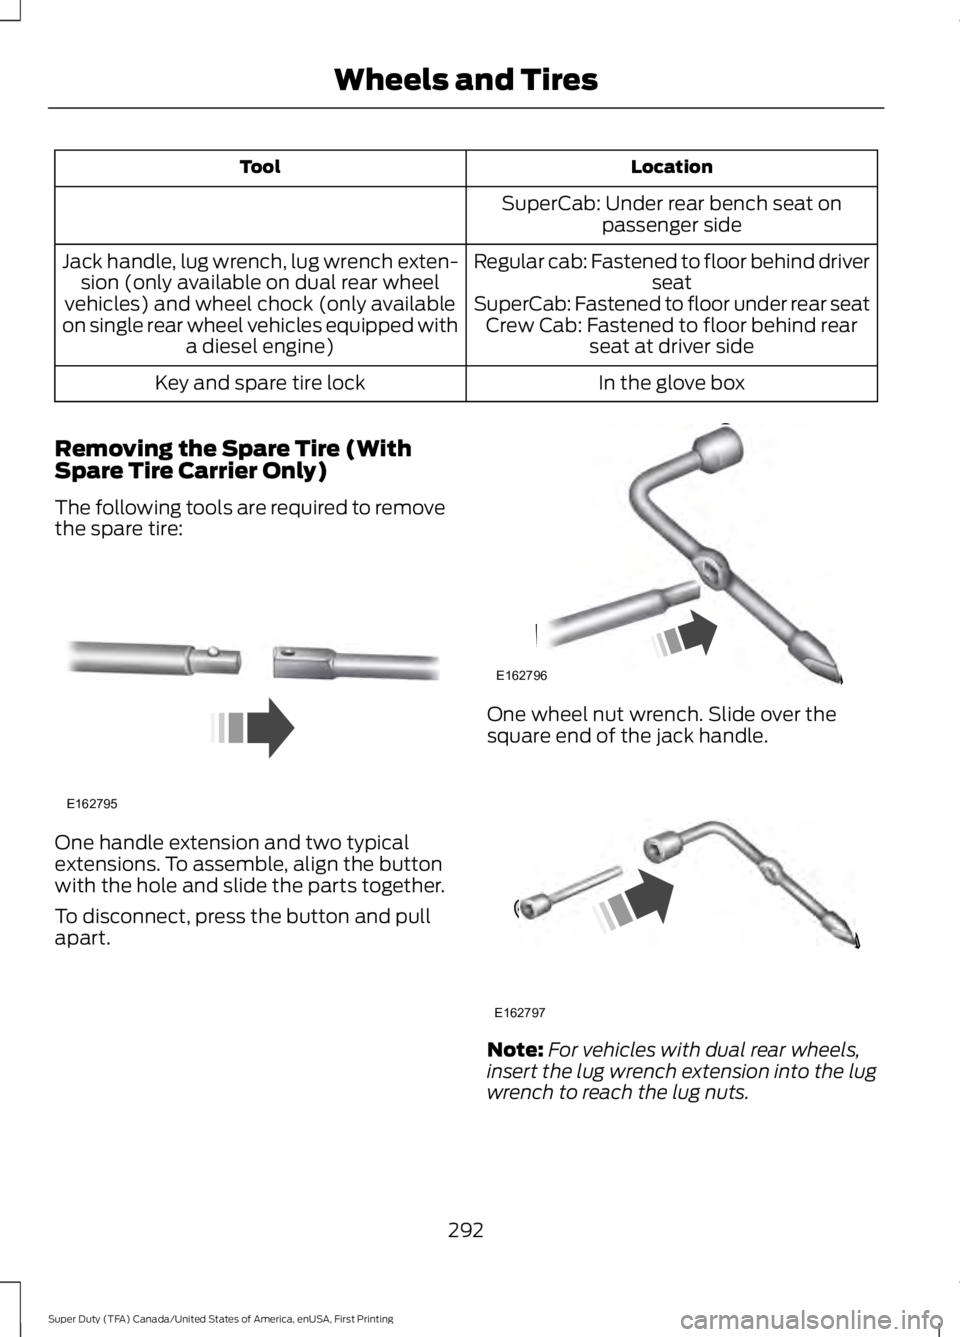
The following tools are required to removethe spare tire:
One handle extension and two typicalextensions. To assemble, align the buttonwith the hole and slide the parts together.
To disconnect, press the button and pullapart.
One wheel nut wrench. Slide over thesquare end of the jack handle.
Note:For vehicles with dual rear wheels,insert the lug wrench extension into the lugwrench to reach the lug nuts.
292
Super Duty (TFA) Canada/United States of America, enUSA, First Printing
Wheels and TiresE162795 E162796 E162797
Page 297 of 507

WARNINGS
Do not attempt to change a tire onthe side of the vehicle close tomoving traffic. Pull far enough off theroad to avoid the danger of being hit whenoperating the jack or changing the wheel.
Always use the jack provided asoriginal equipment with your vehicle.If using a jack other than the oneprovided as original equipment with yourvehicle, make sure the jack capacity isadequate for the vehicle weight, includingany vehicle cargo or modifications.
Note:Passengers should not remain in thevehicle when the vehicle is being jacked.
Park on a level surface, set the parkingbrake and activate the hazard flashers.
1.Turn the engine off and block the wheelthat is diagonally opposite of the flattire using the wheel chock.Note: Lockthe manual hub on the wheel if thevehicle is a 4x4.
2. Remove the jack, jack handle, lugwrench and spare tire from thestowage locations.
3.Use the tip of the lug wrench to removeany wheel trim.
4. Loosen each wheel lug nut ½ turncounterclockwise, but do not removethem until the wheel is raised off theground.
F-250 and F-350 Single Rear WheelVehicles
1. Insert the hooked end of the jackhandle into the jack and use the handleto slide the jack under the vehicle.
2. Position the jack according to thefollowing guides:
Front (4x2)
294
Super Duty (TFA) Canada/United States of America, enUSA, First Printing
Wheels and TiresE142551 E162801 E162802
Page 298 of 507
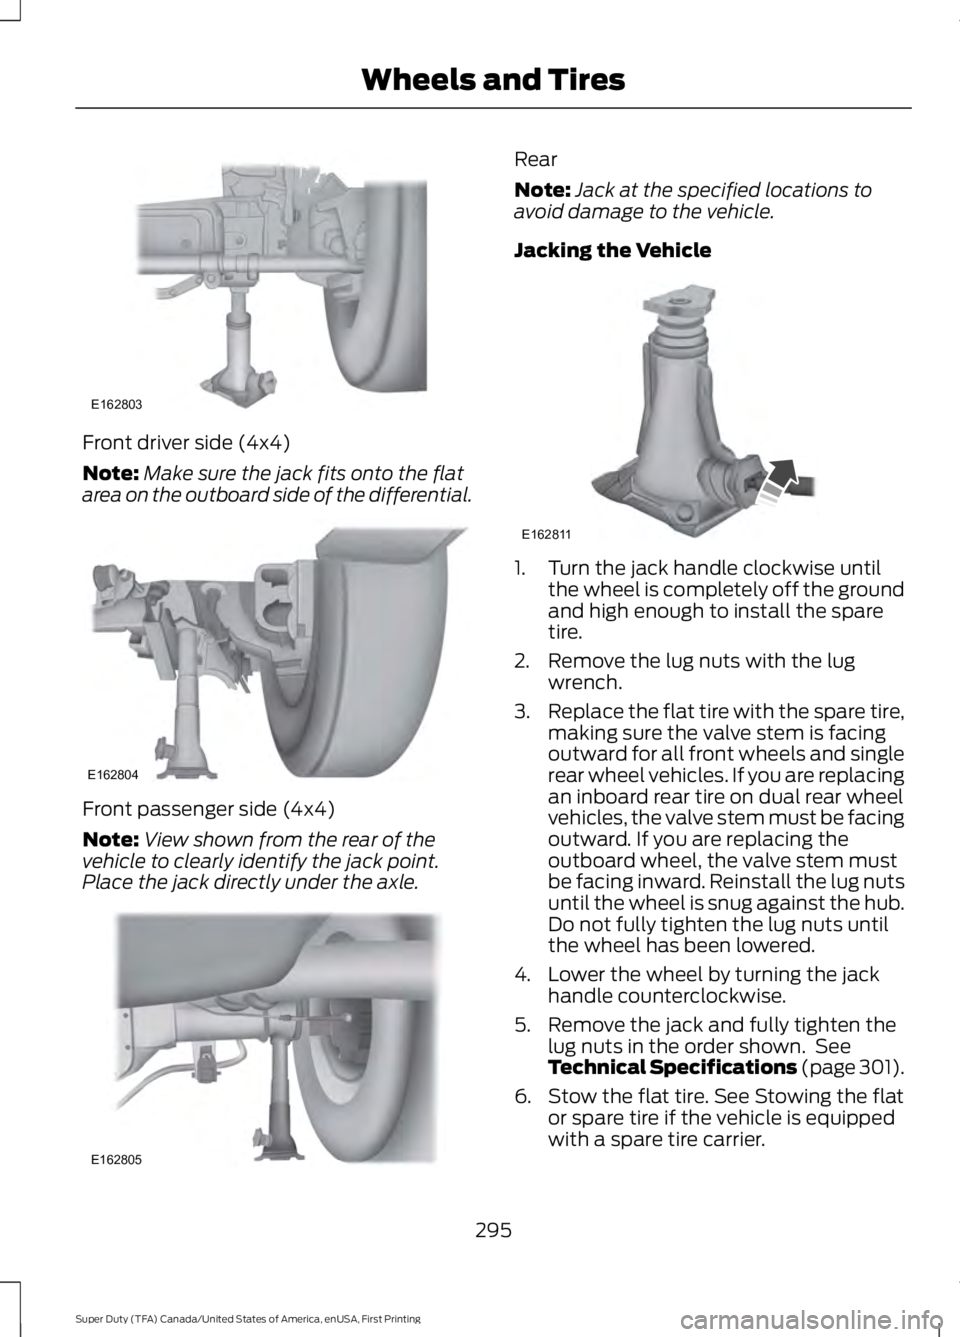
Front driver side (4x4)
Note:Make sure the jack fits onto the flatarea on the outboard side of the differential.
Front passenger side (4x4)
Note:View shown from the rear of thevehicle to clearly identify the jack point.Place the jack directly under the axle.
Rear
Note:Jack at the specified locations toavoid damage to the vehicle.
Jacking the Vehicle
1. Turn the jack handle clockwise untilthe wheel is completely off the groundand high enough to install the sparetire.
2. Remove the lug nuts with the lugwrench.
3.Replace the flat tire with the spare tire,making sure the valve stem is facingoutward for all front wheels and singlerear wheel vehicles. If you are replacingan inboard rear tire on dual rear wheelvehicles, the valve stem must be facingoutward. If you are replacing theoutboard wheel, the valve stem mustbe facing inward. Reinstall the lug nutsuntil the wheel is snug against the hub.Do not fully tighten the lug nuts untilthe wheel has been lowered.
4. Lower the wheel by turning the jackhandle counterclockwise.
5. Remove the jack and fully tighten thelug nuts in the order shown. SeeTechnical Specifications (page 301).
6. Stow the flat tire. See Stowing the flator spare tire if the vehicle is equippedwith a spare tire carrier.
295
Super Duty (TFA) Canada/United States of America, enUSA, First Printing
Wheels and TiresE162803 E162804 E162805 E162811
Page 499 of 507
Capacities and Specifications - 6.8LTriton-30V - V10..........................................311Specifications.......................................................312Capacities and Specifications................303Car WashSee: Cleaning the Exterior..............................256Center Console..............................................139Removable Front Cupholders........................139Changing a Bulb...........................................249Replacing Brake/Tail/Turn/Reverse LampBulbs...................................................................251Replacing Cargo Lamp and Central HighMounted Brake Lamp Bulbs......................251Replacing Fog Lamp Bulbs............................250Replacing Front Clearance andIdentification Lamp Bulbs.........................250Replacing Front Park and DirectionIndicator Lamp Bulbs..................................250Replacing Headlamp Bulbs...........................250Replacing the License Plate LampBulb....................................................................252Changing a Fuse............................................231Fuses........................................................................231Changing a Road Wheel...........................290Dissimilar Spare Wheel and Tire AssemblyInformation.....................................................290Location of the Spare Tire and Tools..........291Removing the Spare Tire (With Spare TireCarrier Only)....................................................292Tire Change Procedure....................................293Changing the 12V Battery.........................245Battery Management System (IfEquipped)........................................................246Changing the Engine Air Filter................254Changing the Wiper Blades.....................247Checking MyKey System Status...............53Checking the Wiper Blades......................247Child Restraint and Safety BeltMaintenance.................................................36Child Safety.......................................................15General Information.............................................15Child Safety Locks..........................................27Child Seat Positioning..................................26Cleaning Leather Seats.............................259With King Ranch Edition.................................260Without King Ranch Edition..........................259Cleaning Products.......................................256Cleaning the Alloy Wheels........................261
Cleaning the Engine....................................257Cleaning the Exterior..................................256Exterior Chrome Parts.....................................256Exterior Plastic Parts.........................................257Stripes or Graphics............................................257Underbody............................................................257Cleaning the Instrument Panel andInstrument Cluster Lens........................259Cleaning the Interior...................................258Cleaning the Windows and WiperBlades...........................................................258Clearing All MyKeys.......................................53Climate............................................................428Climate Control Voice Commands..............431Climate Control..............................................110Climate Controlled Seats..........................125Cooled Seats........................................................126Heated Seats........................................................125Coolant CheckSee: Engine Coolant Check............................236Crash Sensors and Airbag Indicator........45Creating a MyKey............................................52Programming/Changing ConfigurableSettings...............................................................52Cruise Control..................................................67Principle of Operation.......................................183Cruise controlSee: Using Cruise Control................................183Customer Assistance...................................217
D
Data Recording..................................................9Event Data Recording...........................................9Service Data Recording........................................9Daytime Running Lamps.............................73Digital Radio..................................................323HD Radio Reception and StationTroubleshooting............................................324Direction Indicators........................................74Lane Change..........................................................74Driver and Passenger Airbags...................38Children and Airbags...........................................43Passenger Airbag On and Off Switch ..........38Proper Driver and Front Passenger SeatingAdjustment........................................................42Driving Aids.....................................................184Driving Hints...................................................207
496
Super Duty (TFA) Canada/United States of America, enUSA, First Printing
Index