2016 FORD F250 maintenance
[x] Cancel search: maintenancePage 254 of 507

2. Disconnect the electrical connector.
3.
Turn the bulb holder counterclockwise
and remove it.
Note: Do not touch the bulb glass.
Note: You cannot separate the bulb from
the bulb holder.
Replacing
Brake/Tail/Turn/Reverse Lamp
Bulbs
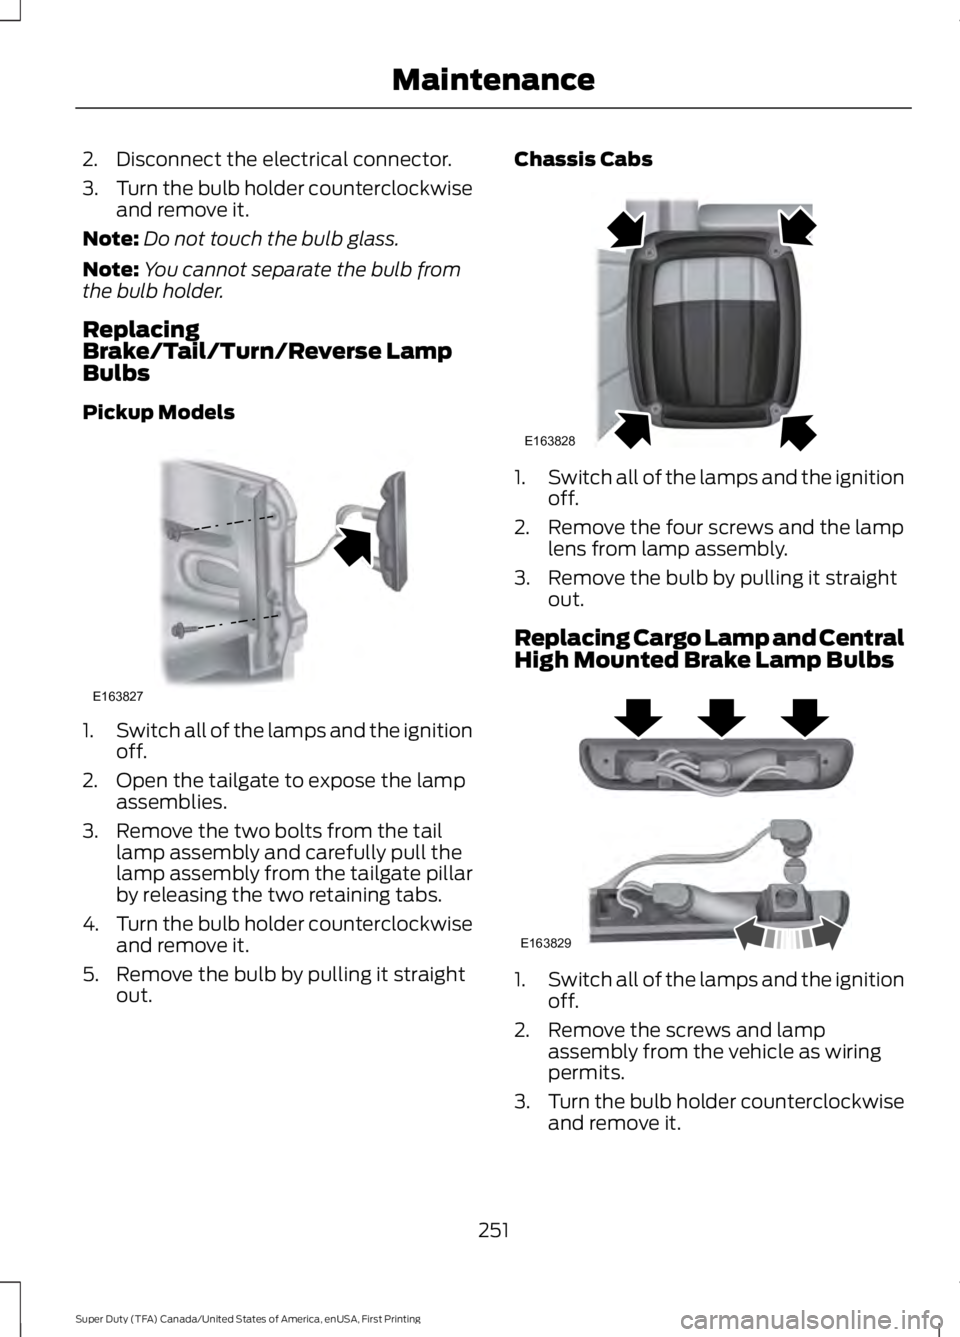
Pickup Models 1.
Switch all of the lamps and the ignition
off.
2. Open the tailgate to expose the lamp assemblies.
3. Remove the two bolts from the tail lamp assembly and carefully pull the
lamp assembly from the tailgate pillar
by releasing the two retaining tabs.
4. Turn the bulb holder counterclockwise
and remove it.
5. Remove the bulb by pulling it straight out. Chassis Cabs
1.
Switch all of the lamps and the ignition
off.
2. Remove the four screws and the lamp lens from lamp assembly.
3. Remove the bulb by pulling it straight out.
Replacing Cargo Lamp and Central
High Mounted Brake Lamp Bulbs 1.
Switch all of the lamps and the ignition
off.
2. Remove the screws and lamp assembly from the vehicle as wiring
permits.
3. Turn the bulb holder counterclockwise
and remove it.
251
Super Duty (TFA) Canada/United States of America, enUSA, First Printing MaintenanceE163827 E163828 E163829
Page 255 of 507

4. Remove the bulb by pulling it straight
out.
Replacing the License Plate Lamp
Bulb
Note: The license plate bulbs are located
behind the rear bumper. 1.
Switch all of the lamps and the ignition
off.
2. Reach behind the rear bumper to locate the bulb.
3. Turn the bulb holder counterclockwise
and remove it.
4. Remove the bulb by pulling it straight out.
BULB SPECIFICATION CHART
Replacement bulbs are specified in the
chart below. Headlamp bulbs must be
marked with an authorized “D.O.T.” for
North America and an “E” for Europe to
ensure lamp performance, light brightness
and pattern and safe visibility. The correct
bulbs will not damage the lamp assembly
or void the lamp assembly warranty and
will provide quality bulb illumination time. Trade name
Number of Bulbs
Function
H13/9008
2
Headlamps
W5W
2
Side marker lamp - front
3157NA
2
Park/Turn lamp- front
3157
2
Tail/stop/turn/side marker
(pickups only)
3157
2
Tail/stop/turn/side marker
(chassis cabs only)
921
2
Reverse (pickups only)
3157
2
Reverse (chassis cabs only)
194
—
License plate lamp
9145
—
Fog lamp
912
1
High-mount brake lamp
912
2
Cargo lamp
12V6W
2
Map lamp
252
Super Duty (TFA) Canada/United States of America, enUSA, First Printing MaintenanceE163830
Page 256 of 507

Trade name
Number of Bulbs
Function
578
3
Dome/reading lamps
2825
2
Interior visor lamp
2825
2
Mirror turn signal
2825
Mirror clearance lamp
194
5
Front clearance lamps and
front identification lamps 1
LED2
4
Rear fender clearance 1
1932
3
Rear identification 1
LED2
1
Underhood Lamp
To replace all instrument panel lights - see your authorized dealer.
1 Dual rear wheels, if equipped.
2 See your authorized dealer to replace the lamp assembly.
253
Super Duty (TFA) Canada/United States of America, enUSA, First Printing Maintenance
Page 257 of 507

CHANGING THE ENGINE AIR
FILTER
WARNING
To reduce the risk of vehicle damage
and personal burn injuries, do not
start your engine with the air cleaner
removed and do not remove it while the
engine is running. Note:
Failure to use the correct air filter
element may result in severe engine
damage. Resulting component damage
may not be covered by the vehicle Warranty.
When changing the air filter element, use
only the air filter element listed. See
Motorcraft Parts (page 304).
Change the air filter element at the correct
interval. See
Scheduled Maintenance
(page 453). 1. Locate the mass air flow sensor
electrical connector on the air outlet
tube. Disconnect the mass air flow
sensor electrical connector. 2. Reposition the locking clip on the
connector (connector shown from
below for clarity), squeeze the
connector and pull it off of the air
outlet tube. 3.
Clean the area from around the air tube
to the air cover connection to prevent
debris from entering the system. Next,
loosen the bolt on the air tube clamp
so the clamp is no longer snug to the
air tube. It is not necessary to
completely remove the clamp.
4. Pull the air tube off from the air cleaner
housing.
254
Super Duty (TFA) Canada/United States of America, enUSA, First Printing MaintenanceE163755 E163756 E163757
Page 258 of 507

5. Release the three clamps that secure
the cover to the air filter housing. Push
the air filter cover toward the center of
the vehicle and up slightly to release it.
6. Remove the air filter element from the
air filter housing.
7. Install the new air filter element. 8.
Replace the air filter housing cover and
secure all the clamps. Be careful not
to crimp the filter element edges
between the air filter housing and cover
and ensure that you properly align the
tabs on the edge into the slots.
9. Slip the air tube onto the air filter housing and tighten the air-tube clamp
bolt snugly. Do not over tighten
air-tube clamp bolt. 10. Reconnect the mass air flow sensor
electrical connector to the outlet
tube. Make sure the locking tab on
the connector is in the locked position
(connector shown from below for
clarity).
255
Super Duty (TFA) Canada/United States of America, enUSA, First Printing MaintenanceE163758 E163759 E163760
Page 263 of 507

You should:
•
Remove dust and loose dirt with a
vacuum cleaner.
• Clean and treat spills and stains as
soon as possible.
Do not use the following products as these
may damage the leather:
• Oil and petroleum or silicone-based
leather conditioners.
• Household cleaners.
• Alcohol solutions.
• Solvents or cleaners intended
specifically for rubber, vinyl and
plastics.
With King Ranch Edition
Your vehicle has seating covered in
premium, top-grain leather that is
extremely durable, but still requires special
care and maintenance in order to preserve
longevity and comfort.
Regular cleaning and conditioning
maintains the appearance of the leather.
Cleaning
For dirt, use a vacuum cleaner then use a
clean, damp cloth or soft brush.
For routine cleaning, wipe the surface with
a soft, damp cloth. For more thorough
cleaning, wipe the surface with a mild soap
and water solution.
• Clean spills as quickly as possible.
• Test any cleaner or stain remover on
an inconspicuous part of the leather as
cleaners may darken the leather. •
Do not spill coffee, ketchup, mustard,
orange juice or oil-based products on
the leather as they may permanently
stain the leather.
• Do not use household cleaning
products, alcohol solutions, solvents
or cleaners intended for rubber, vinyl
or plastics.
Scratches
Because the leather in the seat comes
from genuine steer hides, there may be
evidence of naturally occurring markings,
such as small scars. These markings give
character to the seating covers and are
considered to be proof of a genuine leather
product.
In order to lessen the appearance of
certain scratches and other wear marks,
apply conditioner on the affected area
following the same instructions as in the
Conditioning section.
Conditioning
Bottles of King Ranch Leather Conditioner
are available at the King Ranch Saddle
Shop. Visit the website at
www.krsaddleshop.com, or call
1–800– 282–KING (5464) in the United
States. If you are unable to obtain King
Ranch Leather Conditioner, use another
premium leather conditioner.
• Clean the surfaces using the steps
outlined in the Cleaning section.
• Make sure the leather is dry then apply
a nickel-sized amount of conditioner
to a clean, dry cloth.
• Rub the conditioner into the leather
until it disappears. Allow the
conditioner to dry, then repeat the
process for the entire interior. If a film
appears, wipe it off with a dry, clean
cloth.
260
Super Duty (TFA) Canada/United States of America, enUSA, First Printing Vehicle Care
Page 264 of 507

REPAIRING MINOR PAINT
DAMAGE
Authorized dealers have touch-up paint to
match your vehicle
’s color. Your vehicle
color code is printed on a sticker on the
front, left-hand side door jamb. Take your
color code to your authorized dealer to
make sure you get the correct color.
Before repairing minor paint damage, use
a cleaner such as Motorcraft Bug and Tar
Remover to remove particles such as bird
droppings, tree sap, insect deposits, tar
spots, road salt and industrial fallout.
Always read the instructions before using
cleaning products.
CLEANING THE ALLOY
WHEELS (If Equipped)
Note: Do not apply a cleaning chemical to
warm or hot wheel rims and covers.
Note: Some automatic car washes may
cause damage to the finish on your wheel
rims and covers.
Note: Industrial-strength or heavy-duty
cleaners in combination with brush agitation
to remove brake dust and dirt, could wear
away the clear coat finish over a period time.
Note: Do not use hydrofluoric acid-based
or high caustic-based wheel cleaners, steel
wool, fuels or strong household detergents.
Note: If you intend parking your vehicle for
an extended period after cleaning the
wheels with a wheel cleaner, drive your
vehicle for a few minutes before doing so.
This will reduce the risk of increased
corrosion of the brake discs.
Alloy wheels and wheel covers are coated
with a clear coat paint finish. To maintain
their condition we recommend that you: •
Clean the wheels weekly using
Motorcraft Wheel and Tire Cleaner.
Apply using manufacturer's
instructions.
• Use a sponge to remove heavy
deposits of dirt and brake dust
accumulation.
• Rinse thoroughly with a strong stream
of water when you have completed the
cleaning process.
• To remove tar and grease, use
Motorcraft Bug and Tar Remover.
VEHICLE STORAGE
If you plan on storing your vehicle for 30
days or more, read the following
maintenance recommendations to make
sure your vehicle stays in good operating
condition.
We engineer and test all motor vehicles
and their components for reliable, regular
driving. Under various conditions,
long-term storage may lead to degraded
engine performance or failure unless you
use specific precautions to preserve engine
components.
General
• Store all vehicles in a dry, ventilated
place.
• Protect from sunlight, if possible.
• If vehicles are stored outside, they
require regular maintenance to protect
against rust and damage.
Body
• Wash your vehicle thoroughly to
remove dirt, grease, oil, tar or mud from
exterior surfaces, rear-wheel housing
and the underside of front fenders.
• Periodically wash your vehicle if it is
stored in exposed locations.
261
Super Duty (TFA) Canada/United States of America, enUSA, First Printing Vehicle Care
Page 267 of 507

GENERAL INFORMATION
Use only approved wheel and tire sizes,
using other sizes could damage your
vehicle. If you change the diameter of the
tires from that fitted at the factory, the
speedometer may not display the correct
speed. Take your vehicle to an authorized
Ford dealer to have the system
reprogrammed. If you intend to change the
size of the wheels from that fitted by the
manufacturer, you can check the suitability
with an authorized dealer.
Additional information related to the
functionality and maintenance of your tires
can be found later in this chapter. See Tire
Care (page 267).
The Ford recommended tire inflation
pressures can be found on the Tire Label,
which is located on the B-pillar or the edge
of the driver's door. This information can
also be found on the Safety Compliance
Certification Label (affixed to either the
door hinge pillar, door-latch post, or the
door edge that meets the door last post;
next to the driver ’s seating position).
Ford strongly recommends maintaining
these tire pressures at all times. Failure to
follow the tire pressure recommendations
can cause uneven treadwear patterns,
reduced fuel economy, and adversely
affect the way your vehicle handles.
Note: Check and set the tire pressure at the
ambient temperature in which you are
intending to drive your vehicle and when the
tires are cold.
Note: Check your tire pressures at least
once per month.
Set the pressure for your spare tire to the
highest value given for your vehicle and tire
size combination (if equipped). Notice to utility vehicle and truck
owners WARNINGS
Utility vehicles have a significantly
higher rollover rate than other types
of vehicles. To reduce the risk of
serious injury or death from a rollover or
other crash you must avoid sharp turns and
abrupt maneuvers, drive at safe speeds for
the conditions, keep tires inflated to Ford
recommended pressures, never overload
or improperly load your vehicle, and make
sure every passenger is properly restrained. In a rollover crash, an unbelted
person is significantly more likely to
die than a person wearing a seat belt.
All occupants must wear seat belts and
children/infants must use appropriate
restraints to minimize the risk of injury or
ejection. Do not become overconfident in the
ability of four-wheel drive vehicles.
Although a four-wheel drive vehicle
may accelerate better than a two-wheel
drive vehicle in low traction situations, it
won't stop any faster than two-wheel drive
vehicles. Always drive at a safe speed. 264
Super Duty (TFA) Canada/United States of America, enUSA, First Printing Wheels and TiresE145298