2016 FORD F150 USB
[x] Cancel search: USBPage 2 of 12

Table of Contents
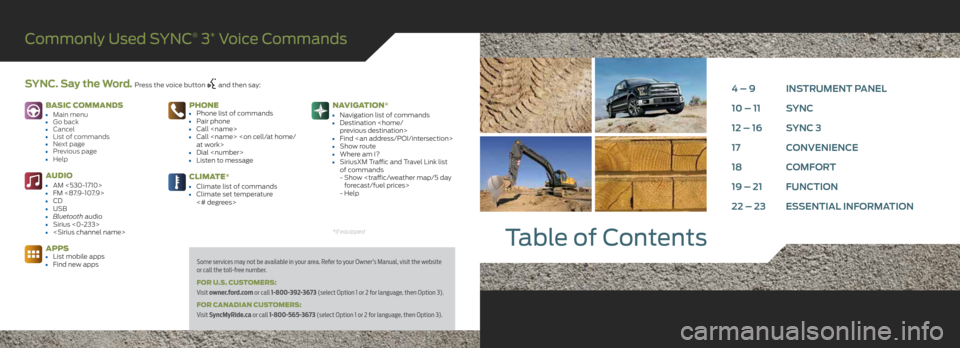
Commonly Used SYNC® 3* Voice Commands
SYNC. Say the Word. Press the voice button and then say:4 – 9 INSTRUMENT PANEL
10 – 11 SYNC
12 – 16 SYNC 3
17 CONVENIENCE
18 COMFORT
19 – 21 FUNCTION
22 – 23 ESSENTIAL INFORMATION
Some services may not be available in your area. Refer to your Owner’s Manual, visit the website
or call the toll-free number.
FOR U.S. CUSTOMERS:
Visit owner.ford.com or call 1-800-392-3673 (select Option 1 or 2 for language, then Option 3).
FOR CANADIAN CUSTOMERS:
Visit SyncMyRide.ca or call 1-800-565-3673 (select Option 1 or 2 for language, then Option 3).
*if equipped
BASIC COMMANDS• Main menu• Go back• Cancel• List of commands• Next page• Previous page• Help
AUDIO
• AM <530-1710>• FM <87.9-107.9>• CD• USB• Bluetooth audio• Sirius <0-233>•
APPS• List mobile apps• Find new apps
PHONE• Phone list of commands• Pair phone• Call
• Dial
CLIMATE*
• Climate list of commands• Climate set temperature
<# degrees>
NAVIGATION*
• Navigation list of commands• Destination
• Find
of commands
- Show
- Help
Page 6 of 12

The System May Prompt You to
• Set your phone as the primary or favorite (the primary phone receives
messages and voicemail).
• Download your phone book (required to use the full set of voice commands).
• Switch on 911 Assist®.
TIPS
• Make sure you accept the request from SYNC to access your phone.
• To pair subsequent phones, please refer to Pairing Subsequent Phones in the
SYNC chapter of your Owner’s Manual.
• If you experience pairing problems, try performing a clean pairing by deleting
your device from SYNC and deleting the SYNC connection from your phone,
and then repeat the process.
WHY DO YOU NEED A SYNC OWNER ACCOUNT?
A SYNC owner account is a requirement to receive the latest software updates
and if you have questions, receive free customer support. For more information,
refer to your Owner’s Manual, visit the website or call the toll-free number. See
the inside front cover of this guide for details.
GETTING STARTED WITH YOUR SYNC SYSTEM
SYNC is a hands-free, voice recognition system used for entertainment, information
and communication. SYNC. SAY THE WORD.
BEFORE YOU GET STARTED
1.
Set up your owner account at owner.ford.com (U.S.) or SyncMyRide.ca (Canada).
Register by following the on-screen instructions. After registering, you can see what
services you may be eligible for.
2. SYNC uses a wireless connection called Bluetooth® to communicate with your
phone. Switch Bluetooth mode on in your phone’s menu options. This lets your phone
find SYNC. For more details on setting up your phone with SYNC, visit owner.ford.com
(U.S.) or SyncMyRide.ca (Canada), or your phone manufacturer’s website.
PAIRING YOUR PHONE WITH SYNC
Note: If you have SYNC 3* with the 8-inch touchscreen, use the pairing instructions
on page 13.
In order to use many of the features of SYNC, you must first pair and connect your
phone with SYNC. To pair your phone for the first time:
1. Make sure that your vehicle is in park (P), you switch on your vehicle's ignition and radio, and your device's Bluetooth feature is also switched on. This allows SYNC to
find your phone. See your device’s manual, if necessary.
2. Press the phone button
. When the display indicates that the system does not
have a paired phone, press OK.
3. When Find SYNC appears in the display, press OK.
4. When prompted on your phone’s display, enter the six-digit PIN provided by SYNC in the radio display.
5. The display indicates when the pairing is successful. USING YOUR PHONE WITH SYNC
Note: You can download your phone book to make phone calls with voice commands
by name.
MAKING A PHONE CALL
Use SYNC to make a phone call to anyone in your phone book by pressing the voice
button
. When prompted, give a voice command.
For example, you could say “Call Jake Smith at home”. When the system confirms the
number, say “Dial” to initiate the call.
Note: You can also make phone calls by pressing the voice button
. When
prompted, give the voice command “Dial” and then verbally say the phone number.
ANSWERING INCOMING CALLS
Whenever you have an incoming call, you will be able to see the name and number of
the person calling in your display. Press the phone button to answer an incoming call.
You can hang up at any time by pressing and holding the phone button
.
USING SYNC TO ACCESS DIGITAL MEDIA
SYNC has a media hub with multiple inputs allowing you to access personal media from
your digital devices. Plug in your USB media devices such as phones and MP3 players
and use SYNC to play all of your favorite music.
Note: SYNC indexes all of your music. The more music that is stored on your device, the
longer it takes SYNC to index. You can then use voice indexing to find a specific song,
artist, playlist or genre when using the USB port to hard-wire your media device.
SYNC
®*
10 – 11
*if equipped
Page 8 of 12

NAVIGATION*
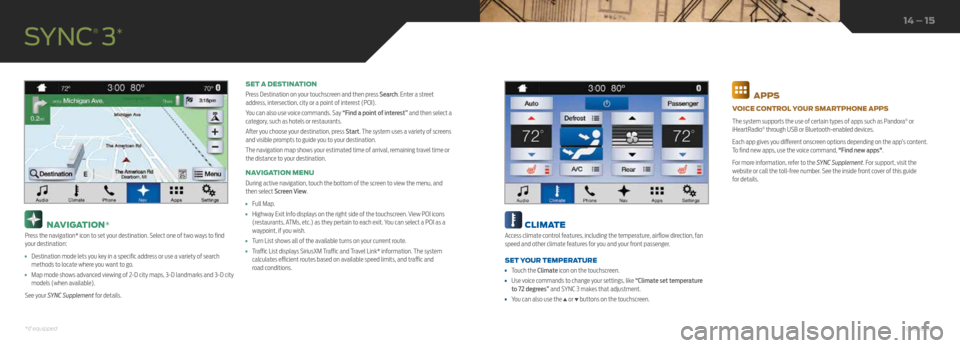
Press the navigation* icon to set your destination. Select one of two ways to find
your destination:
• Destination mode lets you key in a specific address or use a variety of search
methods to locate where you want to go.
• Map mode shows advanced viewing of 2-D city maps, 3-D landmarks and 3-D city
models (when available).
See your SYNC Supplement for details. SET A DESTINATION
Press Destination on your touchscreen and then press Search. Enter a street
address, intersection, city or a point of interest (POI).
You can also use voice commands. Say “Find a point of interest” and then select a
category, such as hotels or restaurants.
After you choose your destination, press Start. The system uses a variety of screens
and visible prompts to guide you to your destination.
The navigation map shows your estimated time of arrival, remaining travel time or
the distance to your destination.
NAVIGATION MENU
During active navigation, touch the bottom of the screen to view the menu, and
then select Screen View.
•
Full Map.
• Highway Exit Info displays on the right side of the touchscreen. View POI icons
(restaurants, ATMs, etc.) as they pertain to each exit. You can select a POI as a
waypoint, if you wish.
• Turn List shows all of the available turns on your current route.
• Traffic List displays SiriusXM Traffic and Travel Link* information. The system
calculates efficient routes based on available speed limits, and traffic and
road conditions.
SYNC
® 3*
14 – 15
CLIMATE
Access climate control features, including the temperature, airflow direction, fan
speed and other climate features for you and your front passenger.
SET YOUR TEMPERATURE
• Touch the Climate icon on the touchscreen.
• Use voice commands to change your settings, like “Climate set temperature
to 72 degrees” and SYNC 3 makes that adjustment.
• You can also use the ▲ or ▼ buttons on the touchscreen.
APPS
VOICE CONTROL YOUR SMARTPHONE APPS
The system supports the use of certain types of apps such as Pandora
® or
iHeartRadio® through USB or Bluetooth-enabled devices.
Each app gives you different onscreen options depending on the app’s content.
To find new apps, use the voice command, "Find new apps".
For more information, refer to the SYNC Supplement. For support, visit the
website or call the toll-free number. See the inside front cover of this guide
for details.
*if equipped*if equipped
Page 9 of 12

AUDIO
No matter how you store your music, SYNC makes it yours to enjoy when you're behind
the wheel. Just press the Audio icon on the touchscreen. From here, you can easily go
between AM/FM, SiriusXM and other media sources.
SET YOUR RADIO PRESETS
• Tune to the station and then press and hold one of the memory preset buttons. The
audio mutes briefly while the system saves the station, and then the audio returns.
• Two preset banks are available for AM and three banks for FM. To access additional
presets, tap the preset button. The indicator on the preset button shows which bank of
presets you are currently viewing.
BRING IN YOUR OWN MUSIC
Use SYNC to play all of your favorite music from phones, flash drives and other devices.
Plug your device into a USB port, select Sources and then choose USB . Wait for the
system to finish indexing your music to begin listening.
You can even create random playlists by using the Shuffle function.
USB AND POWER POINT LOCATIONS
Depending on your vehicle, you may find USB and power point outlets in and around the
center console, in the instrument panel and on the back of the center console for rear-seat
passengers. See the Storage Compartment section in your Owner's Manual.
SYNC
® 3*
MEMORY FUNCTION*
The feature automatically recalls the position
of the driver seat, power mirrors and steering
column*. Use the memory controls on the door
panel to program and then recall memory
positions. To program, switch the ignition on.
1. Move the memory features to the desired positions.
2. Press and hold button 1 until you hear a tone.
3. Use this same procedure to set the second and third positions using
buttons 2 and 3, respectively.
Press a control to recall the set positions. You can also program your memory
seats to your transmitter. That way, when you unlock your door with the
transmitter, your memory features automatically move into your saved position.
See the Seats chapter in your Owner's Manual for more details.
MULTI-CONTOUR FRONT SEATS WITH ACTIVE MOTION*
Using the button mounted on the outside of the front seats, or through the
touchscreen, you and a front-seat passenger can adjust the massage and support
settings. You can also control the intensity of the massage, increase or decrease
the lumbar bolster and cushion support, and adjust the height of the bolster. To
program, switch the ignition on. Refer to Mult-Contour Front Seats with Active
Motion in the Seats chapter of your Owner's Manual for more details. ADJUSTABLE HEAD RESTRAINTS
Adjust the seatback to an upright driving position before adjusting the head
restraint. Adjust the head restraint so that the top of it is level with the top of your
head and as far forward as possible. Make sure that you remain comfortable. To
raise, pull up on the head restraint. To lower, press the head restraint down while
pressing and holding the guide sleeve button.
You may also be able to tilt the head restraint forward or backward for additional
comfort. Pivot the head restraint forward to the desired location. After the head
restraint reaches the forward-most tilt position, pivot it forward again to return it
to its standard position.
Note: After tilting the head restraint, do not attempt to force the head
restraint backward.
16 – 17
Convenience
*if equipped*if equipped