2016 FORD F150 tire type
[x] Cancel search: tire typePage 8 of 505

Cleaning the Alloy Wheels.......................335
Vehicle Storage............................................336
Wheels and Tires
General Information
...................................338
Tire Care
.........................................................340
Using Snow Chains
.....................................355
Tire Pressure Monitoring System..........356
Changing a Road Wheel............................361
Technical Specifications
..........................369
Capacities and Specific- ations
Engine Specifications
................................370
Motorcraft Parts
............................................371
Vehicle Identification Number.................371
Vehicle Certification Label........................372
Transmission Code Designation
.............373
Capacities and Specifications - 2.7L EcoBoost™................................................374
Capacities and Specifications - 3.5L Ecoboost™................................................378
Capacities and Specifications - 3.5L....382
Capacities and Specifications - 5.0L...............................................................387
Audio System
General Information
...................................392
Audio Unit - Vehicles With: AM/FM......393
Audio Unit - Vehicles With: AM/FM/ CD..................................................................395
Audio Unit - Vehicles With: AM/FM/ SYNC...........................................................398
Audio Unit - Vehicles With: AM/FM/CD/ SYNC/Satellite Radio
...........................400
Audio Unit - Vehicles With: Sony AM/FM/ CD.................................................................402
Digital Radio
.................................................404
Satellite Radio.............................................406
USB Port.........................................................409
Media Hub
.....................................................409 SYNC™
General Information....................................410
Using Voice Recognition............................412
Using SYNC™ With Your Phone.............414
SYNC™ Applications and Services......426
Using SYNC™ With Your Media
Player............................................................431
SYNC™ Troubleshooting
.........................440
Accessories
Accessories...................................................448
Extended Service Plan (ESP)
Extended Service Plan (ESP)..................451
Scheduled Maintenance
General Maintenance Information.......453
Normal Scheduled Maintenance
..........456
Special Operating Conditions Scheduled Maintenance.............................................459
Scheduled Maintenance Record
...........462
Appendices
End User License Agreement..................472
Type Approvals
............................................488
5
F-150 (TFC) Canada/United States of America, enUSA, Edition date: 08/2015, First Printing Table of Contents
Page 39 of 505

Safety Belt Locking Modes
WARNINGS
After any vehicle crash, the safety
belt system at all passenger seating
positions must be checked by an
authorized dealer to verify that the
automatic locking retractor feature for
child seats is still functioning properly. In
addition, all safety belts should be checked
for proper function. The belt and retractor must be
replaced if the safety belt assembly
automatic locking retractor feature
or any other safety belt function is not
operating properly when checked by an
authorized dealer. Failure to replace the
belt and retractor assembly could increase
the risk of injury in crashes. All safety restraints in the vehicle are
combination lap and shoulder belts. The
driver safety belt has the first type of
locking mode, and the front outboard
passenger and rear seat safety belts have
both types of locking modes described as
follows:
Vehicle Sensitive Mode
This is the normal retractor mode, which
allows free shoulder belt length
adjustment to your movements and
locking in response to vehicle movement.
For example, if the driver brakes suddenly,
turns a corner sharply, or the vehicle
receives an impact of about 5 mph
(8 km/h) or more, the combination safety
belts will lock to help reduce forward
movement of the driver and passengers.
In addition, the retractor is designed to lock
if the webbing is pulled out too quickly. If
this occurs, let the belt retract slightly and
pull webbing out again in a slow and
controlled manner. Automatic Locking Mode
In this mode, the shoulder belt is
automatically pre-locked. The belt will still
retract to remove any slack in the shoulder
belt. The automatic locking mode is not
available on the driver safety belt.
When to Use the Automatic Locking
Mode
Use this mode any time you install a child
safety seat in a front outboard passenger
seating position in a Regular Cab,
SuperCab, SuperCrew or any rear seating
position of a SuperCab or SuperCrew. The
optional front seat's center safety belt has
a cinch mechanism. Children 12 years old
and under should be properly restrained in
a rear seat whenever possible. See
Child
Safety (page 15).
How to Use the Automatic Locking
Mode
Non-inflatable safety belts 1. Buckle the combination lap and
shoulder belt.
2. Grasp the shoulder portion and pull downward until you pull the entire belt
out.
3. Allow the belt to retract. As the belt retracts, you will hear a clicking sound.
This indicates the safety belt is now in
the automatic locking mode.
36
F-150 (TFC) Canada/United States of America, enUSA, Edition date: 08/2015, First Printing SeatbeltsE142591
Page 76 of 505

1.
Insert the first previously programmed
coded key into the ignition.
2. Switch the ignition from off to on. Keep
the ignition on for at least three
seconds, but no more than 10 seconds.
3. Switch the ignition off and remove the
first coded key from the ignition.
4. After three seconds but within 10 seconds of switching the ignition off,
insert the second previously coded key
into the ignition.
5. Switch the ignition from off to on. Keep
the ignition on for at least three
seconds, but no more than 10 seconds.
6. Switch the ignition off and remove the
second previously programmed coded
key from the ignition.
7. After three seconds but within 10 seconds of switching the ignition off
and removing the previously
programmed coded key, insert the new
unprogrammed key into the ignition.
8. Switch the ignition from off to on. Keep
the ignition on for at least six seconds
until you hear the door locks cycle.
9. Remove the newly programmed coded
key from the ignition.
The key starts the engine if programming
is successful. You can operate the remote
entry system if the new key is an integrated
keyhead transmitter.
If programming was not successful, wait
20 seconds and repeat Steps 1 through 8.
If you are still unsuccessful, take your
vehicle to an authorized dealer.
Programming a Spare Intelligent
Access Key
Note: You can program a maximum of four
intelligent access keys to your vehicle. Note:
If your programmed transmitters are
lost or stolen and you do not have an extra
coded key, you need to have your vehicle
towed to an authorized dealer. You need to
erase the key codes from your vehicle and
program new coded keys. Store an extra
programmed key away from your vehicle in
a safe place to help prevent any
inconvenience. Contact an authorized dealer
to purchase additional spare or replacement
keys.
You must have two previously
programmed intelligent access keys inside
your vehicle and the new unprogrammed
intelligent access keys readily accessible.
Contact an authorized dealer to have the
spare key programmed if two previously
programmed keys are not available.
Make sure that your vehicle is off before
beginning this procedure. Make sure that
you close all the doors before beginning
and that they remain closed throughout
the procedure. Perform all steps within 30
seconds of starting the sequence. Stop
and wait for at least one minute before
starting again if you perform any steps out
of sequence.
Read and understand the entire procedure
before you begin.
Type One 73
F-150 (TFC) Canada/United States of America, enUSA, Edition date: 08/2015, First Printing SecurityE187576
Page 113 of 505

Fuel Economy
Distance to E
Instant Fuel Economy
Average Fuel Economy
Auto StartStop status
• Distance to E - Shows the approximate distance your vehicle can travel before running
out of fuel.
• Instant Fuel Economy - Shows your instantaneous fuel usage.
• Average Fuel Economy - Shows the average fuel usage based on time. Press and hold
OK to reset this value.
• Auto StartStop status - Shows the current status of the auto startstop system.
Note: You can reset your average fuel economy by pressing and holding the OK button on
the left hand steering wheel controls.
Driver Assist
Note: Use the arrow buttons to configure different driver setting choices. Driver Assist
Engine Hours XXXXXX
Engine Hours
Driver Assist
Engine Idle Hours XXXXXX
Vehicle graphic with tire pres-
sures
Tire Pressure
Rear Park Aid
Select Your Setting
Brake Type
Trailer Sway
Note: Some items are optional and may not appear.
110
F-150 (TFC) Canada/United States of America, enUSA, Edition date: 08/2015, First Printing Information Displays
Page 115 of 505

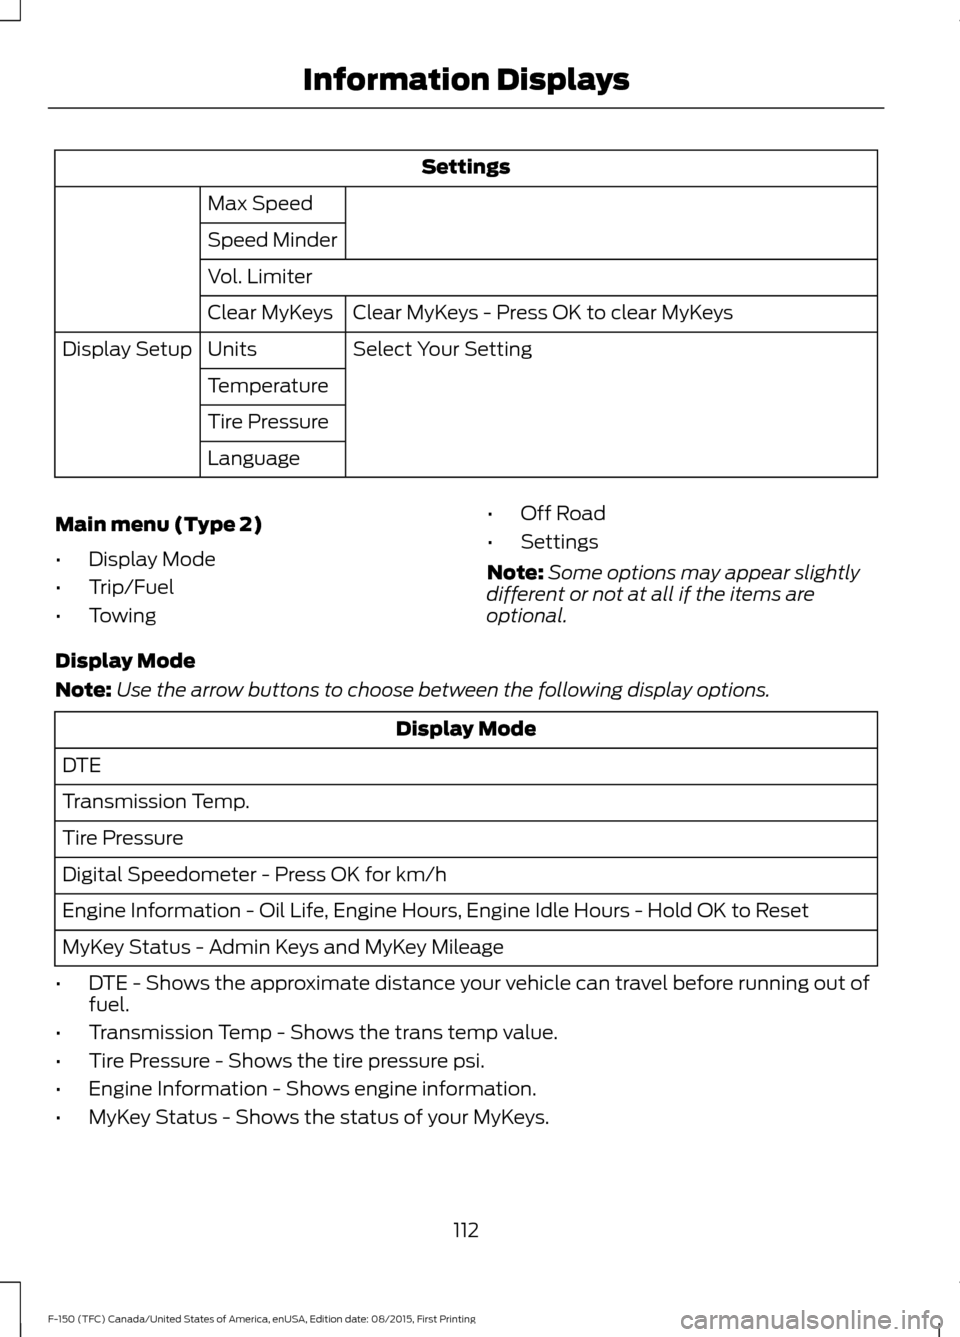
Settings
Max Speed
Speed Minder
Vol. Limiter Clear MyKeys - Press OK to clear MyKeys
Clear MyKeys
Select Your Setting
Units
Display Setup
Temperature
Tire Pressure
Language
Main menu (Type 2)
• Display Mode
• Trip/Fuel
• Towing •
Off Road
• Settings
Note: Some options may appear slightly
different or not at all if the items are
optional.
Display Mode
Note: Use the arrow buttons to choose between the following display options. Display Mode
DTE
Transmission Temp.
Tire Pressure
Digital Speedometer - Press OK for km/h
Engine Information - Oil Life, Engine Hours, Engine Idle Hours - Hold OK to Reset
MyKey Status - Admin Keys and MyKey Mileage
• DTE - Shows the approximate distance your vehicle can travel before running out of
fuel.
• Transmission Temp - Shows the trans temp value.
• Tire Pressure - Shows the tire pressure psi.
• Engine Information - Shows engine information.
• MyKey Status - Shows the status of your MyKeys.
112
F-150 (TFC) Canada/United States of America, enUSA, Edition date: 08/2015, First Printing Information Displays
Page 120 of 505

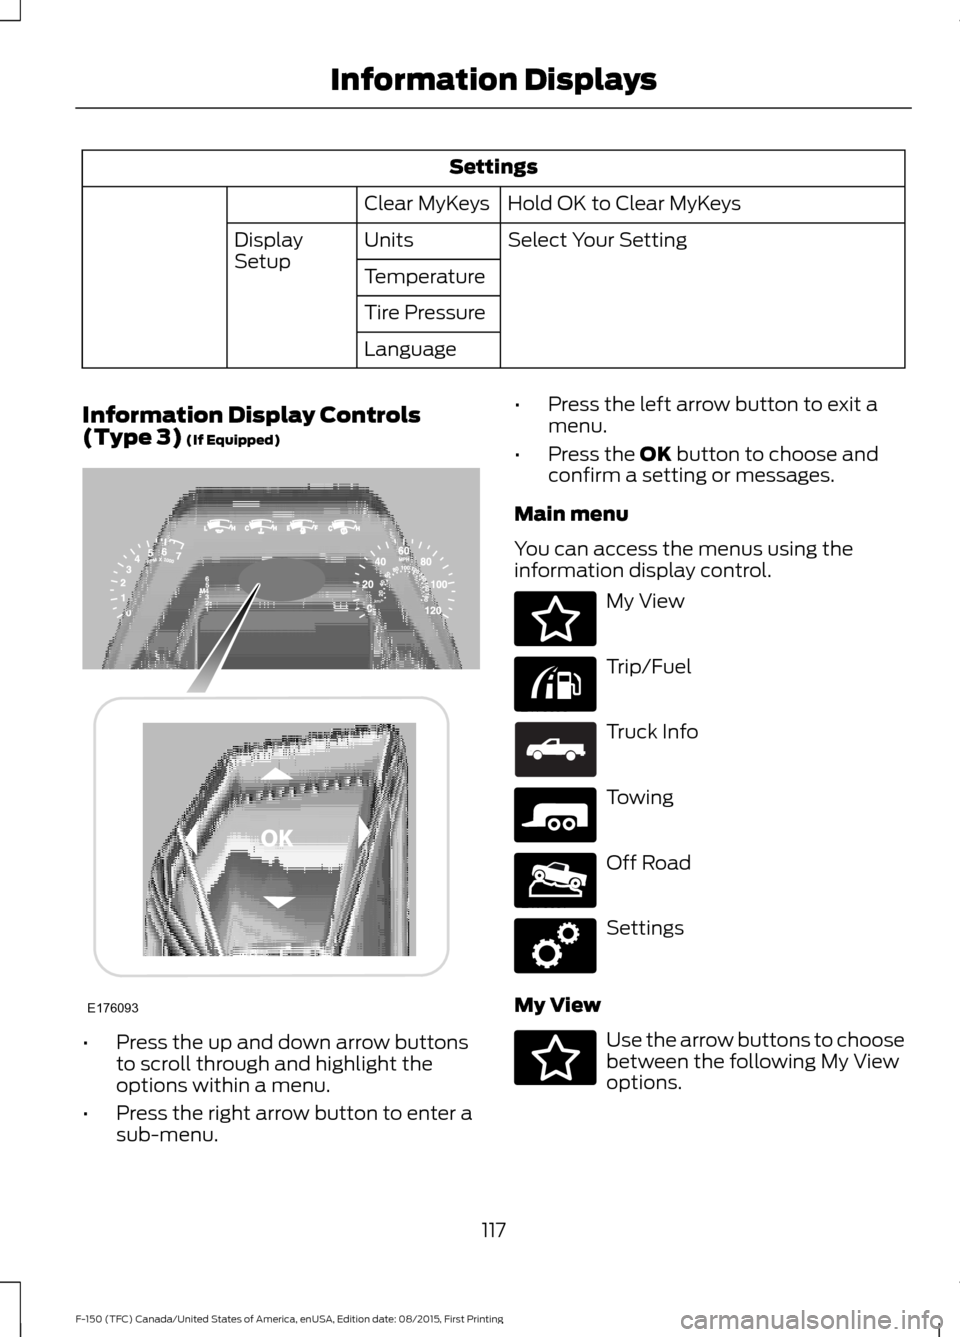
Settings
Hold OK to Clear MyKeys
Clear MyKeys
Select Your Setting
Units
Display
Setup
Temperature
Tire Pressure
Language
Information Display Controls
(Type 3) (If Equipped) •
Press the up and down arrow buttons
to scroll through and highlight the
options within a menu.
• Press the right arrow button to enter a
sub-menu. •
Press the left arrow button to exit a
menu.
• Press the OK button to choose and
confirm a setting or messages.
Main menu
You can access the menus using the
information display control. My View
Trip/Fuel
Truck Info
Towing
Off Road
Settings
My View Use the arrow buttons to choose
between the following My View
options.
117
F-150 (TFC) Canada/United States of America, enUSA, Edition date: 08/2015, First Printing Information DisplaysE176093 E176094 E176095 E163181 E176096 E176097 E176098 E176094
Page 127 of 505

Settings
Seats and Wheel or
Seats
Duration
Advanced
Settings
System
Courtesy Wipe
Wiper Controls
Rain Sensing
Hold OK to Create MyKey
Create MyKey
MyKey
Select Your Setting
911 Assist
Do Not Disturb
AdvanceTrac
Max Speed
Speed Minder
Volume Limiter
Hold OK to Clear MyKeys
Clear MyKeys
Select Your Setting
Units
Display Setup
Temperature
Tire Pressure
Language
INFORMATION MESSAGES
Note: Depending on your vehicle options
and instrument cluster type, not all of the
messages will display or be available. The
information display may abbreviate or
shorten certain messages. 124
F-150 (TFC) Canada/United States of America, enUSA, Edition date: 08/2015, First Printing Information DisplaysE184451
Page 191 of 505

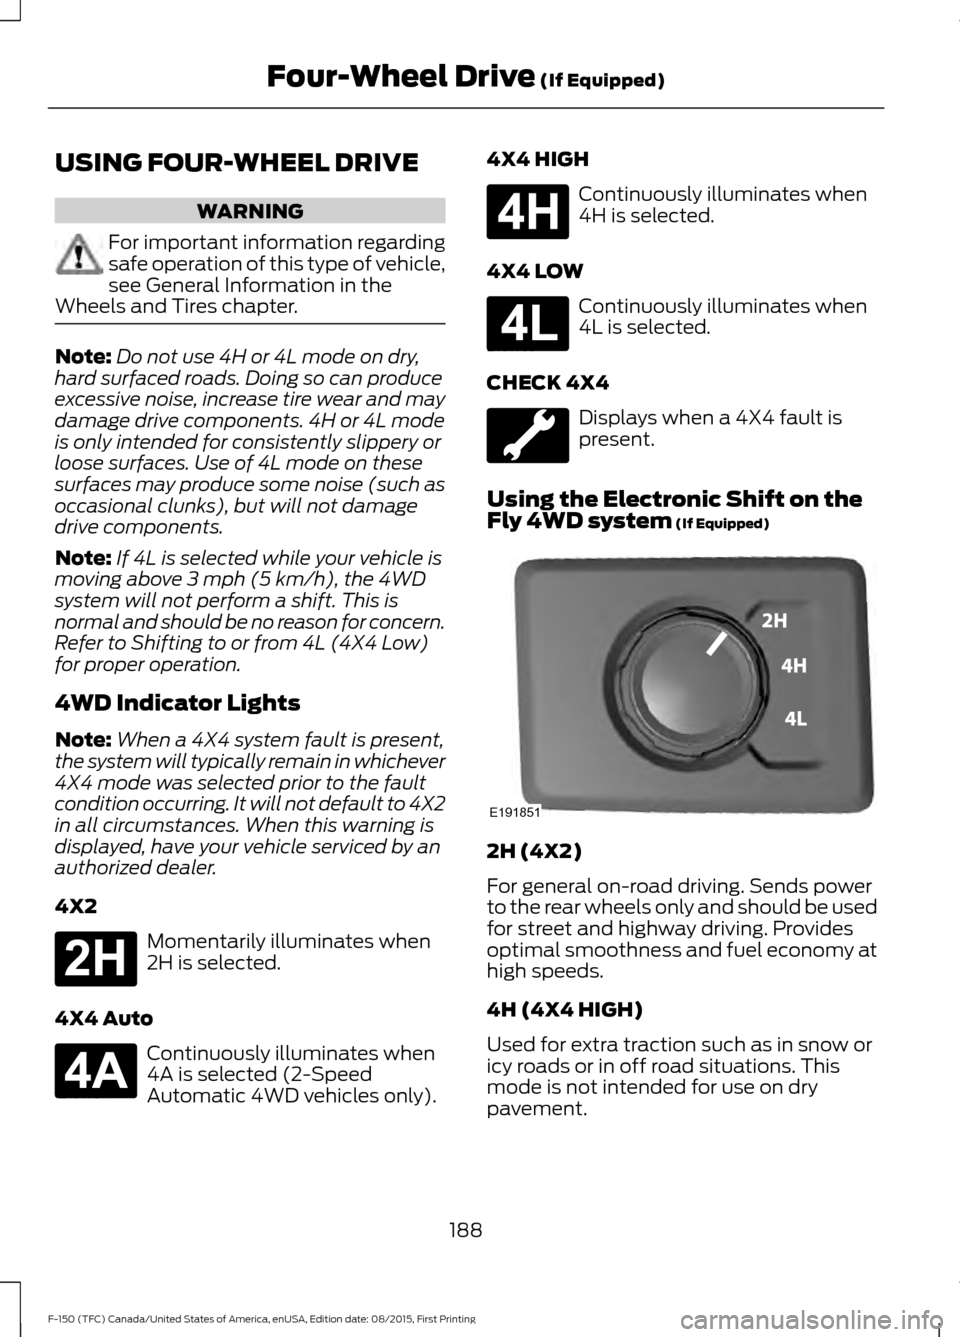
USING FOUR-WHEEL DRIVE
WARNING
For important information regarding
safe operation of this type of vehicle,
see General Information in the
Wheels and Tires chapter. Note:
Do not use 4H or 4L mode on dry,
hard surfaced roads. Doing so can produce
excessive noise, increase tire wear and may
damage drive components. 4H or 4L mode
is only intended for consistently slippery or
loose surfaces. Use of 4L mode on these
surfaces may produce some noise (such as
occasional clunks), but will not damage
drive components.
Note: If 4L is selected while your vehicle is
moving above 3 mph (5 km/h), the 4WD
system will not perform a shift. This is
normal and should be no reason for concern.
Refer to Shifting to or from 4L (4X4 Low)
for proper operation.
4WD Indicator Lights
Note: When a 4X4 system fault is present,
the system will typically remain in whichever
4X4 mode was selected prior to the fault
condition occurring. It will not default to 4X2
in all circumstances. When this warning is
displayed, have your vehicle serviced by an
authorized dealer.
4X2 Momentarily illuminates when
2H is selected.
4X4 Auto Continuously illuminates when
4A is selected (2-Speed
Automatic 4WD vehicles only). 4X4 HIGH Continuously illuminates when
4H is selected.
4X4 LOW Continuously illuminates when
4L is selected.
CHECK 4X4 Displays when a 4X4 fault is
present.
Using the Electronic Shift on the
Fly 4WD system
(If Equipped) 2H (4X2)
For general on-road driving. Sends power
to the rear wheels only and should be used
for street and highway driving. Provides
optimal smoothness and fuel economy at
high speeds.
4H (4X4 HIGH)
Used for extra traction such as in snow or
icy roads or in off road situations. This
mode is not intended for use on dry
pavement.
188
F-150 (TFC) Canada/United States of America, enUSA, Edition date: 08/2015, First Printing Four-Wheel Drive
(If Equipped)E181778 E181781 E181779 E181780 E191851