2016 FORD F150 climate settings
[x] Cancel search: climate settingsPage 114 of 505

Tire Pressure
Displays your current vehicle tire pres- sures.Settings
Settings
Select Your Setting
DTE Calculate
Vehicle
Select Your Setting
Autolamp Delay
Lighting
Daytime Light
Autolock
Locks
Autounlock Select Your Setting
Remote Unlock
Remaining Life XX% - Hold OK to reset
Oil Life Reset
Select Your Setting
Climate Control
Remote Start
Duration
System
Courtesy Wipe
Wiper
Controls
Admin Keys and MyKeys
MyKey Status
MyKey
MyKey Mileage
Hold OK to Create MyKey
Create MyKey
Select Your Setting
911 Assist
Do Not
Disturb
AdvanceTrac
111
F-150 (TFC) Canada/United States of America, enUSA, Edition date: 08/2015, First Printing Information DisplaysE185360
Page 119 of 505

Settings
Settings
Blind Spot
Cross Traffic Alert
Rear Park Aid Select Your Setting
DTE Calcula-
tion
Easy Entry/ExitSelect Your Setting
Autolamp
Delay
Lighting
Daytime Lights
Autolock
Locks
AutounlockSelect Your Setting
Remote
Unlock
Vehicle
Climate
Control
Remote Start
Seats
Duration
System
Courtesy Wipe
Wiper
Controls
Advanced
Settings
Rain Sensing
Hold OK to Create MyKey
Create MyKey
MyKey
Select Your Setting
911 Assist
Do Not
Disturb
AdvanceTrac
Max Speed
Speed Minder
Volume Limiter
116
F-150 (TFC) Canada/United States of America, enUSA, Edition date: 08/2015, First Printing Information Displays
Page 126 of 505

Settings
Auto Highbeam
Blind Spot
Cross Traffic Alert
Driver Alert
Rear Park Aid Select Your Setting
Alert Sensit-
ivity
Collision
Warn
Warn
Select Your Setting
Cruise
Control
Select Your Setting
Mode
Lane
Keeping
System Alert Intensity
Select Your Setting
DTE Calcula-
tion
Auto Engine Off
Vehicle
Easy Entry/Exit Select Your
Setting
Autolamp Delay
Lighting
Daytime Lights
Autolock
Locks
Autounlock Select Your
Setting
Remote Unlock
Select Your Setting
Alarm
Ask on Exit
Select Your Setting
Power Running
Boards
Select Your
Setting
Climate Control
Remote Start
123
F-150 (TFC) Canada/United States of America, enUSA, Edition date: 08/2015, First Printing Information Displays
Page 145 of 505

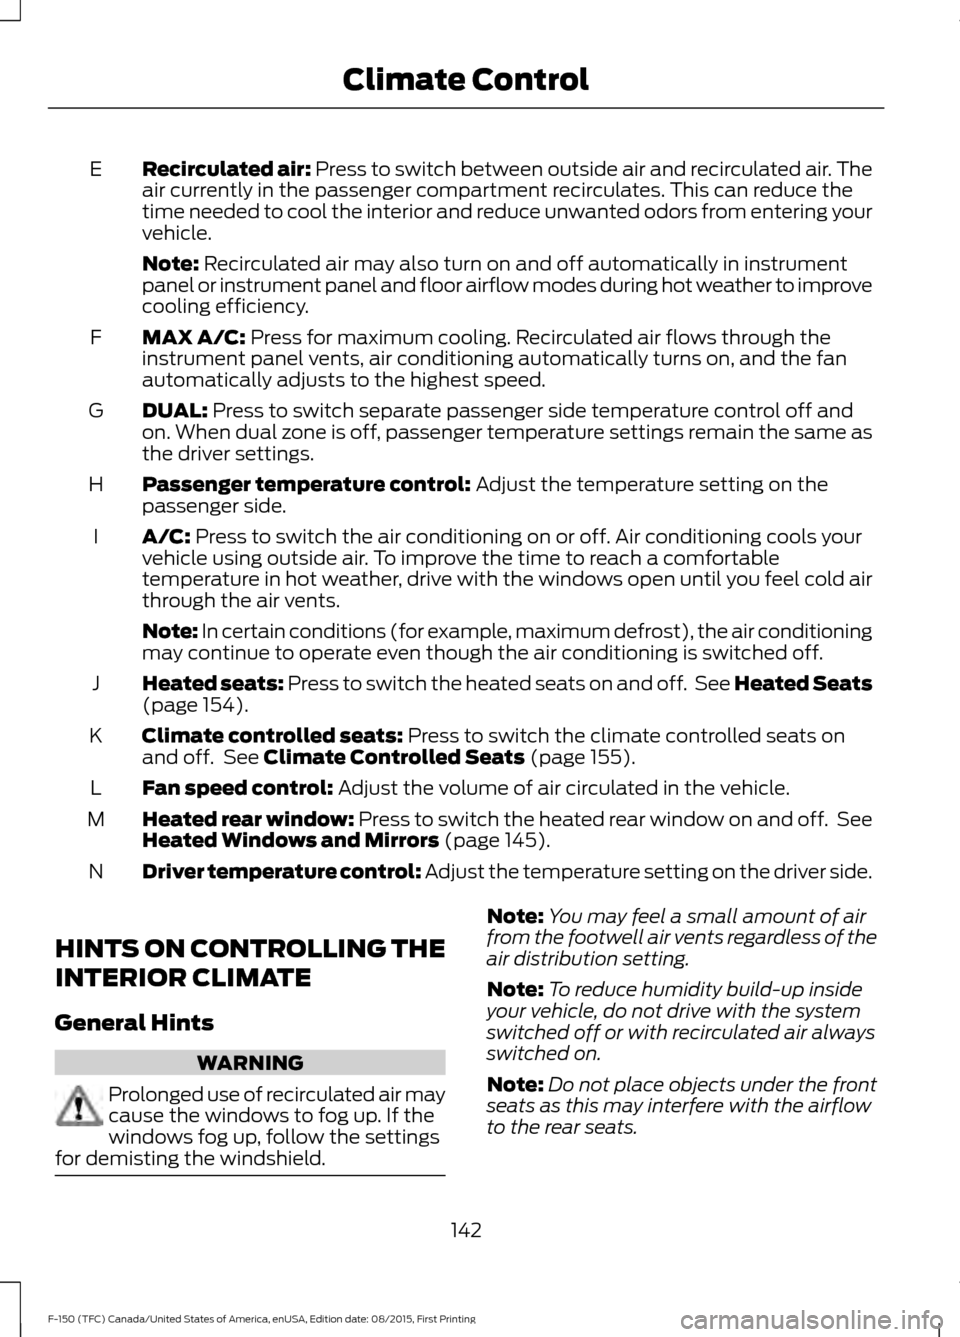
Recirculated air: Press to switch between outside air and recirculated air. The
air currently in the passenger compartment recirculates. This can reduce the
time needed to cool the interior and reduce unwanted odors from entering your
vehicle.
E
Note:
Recirculated air may also turn on and off automatically in instrument
panel or instrument panel and floor airflow modes during hot weather to improve
cooling efficiency.
MAX A/C:
Press for maximum cooling. Recirculated air flows through the
instrument panel vents, air conditioning automatically turns on, and the fan
automatically adjusts to the highest speed.
F
DUAL:
Press to switch separate passenger side temperature control off and
on. When dual zone is off, passenger temperature settings remain the same as
the driver settings.
G
Passenger temperature control:
Adjust the temperature setting on the
passenger side.
H
A/C:
Press to switch the air conditioning on or off. Air conditioning cools your
vehicle using outside air. To improve the time to reach a comfortable
temperature in hot weather, drive with the windows open until you feel cold air
through the air vents.
I
Note: In certain conditions (for example, maximum defrost), the air conditioning
may continue to operate even though the air conditioning is switched off.
Heated seats:
Press to switch the heated seats on and off. See Heated Seats
(page 154).
J
Climate controlled seats:
Press to switch the climate controlled seats on
and off. See Climate Controlled Seats (page 155).
K
Fan speed control:
Adjust the volume of air circulated in the vehicle.
L
Heated rear window: Press to switch the heated rear window on and off. See
Heated Windows and Mirrors
(page 145).
M
Driver temperature control: Adjust the temperature setting on the driver side.
N
HINTS ON CONTROLLING THE
INTERIOR CLIMATE
General Hints WARNING
Prolonged use of recirculated air may
cause the windows to fog up. If the
windows fog up, follow the settings
for demisting the windshield. Note:
You may feel a small amount of air
from the footwell air vents regardless of the
air distribution setting.
Note: To reduce humidity build-up inside
your vehicle, do not drive with the system
switched off or with recirculated air always
switched on.
Note: Do not place objects under the front
seats as this may interfere with the airflow
to the rear seats.
142
F-150 (TFC) Canada/United States of America, enUSA, Edition date: 08/2015, First Printing Climate Control
Page 146 of 505

Note:
Remove any snow, ice or leaves from
the air intake area at the base of the
windshield.
Note: To improve the time to reach a
comfortable temperature in hot weather,
drive with the windows open until you feel
cold air through the air vents.
Manual Climate Control
Note: To reduce fogging of the windshield
during humid weather, adjust the air
distribution control to the windshield air
vents position. Automatic Climate Control
Note:
Adjusting the settings when your
vehicle interior is extremely hot or cold is
not necessary. The system automatically
adjusts to heat or cool the interior to your
selected temperature as quickly as possible.
For the system to function efficiently, the
instrument panel and side air vents should
be fully open.
Note: If you select AUTO during cold
outside temperatures, the system directs
airflow to the windshield and side window
vents. In addition, the fan may run at a
slower speed until the engine warms up.
Note: If you select AUTO during hot outside
temperatures, or when the inside of the
vehicle is hot, the system automatically uses
recirculated air to maximize interior cooling.
When the interior reaches the selected
temperature, the system automatically
switches to using outside air.
Heating the Interior Quickly Vehicle with automatic climate control
Vehicle with manual climate control
Press the
AUTO button.
Adjust the fan speed to a high speed
setting.
1
Adjust the temperature control to the
desired setting.
Adjust the temperature control to the
full heat setting.
2
Select the footwell air vents using the
air distribution buttons.
3
143
F-150 (TFC) Canada/United States of America, enUSA, Edition date: 08/2015, First Printing Climate Control
Page 147 of 505

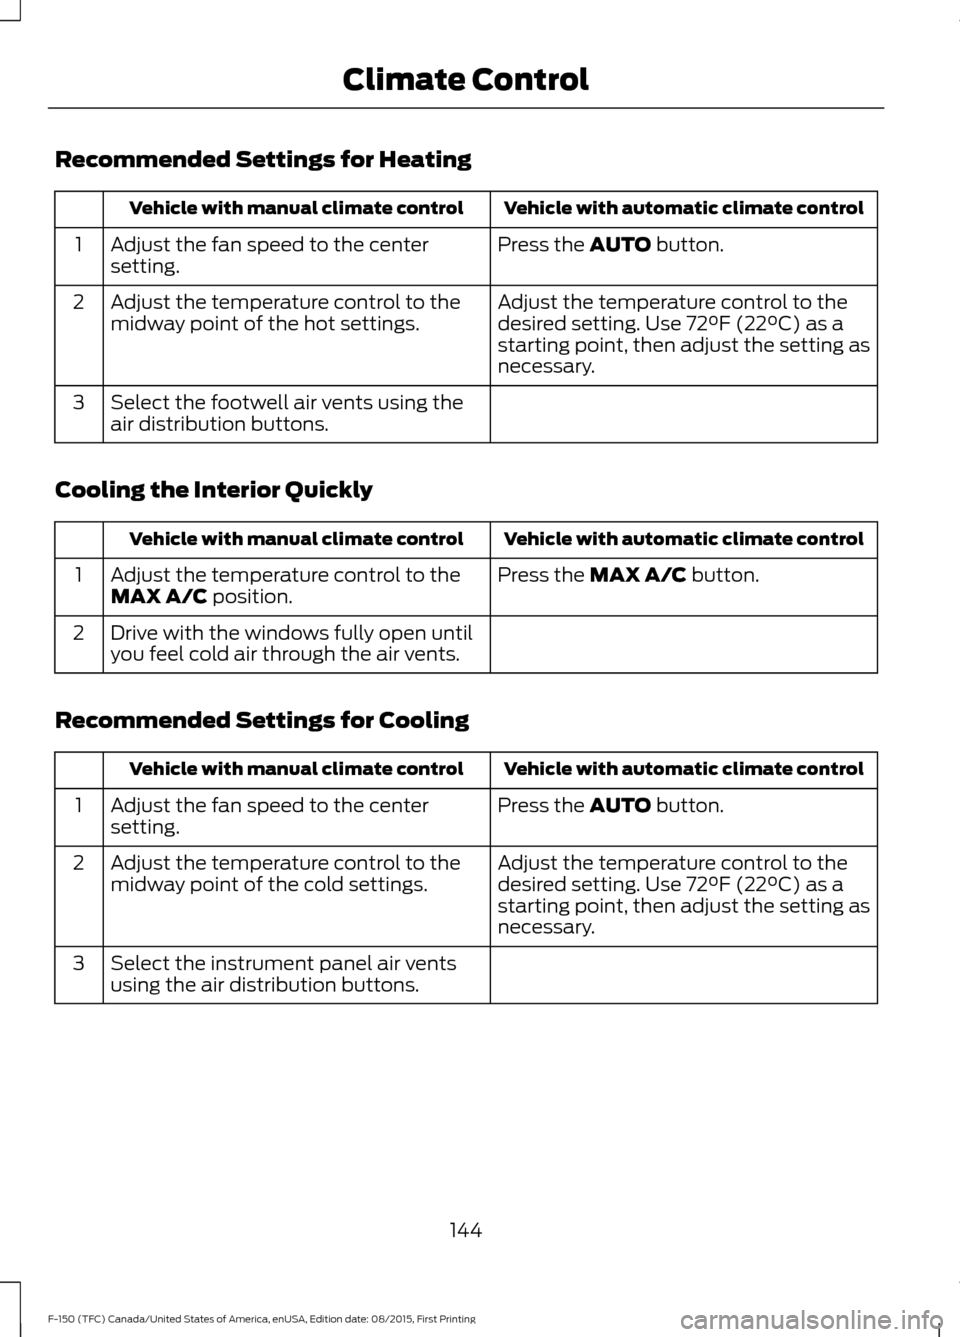
Recommended Settings for Heating
Vehicle with automatic climate control
Vehicle with manual climate control
Press the AUTO button.
Adjust the fan speed to the center
setting.
1
Adjust the temperature control to the
desired setting. Use
72°F (22°C) as a
starting point, then adjust the setting as
necessary.
Adjust the temperature control to the
midway point of the hot settings.
2
Select the footwell air vents using the
air distribution buttons.
3
Cooling the Interior Quickly Vehicle with automatic climate control
Vehicle with manual climate control
Press the
MAX A/C button.
Adjust the temperature control to the
MAX A/C position.
1
Drive with the windows fully open until
you feel cold air through the air vents.
2
Recommended Settings for Cooling Vehicle with automatic climate control
Vehicle with manual climate control
Press the
AUTO button.
Adjust the fan speed to the center
setting.
1
Adjust the temperature control to the
desired setting. Use
72°F (22°C) as a
starting point, then adjust the setting as
necessary.
Adjust the temperature control to the
midway point of the cold settings.
2
Select the instrument panel air vents
using the air distribution buttons.
3
144
F-150 (TFC) Canada/United States of America, enUSA, Edition date: 08/2015, First Printing Climate Control
Page 149 of 505

For additional cabin air filter information,
or to replace the filter, see an authorized
dealer.
REMOTE START (If Equipped)
The remote start feature allows you to
pre-condition the interior of your vehicle.
The climate control system works to
achieve comfort according to your previous
settings.
Note: You cannot adjust the system during
remote start operation.
Turn the ignition on to return the system
to its previous settings. You can now make
adjustments normally, but you need to turn
certain vehicle-dependent features back
on, such as:
• Heated seats.
• Cooled seats.
• Heated steering wheel.
• Heated mirrors.
• Heated rear window.
You can adjust the default remote start
settings using the information display
controls. See
Information Displays
(page 108).
Automatic Settings
In hot weather, the system is set to
72°F
(22°C). The cooled seats are set to high
(if available, and selected to AUTO in the
information display).
In moderate weather, the system either
heats or cools (based on previous
settings). The rear defroster, heated
mirrors and heated seats do not
automatically turn on.
In cold weather, the system is set to
72°F
(22°C). The heated seats are set to high
(if available, and selected to AUTO in the
information display). The rear defroster
and heated mirrors automatically turn on.
146
F-150 (TFC) Canada/United States of America, enUSA, Edition date: 08/2015, First Printing Climate Control
Page 158 of 505

Do not do the following:
•
Place heavy objects on the seat.
• Operate the heated seat if water or any
other liquid spills on the seat. Allow the
seat to dry thoroughly.
• Operate the heated seats unless the
engine is running. Doing so can cause
the battery to lose charge. Press the heated seat symbol to cycle
through the various heat settings and off.
More indicator lights indicate warmer
settings.
Rear Heated Seats (If Equipped)
WARNING
People who are unable to feel pain
to the skin because of advanced age,
chronic illness, diabetes, spinal cord
injury, medication, alcohol use, exhaustion,
or other physical conditions, must exercise
care when using the seat heater. The seat
heater may cause burns even at low
temperatures, especially if used for long
periods of time. Do not place anything on
the seat that insulates against heat, such
as a blanket or cushion, because this may
cause the seat heater to overheat. Do not
puncture the seat with pins, needles, or
other pointed objects because this may
damage the heating element which may
cause the seat heater to overheat. An
overheated seat may cause serious
personal injury. Do not do the following:
•
Place heavy objects on the seat.
• Operate the heated seat if water or any
other liquid spills on the seat. Allow the
seat to dry thoroughly.
• Operate the heated seats unless the
engine is running. Doing so can cause
the battery to lose charge.
The rear seat heat controls are located on
the rear of the center console. Press the heated seat symbol to cycle
through the various heat settings and off.
More indicator lights indicate warmer
settings.
The heated seat module resets at every
ignition run cycle. While the ignition is in
the on position, press the heated seat
switch to enable heating mode. When
activated, they turn off automatically when
you switch off the engine.
CLIMATE CONTROLLED SEATS
(If Equipped)
Heated Seats
155
F-150 (TFC) Canada/United States of America, enUSA, Edition date: 08/2015, First Printing SeatsE146322 E146322