2016 FORD F150 wheel
[x] Cancel search: wheelPage 232 of 505

Note:
When Aid mode is on and the system
detects no steering activity for a short
period, the system will alert you to put your
hands on the steering wheel. The system
may detect a light grip or touch on the
steering wheel as hands off driving.
The system notifies you to stay in your lane
through the steering system and the
instrument cluster display when the front
camera detects an unintentional drift out
of your lane is likely to occur. The system
automatically detects and tracks the road
lane markings using a camera mounted
behind the interior rear view mirror.
Switching the System On and Off
Note: The system on or off setting is stored
until it is manually changed, unless a
MyKey® is detected. If the system detects
a MyKey®, it defaults to on and the mode
is set to alert.
Note: If a MyKey® is detected, pressing the
button will not affect the on or off status of
the system. You can only change the mode
and intensity settings. Press the button located on the
center console to switch the
system on or off.
System Settings
The system has one standard feature
setting and one optional setting menu
available. To view or adjust the settings,
See General Information (page 108). The
system stores the last known selection for
each of these settings. You do not need to
readjust your settings each time you turn
on the system.
Mode: This setting allows you to select
which of the system features you can
enable. Alert only – Provides a steering wheel
vibration when an unintended lane
departure is detected.
Aid only – Provides a steering wheel
vibration when the system detects an
unintended lane departure.
229
F-150 (TFC) Canada/United States of America, enUSA, Edition date: 08/2015, First Printing Driving AidsE173233 E165515 E165516
Page 233 of 505

Alert
A
AidB
Alert + Aid – Provides an assistance
steering torque input toward the lane
center. If your vehicle continues drifting out
of the lane, the system provides a steering
wheel vibration.
Note: The alert and aid diagrams illustrate
general zone coverage. They do not provide
exact zone parameters.
Intensity: This setting affects the intensity
of the steering wheel vibration used for the
alert and alert + aid modes. This setting
does not affect the aid mode.
• Low
• Medium
• High
System Display When you switch on the system,
an overhead graphic of a vehicle
with lane markings will display
in the information display. If you select aid mode when you
switch on the system, arrows will
be displayed with lane markings.
When you switch off the system, the lane
marking graphics will not display. Note:
The overhead vehicle graphic may
still be displayed if adaptive cruise control
is enabled.
While the system is on, the color of the
lane markings will change to indicate the
system status.
Gray: Indicates that the system is
temporarily unable to provide a warning
or intervention on the indicated side(s).
This may be because:
• Your vehicle is under the activation
speed.
• Your turn indicator is active.
• Your vehicle is in a dynamic maneuver.
• The road has no or poor lane markings
in the camera field-of-view.
• The camera is obscured or unable to
detect the lane markings due to
environmental conditions (significant
sun angles, shadows, snow, heavy rain,
fog), traffic conditions (following a
large vehicle that is blocking or
shadowing the lane), or vehicle
conditions (poor headlamp
illumination).
See Troubleshooting for additional
information.
Green: Indicates that the system is
available or ready to provide a warning or
intervention, on the indicated side(s).
Yellow: Indicates that the system is
providing or has just provided a lane
keeping aid intervention.
Red: Indicates that the system is providing
or has just provided a lane keeping alert
warning.
You can temporarily disable the system at
any time by doing the following
• Quick braking.
• Fast acceleration.
• Using your direction indicator.
• Evasive steering maneuver.
230
F-150 (TFC) Canada/United States of America, enUSA, Edition date: 08/2015, First Printing Driving AidsE165517 E144813 E173234
Page 243 of 505

Action
Cause
Clean the radar sensor cover or remove theobstruction
The radar sensor cover in the grille is dirty
or obstructed
Wait a short time. The radar may take
several minutes to reset after you remove the obstruction
The surface of the radar sensor cover is
clean but the message remains in the display
The collision warning system is temporarilydisabled. Shortly after weather conditions improve, the collision warning system automatically reactivates
Heavy rain, spray, snow or fog in the air
interferes with the radar signals
The collision warning system is temporarilydisabled. Shortly after weather conditions improve, the collision warning system automatically reactivates
Swirling water, snow or ice on the road
surface interferes with the radar signals
System Limitations WARNING
The collision warning system
’s brake
support only reduces collision speed
if you first apply your brakes. You
must brake as you would in any typical
braking situation. Due to the nature of radar technology,
there may be certain instances where
vehicles do not provide a collision warning.
These include:
•
Stationary vehicles or vehicles moving
below 6 mph (10 km/h).
• Pedestrians or objects in the roadway.
• Oncoming vehicles in the same lane.
• Severe weather conditions (see
blocked sensor section).
• Debris build-up on the grille near the
headlamps (see blocked sensor
section).
• Small distance to vehicle ahead.
• Large steering wheel and pedal
movements (very active driving style). Damage to the front end of your vehicle
may alter the radar sensor's coverage area.
This may result in missed or false collision
warnings. Have an authorized dealer check
your radar sensor for proper coverage and
operation.
240
F-150 (TFC) Canada/United States of America, enUSA, Edition date: 08/2015, First Printing Driving Aids
Page 249 of 505

GCW (Gross Combined Weight)
- is the Gross Vehicle Weight plus
the weight of the fully loaded
trailer.
GCWR (Gross Combined
Weight Rating) - is the maximum
allowable weight of the vehicle
and the loaded trailer, including
all cargo and passengers, that the
vehicle can handle without risking
damage. (Important: The towing
vehicle ’s braking system is rated
for operation at Gross Vehicle
Weight Rating, not at Gross
Combined Weight Rating.)
Separate functional brakes should
be used for safe control of towed
vehicles and for trailers where the
Gross Combined Weight of the
towing vehicle plus the trailer
exceed the Gross Vehicle Weight
Rating of the towing vehicle. The
Gross Combined Weight must
never exceed the Gross
Combined Weight Rating.
Maximum Loaded Trailer
Weight -
is the highest possible
weight of a fully loaded trailer the
vehicle can tow. It assumes a
vehicle with mandatory options,
driver and front passenger weight
(150 pounds [68 kilograms]
each), no cargo weight (internal
or external) and a tongue load of
10– 15% (conventional trailer) or
king pin weight of 15– 25% (fifth
wheel trailer). Consult an
authorized dealer (or the RV and
Trailer Towing Guide available at
an authorized dealer) for more
detailed information. Tongue Load or Fifth Wheel
King Pin Weight -
refers to the
amount of the weight that a trailer
pushes down on a trailer hitch.
Examples:
For a 5000 pound
(2268 kilogram) conventional
trailer, multiply 5000 by 0.10 and
0.15 to obtain a proper tongue
load range of 500 to 750 pounds
(227 to 340 kilograms). For an
11500 pound (5216 kilogram) fifth
wheel trailer, multiply by 0.15 and
0.25 to obtain a proper king pin
load range of 1725 to 2875 pounds
(782 to 1304 kilograms). WARNINGS
Do not exceed the GVWR or
the GAWR specified on the
Safety Compliance Certification
Label. Do not use replacement tires
with lower load carrying
capacities than the original tires
because they may lower the
vehicle ’s GVWR and GAWR
limitations. Replacement tires
with a higher limit than the original
tires do not increase the GVWR
and GAWR limitations. Exceeding any vehicle weight
rating limitation could result
in serious damage to the vehicle
and/or personal injury. Steps for determining the
correct load limit:
246
F-150 (TFC) Canada/United States of America, enUSA, Edition date: 08/2015, First Printing Load Carrying
Page 257 of 505

Setting Up Pro Trailer Backup
Assist
Note:
Once you have entered a trailer's
information into the system, it is stored for
easy recall. A maximum of 10 trailers can be
added to the system.
Step 1: Position your Vehicle and Trailer
Hitch your conventional trailer to your
vehicle. See Essential Towing Checks
(page 269).
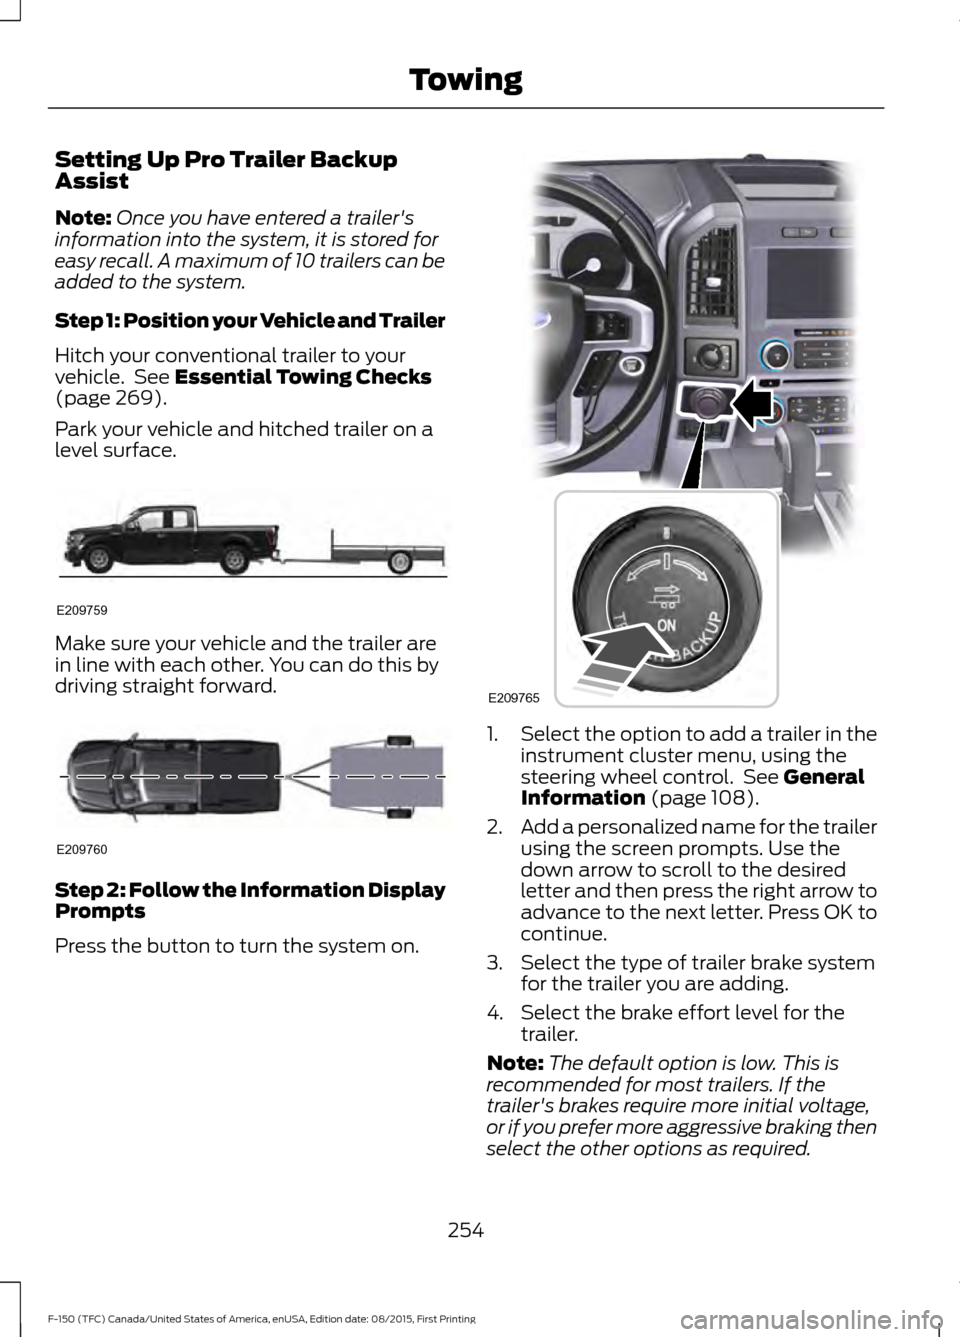
Park your vehicle and hitched trailer on a
level surface. Make sure your vehicle and the trailer are
in line with each other. You can do this by
driving straight forward.
Step 2: Follow the Information Display
Prompts
Press the button to turn the system on. 1.
Select the option to add a trailer in the
instrument cluster menu, using the
steering wheel control. See
General
Information (page 108).
2. Add a personalized name for the trailer
using the screen prompts. Use the
down arrow to scroll to the desired
letter and then press the right arrow to
advance to the next letter. Press OK to
continue.
3. Select the type of trailer brake system for the trailer you are adding.
4. Select the brake effort level for the trailer.
Note: The default option is low. This is
recommended for most trailers. If the
trailer's brakes require more initial voltage,
or if you prefer more aggressive braking then
select the other options as required.
254
F-150 (TFC) Canada/United States of America, enUSA, Edition date: 08/2015, First Printing TowingE209759 E209760 E209765
Page 258 of 505

5. Select the trailer type.
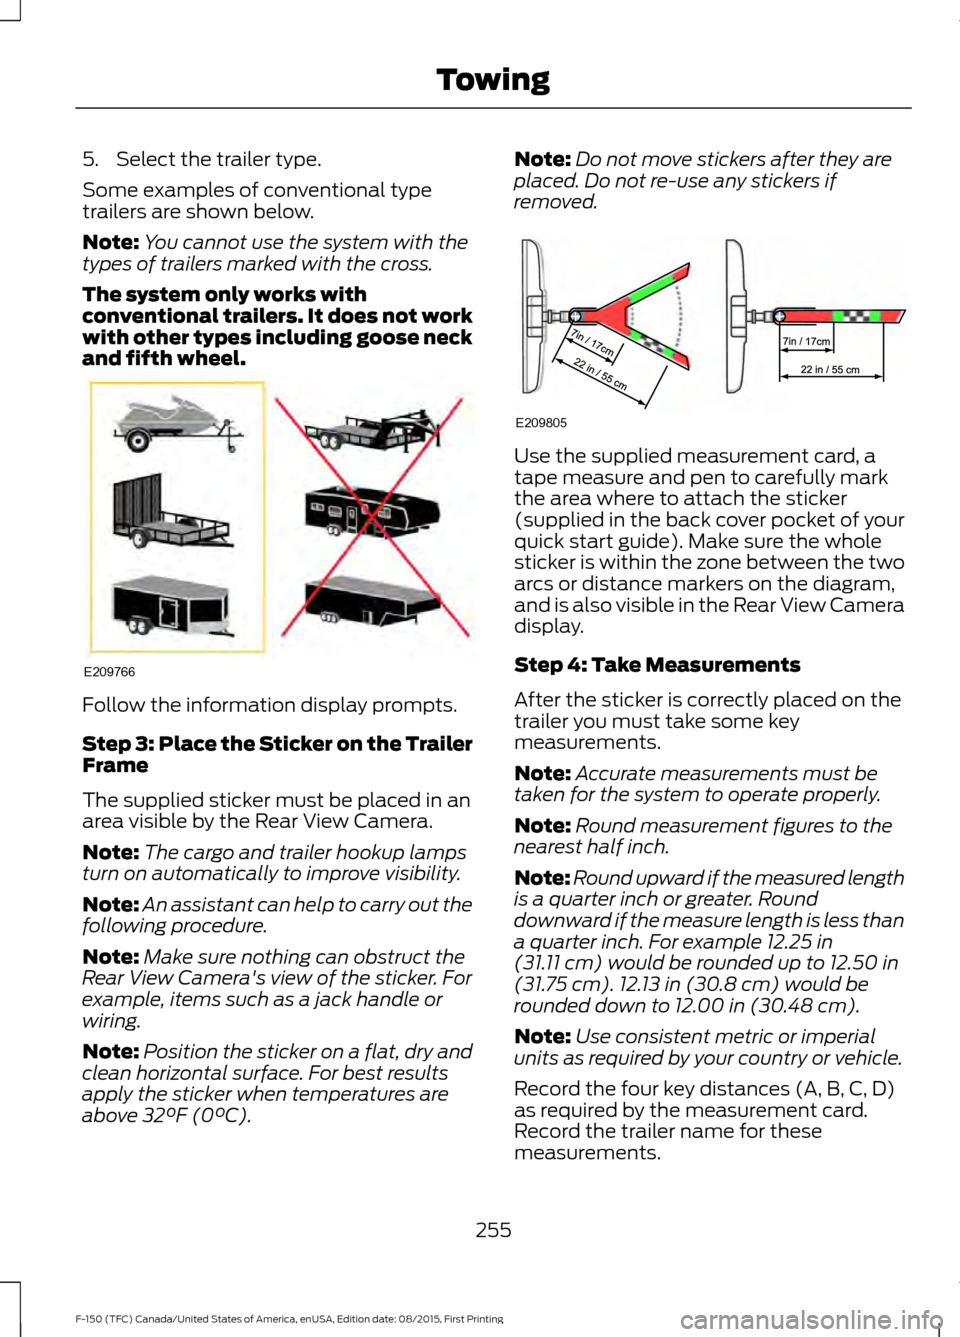
Some examples of conventional type
trailers are shown below.
Note:
You cannot use the system with the
types of trailers marked with the cross.
The system only works with
conventional trailers. It does not work
with other types including goose neck
and fifth wheel. Follow the information display prompts.
Step 3: Place the Sticker on the Trailer
Frame
The supplied sticker must be placed in an
area visible by the Rear View Camera.
Note:
The cargo and trailer hookup lamps
turn on automatically to improve visibility.
Note: An assistant can help to carry out the
following procedure.
Note: Make sure nothing can obstruct the
Rear View Camera's view of the sticker. For
example, items such as a jack handle or
wiring.
Note: Position the sticker on a flat, dry and
clean horizontal surface. For best results
apply the sticker when temperatures are
above 32°F (0°C). Note:
Do not move stickers after they are
placed. Do not re-use any stickers if
removed. Use the supplied measurement card, a
tape measure and pen to carefully mark
the area where to attach the sticker
(supplied in the back cover pocket of your
quick start guide). Make sure the whole
sticker is within the zone between the two
arcs or distance markers on the diagram,
and is also visible in the Rear View Camera
display.
Step 4: Take Measurements
After the sticker is correctly placed on the
trailer you must take some key
measurements.
Note:
Accurate measurements must be
taken for the system to operate properly.
Note: Round measurement figures to the
nearest half inch.
Note: Round upward if the measured length
is a quarter inch or greater. Round
downward if the measure length is less than
a quarter inch. For example
12.25 in
(31.11 cm) would be rounded up to 12.50 in
(31.75 cm). 12.13 in (30.8 cm) would be
rounded down to 12.00 in (30.48 cm).
Note: Use consistent metric or imperial
units as required by your country or vehicle.
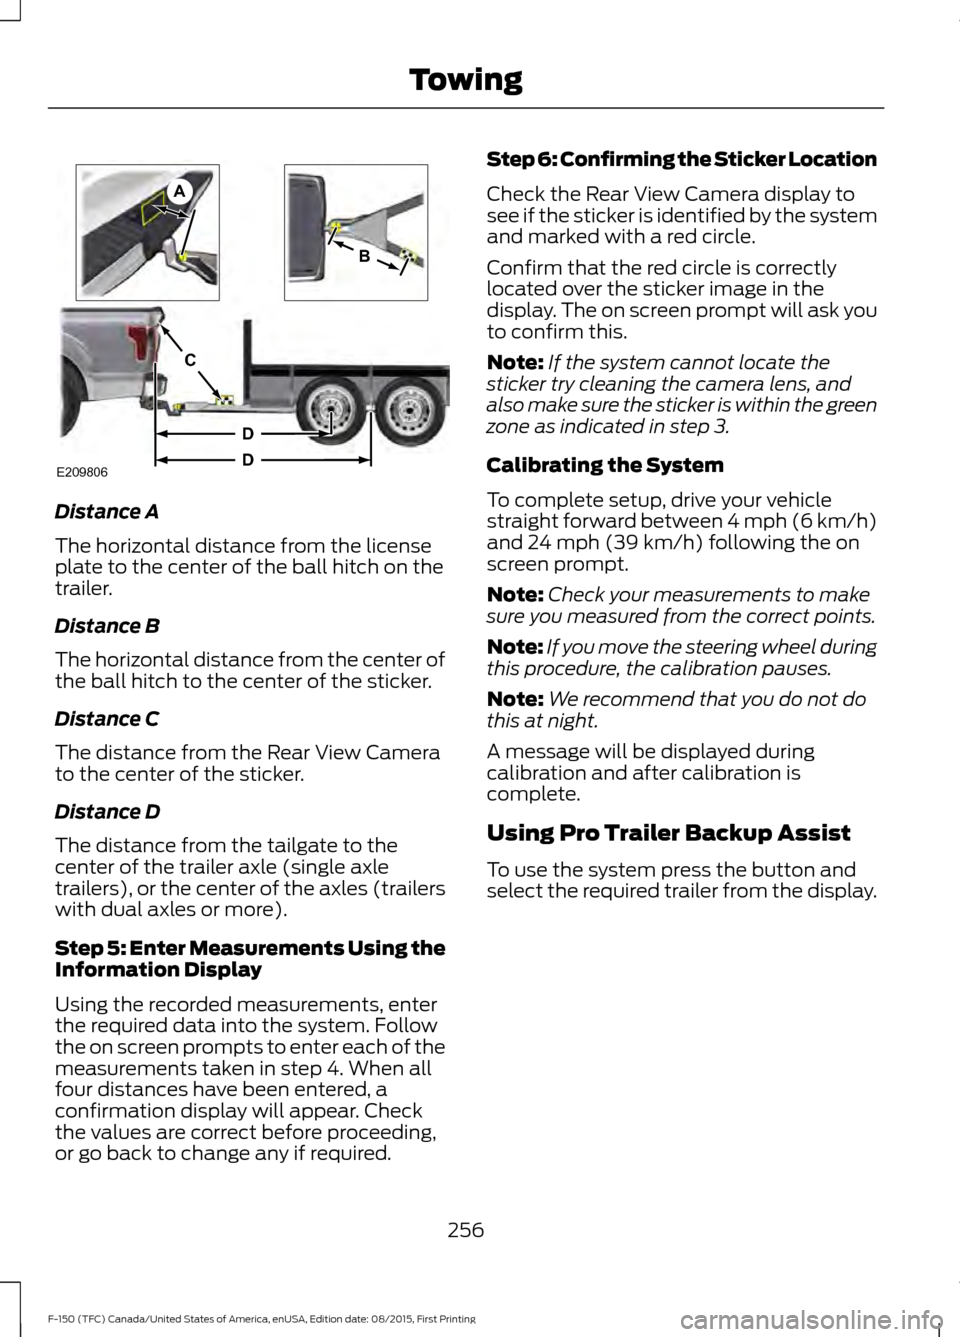
Record the four key distances (A, B, C, D)
as required by the measurement card.
Record the trailer name for these
measurements.
255
F-150 (TFC) Canada/United States of America, enUSA, Edition date: 08/2015, First Printing TowingE209766 E209805
Page 259 of 505

Distance A
The horizontal distance from the license
plate to the center of the ball hitch on the
trailer.
Distance B
The horizontal distance from the center of
the ball hitch to the center of the sticker.
Distance C
The distance from the Rear View Camera
to the center of the sticker.
Distance D
The distance from the tailgate to the
center of the trailer axle (single axle
trailers), or the center of the axles (trailers
with dual axles or more).
Step 5: Enter Measurements Using the
Information Display
Using the recorded measurements, enter
the required data into the system. Follow
the on screen prompts to enter each of the
measurements taken in step 4. When all
four distances have been entered, a
confirmation display will appear. Check
the values are correct before proceeding,
or go back to change any if required. Step 6: Confirming the Sticker Location
Check the Rear View Camera display to
see if the sticker is identified by the system
and marked with a red circle.
Confirm that the red circle is correctly
located over the sticker image in the
display. The on screen prompt will ask you
to confirm this.
Note:
If the system cannot locate the
sticker try cleaning the camera lens, and
also make sure the sticker is within the green
zone as indicated in step 3.
Calibrating the System
To complete setup, drive your vehicle
straight forward between 4 mph (6 km/h)
and 24 mph (39 km/h) following the on
screen prompt.
Note: Check your measurements to make
sure you measured from the correct points.
Note: If you move the steering wheel during
this procedure, the calibration pauses.
Note: We recommend that you do not do
this at night.
A message will be displayed during
calibration and after calibration is
complete.
Using Pro Trailer Backup Assist
To use the system press the button and
select the required trailer from the display.
256
F-150 (TFC) Canada/United States of America, enUSA, Edition date: 08/2015, First Printing TowingE209806
A
B
C
D
D
Page 260 of 505

When the sticker is located, the display
prompts you to shift into reverse (R). The
system turns on.
Note:
The system does not function if your
hands are on the steering wheel. Remove
your hands to resume operation.
Follow the screen prompts to steer your
vehicle and trailer.
Note: You may have to drive forward to
straighten the trailer.
Take your hands off the steering wheel and
turn the Pro Trailer Backup Assist control
knob instead. The knob acts as the steering
control for the trailer.
Note: The more you turn the knob, the
sharper the trailer turns. Turn and hold counterclockwise to make
the trailer go left.
Turn and hold clockwise to make the trailer
go right.
Note:
Practice maneuvering with the
system in a safe open area first.
Note: Try backing up in a straight line and
then turning the knob slowly in the direction
you want to go.
Note: Quickly turning and releasing the
knob results in a jerky movement of the
vehicle. 257
F-150 (TFC) Canada/United States of America, enUSA, Edition date: 08/2015, First Printing TowingE209765 E209812 E209813 E209814