Page 71 of 154

Protected componentsFuse amp ratingFuse or relay number
Blower motor relay feed.40A**J1
Headlamps.30A**J2Daytime running lamps on/off relay coil.Headlamp daytime running lamp relayfeed.Instrument panel fuses #25, 31.
Vehicle power.30A**J3Powertrain control module relay feed.Power distribution box fuse F16, F17, F18,J22.
Cigar lighter feed.20A**J4Diagnostic tool connector.
Not used.—J5
Starter relay feed.30A**J6Starter motor.
Anti-lock brake system.40A**J7Hydromax pump60A**
Trailer tow park lamps.20A**J8
Instrument panel fuse #4, 10, 16, 22.50A**J9
4-channel anti-lock brake system module.60A**J10
3-channel anti-lock brake system module.40A**
Fuel pump relay feed.20A**J11Fuel injectors.Mass air flow sensor.Fuel pump motor.
Trailer tow electronic brake.30A**J12
Ignition switch feed (instrument panelfuses #1, 5, 7, 11, 13, 17, 19, 23).40A**J13
Not used.—J14
Instrument panel fuses #9, 15, 21.60A**J15
Horn.20A**J16
Ignition switch feed (instrument panelfuses #1, 5, 7, 11, 13, 17, 19, 23.40A**J17
68Motorhome (TY3) , enUSA, First PrintingFuses
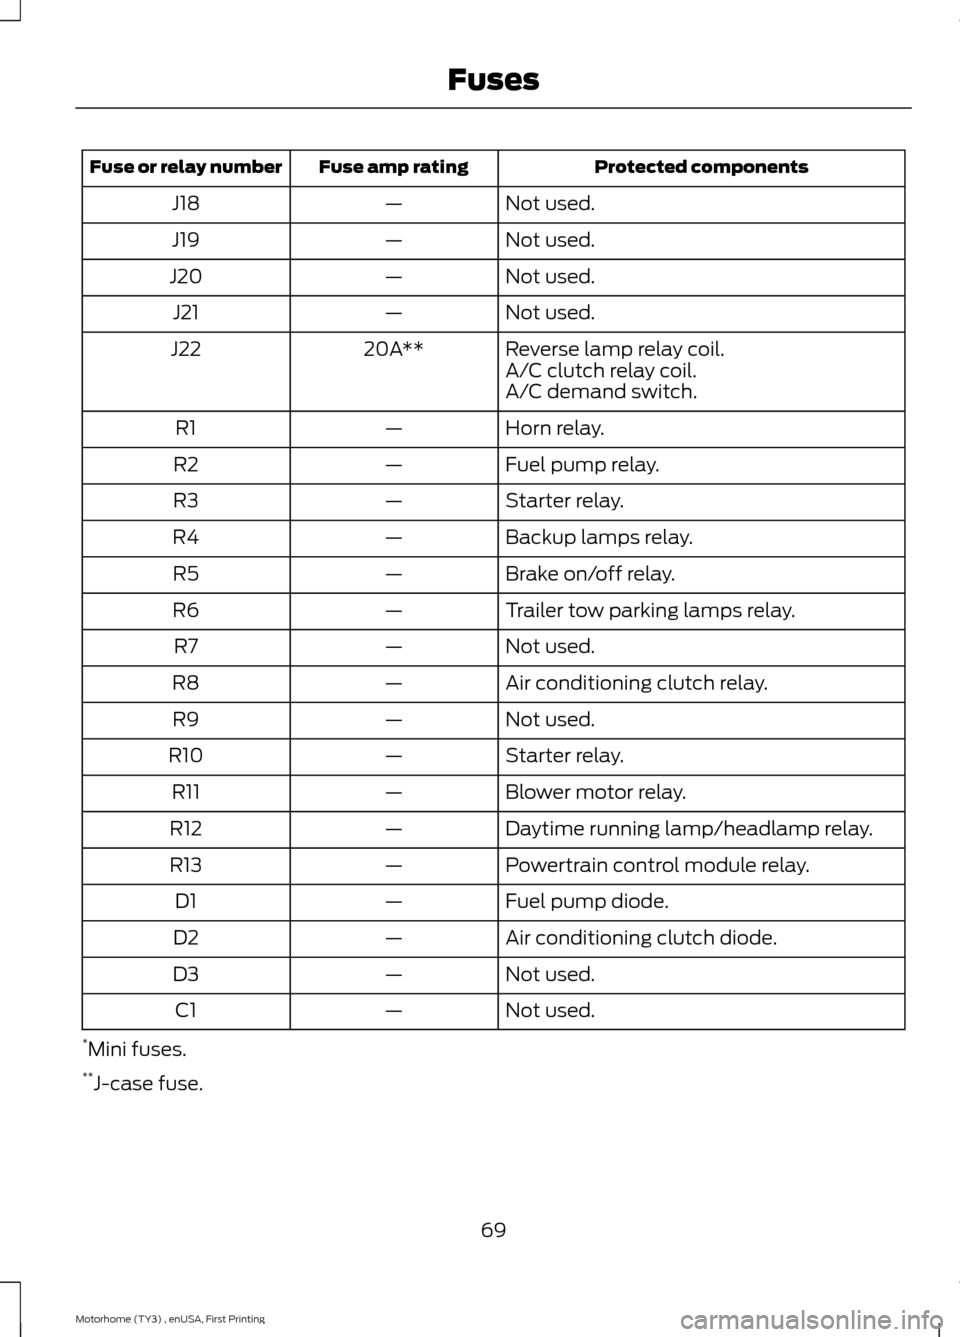
Page 72 of 154
Protected componentsFuse amp ratingFuse or relay number
Not used.—J18
Not used.—J19
Not used.—J20
Not used.—J21
Reverse lamp relay coil.20A**J22A/C clutch relay coil.A/C demand switch.
Horn relay.—R1
Fuel pump relay.—R2
Starter relay.—R3
Backup lamps relay.—R4
Brake on/off relay.—R5
Trailer tow parking lamps relay.—R6
Not used.—R7
Air conditioning clutch relay.—R8
Not used.—R9
Starter relay.—R10
Blower motor relay.—R11
Daytime running lamp/headlamp relay.—R12
Powertrain control module relay.—R13
Fuel pump diode.—D1
Air conditioning clutch diode.—D2
Not used.—D3
Not used.—C1
*Mini fuses.**J-case fuse.
69Motorhome (TY3) , enUSA, First PrintingFuses
Page 73 of 154
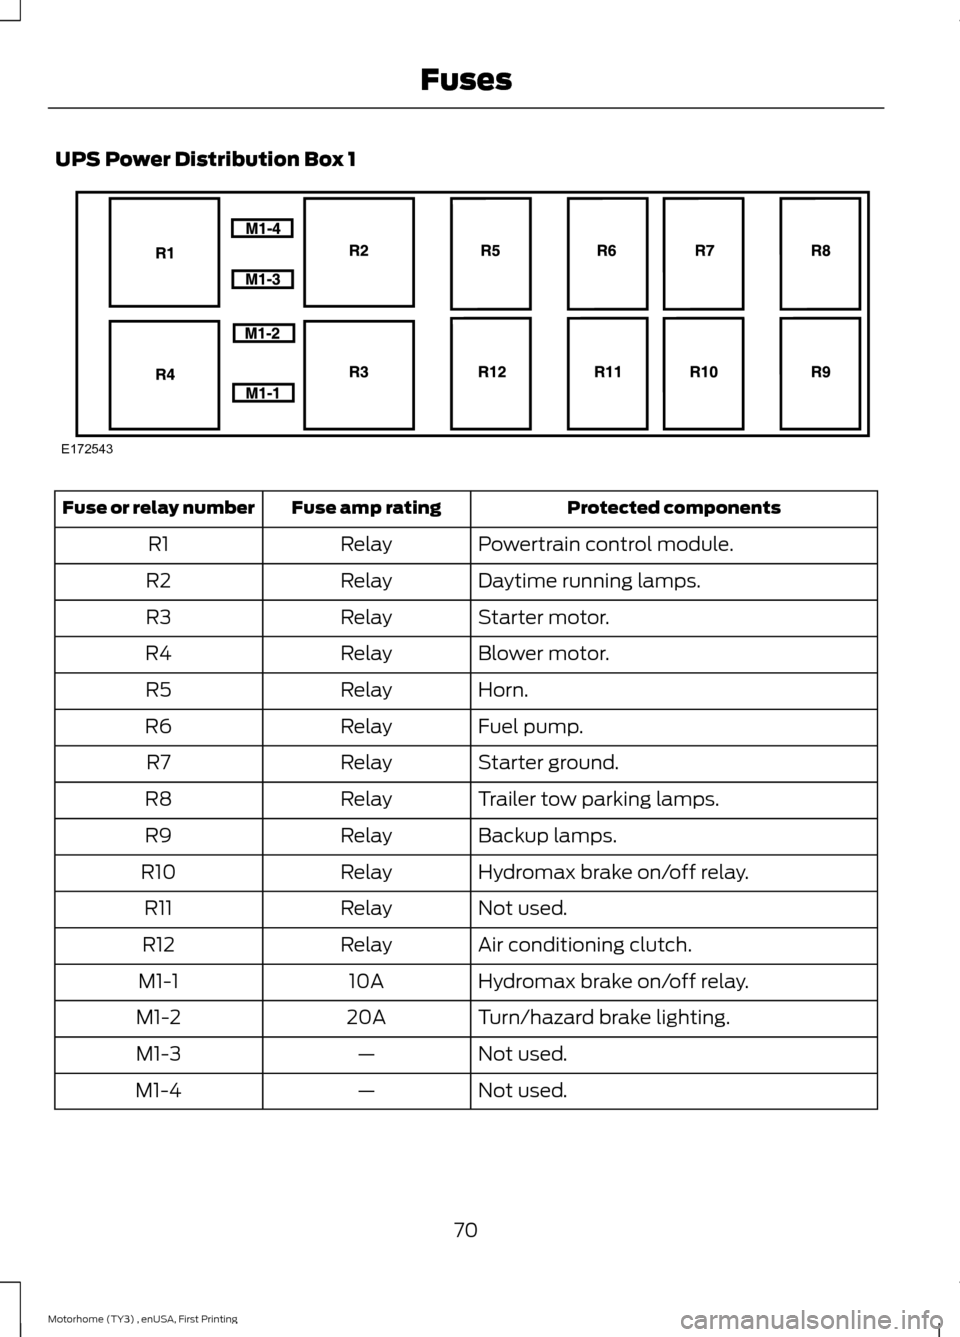
UPS Power Distribution Box 1
Protected componentsFuse amp ratingFuse or relay number
Powertrain control module.RelayR1
Daytime running lamps.RelayR2
Starter motor.RelayR3
Blower motor.RelayR4
Horn.RelayR5
Fuel pump.RelayR6
Starter ground.RelayR7
Trailer tow parking lamps.RelayR8
Backup lamps.RelayR9
Hydromax brake on/off relay.RelayR10
Not used.RelayR11
Air conditioning clutch.RelayR12
Hydromax brake on/off relay.10AM1-1
Turn/hazard brake lighting.20AM1-2
Not used.—M1-3
Not used.—M1-4
70Motorhome (TY3) , enUSA, First PrintingFusesE172543
Page 74 of 154
UPS Power Distribution Box 2
Protected componentsFuse amp ratingFuse or relay number
Backup lamps.25A*M1
Daytime running lamps.20A*M2
4–channel anti-lock brake system module(Hydromax).30A*M3
Powertrain control module run/start.20A*M4Fuel pump relay coil.
Starter relay coil.10A*M5
Vehicle power 4.20A*M6Ignition coils.
Hydromax motor monitor.5A*M7
Vehicle power 2.20A*M8
Vehicle power 1.20A*M9Mass air flow sensor.
Air conditioning.10A*M10
Powertrain control module relay keep alivepower.5A*M11
Canister vent valve.
Parking lamps feed.20A*M12Trailer tow running lamp relay coil.
One-touch start.DiodeD1
71Motorhome (TY3) , enUSA, First PrintingFusesE172544
Page 75 of 154
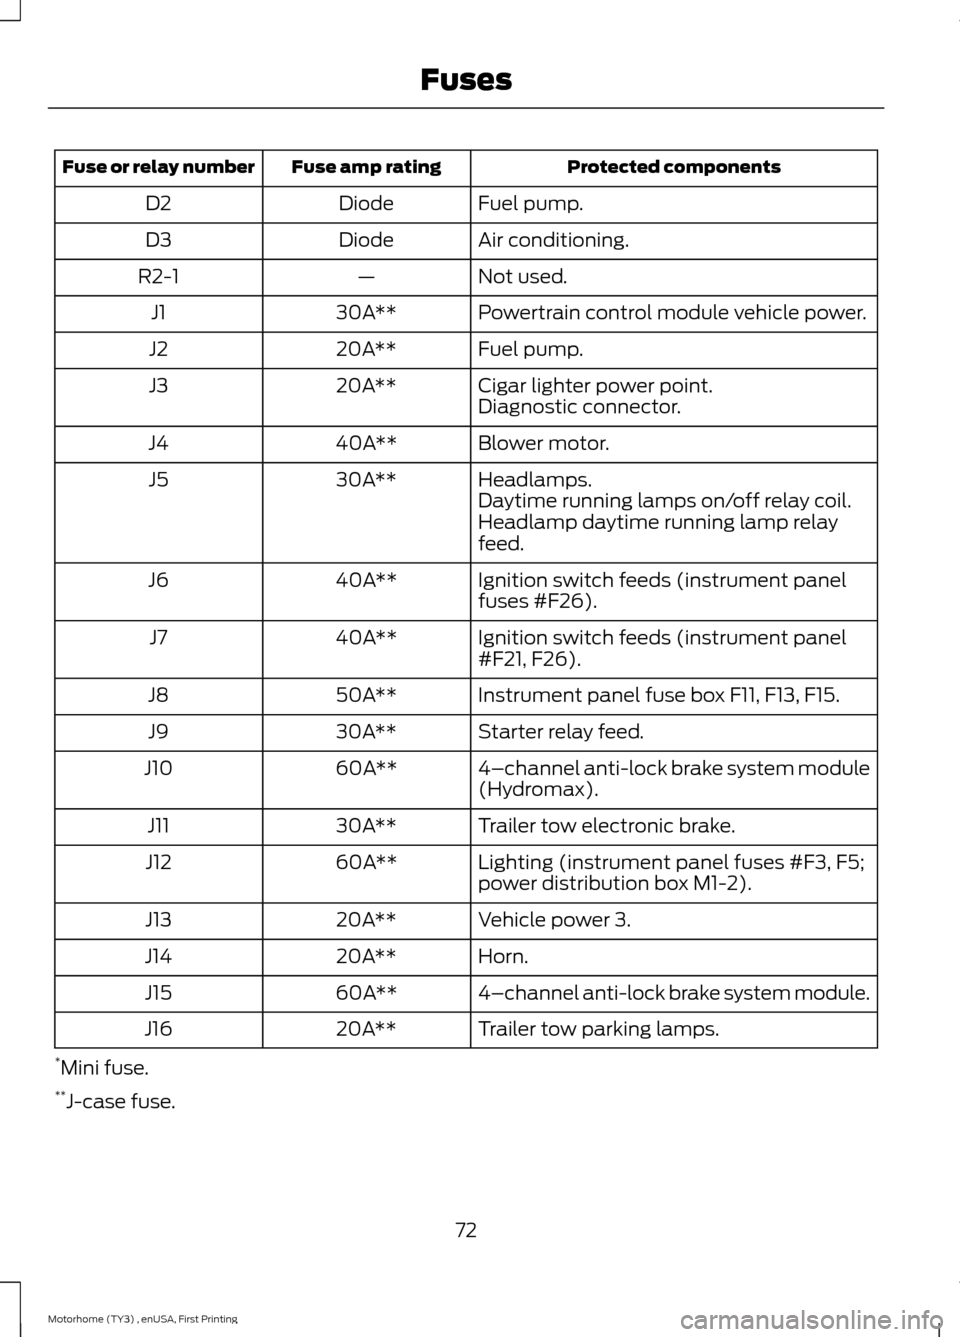
Protected componentsFuse amp ratingFuse or relay number
Fuel pump.DiodeD2
Air conditioning.DiodeD3
Not used.—R2-1
Powertrain control module vehicle power.30A**J1
Fuel pump.20A**J2
Cigar lighter power point.20A**J3Diagnostic connector.
Blower motor.40A**J4
Headlamps.30A**J5Daytime running lamps on/off relay coil.Headlamp daytime running lamp relayfeed.
Ignition switch feeds (instrument panelfuses #F26).40A**J6
Ignition switch feeds (instrument panel#F21, F26).40A**J7
Instrument panel fuse box F11, F13, F15.50A**J8
Starter relay feed.30A**J9
4–channel anti-lock brake system module(Hydromax).60A**J10
Trailer tow electronic brake.30A**J11
Lighting (instrument panel fuses #F3, F5;power distribution box M1-2).60A**J12
Vehicle power 3.20A**J13
Horn.20A**J14
4–channel anti-lock brake system module.60A**J15
Trailer tow parking lamps.20A**J16
*Mini fuse.**J-case fuse.
72Motorhome (TY3) , enUSA, First PrintingFuses
Page 84 of 154
GENERAL INFORMATION
Have your vehicle serviced regularly to helpmaintain its roadworthiness and resalevalue. There is a large network ofauthorized dealers that are there to helpyou with their professional servicingexpertise. We believe that their speciallytrained technicians are best qualified toservice your vehicle properly and expertly.They are supported by a wide range ofhighly specialized tools developedspecifically for servicing your vehicle.
To help you service your vehicle, weprovide scheduled maintenanceinformation which makes tracking routineservice easy. See ScheduledMaintenance (page 128).
If your vehicle requires professional service,an authorized dealer can provide thenecessary parts and service. Check yourwarranty information to find out whichparts and services are covered.
Use only recommended fuels, lubricants,fluids and service parts conforming tospecifications. Motorcraft® parts aredesigned and built to provide the bestperformance in your vehicle.
Precautions
•Do not work on a hot engine.
•Make sure that nothing gets caught inmoving parts.
•Do not work on a vehicle with theengine running in an enclosed space,unless you are sure you have enoughventilation.
•Keep all open flames and other burningmaterial (such as cigarettes) awayfrom the battery and all fuel relatedparts.
Working with the Engine Off
1.Set the parking brake and shift to park(P).
2.Switch off the engine.
3.Block the wheels.
Working with the Engine On
WARNING
To reduce the risk of vehicle damageand/or personal burn injuries, do notstart your engine with the air cleanerremoved and do not remove it while theengine is running.
1.Set the parking brake and shift to park(P).
2.Block the wheels
81Motorhome (TY3) , enUSA, First PrintingMaintenance
Page 86 of 154
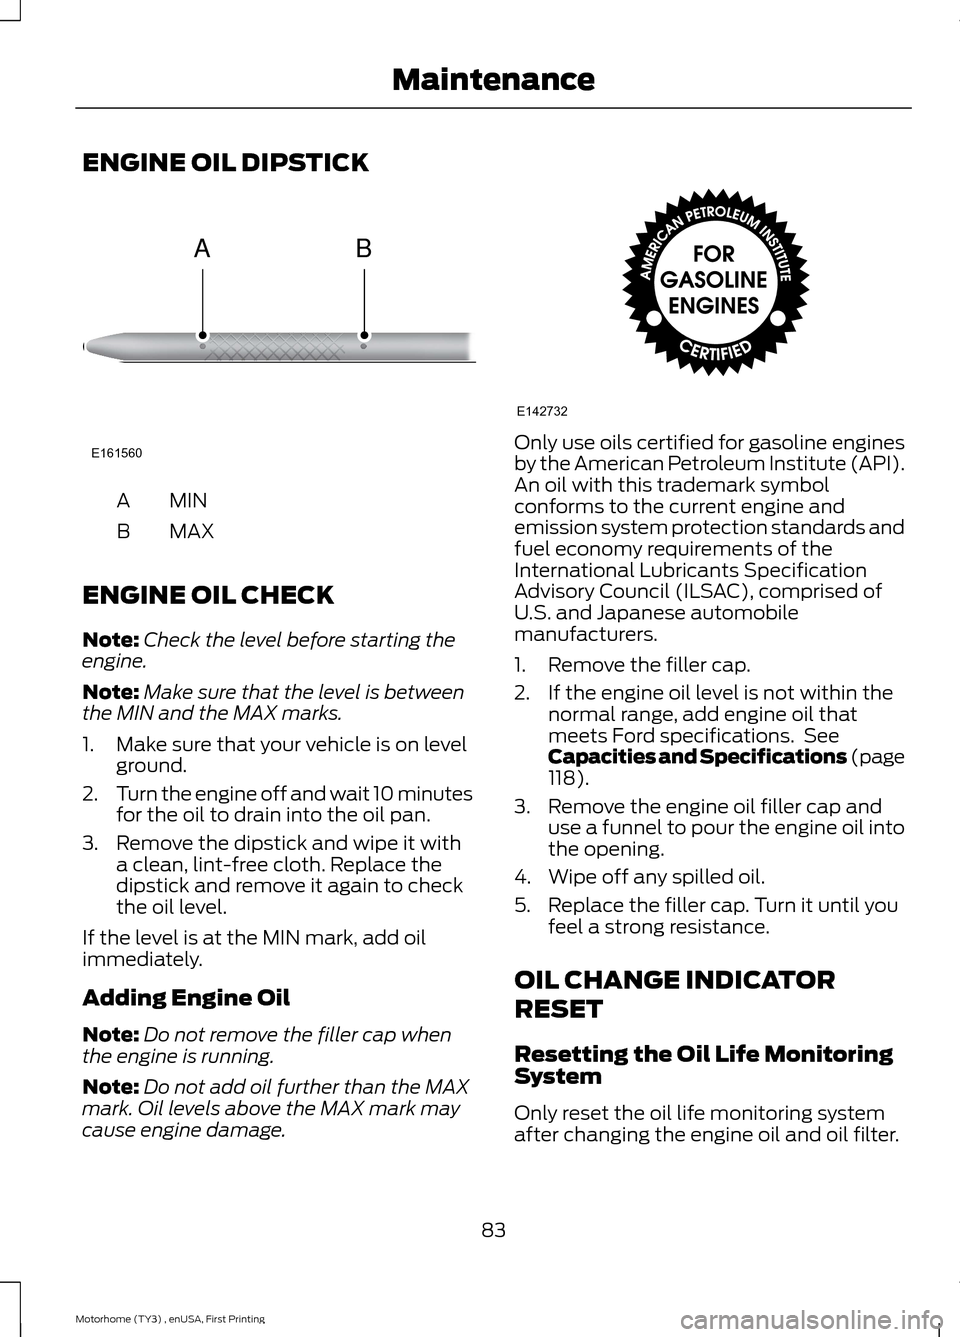
ENGINE OIL DIPSTICK
MINA
MAXB
ENGINE OIL CHECK
Note:Check the level before starting theengine.
Note:Make sure that the level is betweenthe MIN and the MAX marks.
1.Make sure that your vehicle is on levelground.
2.Turn the engine off and wait 10 minutesfor the oil to drain into the oil pan.
3.Remove the dipstick and wipe it witha clean, lint-free cloth. Replace thedipstick and remove it again to checkthe oil level.
If the level is at the MIN mark, add oilimmediately.
Adding Engine Oil
Note:Do not remove the filler cap whenthe engine is running.
Note:Do not add oil further than the MAXmark. Oil levels above the MAX mark maycause engine damage.
Only use oils certified for gasoline enginesby the American Petroleum Institute (API).An oil with this trademark symbolconforms to the current engine andemission system protection standards andfuel economy requirements of theInternational Lubricants SpecificationAdvisory Council (ILSAC), comprised ofU.S. and Japanese automobilemanufacturers.
1.Remove the filler cap.
2.If the engine oil level is not within thenormal range, add engine oil thatmeets Ford specifications. SeeCapacities and Specifications (page118).
3.Remove the engine oil filler cap anduse a funnel to pour the engine oil intothe opening.
4.Wipe off any spilled oil.
5.Replace the filler cap. Turn it until youfeel a strong resistance.
OIL CHANGE INDICATOR
RESET
Resetting the Oil Life MonitoringSystem
Only reset the oil life monitoring systemafter changing the engine oil and oil filter.
83Motorhome (TY3) , enUSA, First PrintingMaintenanceE161560AB E142732
Page 94 of 154
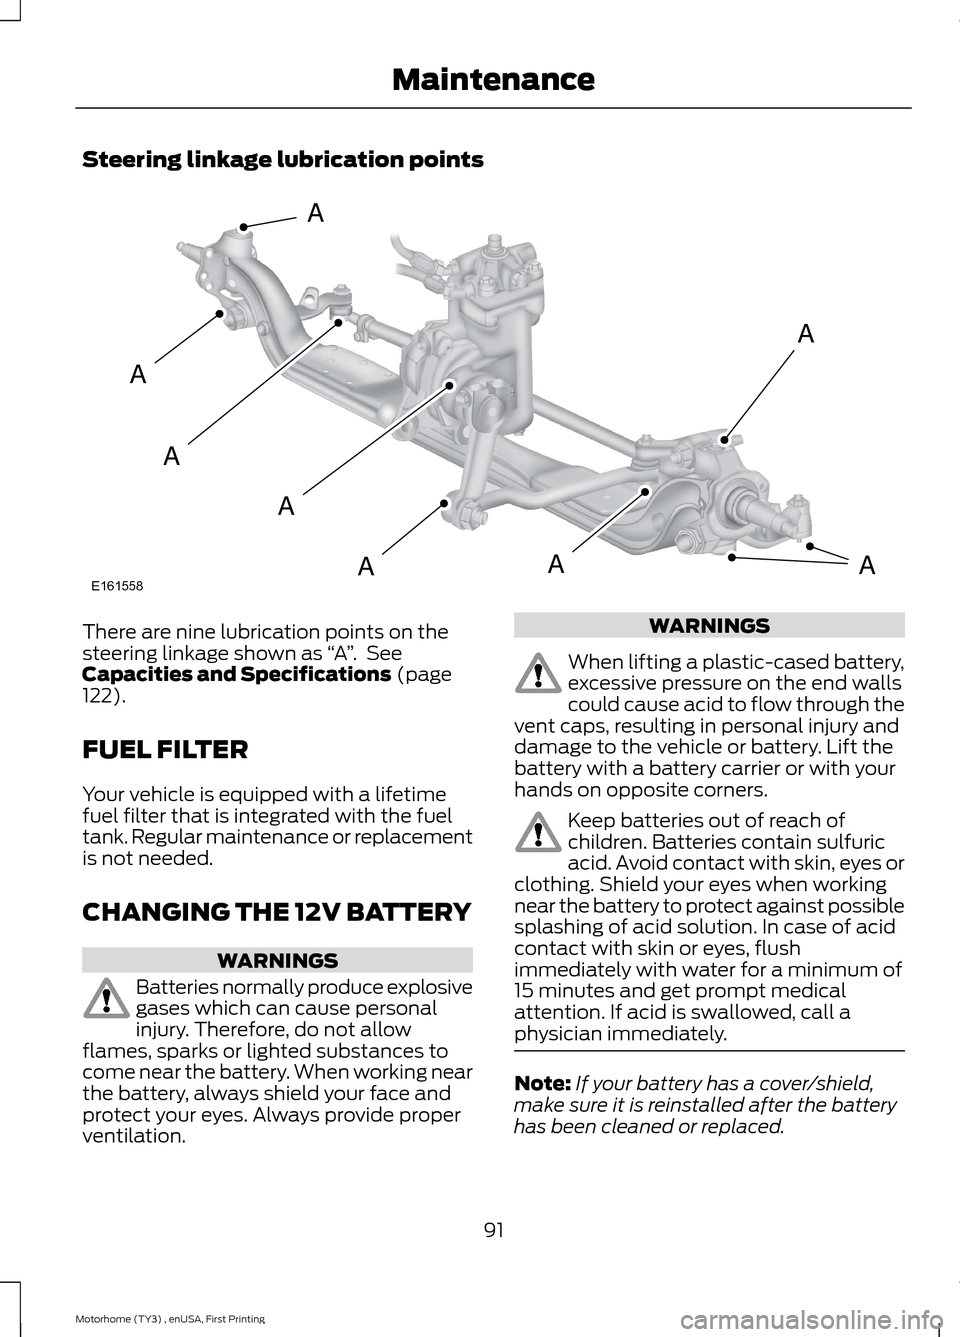
Steering linkage lubrication points
There are nine lubrication points on thesteering linkage shown as “A”. SeeCapacities and Specifications (page122).
FUEL FILTER
Your vehicle is equipped with a lifetimefuel filter that is integrated with the fueltank. Regular maintenance or replacementis not needed.
CHANGING THE 12V BATTERY
WARNINGS
Batteries normally produce explosivegases which can cause personalinjury. Therefore, do not allowflames, sparks or lighted substances tocome near the battery. When working nearthe battery, always shield your face andprotect your eyes. Always provide properventilation.
WARNINGS
When lifting a plastic-cased battery,excessive pressure on the end wallscould cause acid to flow through thevent caps, resulting in personal injury anddamage to the vehicle or battery. Lift thebattery with a battery carrier or with yourhands on opposite corners.
Keep batteries out of reach ofchildren. Batteries contain sulfuricacid. Avoid contact with skin, eyes orclothing. Shield your eyes when workingnear the battery to protect against possiblesplashing of acid solution. In case of acidcontact with skin or eyes, flushimmediately with water for a minimum of15 minutes and get prompt medicalattention. If acid is swallowed, call aphysician immediately.
Note:If your battery has a cover/shield,make sure it is reinstalled after the batteryhas been cleaned or replaced.
91Motorhome (TY3) , enUSA, First PrintingMaintenanceE161558AAAAAAAA