2016 FORD F SERIES MOTORHOME AND COMMERCIAL CHASSIS transmission
[x] Cancel search: transmissionPage 82 of 154
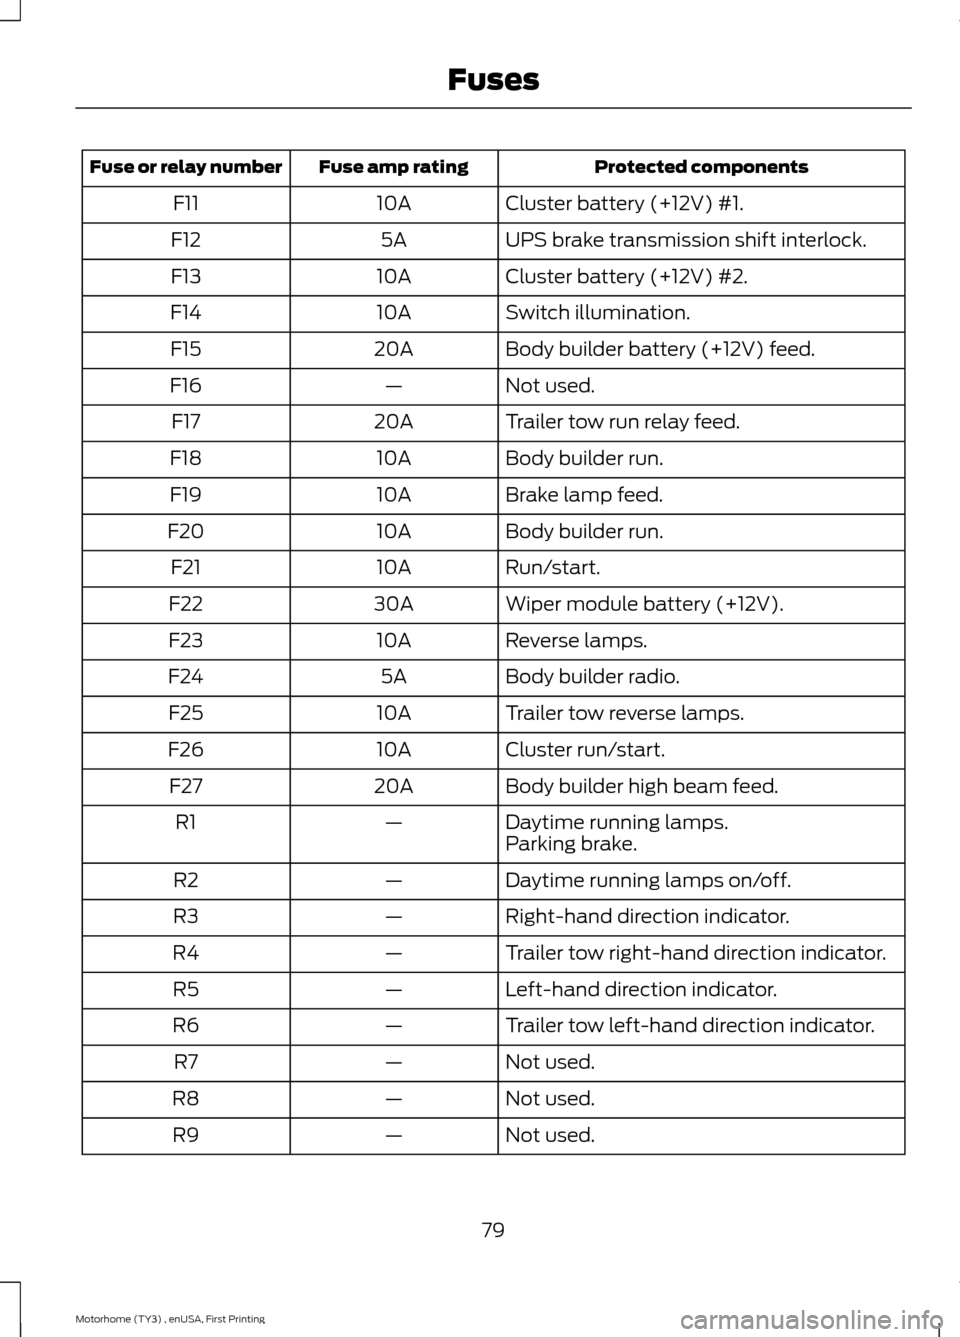
Protected componentsFuse amp ratingFuse or relay number
Cluster battery (+12V) #1.10AF11
UPS brake transmission shift interlock.5AF12
Cluster battery (+12V) #2.10AF13
Switch illumination.10AF14
Body builder battery (+12V) feed.20AF15
Not used.—F16
Trailer tow run relay feed.20AF17
Body builder run.10AF18
Brake lamp feed.10AF19
Body builder run.10AF20
Run/start.10AF21
Wiper module battery (+12V).30AF22
Reverse lamps.10AF23
Body builder radio.5AF24
Trailer tow reverse lamps.10AF25
Cluster run/start.10AF26
Body builder high beam feed.20AF27
Daytime running lamps.—R1Parking brake.
Daytime running lamps on/off.—R2
Right-hand direction indicator.—R3
Trailer tow right-hand direction indicator.—R4
Left-hand direction indicator.—R5
Trailer tow left-hand direction indicator.—R6
Not used.—R7
Not used.—R8
Not used.—R9
79Motorhome (TY3) , enUSA, First PrintingFuses
Page 85 of 154
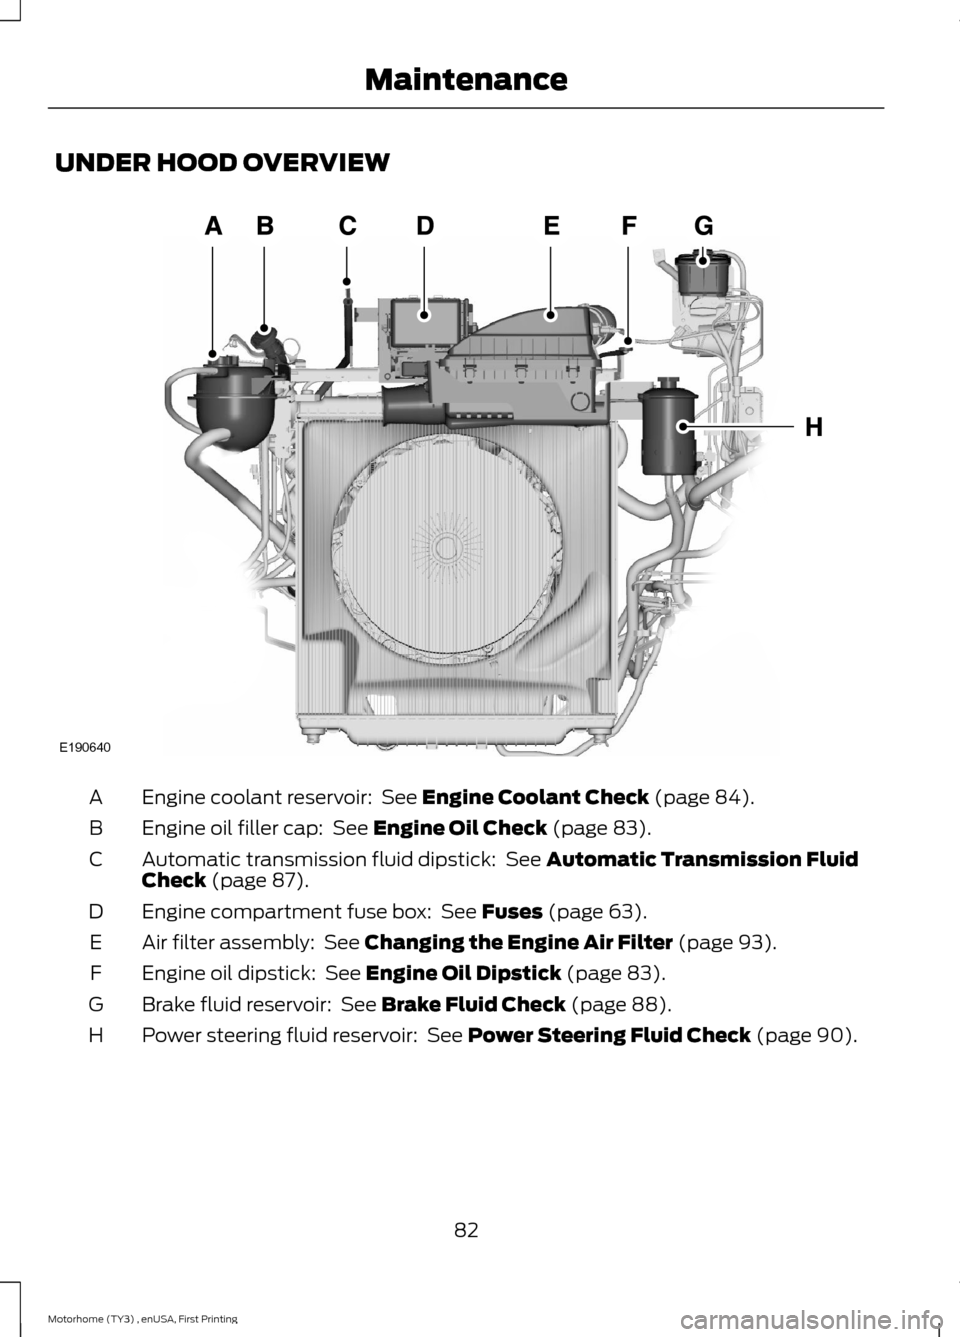
UNDER HOOD OVERVIEW
Engine coolant reservoir: See Engine Coolant Check (page 84).A
Engine oil filler cap: See Engine Oil Check (page 83).B
Automatic transmission fluid dipstick: See Automatic Transmission FluidCheck (page 87).C
Engine compartment fuse box: See Fuses (page 63).D
Air filter assembly: See Changing the Engine Air Filter (page 93).E
Engine oil dipstick: See Engine Oil Dipstick (page 83).F
Brake fluid reservoir: See Brake Fluid Check (page 88).G
Power steering fluid reservoir: See Power Steering Fluid Check (page 90).H
82Motorhome (TY3) , enUSA, First PrintingMaintenanceE190640
Page 90 of 154
AUTOMATIC TRANSMISSION
FLUID CHECK
WARNING
The dipstick cap and surroundingcomponents may be hot; gloves arerecommended.
Note:Automatic transmission fluidexpands when warmed. To obtain anaccurate fluid check, drive the vehicle untilit is at normal operating temperature(approximately 20 miles [30 km]). If yourvehicle has been operated for an extendedperiod at high speeds, in city traffic duringhot weather or pulling a trailer, the vehicleshould be turned off for about 30 minutesto allow fluid to cool to normal operatingtemperature 196°F - 215°F (91°C - 102°C)before checking.
Refer to your scheduled maintenanceinformation for scheduled intervals for fluidchecks and changes.
Your transmission does not consume fluid.However, the fluid level should be checkedif the transmission is not working properly,(i.e., if the transmission slips or shiftsslowly) or if you notice some sign of fluidleakage. To check the fluid level:
1.Drive the vehicle 20 miles (30 km) oruntil it reaches normal operatingtemperature
2.Park the vehicle on a level surface andengage the parking brake
3.With the engine running, parking brakeengaged and your foot on the brakepedal, move the gearshift lever throughall of the gear ranges. Allow sufficienttime for each gear to engage
4.Latch the gearshift lever in P (Park)and leave the engine running.
5.Remove the dipstick, wiping it cleanwith a clean, dry lint free rag. Ifnecessary, refer to Under HoodOverview in this chapter for thelocation of the dipstick.
6.Install the dipstick making sure it is fullyseated in the filler tube.
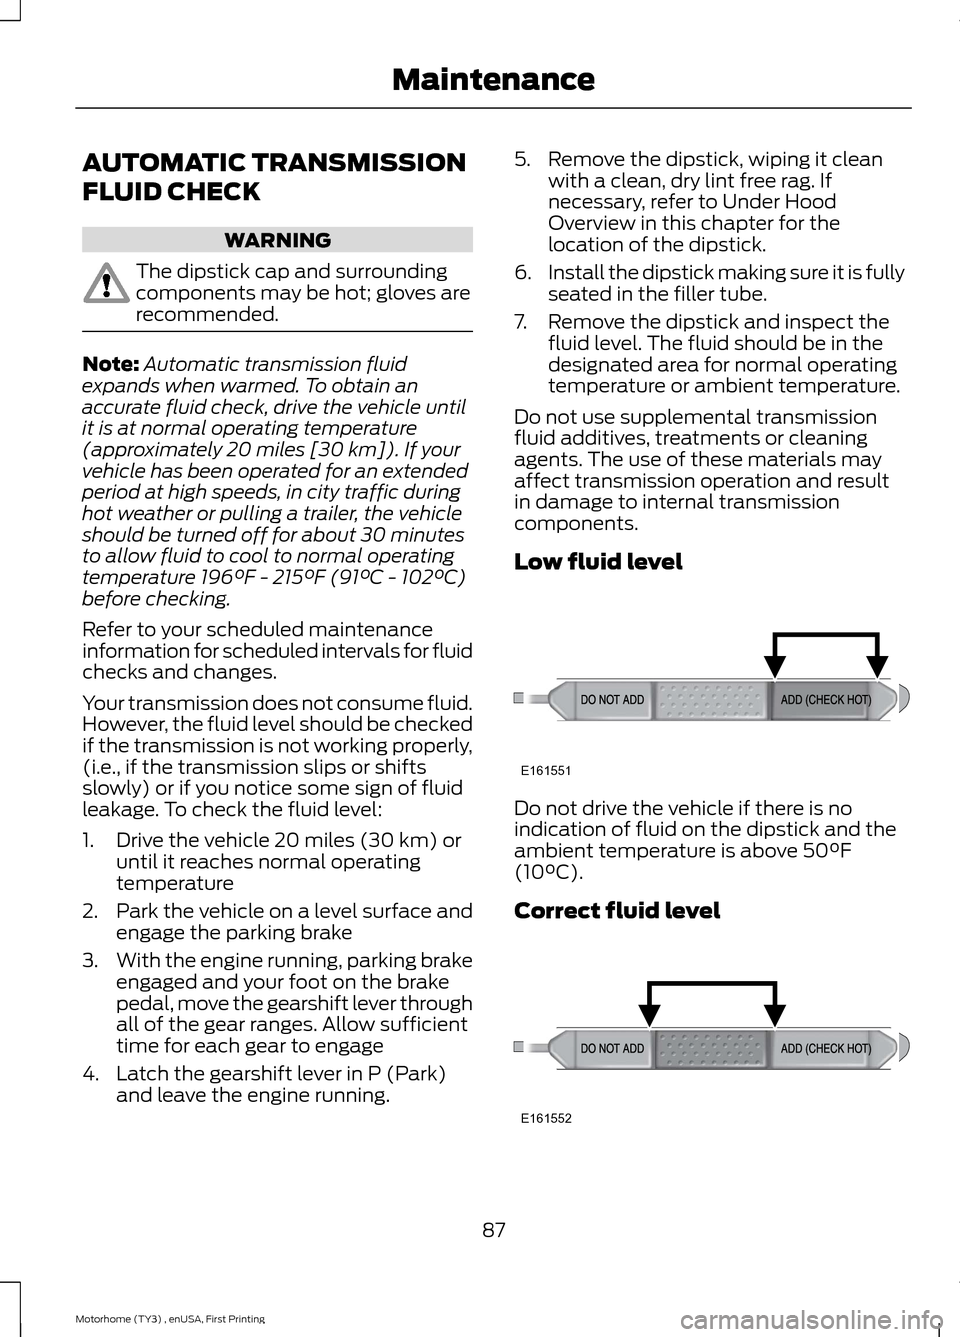
7.Remove the dipstick and inspect thefluid level. The fluid should be in thedesignated area for normal operatingtemperature or ambient temperature.
Do not use supplemental transmissionfluid additives, treatments or cleaningagents. The use of these materials mayaffect transmission operation and resultin damage to internal transmissioncomponents.
Low fluid level
Do not drive the vehicle if there is noindication of fluid on the dipstick and theambient temperature is above 50°F(10°C).
Correct fluid level
87Motorhome (TY3) , enUSA, First PrintingMaintenanceE161551 E161552
Page 91 of 154
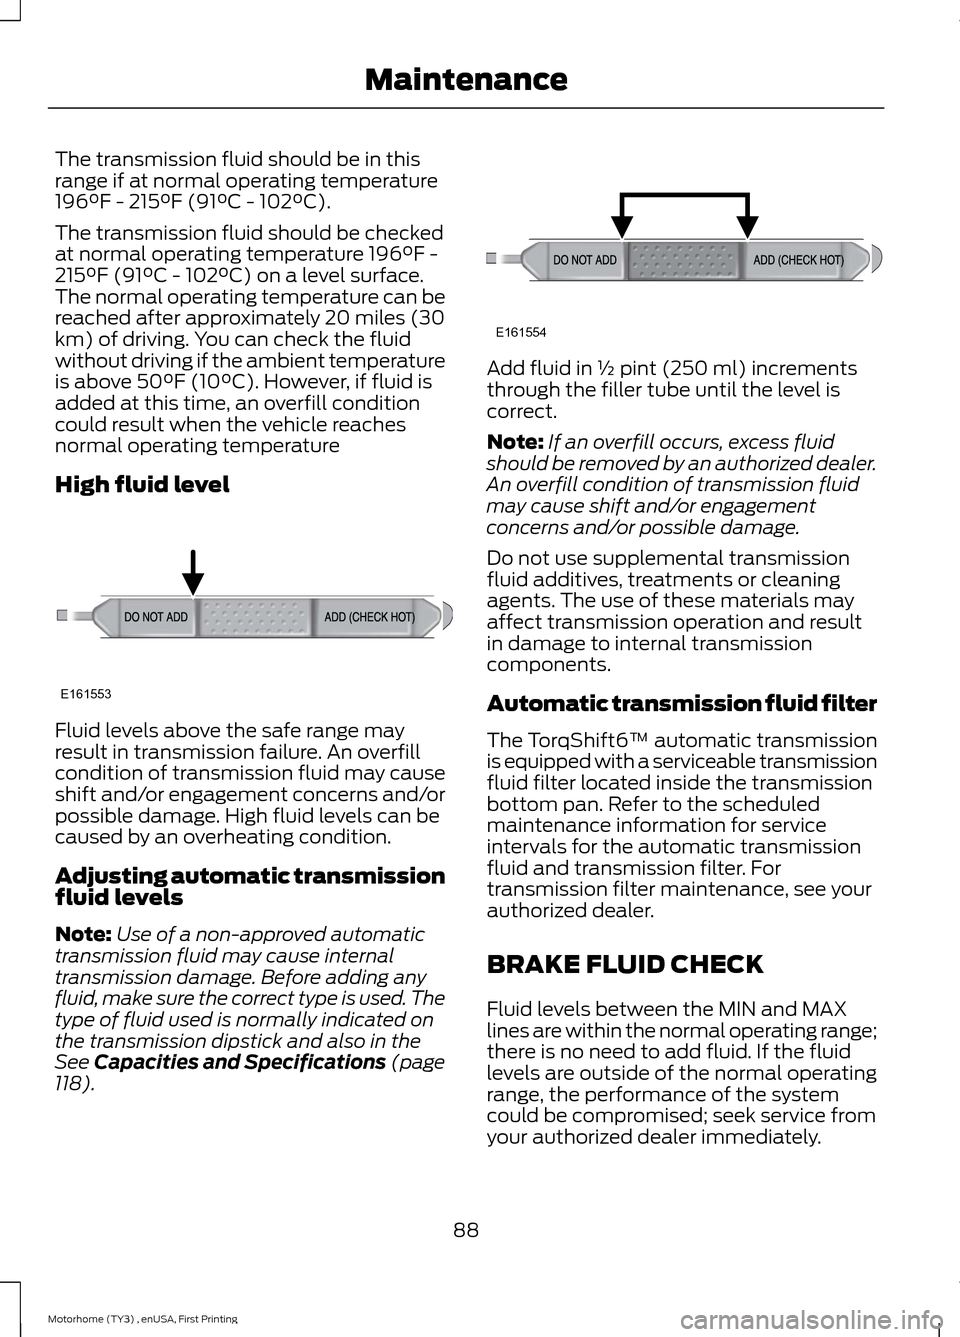
The transmission fluid should be in thisrange if at normal operating temperature196°F - 215°F (91°C - 102°C).
The transmission fluid should be checkedat normal operating temperature 196°F -215°F (91°C - 102°C) on a level surface.The normal operating temperature can bereached after approximately 20 miles (30km) of driving. You can check the fluidwithout driving if the ambient temperatureis above 50°F (10°C). However, if fluid isadded at this time, an overfill conditioncould result when the vehicle reachesnormal operating temperature
High fluid level
Fluid levels above the safe range mayresult in transmission failure. An overfillcondition of transmission fluid may causeshift and/or engagement concerns and/orpossible damage. High fluid levels can becaused by an overheating condition.
Adjusting automatic transmissionfluid levels
Note:Use of a non-approved automatictransmission fluid may cause internaltransmission damage. Before adding anyfluid, make sure the correct type is used. Thetype of fluid used is normally indicated onthe transmission dipstick and also in theSee Capacities and Specifications (page118).
Add fluid in ½ pint (250 ml) incrementsthrough the filler tube until the level iscorrect.
Note:If an overfill occurs, excess fluidshould be removed by an authorized dealer.An overfill condition of transmission fluidmay cause shift and/or engagementconcerns and/or possible damage.
Do not use supplemental transmissionfluid additives, treatments or cleaningagents. The use of these materials mayaffect transmission operation and resultin damage to internal transmissioncomponents.
Automatic transmission fluid filter
The TorqShift6™ automatic transmissionis equipped with a serviceable transmissionfluid filter located inside the transmissionbottom pan. Refer to the scheduledmaintenance information for serviceintervals for the automatic transmissionfluid and transmission filter. Fortransmission filter maintenance, see yourauthorized dealer.
BRAKE FLUID CHECK
Fluid levels between the MIN and MAXlines are within the normal operating range;there is no need to add fluid. If the fluidlevels are outside of the normal operatingrange, the performance of the systemcould be compromised; seek service fromyour authorized dealer immediately.
88Motorhome (TY3) , enUSA, First PrintingMaintenanceE161553 E161554
Page 95 of 154
Note:Battery posts, terminals and relatedaccessories contain lead and leadcompounds. Wash hands after handling.
Your vehicle is equipped with aMotorcraft® maintenance-free batterywhich normally does not require additionalwater during its life of service.
For longer, trouble-free operation, keep thetop of the battery clean and dry. Also,make certain the battery cables are alwaystightly fastened to the battery terminals.
If you see any corrosion on the battery orterminals, remove the cables from theterminals and clean with a wire brush. Youcan neutralize the acid with a solution ofbaking soda and water.
It is recommended that the negativebattery cable terminal be disconnectedfrom the battery if you plan to store yourvehicle for an extended period of time.
To ensure proper operation of the batterymanagement system (BMS), any electricaldevices that are added to the vehicleshould not have their ground connectionmade directly at the negative battery post.A connection at the negative battery postcan cause inaccurate measurements ofthe battery condition and potentialincorrect system operation.
Note:Electrical or electronic accessoriesor components added to the vehicle by thedealer or the owner may adversely affectbattery performance and durability and mayalso affect the performance of otherelectrical systems in the vehicle.
When a battery replacement is required,the battery should only be replaced witha Ford recommended replacement batterythat matches the electrical requirementsof the vehicle.
Note:Always dispose of automotivebatteries in a responsible manner. Followyour local authorized standards for disposal.Call your local authorized recycling centerto find out more about recycling automotivebatteries.
Battery relearn
When the battery is disconnected or a newbattery installed:
•The transmission must relearn itsadaptive strategy. As a result of this,the transmission may shift firmly. Thisoperation is considered normal and willnot affect function or durability of thetransmission. Over time the adaptivelearning process will fully updatetransmission operation to its optimumshift feel.
•The clock and the preset radio stationsmust be reset once the battery isreconnected.
•Your vehicle’s engine is electronicallycontrolled by a computer, some controlconditions are maintained by powerfrom the battery, the engine mustrelearn its idle and fuel trim strategy.
When the battery is disconnected or a newbattery is installed, begin the batteryrelearn process:
1.With the vehicle at a complete stop,set the parking brake.
2.Put the gearshift lever in P (Park), turnoff all accessories and start the engine.
3.Run the engine until it reaches normaloperating temperature.
4.Allow the engine to idle for at least oneminute.
92Motorhome (TY3) , enUSA, First PrintingMaintenance
Page 118 of 154
Use of one of the dissimilar spare tireslisted above at any one wheel location canlead to impairment of the following:
•Handling, stability and brakingperformance.
•Comfort and noise.
•Ground clearance and parking at curbs.
•Winter weather driving capability.
•Wet weather driving capability.
•All-wheel driving capability.
3.Full-size dissimilar spare withoutlabel on wheel
When driving with the full-size dissimilarspare wheel and tire assembly, do not:
•Exceed 70 mph (113 km/h).
•Use more than one dissimilar sparewheel and tire assembly at a time.
•Use commercial car washingequipment.
•Use snow chains on the end of thevehicle with the dissimilar spare wheeland tire assembly.
The usage of a full-size dissimilar sparewheel and tire assembly can lead toimpairment of the following:
•Handling, stability and brakingperformance.
•Comfort and noise.
•Ground clearance and parking at curbs.
•Winter weather driving capability.
•Wet weather driving capability.
•All-wheel driving capability.
When driving with the full-size dissimilarspare wheel and tire assembly additionalcaution should be given to:
•Towing a trailer.
•Driving vehicles equipped with acamper body.
•Driving vehicles with a load on thecargo rack.
Drive cautiously when using a full-sizedissimilar spare wheel and tire assemblyand seek service as soon as possible.
Tire Change Procedure
WARNINGS
When one of the front wheels is offthe ground, the transmission alonewill not prevent the vehicle frommoving or slipping off the jack, even if thetransmission is in park (P).
To help prevent the vehicle frommoving when you change a tire, besure to place the transmission in park(P), set the parking brake and block (inboth directions) the wheel that isdiagonally opposite (other side and end ofthe vehicle) to the tire being changed.
Never get underneath a vehicle thatis supported only by a jack. If thevehicle slips off the jack, you orsomeone else could be seriously injured.
Do not attempt to change a tire onthe side of the vehicle close tomoving traffic. Pull far enough off theroad to avoid the danger of being hit whenoperating the jack or changing the wheel.
Always use the jack provided asoriginal equipment with your vehicle.If using a jack other than the oneprovided as original equipment with yourvehicle, make sure the jack capacity isadequate for the vehicle weight, includingany vehicle cargo or modifications.
1.Park on a level surface, set the parkingbrake and activate the hazard flashers.
2.Place the transmission in park (P) andturn the engine off.
115Motorhome (TY3) , enUSA, First PrintingWheels and Tires
Page 119 of 154
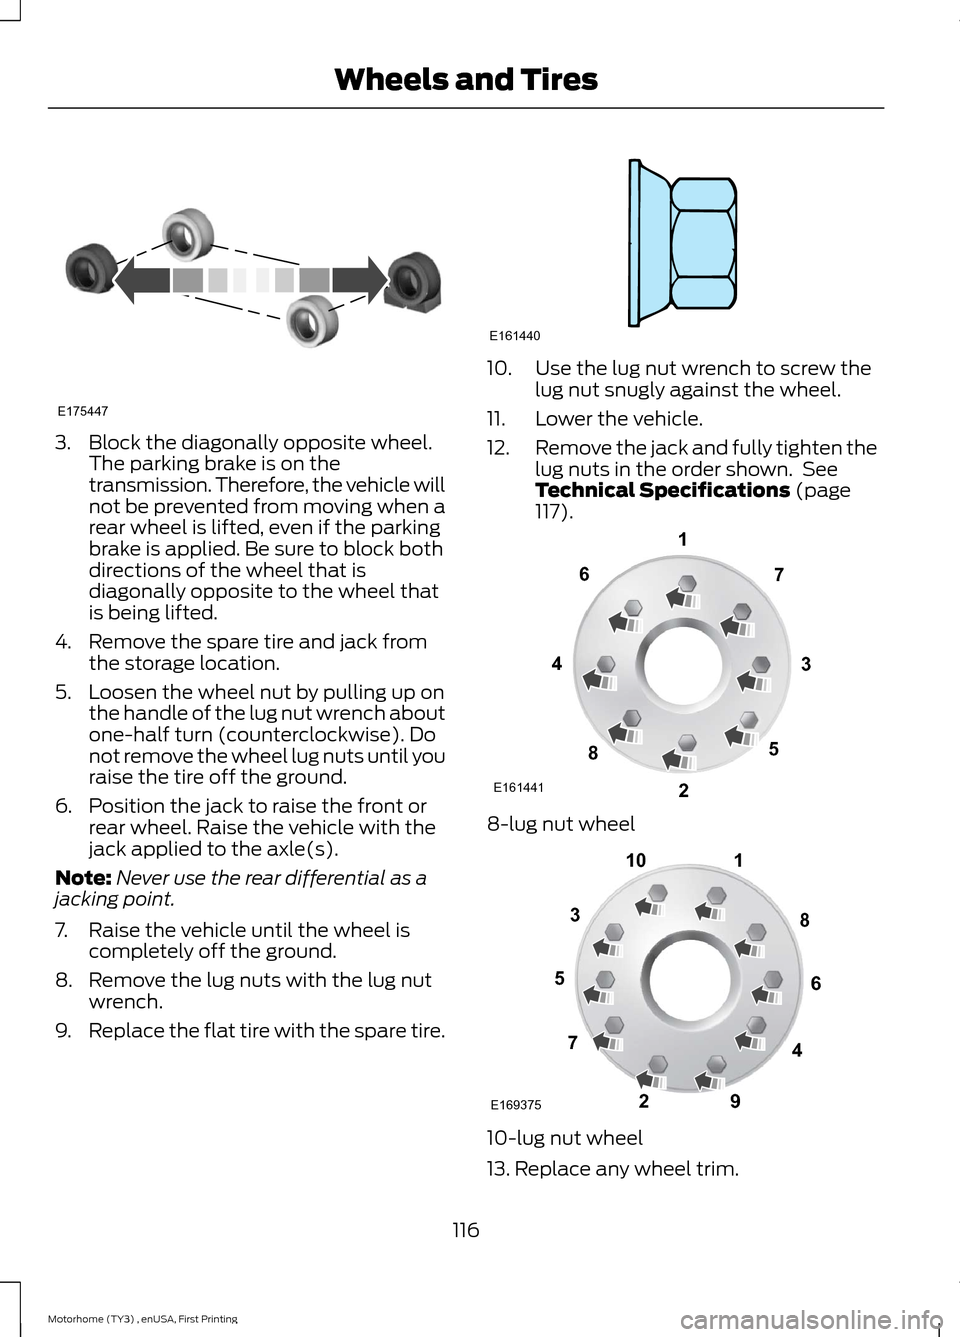
3.Block the diagonally opposite wheel.The parking brake is on thetransmission. Therefore, the vehicle willnot be prevented from moving when arear wheel is lifted, even if the parkingbrake is applied. Be sure to block bothdirections of the wheel that isdiagonally opposite to the wheel thatis being lifted.
4.Remove the spare tire and jack fromthe storage location.
5.Loosen the wheel nut by pulling up onthe handle of the lug nut wrench aboutone-half turn (counterclockwise). Donot remove the wheel lug nuts until youraise the tire off the ground.
6.Position the jack to raise the front orrear wheel. Raise the vehicle with thejack applied to the axle(s).
Note:Never use the rear differential as ajacking point.
7.Raise the vehicle until the wheel iscompletely off the ground.
8.Remove the lug nuts with the lug nutwrench.
9.Replace the flat tire with the spare tire.
10.Use the lug nut wrench to screw thelug nut snugly against the wheel.
11.Lower the vehicle.
12.Remove the jack and fully tighten thelug nuts in the order shown. SeeTechnical Specifications (page117).
8-lug nut wheel
10-lug nut wheel
13. Replace any wheel trim.
116Motorhome (TY3) , enUSA, First PrintingWheels and TiresE175447 E161440 E16144113427658 12345678910E169375
Page 122 of 154

6.8L V10 engineComponent
SP-509Spark plugs
FT-180Transmission fluid filter
We recommend Motorcraft replacement parts available at your Ford dealer or atfordparts.com for scheduled maintenance. These parts meet or exceed Ford MotorCompany’s specifications and are engineered for your vehicle. Use of other parts mayimpact vehicle performance, emissions and durability. Your warranty may be void for anydamage related to use of other parts.
If a Motorcraft oil filter is not available, use an oil filter that meets industry performancespecification SAE/USCAR-36.
For spark plug replacement, contact an authorized dealer. Replace the spark plugs at theappropriate intervals. See Scheduled Maintenance (page 128).
119Motorhome (TY3) , enUSA, First PrintingCapacities and Specifications