2016 FORD F SERIES MOTORHOME AND COMMERCIAL CHASSIS wheel
[x] Cancel search: wheelPage 77 of 154
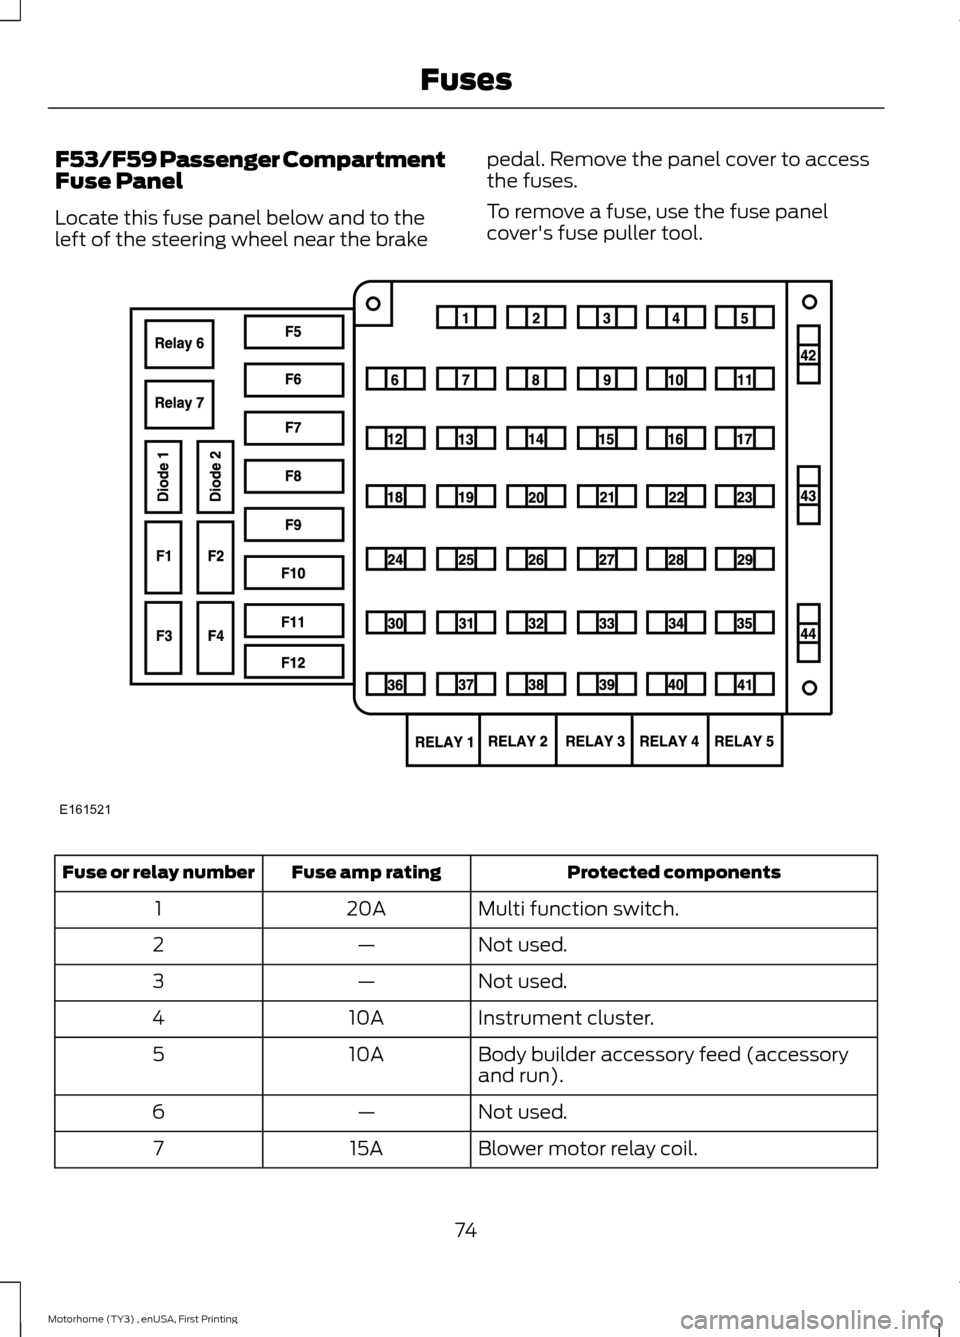
F53/F59 Passenger CompartmentFuse Panel
Locate this fuse panel below and to theleft of the steering wheel near the brake
pedal. Remove the panel cover to accessthe fuses.
To remove a fuse, use the fuse panelcover's fuse puller tool.
Protected componentsFuse amp ratingFuse or relay number
Multi function switch.20A1
Not used.—2
Not used.—3
Instrument cluster.10A4
Body builder accessory feed (accessoryand run).10A5
Not used.—6
Blower motor relay coil.15A7
74Motorhome (TY3) , enUSA, First PrintingFusesE161521
Page 84 of 154
GENERAL INFORMATION
Have your vehicle serviced regularly to helpmaintain its roadworthiness and resalevalue. There is a large network ofauthorized dealers that are there to helpyou with their professional servicingexpertise. We believe that their speciallytrained technicians are best qualified toservice your vehicle properly and expertly.They are supported by a wide range ofhighly specialized tools developedspecifically for servicing your vehicle.
To help you service your vehicle, weprovide scheduled maintenanceinformation which makes tracking routineservice easy. See ScheduledMaintenance (page 128).
If your vehicle requires professional service,an authorized dealer can provide thenecessary parts and service. Check yourwarranty information to find out whichparts and services are covered.
Use only recommended fuels, lubricants,fluids and service parts conforming tospecifications. Motorcraft® parts aredesigned and built to provide the bestperformance in your vehicle.
Precautions
•Do not work on a hot engine.
•Make sure that nothing gets caught inmoving parts.
•Do not work on a vehicle with theengine running in an enclosed space,unless you are sure you have enoughventilation.
•Keep all open flames and other burningmaterial (such as cigarettes) awayfrom the battery and all fuel relatedparts.
Working with the Engine Off
1.Set the parking brake and shift to park(P).
2.Switch off the engine.
3.Block the wheels.
Working with the Engine On
WARNING
To reduce the risk of vehicle damageand/or personal burn injuries, do notstart your engine with the air cleanerremoved and do not remove it while theengine is running.
1.Set the parking brake and shift to park(P).
2.Block the wheels
81Motorhome (TY3) , enUSA, First PrintingMaintenance
Page 93 of 154
POWER STEERING FLUID
CHECK
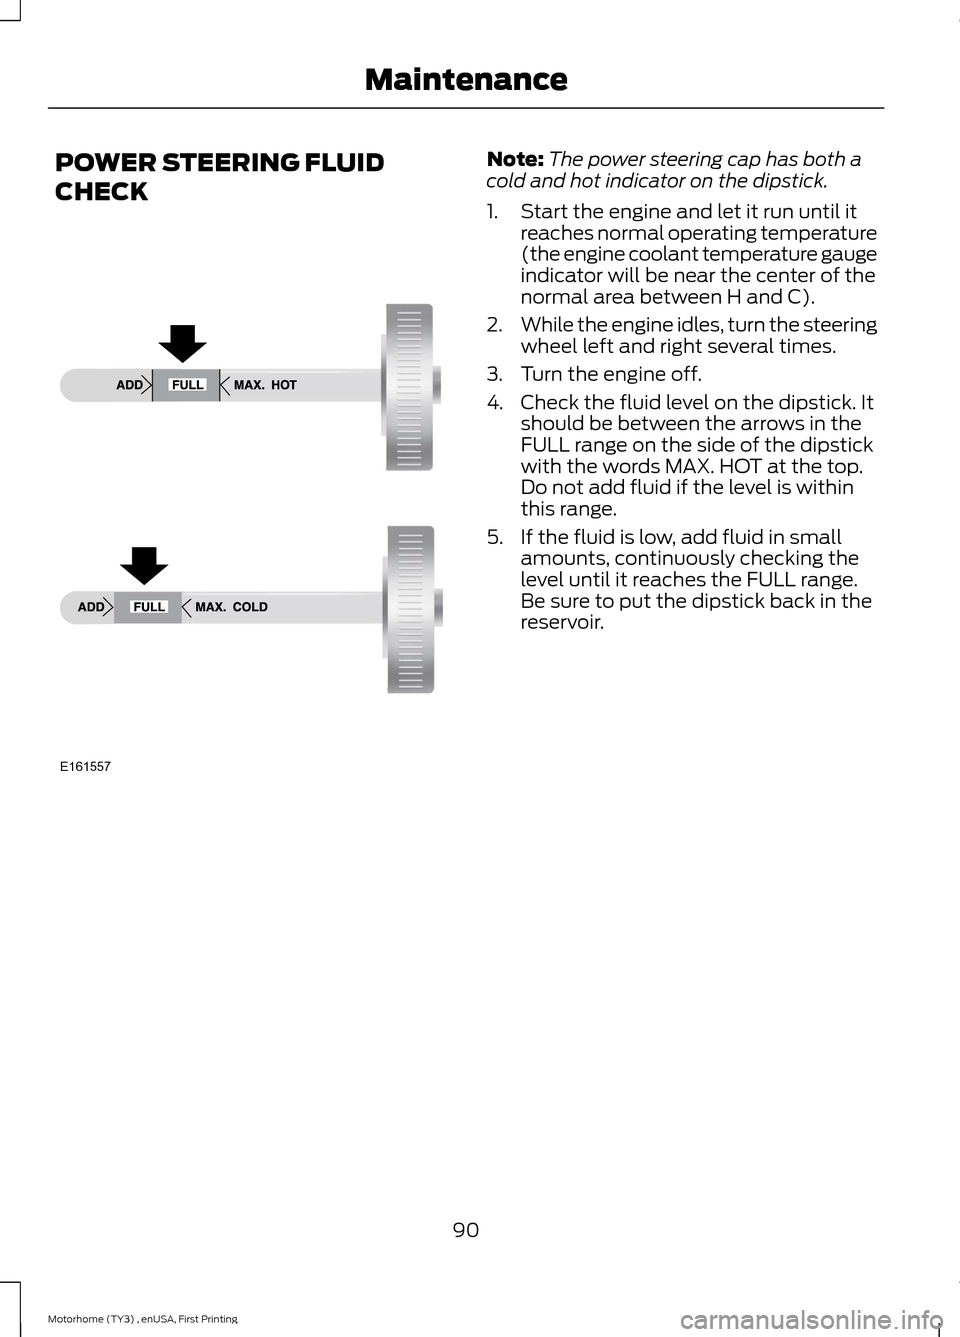
Note:The power steering cap has both acold and hot indicator on the dipstick.
1.Start the engine and let it run until itreaches normal operating temperature(the engine coolant temperature gaugeindicator will be near the center of thenormal area between H and C).
2.While the engine idles, turn the steeringwheel left and right several times.
3.Turn the engine off.
4.Check the fluid level on the dipstick. Itshould be between the arrows in theFULL range on the side of the dipstickwith the words MAX. HOT at the top.Do not add fluid if the level is withinthis range.
5.If the fluid is low, add fluid in smallamounts, continuously checking thelevel until it reaches the FULL range.Be sure to put the dipstick back in thereservoir.
90Motorhome (TY3) , enUSA, First PrintingMaintenanceE161557
Page 97 of 154
GENERAL INFORMATION
Your Ford or Lincoln authorized dealer hasmany quality products available to cleanyour vehicle and protect its finishes.
CLEANING THE EXTERIOR
Wash your vehicle regularly with cool orlukewarm water and a neutral pHshampoo, we recommend MotorcraftDetail Wash.
•Never use strong household detergentsor soap, for example dish washing orlaundry liquid. These products candiscolor and spot painted surfaces.
•Never wash your vehicle when is hot tothe touch, or during strong or directsunlight.
•Dry your vehicle with a chamois or softterry cloth towel to eliminate waterspotting.
•Immediately remove fuel spillages, birddroppings, insect deposits and road tar.These may cause damage to yourvehicle’s paintwork or trim over time.We recommend Motorcraft Bug andTar Remover.
•Remove any exterior accessories, forexample antennas, before entering acar wash.
Note:Suntan lotions and insect repellentscan damage painted surfaces. If thesesubstances come in contact with yourvehicle, wash the affected area as soon aspossible.
Exterior Chrome Parts
•Apply a high quality-cleaning productto bumpers and other chrome parts.Follow the manufacturer’s instructions.We recommend Motorcraft CustomBright Metal Cleaner.
•Do not apply the cleaning product tohot surfaces. Do not leave the cleaningproduct on chrome surfaces longerthan the time recommended.
•Using other non-recommendedcleaners can result in severe andpermanent cosmetic damage.
Note:Never use abrasive materials, forexample steel wool or plastic pads as theycan scratch the chrome surface.
Note:Do not use chrome cleaner, metalcleaner or polish on wheels or wheel covers.
Exterior Plastic Parts
For routine cleaning we recommendMotorcraft Detail Wash. If tar or greasespots are present, we recommendMotorcraft Bug and Tar Remover.
Stripes or Graphics (If Equipped)
Do not use a commercial or high-pressuresprayer on the surface or edge of stripesand graphics. This can damage them andcause the edges to peel away from thevehicle surface.
Underbody
Flush the complete underside of yourvehicle frequently. Keep body and doordrain holes free of debris or foreignmaterial.
CLEANING THE ENGINE
Engines are more efficient when they areclean because grease and dirt buildup keepthe engine warmer than normal.
94Motorhome (TY3) , enUSA, First PrintingVehicle Care
Page 98 of 154
When washing:
•Take care when using a power washerto clean the engine. The high-pressurefluid could penetrate the sealed partsand cause damage.
•Do not spray a hot engine with coldwater to avoid cracking the engineblock or other engine components.
•Spray Motorcraft Engine Shampoo andDegreaser on all parts that requirecleaning and pressure rinse clean. InCanada, use Motorcraft EngineShampoo.
•Never wash or rinse the engine while itis hot or running; water in the runningengine may cause internal damage.
•Never wash or rinse any ignition coil,spark plug wire or spark plug well, orthe area in and around these locations.
•Cover the battery, power distributionbox, and air filter assembly to preventwater damage when cleaning theengine.
CLEANING THE ALLOY
WHEELS (If Equipped)
Note:Do not apply a cleaning chemical towarm or hot wheel rims and covers.
Note:Some automatic car washes maycause damage to the finish on your wheelrims and covers.
Note:Industrial-strength or heavy-dutycleaners in combination with brush agitationto remove brake dust and dirt, could wearaway the clear coat finish over a period time.
Note:Do not use hydrofluoric acid-basedor high caustic-based wheel cleaners, steelwool, fuels or strong household detergents.
Note:If you intend parking your vehicle foran extended period after cleaning thewheels with a wheel cleaner, drive yourvehicle for a few minutes before doing so.This will reduce the risk of increasedcorrosion of the brake discs.
Alloy wheels and wheel covers are coatedwith a clear coat paint finish. To maintaintheir condition we recommend that you:
•Clean the wheels weekly usingMotorcraft Wheel and Tire Cleaner.Apply using manufacturer'sinstructions.
•Use a sponge to remove heavydeposits of dirt and brake dustaccumulation.
•Rinse thoroughly with a strong streamof water when you have completed thecleaning process.
•To remove tar and grease, useMotorcraft Bug and Tar Remover.
VEHICLE STORAGE
If you plan on storing your vehicle for 30days or more, read the followingmaintenance recommendations to makesure your vehicle stays in good operatingcondition.
We engineer and test all motor vehiclesand their components for reliable, regulardriving. Under various conditions,long-term storage may lead to degradedengine performance or failure unless youuse specific precautions to preserve enginecomponents.
General
•Store all vehicles in a dry, ventilatedplace.
•Protect from sunlight, if possible.
•If vehicles are stored outside, theyrequire regular maintenance to protectagainst rust and damage.
95Motorhome (TY3) , enUSA, First PrintingVehicle Care
Page 99 of 154
Body
•Wash your vehicle thoroughly toremove dirt, grease, oil, tar or mud fromexterior surfaces, rear-wheel housingand the underside of front fenders.
•Periodically wash your vehicle if it isstored in exposed locations.
•Touch-up exposed or primed metal toprevent rust.
•Cover chrome and stainless steel partswith a thick coat of auto wax to preventdiscoloration. Re-wax as necessarywhen you wash your vehicle.
•Lubricate all hood, door and luggagecompartment hinges and latches witha light grade oil.
•Cover interior trim to prevent fading.
•Keep all rubber parts free from oil andsolvents.
Engine
•Change the engine oil and filter prior tostorage because used engine oilcontains contaminates which maycause engine damage.
•Start the engine every 15 days for aminimum of 15 minutes. Run at fast idlewith the climate controls set to defrostuntil the engine reaches normaloperating temperature.
•With your foot on the brake, shiftthrough all the gears while the engineis running.
•We recommend that you change theengine oil before you use your vehicleagain.
Fuel system
•Fill the fuel tank with high-quality fueluntil the first automatic shutoff of thefuel pump nozzle.
Cooling system
•Protect against freezing temperatures.
•When removing your vehicle fromstorage, check coolant fluid level.Confirm that there are no coolingsystem leaks and that fluid is at therecommended level.
Battery
•Check and recharge as necessary. Keepconnections clean.
•If storing your vehicle for more than 30days without recharging the battery,we recommend that you disconnectthe battery cables to maintain batterycharge for quick starting.
Note:It is necessary to reset memoryfeatures if battery cables are disconnected.
Brakes
•Make sure the brakes and parking brakerelease fully.
Tires
•Maintain recommended air pressure.
Miscellaneous
•Make sure all linkages, cables, leversand pins under your vehicle are coveredwith grease to prevent rust.
•Move vehicles at least 25 ft (7.5 m)every 15 days to lubricate working partsand prevent corrosion.
Removing Vehicle From Storage
When your vehicle is ready to come out ofstorage, do the following:
•Wash your vehicle to remove any dirtor grease film build-up on windowsurfaces.
•Check windshield wipers for anydeterioration.
96Motorhome (TY3) , enUSA, First PrintingVehicle Care
Page 101 of 154
TIRE CARE
Information About UniformTire Quality Grading
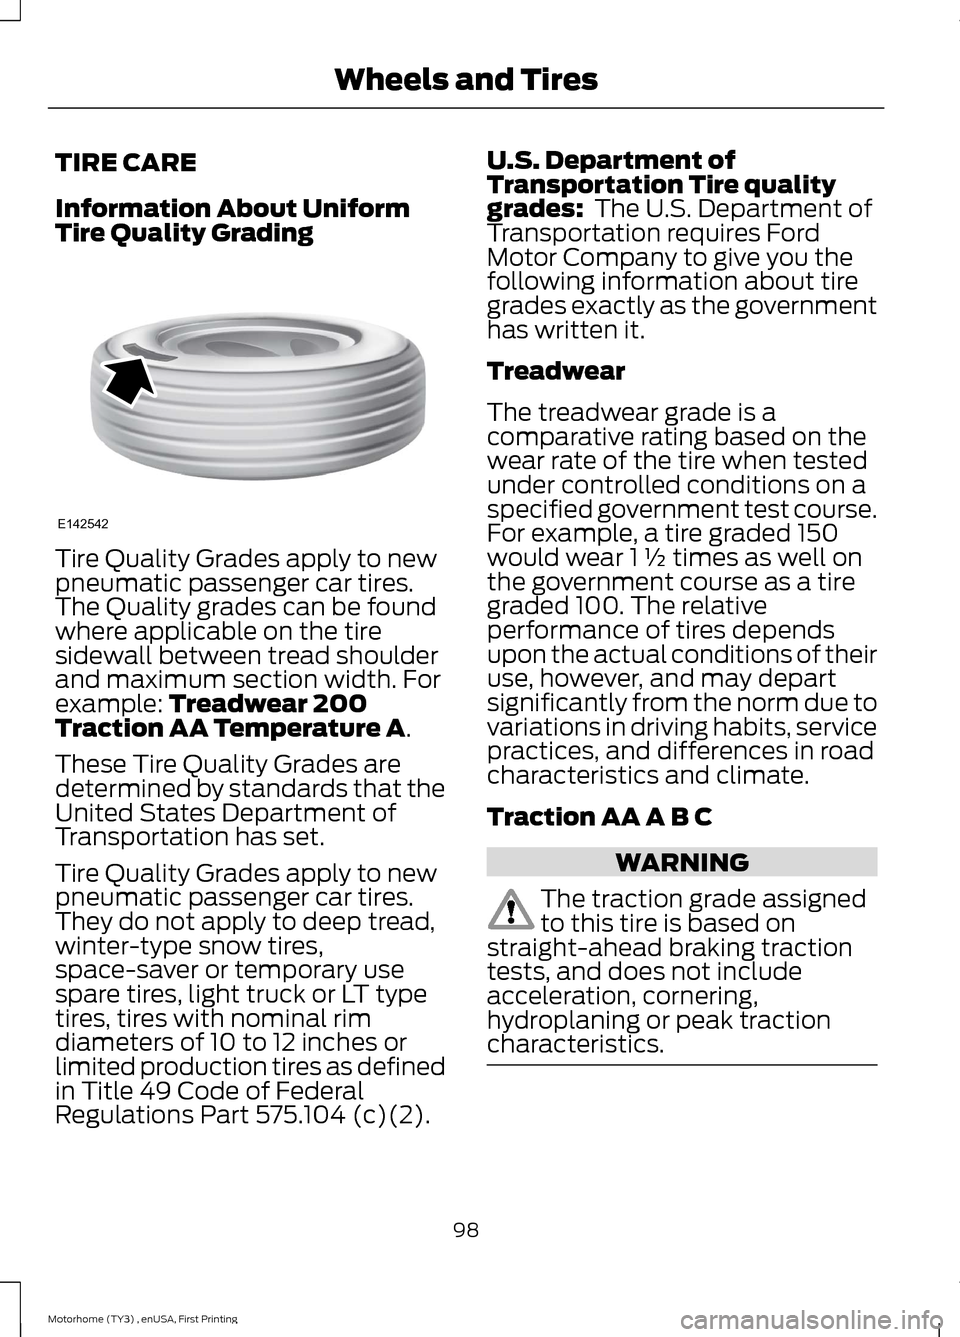
Tire Quality Grades apply to newpneumatic passenger car tires.The Quality grades can be foundwhere applicable on the tiresidewall between tread shoulderand maximum section width. Forexample: Treadwear 200Traction AA Temperature A.
These Tire Quality Grades aredetermined by standards that theUnited States Department ofTransportation has set.
Tire Quality Grades apply to newpneumatic passenger car tires.They do not apply to deep tread,winter-type snow tires,space-saver or temporary usespare tires, light truck or LT typetires, tires with nominal rimdiameters of 10 to 12 inches orlimited production tires as definedin Title 49 Code of FederalRegulations Part 575.104 (c)(2).
U.S. Department ofTransportation Tire qualitygrades: The U.S. Department ofTransportation requires FordMotor Company to give you thefollowing information about tiregrades exactly as the governmenthas written it.
Treadwear
The treadwear grade is acomparative rating based on thewear rate of the tire when testedunder controlled conditions on aspecified government test course.For example, a tire graded 150would wear 1 ½ times as well onthe government course as a tiregraded 100. The relativeperformance of tires dependsupon the actual conditions of their
use, however, and may departsignificantly from the norm due tovariations in driving habits, servicepractices, and differences in roadcharacteristics and climate.
Traction AA A B C
WARNING
The traction grade assignedto this tire is based onstraight-ahead braking tractiontests, and does not includeacceleration, cornering,hydroplaning or peak tractioncharacteristics.
98Motorhome (TY3) , enUSA, First PrintingWheels and TiresE142542
Page 102 of 154
The traction grades, from highestto lowest are AA, A, B, and C. Thegrades represent the tire’s abilityto stop on wet pavement asmeasured under controlledconditions on specifiedgovernment test surfaces ofasphalt and concrete. A tiremarked C may have poor tractionperformance.
Temperature A B C
WARNING
The temperature grade forthis tire is established for atire that is properly inflated andnot overloaded. Excessive speed,underinflation, or excessiveloading, either separately or incombination, can cause heat
buildup and possible tire failure.
The temperature grades are A(the highest), B and C,representing the tire’s resistanceto the generation of heat and itsability to dissipate heat whentested under controlled conditionson a specified indoor laboratorytest wheel. Sustained hightemperature can cause thematerial of the tire to degenerateand reduce tire life, and excessivetemperature can lead to suddentire failure. The grade Ccorresponds to a level ofperformance which all passengercar tires must meet under the
Federal Motor Vehicle SafetyStandard No. 139. Grades B and Arepresent higher levels ofperformance on the laboratorytest wheel than the minimumrequired by law.
Glossary of Tire Terminology
*Tire label: A label showing theoriginal equipment tire sizes,recommended inflation pressureand the maximum weight thevehicle can carry.
*Tire Identification Number: Anumber on the sidewall of eachtire providing information aboutthe tire brand and manufacturingplant, tire size and date ofmanufacture. Also referred to asDOT code.
*Inflation pressure: A measureof the amount of air in a tire.
*Standard load: A class ofP-metric or Metric tires designedto carry a maximum load at setpressure. For example: ForP-metric tires 35 psi (2.4 bar) or36 (2.5 bar) depending on tire sizeand for Metric tires 36 psi (2.5bar). Increasing the inflationpressure beyond this pressure willnot increase the tire’s loadcarrying capability.
*Extra load: A class of P-metricor Metric tires designed to carry aheavier maximum load at 42 psi(2.9 bar). Increasing the inflationpressure beyond this pressure willnot increase the tire’s loadcarrying capability.
99Motorhome (TY3) , enUSA, First PrintingWheels and Tires