2016 FORD F SERIES MOTORHOME AND COMMERCIAL CHASSIS parking brake
[x] Cancel search: parking brakePage 79 of 154
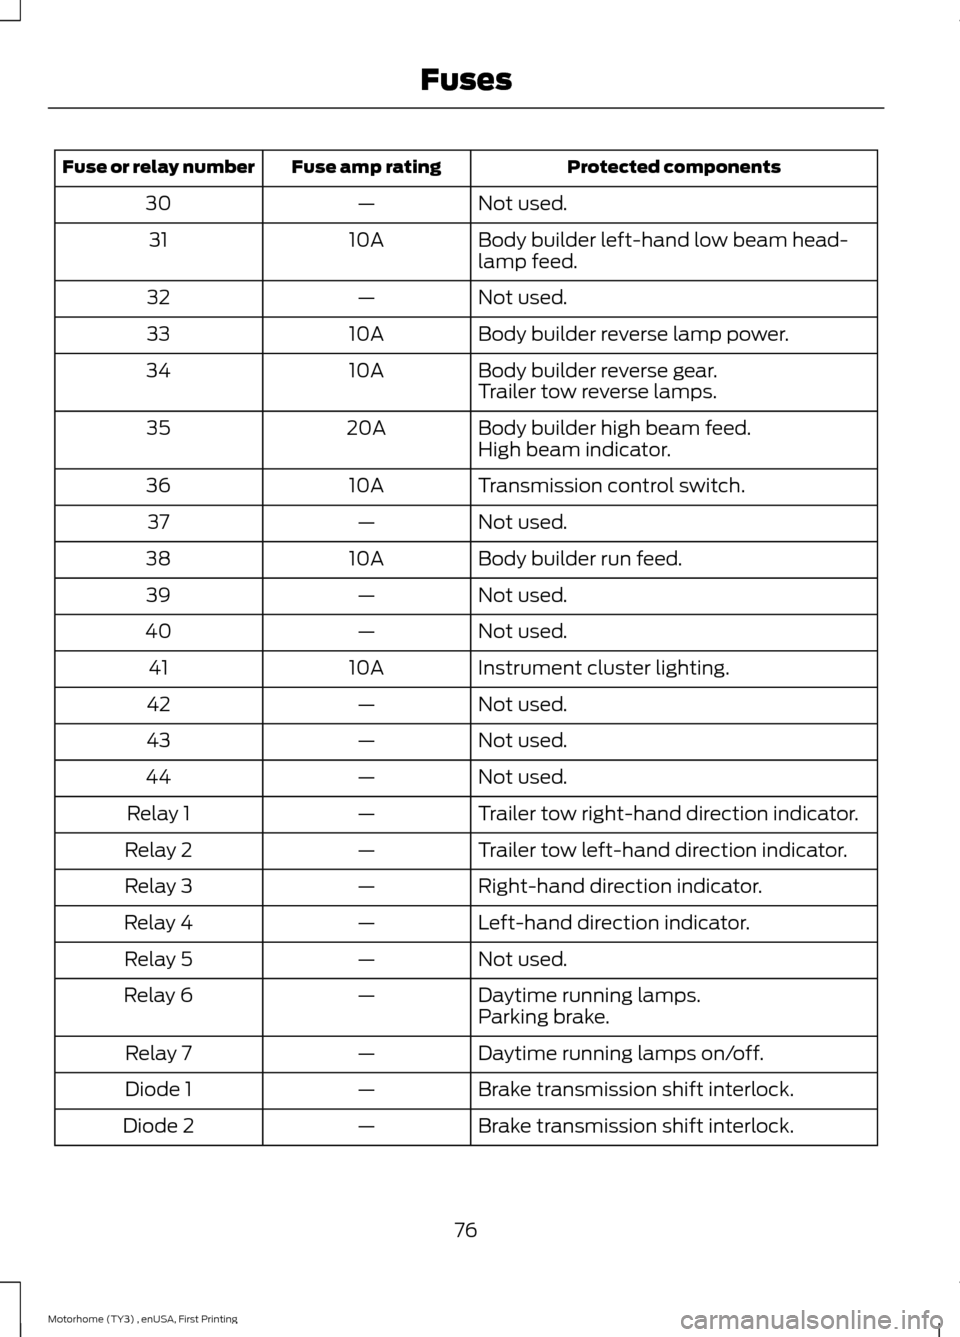
Protected componentsFuse amp ratingFuse or relay number
Not used.—30
Body builder left-hand low beam head-lamp feed.10A31
Not used.—32
Body builder reverse lamp power.10A33
Body builder reverse gear.10A34Trailer tow reverse lamps.
Body builder high beam feed.20A35High beam indicator.
Transmission control switch.10A36
Not used.—37
Body builder run feed.10A38
Not used.—39
Not used.—40
Instrument cluster lighting.10A41
Not used.—42
Not used.—43
Not used.—44
Trailer tow right-hand direction indicator.—Relay 1
Trailer tow left-hand direction indicator.—Relay 2
Right-hand direction indicator.—Relay 3
Left-hand direction indicator.—Relay 4
Not used.—Relay 5
Daytime running lamps.—Relay 6Parking brake.
Daytime running lamps on/off.—Relay 7
Brake transmission shift interlock.—Diode 1
Brake transmission shift interlock.—Diode 2
76Motorhome (TY3) , enUSA, First PrintingFuses
Page 82 of 154
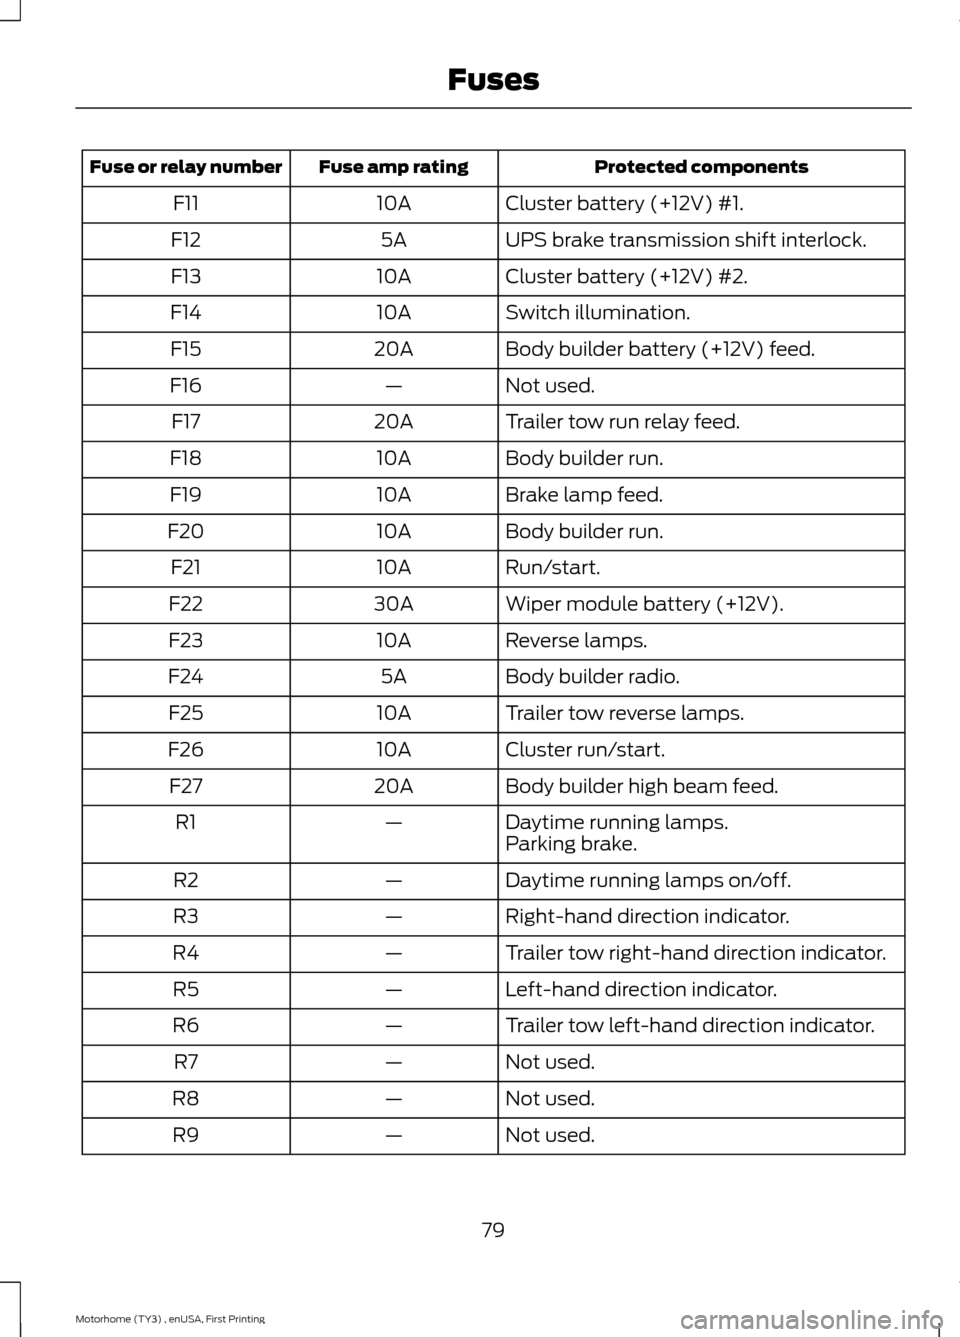
Protected componentsFuse amp ratingFuse or relay number
Cluster battery (+12V) #1.10AF11
UPS brake transmission shift interlock.5AF12
Cluster battery (+12V) #2.10AF13
Switch illumination.10AF14
Body builder battery (+12V) feed.20AF15
Not used.—F16
Trailer tow run relay feed.20AF17
Body builder run.10AF18
Brake lamp feed.10AF19
Body builder run.10AF20
Run/start.10AF21
Wiper module battery (+12V).30AF22
Reverse lamps.10AF23
Body builder radio.5AF24
Trailer tow reverse lamps.10AF25
Cluster run/start.10AF26
Body builder high beam feed.20AF27
Daytime running lamps.—R1Parking brake.
Daytime running lamps on/off.—R2
Right-hand direction indicator.—R3
Trailer tow right-hand direction indicator.—R4
Left-hand direction indicator.—R5
Trailer tow left-hand direction indicator.—R6
Not used.—R7
Not used.—R8
Not used.—R9
79Motorhome (TY3) , enUSA, First PrintingFuses
Page 84 of 154
GENERAL INFORMATION
Have your vehicle serviced regularly to helpmaintain its roadworthiness and resalevalue. There is a large network ofauthorized dealers that are there to helpyou with their professional servicingexpertise. We believe that their speciallytrained technicians are best qualified toservice your vehicle properly and expertly.They are supported by a wide range ofhighly specialized tools developedspecifically for servicing your vehicle.
To help you service your vehicle, weprovide scheduled maintenanceinformation which makes tracking routineservice easy. See ScheduledMaintenance (page 128).
If your vehicle requires professional service,an authorized dealer can provide thenecessary parts and service. Check yourwarranty information to find out whichparts and services are covered.
Use only recommended fuels, lubricants,fluids and service parts conforming tospecifications. Motorcraft® parts aredesigned and built to provide the bestperformance in your vehicle.
Precautions
•Do not work on a hot engine.
•Make sure that nothing gets caught inmoving parts.
•Do not work on a vehicle with theengine running in an enclosed space,unless you are sure you have enoughventilation.
•Keep all open flames and other burningmaterial (such as cigarettes) awayfrom the battery and all fuel relatedparts.
Working with the Engine Off
1.Set the parking brake and shift to park(P).
2.Switch off the engine.
3.Block the wheels.
Working with the Engine On
WARNING
To reduce the risk of vehicle damageand/or personal burn injuries, do notstart your engine with the air cleanerremoved and do not remove it while theengine is running.
1.Set the parking brake and shift to park(P).
2.Block the wheels
81Motorhome (TY3) , enUSA, First PrintingMaintenance
Page 90 of 154
AUTOMATIC TRANSMISSION
FLUID CHECK
WARNING
The dipstick cap and surroundingcomponents may be hot; gloves arerecommended.
Note:Automatic transmission fluidexpands when warmed. To obtain anaccurate fluid check, drive the vehicle untilit is at normal operating temperature(approximately 20 miles [30 km]). If yourvehicle has been operated for an extendedperiod at high speeds, in city traffic duringhot weather or pulling a trailer, the vehicleshould be turned off for about 30 minutesto allow fluid to cool to normal operatingtemperature 196°F - 215°F (91°C - 102°C)before checking.
Refer to your scheduled maintenanceinformation for scheduled intervals for fluidchecks and changes.
Your transmission does not consume fluid.However, the fluid level should be checkedif the transmission is not working properly,(i.e., if the transmission slips or shiftsslowly) or if you notice some sign of fluidleakage. To check the fluid level:
1.Drive the vehicle 20 miles (30 km) oruntil it reaches normal operatingtemperature
2.Park the vehicle on a level surface andengage the parking brake
3.With the engine running, parking brakeengaged and your foot on the brakepedal, move the gearshift lever throughall of the gear ranges. Allow sufficienttime for each gear to engage
4.Latch the gearshift lever in P (Park)and leave the engine running.
5.Remove the dipstick, wiping it cleanwith a clean, dry lint free rag. Ifnecessary, refer to Under HoodOverview in this chapter for thelocation of the dipstick.
6.Install the dipstick making sure it is fullyseated in the filler tube.
7.Remove the dipstick and inspect thefluid level. The fluid should be in thedesignated area for normal operatingtemperature or ambient temperature.
Do not use supplemental transmissionfluid additives, treatments or cleaningagents. The use of these materials mayaffect transmission operation and resultin damage to internal transmissioncomponents.
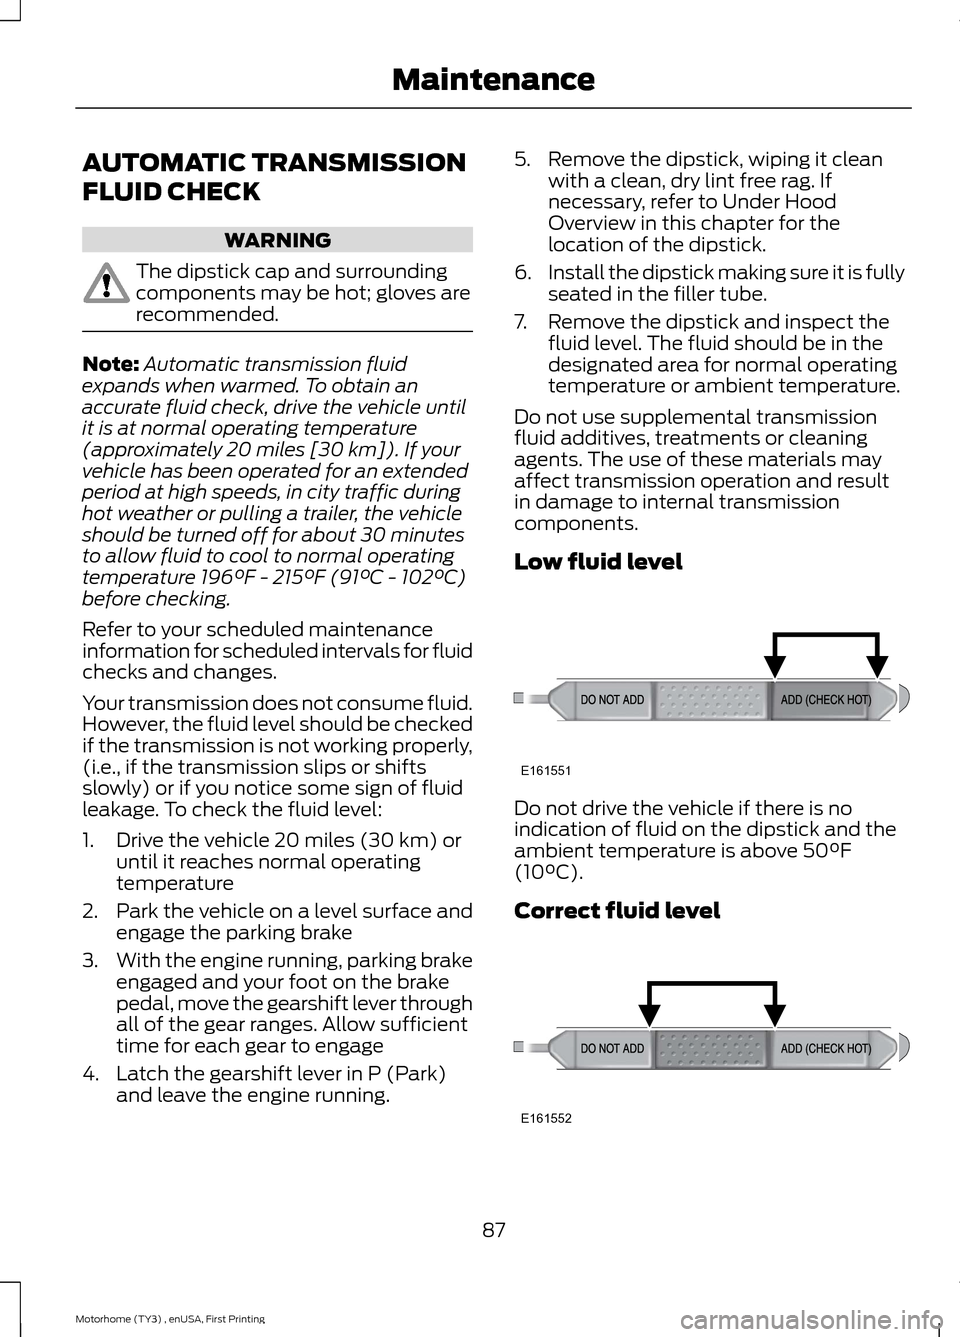
Low fluid level
Do not drive the vehicle if there is noindication of fluid on the dipstick and theambient temperature is above 50°F(10°C).
Correct fluid level
87Motorhome (TY3) , enUSA, First PrintingMaintenanceE161551 E161552
Page 95 of 154
Note:Battery posts, terminals and relatedaccessories contain lead and leadcompounds. Wash hands after handling.
Your vehicle is equipped with aMotorcraft® maintenance-free batterywhich normally does not require additionalwater during its life of service.
For longer, trouble-free operation, keep thetop of the battery clean and dry. Also,make certain the battery cables are alwaystightly fastened to the battery terminals.
If you see any corrosion on the battery orterminals, remove the cables from theterminals and clean with a wire brush. Youcan neutralize the acid with a solution ofbaking soda and water.
It is recommended that the negativebattery cable terminal be disconnectedfrom the battery if you plan to store yourvehicle for an extended period of time.
To ensure proper operation of the batterymanagement system (BMS), any electricaldevices that are added to the vehicleshould not have their ground connectionmade directly at the negative battery post.A connection at the negative battery postcan cause inaccurate measurements ofthe battery condition and potentialincorrect system operation.
Note:Electrical or electronic accessoriesor components added to the vehicle by thedealer or the owner may adversely affectbattery performance and durability and mayalso affect the performance of otherelectrical systems in the vehicle.
When a battery replacement is required,the battery should only be replaced witha Ford recommended replacement batterythat matches the electrical requirementsof the vehicle.
Note:Always dispose of automotivebatteries in a responsible manner. Followyour local authorized standards for disposal.Call your local authorized recycling centerto find out more about recycling automotivebatteries.
Battery relearn
When the battery is disconnected or a newbattery installed:
•The transmission must relearn itsadaptive strategy. As a result of this,the transmission may shift firmly. Thisoperation is considered normal and willnot affect function or durability of thetransmission. Over time the adaptivelearning process will fully updatetransmission operation to its optimumshift feel.
•The clock and the preset radio stationsmust be reset once the battery isreconnected.
•Your vehicle’s engine is electronicallycontrolled by a computer, some controlconditions are maintained by powerfrom the battery, the engine mustrelearn its idle and fuel trim strategy.
When the battery is disconnected or a newbattery is installed, begin the batteryrelearn process:
1.With the vehicle at a complete stop,set the parking brake.
2.Put the gearshift lever in P (Park), turnoff all accessories and start the engine.
3.Run the engine until it reaches normaloperating temperature.
4.Allow the engine to idle for at least oneminute.
92Motorhome (TY3) , enUSA, First PrintingMaintenance
Page 98 of 154
When washing:
•Take care when using a power washerto clean the engine. The high-pressurefluid could penetrate the sealed partsand cause damage.
•Do not spray a hot engine with coldwater to avoid cracking the engineblock or other engine components.
•Spray Motorcraft Engine Shampoo andDegreaser on all parts that requirecleaning and pressure rinse clean. InCanada, use Motorcraft EngineShampoo.
•Never wash or rinse the engine while itis hot or running; water in the runningengine may cause internal damage.
•Never wash or rinse any ignition coil,spark plug wire or spark plug well, orthe area in and around these locations.
•Cover the battery, power distributionbox, and air filter assembly to preventwater damage when cleaning theengine.
CLEANING THE ALLOY
WHEELS (If Equipped)
Note:Do not apply a cleaning chemical towarm or hot wheel rims and covers.
Note:Some automatic car washes maycause damage to the finish on your wheelrims and covers.
Note:Industrial-strength or heavy-dutycleaners in combination with brush agitationto remove brake dust and dirt, could wearaway the clear coat finish over a period time.
Note:Do not use hydrofluoric acid-basedor high caustic-based wheel cleaners, steelwool, fuels or strong household detergents.
Note:If you intend parking your vehicle foran extended period after cleaning thewheels with a wheel cleaner, drive yourvehicle for a few minutes before doing so.This will reduce the risk of increasedcorrosion of the brake discs.
Alloy wheels and wheel covers are coatedwith a clear coat paint finish. To maintaintheir condition we recommend that you:
•Clean the wheels weekly usingMotorcraft Wheel and Tire Cleaner.Apply using manufacturer'sinstructions.
•Use a sponge to remove heavydeposits of dirt and brake dustaccumulation.
•Rinse thoroughly with a strong streamof water when you have completed thecleaning process.
•To remove tar and grease, useMotorcraft Bug and Tar Remover.
VEHICLE STORAGE
If you plan on storing your vehicle for 30days or more, read the followingmaintenance recommendations to makesure your vehicle stays in good operatingcondition.
We engineer and test all motor vehiclesand their components for reliable, regulardriving. Under various conditions,long-term storage may lead to degradedengine performance or failure unless youuse specific precautions to preserve enginecomponents.
General
•Store all vehicles in a dry, ventilatedplace.
•Protect from sunlight, if possible.
•If vehicles are stored outside, theyrequire regular maintenance to protectagainst rust and damage.
95Motorhome (TY3) , enUSA, First PrintingVehicle Care
Page 99 of 154
Body
•Wash your vehicle thoroughly toremove dirt, grease, oil, tar or mud fromexterior surfaces, rear-wheel housingand the underside of front fenders.
•Periodically wash your vehicle if it isstored in exposed locations.
•Touch-up exposed or primed metal toprevent rust.
•Cover chrome and stainless steel partswith a thick coat of auto wax to preventdiscoloration. Re-wax as necessarywhen you wash your vehicle.
•Lubricate all hood, door and luggagecompartment hinges and latches witha light grade oil.
•Cover interior trim to prevent fading.
•Keep all rubber parts free from oil andsolvents.
Engine
•Change the engine oil and filter prior tostorage because used engine oilcontains contaminates which maycause engine damage.
•Start the engine every 15 days for aminimum of 15 minutes. Run at fast idlewith the climate controls set to defrostuntil the engine reaches normaloperating temperature.
•With your foot on the brake, shiftthrough all the gears while the engineis running.
•We recommend that you change theengine oil before you use your vehicleagain.
Fuel system
•Fill the fuel tank with high-quality fueluntil the first automatic shutoff of thefuel pump nozzle.
Cooling system
•Protect against freezing temperatures.
•When removing your vehicle fromstorage, check coolant fluid level.Confirm that there are no coolingsystem leaks and that fluid is at therecommended level.
Battery
•Check and recharge as necessary. Keepconnections clean.
•If storing your vehicle for more than 30days without recharging the battery,we recommend that you disconnectthe battery cables to maintain batterycharge for quick starting.
Note:It is necessary to reset memoryfeatures if battery cables are disconnected.
Brakes
•Make sure the brakes and parking brakerelease fully.
Tires
•Maintain recommended air pressure.
Miscellaneous
•Make sure all linkages, cables, leversand pins under your vehicle are coveredwith grease to prevent rust.
•Move vehicles at least 25 ft (7.5 m)every 15 days to lubricate working partsand prevent corrosion.
Removing Vehicle From Storage
When your vehicle is ready to come out ofstorage, do the following:
•Wash your vehicle to remove any dirtor grease film build-up on windowsurfaces.
•Check windshield wipers for anydeterioration.
96Motorhome (TY3) , enUSA, First PrintingVehicle Care
Page 118 of 154
Use of one of the dissimilar spare tireslisted above at any one wheel location canlead to impairment of the following:
•Handling, stability and brakingperformance.
•Comfort and noise.
•Ground clearance and parking at curbs.
•Winter weather driving capability.
•Wet weather driving capability.
•All-wheel driving capability.
3.Full-size dissimilar spare withoutlabel on wheel
When driving with the full-size dissimilarspare wheel and tire assembly, do not:
•Exceed 70 mph (113 km/h).
•Use more than one dissimilar sparewheel and tire assembly at a time.
•Use commercial car washingequipment.
•Use snow chains on the end of thevehicle with the dissimilar spare wheeland tire assembly.
The usage of a full-size dissimilar sparewheel and tire assembly can lead toimpairment of the following:
•Handling, stability and brakingperformance.
•Comfort and noise.
•Ground clearance and parking at curbs.
•Winter weather driving capability.
•Wet weather driving capability.
•All-wheel driving capability.
When driving with the full-size dissimilarspare wheel and tire assembly additionalcaution should be given to:
•Towing a trailer.
•Driving vehicles equipped with acamper body.
•Driving vehicles with a load on thecargo rack.
Drive cautiously when using a full-sizedissimilar spare wheel and tire assemblyand seek service as soon as possible.
Tire Change Procedure
WARNINGS
When one of the front wheels is offthe ground, the transmission alonewill not prevent the vehicle frommoving or slipping off the jack, even if thetransmission is in park (P).
To help prevent the vehicle frommoving when you change a tire, besure to place the transmission in park(P), set the parking brake and block (inboth directions) the wheel that isdiagonally opposite (other side and end ofthe vehicle) to the tire being changed.
Never get underneath a vehicle thatis supported only by a jack. If thevehicle slips off the jack, you orsomeone else could be seriously injured.
Do not attempt to change a tire onthe side of the vehicle close tomoving traffic. Pull far enough off theroad to avoid the danger of being hit whenoperating the jack or changing the wheel.
Always use the jack provided asoriginal equipment with your vehicle.If using a jack other than the oneprovided as original equipment with yourvehicle, make sure the jack capacity isadequate for the vehicle weight, includingany vehicle cargo or modifications.
1.Park on a level surface, set the parkingbrake and activate the hazard flashers.
2.Place the transmission in park (P) andturn the engine off.
115Motorhome (TY3) , enUSA, First PrintingWheels and Tires