2016 FORD F SERIES MOTORHOME AND COMMERCIAL CHASSIS instrument cluster
[x] Cancel search: instrument clusterPage 38 of 154
GENERAL INFORMATION
Note:Occasional brake noise is normal. Ifa metal-to-metal, continuous grinding orcontinuous squeal sound is present, thebrake linings may be worn-out and shouldbe inspected by an authorized dealer. If thevehicle has continuous vibration or shudderin the steering wheel while braking, thevehicle should be inspected by anauthorized dealer.
Note:Brake dust may accumulate on thewheels, even under normal drivingconditions. Some dust is inevitable as thebrakes wear and does not contribute tobrake noise. See Cleaning the AlloyWheels (page 95).
See the Instrument Clusterchapter for information on thebrake system warning light.
Wet brakes result in reduced brakingefficiency. Gently press the brake pedal afew times when driving from a car wash orstanding water to dry the brakes.
Brake Over Accelerator
In the event the accelerator pedalbecomes stuck or entrapped, apply steadyand firm pressure to the brake pedal toslow the vehicle and reduce engine power.If you experience this condition, apply thebrakes and bring your vehicle to a safestop. Turn the engine off, shift thetransmission into park (P), apply theparking brake, and then inspect theaccelerator pedal for any interferences. Ifnone are found and the condition persists,have your vehicle towed to the nearestauthorized dealer.
Hydraulic brake booster system(Hydroboost or Hydromax)
The Hydroboost and Hydromax systemsreceive fluid pressure from the powersteering pump to provide power assistduring braking.
The Hydromax booster receives backuppressure from the reserve system electricpump whenever the fluid in the powersteering system is not flowing. When theengine is off, the pump will turn on if thebrake pedal is applied, or if the ignition isturned to the on position.
The sound of the pump operating may beheard by the driver, but this is a normalcharacteristic of the system.
The reserve system provides reducedbraking power, so the vehicle should beoperated under these conditions withcaution, and only to seek service repair andremove the vehicle from the roadway.
Note:For Hydromax-equipped vehiclesoperating under normal conditions, the noiseof the fluid flowing through the booster maybe heard whenever the brake is applied. Thiscondition is normal. Vehicle service is notrequired.
If braking performance or pedal responsebecomes very poor, even when the pedalis strongly pressed, it may indicate thepresence of air in the hydraulic system orleakage of fluid. Stop the vehicle safely assoon as possible and seek serviceimmediately.
HINTS ON DRIVING WITH
ANTI-LOCK BRAKES
Note:When the system is operating, thebrake pedal will pulse and may travelfurther. Maintain pressure on the brakepedal. You may also hear a noise from thesystem. This is normal.
35Motorhome (TY3) , enUSA, First PrintingBrakesE144522
Page 39 of 154
The anti-lock braking system will noteliminate the risks when:
•You drive too closely to the vehicle infront of you.
•Your vehicle is hydroplaning.
•You take corners too fast.
•The road surface is poor.
PARKING BRAKE
WARNING
Always set the parking brake fullyand make sure the transmissionselector lever is placed in park (P).Failure to set the parking brake and engagepark could result in vehicle roll-away,property damage or bodily injury. Turn theignition to the lock position and removethe key whenever you leave your vehicle.
Apply the parking brake whenever yourvehicle is parked.
•For vehicles equipped with a footoperated parking brake, press the pedaldownward to set the parking brake.
•For vehicle equipped with a handoperated parking brake, pull theparking brake lever up to set theparking brake.
The brake warning lamp in theinstrument cluster illuminateswhen the ignition is turned onand the parking brake is applied.
The parking brake is not recommended tostop a moving vehicle. However, if thenormal brakes fail, the parking brake canbe used to stop your vehicle in anemergency. Your vehicle's stoppingdistance will increase greatly and thehandling of your vehicle will be adverselyaffected.
To release the parking brake:
•For vehicles equipped with a footoperated parking brake, pull theparking brake release lever.
•For vehicles equipped with a handoperated parking brake, push theparking brake lever down.
36Motorhome (TY3) , enUSA, First PrintingBrakesE144522
Page 40 of 154
PRINCIPLE OF OPERATION
Cruise control lets you maintain a setspeed without keeping your foot on theaccelerator pedal. You can use cruisecontrol when your vehicle speed is greaterthan 20 mph (30 km/h).
USING CRUISE CONTROL
WARNINGS
Do not use cruise control on windingroads, in heavy traffic or when theroad surface is slippery. This couldresult in loss of vehicle control, seriousinjury or death.
When you are going downhill, yourvehicle speed may increase abovethe set speed. The system will notapply the brakes. Change down a gear toassist the system in maintaining the setspeed. Failure to do so could result in lossof vehicle control, serious injury or death.
Note:Cruise control will disengage if thevehicle speed decreases more than 10 mph(16 km/h) below the set speed while drivinguphill.
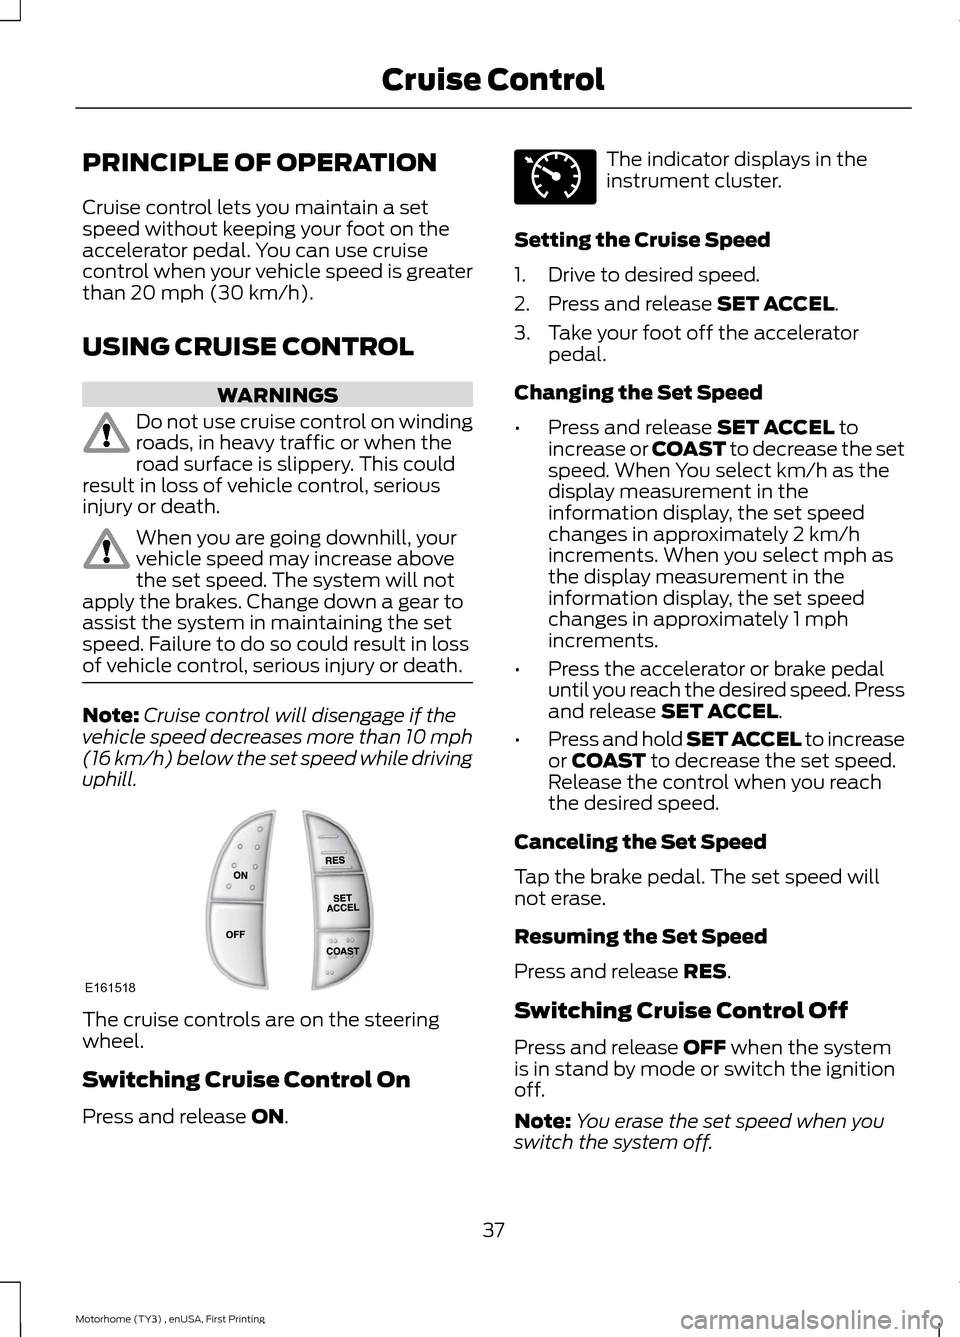
The cruise controls are on the steeringwheel.
Switching Cruise Control On
Press and release ON.
The indicator displays in theinstrument cluster.
Setting the Cruise Speed
1.Drive to desired speed.
2.Press and release SET ACCEL.
3.Take your foot off the acceleratorpedal.
Changing the Set Speed
•Press and release SET ACCEL toincrease or COAST to decrease the setspeed. When You select km/h as thedisplay measurement in theinformation display, the set speedchanges in approximately 2 km/hincrements. When you select mph asthe display measurement in theinformation display, the set speedchanges in approximately 1 mphincrements.
•Press the accelerator or brake pedaluntil you reach the desired speed. Pressand release SET ACCEL.
•Press and hold SET ACCEL to increaseor COAST to decrease the set speed.Release the control when you reachthe desired speed.
Canceling the Set Speed
Tap the brake pedal. The set speed willnot erase.
Resuming the Set Speed
Press and release RES.
Switching Cruise Control Off
Press and release OFF when the systemis in stand by mode or switch the ignitionoff.
Note:You erase the set speed when youswitch the system off.
37Motorhome (TY3) , enUSA, First PrintingCruise ControlE161518 E71340
Page 77 of 154
F53/F59 Passenger CompartmentFuse Panel
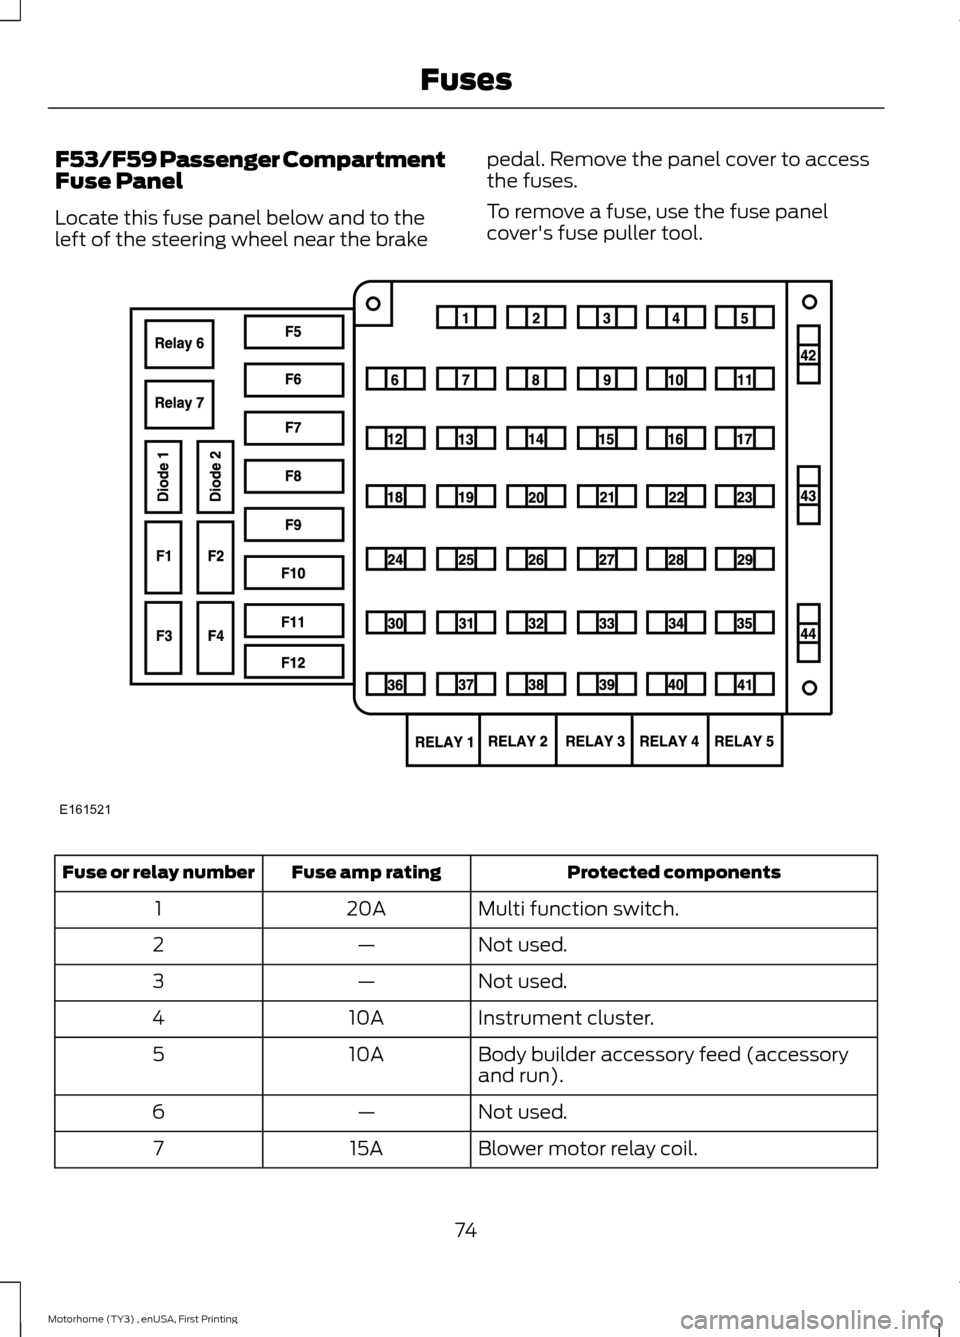
Locate this fuse panel below and to theleft of the steering wheel near the brake
pedal. Remove the panel cover to accessthe fuses.
To remove a fuse, use the fuse panelcover's fuse puller tool.
Protected componentsFuse amp ratingFuse or relay number
Multi function switch.20A1
Not used.—2
Not used.—3
Instrument cluster.10A4
Body builder accessory feed (accessoryand run).10A5
Not used.—6
Blower motor relay coil.15A7
74Motorhome (TY3) , enUSA, First PrintingFusesE161521
Page 78 of 154
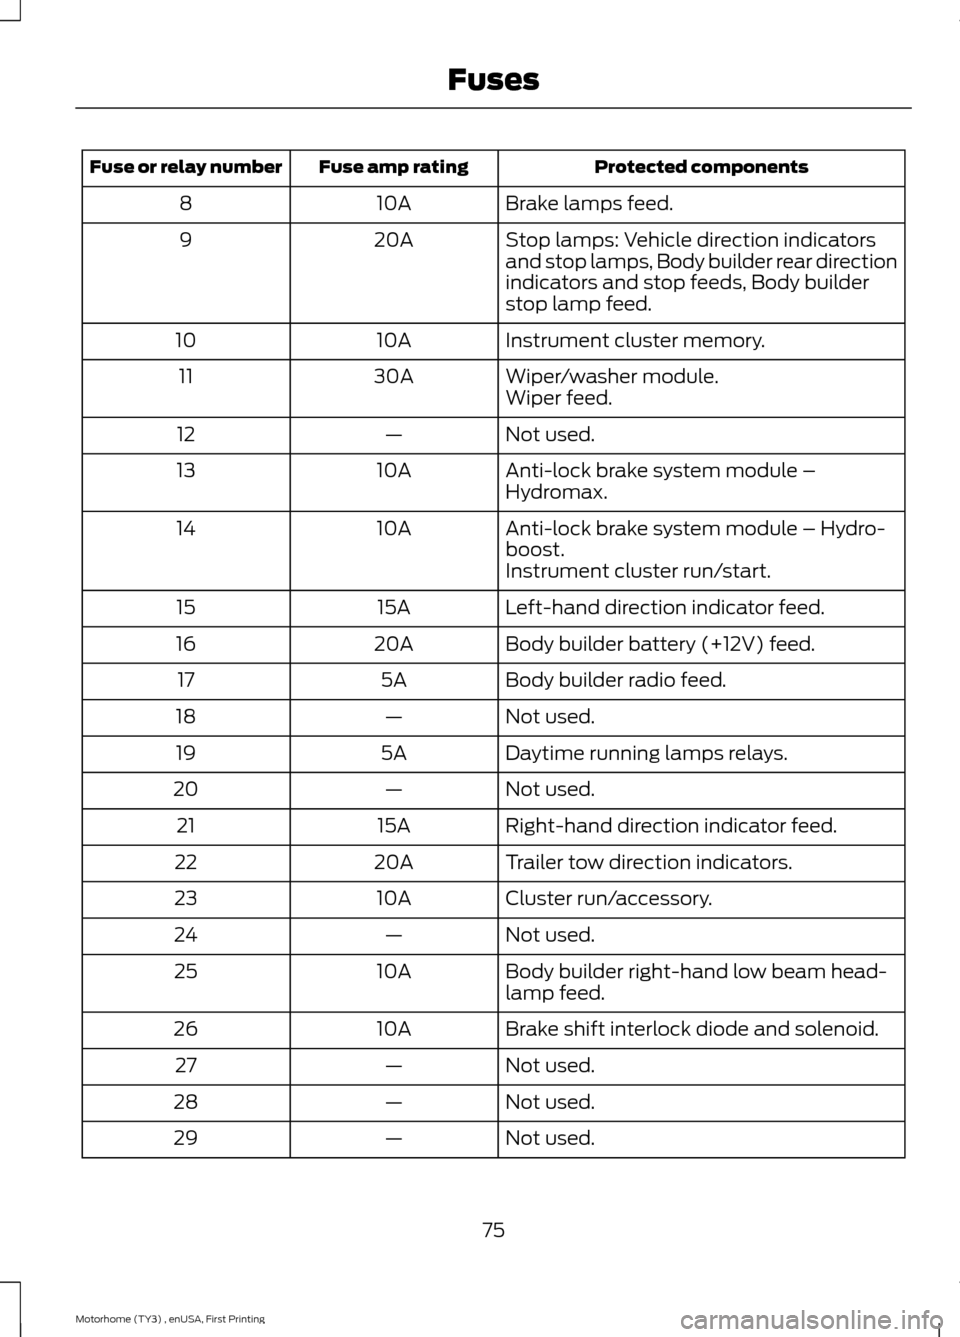
Protected componentsFuse amp ratingFuse or relay number
Brake lamps feed.10A8
Stop lamps: Vehicle direction indicatorsand stop lamps, Body builder rear directionindicators and stop feeds, Body builderstop lamp feed.
20A9
Instrument cluster memory.10A10
Wiper/washer module.30A11Wiper feed.
Not used.—12
Anti-lock brake system module –Hydromax.10A13
Anti-lock brake system module – Hydro-boost.10A14
Instrument cluster run/start.
Left-hand direction indicator feed.15A15
Body builder battery (+12V) feed.20A16
Body builder radio feed.5A17
Not used.—18
Daytime running lamps relays.5A19
Not used.—20
Right-hand direction indicator feed.15A21
Trailer tow direction indicators.20A22
Cluster run/accessory.10A23
Not used.—24
Body builder right-hand low beam head-lamp feed.10A25
Brake shift interlock diode and solenoid.10A26
Not used.—27
Not used.—28
Not used.—29
75Motorhome (TY3) , enUSA, First PrintingFuses
Page 79 of 154
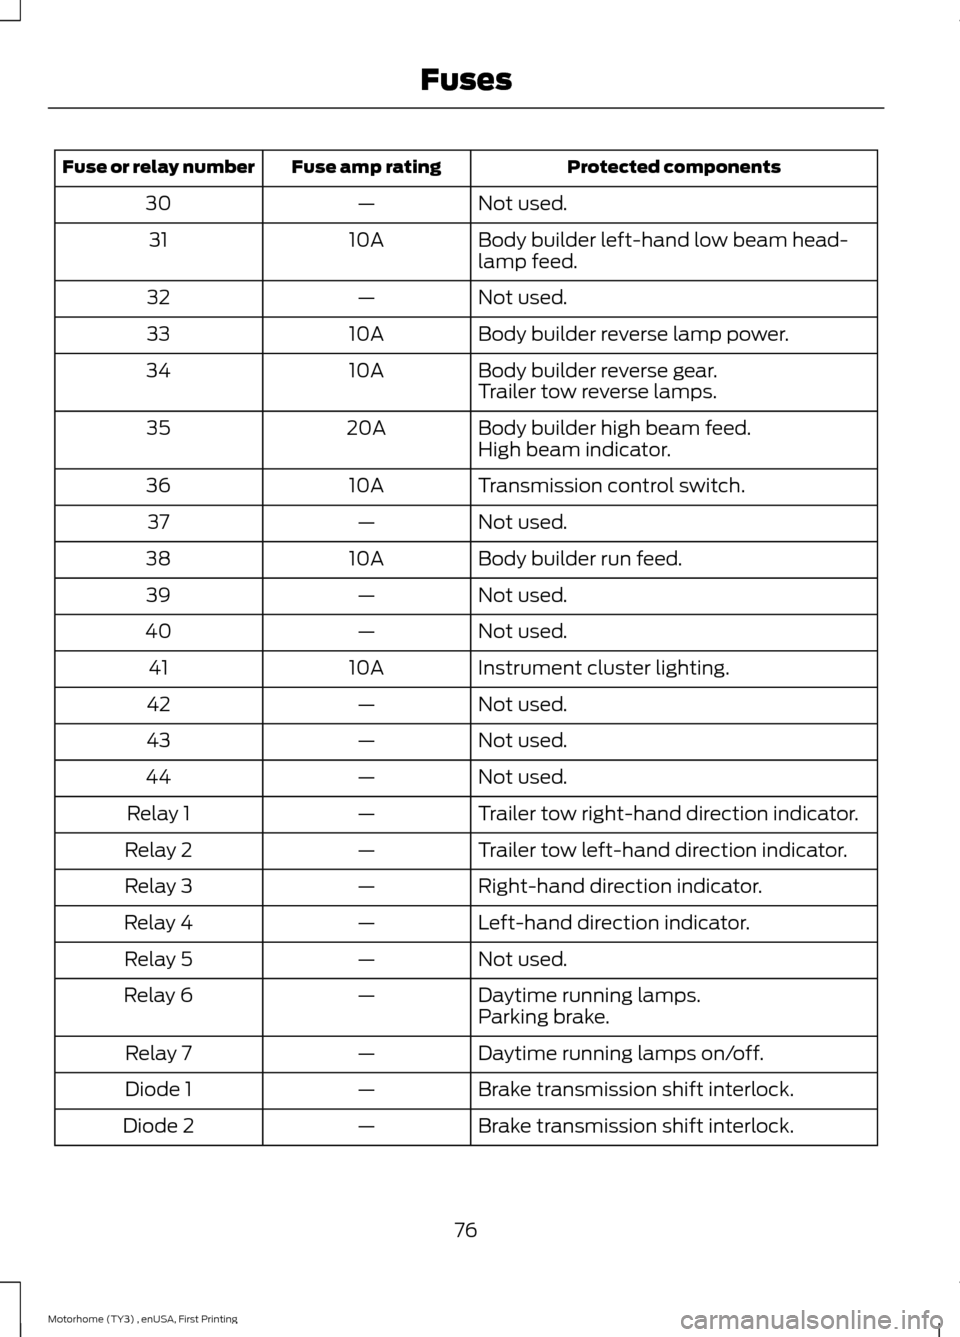
Protected componentsFuse amp ratingFuse or relay number
Not used.—30
Body builder left-hand low beam head-lamp feed.10A31
Not used.—32
Body builder reverse lamp power.10A33
Body builder reverse gear.10A34Trailer tow reverse lamps.
Body builder high beam feed.20A35High beam indicator.
Transmission control switch.10A36
Not used.—37
Body builder run feed.10A38
Not used.—39
Not used.—40
Instrument cluster lighting.10A41
Not used.—42
Not used.—43
Not used.—44
Trailer tow right-hand direction indicator.—Relay 1
Trailer tow left-hand direction indicator.—Relay 2
Right-hand direction indicator.—Relay 3
Left-hand direction indicator.—Relay 4
Not used.—Relay 5
Daytime running lamps.—Relay 6Parking brake.
Daytime running lamps on/off.—Relay 7
Brake transmission shift interlock.—Diode 1
Brake transmission shift interlock.—Diode 2
76Motorhome (TY3) , enUSA, First PrintingFuses
Page 151 of 154
Engine Coolant Check..................................84Adding Engine Coolant......................................84Recycled Engine Coolant..................................85Severe Climates....................................................85What you Should Know About Fail-SafeCooling................................................................86Engine Oil Check............................................83Adding Engine Oil.................................................83Engine Oil Dipstick.........................................83Engine Specifications..................................118Drivebelt Routing.................................................118Environment.......................................................8Essential Towing Checks.............................47Before Towing a Trailer......................................48Hitches......................................................................47Launching or Retrieving a Boat or PersonalWatercraft (PWC)..........................................49Safety Chains.........................................................47Trailer Brakes.........................................................48Trailer Lamps.........................................................48When Towing a Trailer.......................................48Export Unique Options...................................7Extended Service Plan (ESP)..................126SERVICE PLANS (CANADA ONLY)..............127SERVICE PLANS (U.S. Only)..........................126
F
Ford Credit...........................................................5(U.S. Only).................................................................5Fuel and Refueling.........................................25Fuel Consumption.........................................28Calculating Fuel Economy................................28Filling the Tank......................................................28Fuel Filter............................................................91Fuel Quality......................................................26Choosing the Right Fuel....................................26Fuses...................................................................63Fuse Specification Chart.............................63Diode and Relay Module....................................73F53/F59 Passenger Compartment FusePanel.....................................................................74F53 Power Distribution Box..............................63
G
Gauges.................................................................13Engine Coolant Temperature Gauge.............14Engine Oil Pressure Gauge................................14Fuel Gauge...............................................................14Speedometer..........................................................14Transmission Fluid TemperatureGauge....................................................................14General Maintenance Information.........128Multi-point Inspection......................................130Owner Checks and Services...........................129Protecting Your Investment............................128Why Maintain Your Vehicle?..........................128Why Maintain Your Vehicle at YourDealership?......................................................128Getting Assistance Outside the U.S. andCanada...........................................................60Getting the Services You Need..................57Away From Home.................................................57
H
HandbrakeSee: Parking Brake...............................................36Hazard Warning Flashers............................54Hints on Driving With Anti-LockBrakes..............................................................35
I
Ignition Switch.................................................22In California (U.S. Only)...............................58Information Displays......................................18General Information.............................................18Information Messages..................................19Engine.......................................................................20Maintenance...........................................................21Transmission...........................................................21Instrument Cluster..........................................13Instrument Lighting Dimmer........................11Introduction........................................................3
148Motorhome (TY3) , enUSA, First PrintingIndex