2016 FORD EXPLORER ECO mode
[x] Cancel search: ECO modePage 396 of 541
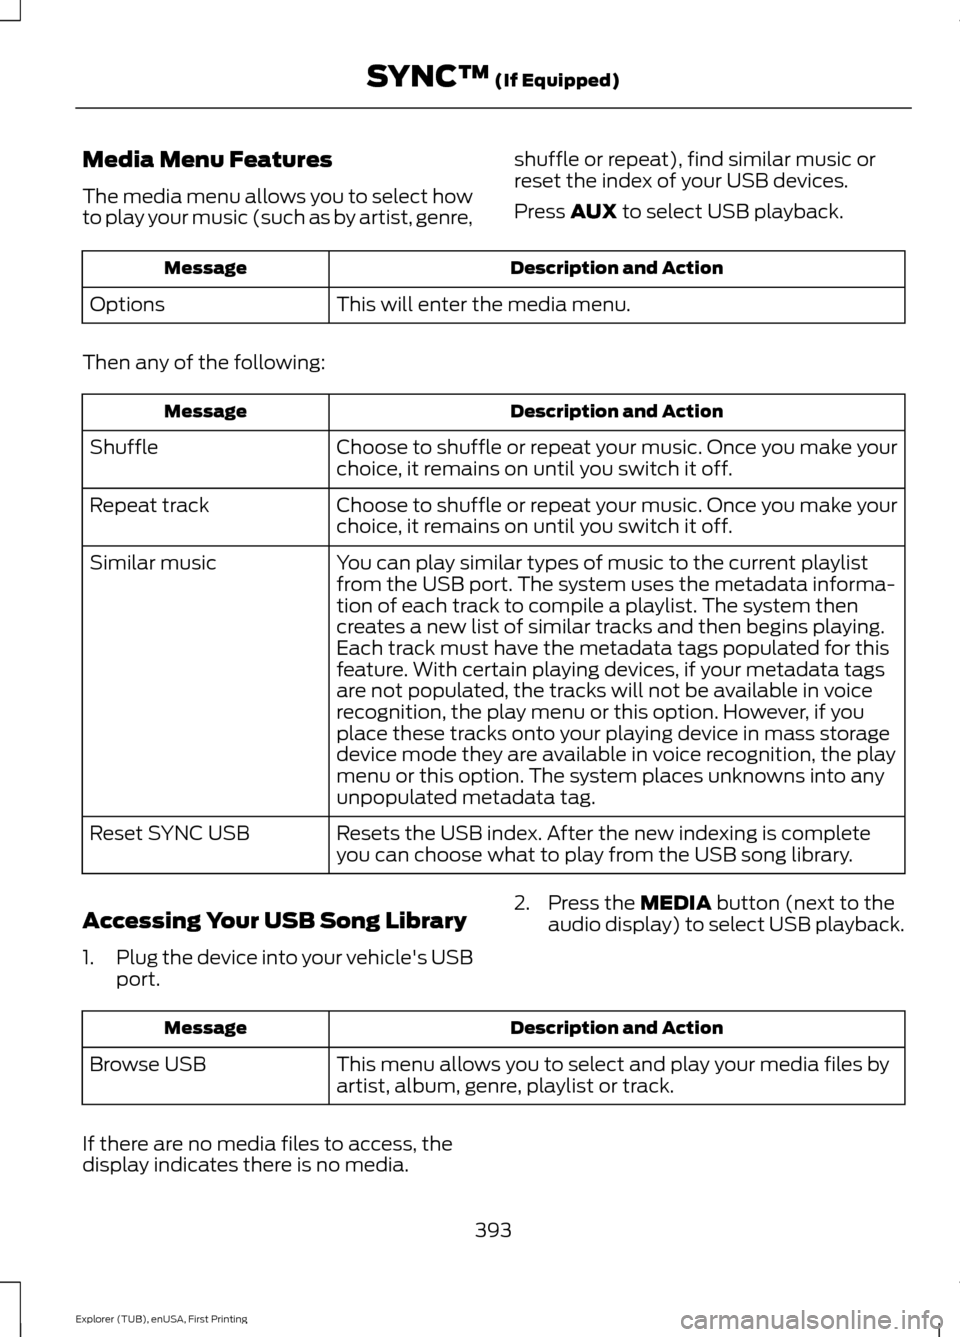
Media Menu Features
The media menu allows you to select how
to play your music (such as by artist, genre,
shuffle or repeat), find similar music or
reset the index of your USB devices.
Press AUX to select USB playback. Description and Action
Message
This will enter the media menu.
Options
Then any of the following: Description and Action
Message
Choose to shuffle or repeat your music. Once you make your
choice, it remains on until you switch it off.
Shuffle
Choose to shuffle or repeat your music. Once you make your
choice, it remains on until you switch it off.
Repeat track
You can play similar types of music to the current playlist
from the USB port. The system uses the metadata informa-
tion of each track to compile a playlist. The system then
creates a new list of similar tracks and then begins playing.
Each track must have the metadata tags populated for this
feature. With certain playing devices, if your metadata tags
Similar music
are not populated, the tracks will not be available in voice
recognition, the play menu or this option. However, if you
place these tracks onto your playing device in mass storage
device mode they are available in voice recognition, the play
menu or this option. The system places unknowns into any
unpopulated metadata tag.
Resets the USB index. After the new indexing is complete
you can choose what to play from the USB song library.
Reset SYNC USB
Accessing Your USB Song Library
1. Plug the device into your vehicle's USB
port. 2. Press the
MEDIA button (next to the
audio display) to select USB playback. Description and Action
Message
This menu allows you to select and play your media files by
artist, album, genre, playlist or track.
Browse USB
If there are no media files to access, the
display indicates there is no media. 393
Explorer (TUB), enUSA, First Printing SYNC™
(If Equipped)
Page 413 of 541

Safety Information
WARNING
Driving while distracted can result in
loss of vehicle control, crash and
injury. We strongly recommend that
you use extreme caution when using any
device that may take your focus off the
road. Your primary responsibility is the safe
operation of your vehicle. We recommend
against the use of any hand-held device
while driving and encourage the use of
voice-operated systems when possible.
Make sure you are aware of all applicable
local laws that may affect the use of
electronic devices while driving. •
Do not attempt to service or repair the
system. Have your vehicle checked by
an authorized dealer.
• Do not operate media devices if the
power cables are broken or damaged. •
Make sure the power cables do not
interfere with the safe operation of your
vehicle's controls or affect your safe
driving abilities.
• Some SYNC functions are
speed-dependent. Their use is limited
to when your vehicle is traveling at
speeds below 3 mph (5 km/h).
Make sure that you review your device's
manual before using it with SYNC.
Speed-restricted Features
Some features of this system are restricted
from use unless your vehicle is stationary.
• Screens crowded with information, for
example:
•Point of Interest reviews and ratings
• SIRIUS Travel Link sports scores
• Movie times
• Ski conditions.
• Any action that requires keyboard use,
for example: entering a navigation
destination or editing information.
• All lists are limited, for example: phone
contacts.
See the following chart for more specific
examples. Speed-restricted Features
Pairing a cell phone
Cell phone
Adding or editing phonebook contacts
Phone contacts and recent phone call entries
Enabling Valet Mode
System Functionality
Editing settings while the rear view camera or active park
assist are active
Editing wireless settings
Wi-Fi and Wireless
Editing the list of wireless networks
410
Explorer (TUB), enUSA, First Printing MyFord Touch
™ (If Equipped)
Page 417 of 541

The selection menu expands and different
options appear.
•
Press the up and down arrows to scroll
through the modes.
• Press the right arrow to enter the mode.
• Press the left or right arrows to make
adjustments within the chosen mode.
• Press OK to confirm your selection.
Note: If your vehicle is not equipped with
Navigation, Compass appears in the display
instead of Navigation. If you press the right
arrow to go into the Compass menu, you
can see the compass graphic. The compass
displays the direction in which the vehicle
is traveling, not true direction (for example,
if the vehicle is traveling west, the middle
of the compass graphic displays west; north
displays to the left of west though its true
direction is to the right of west).
Using Voice Commands
This system helps you control many
features using voice commands. This
allows you to keep your hands on the
wheel and focus on what is in front of you.
The system provides feedback through
audible tones, prompts, questions and
spoken confirmations depending on the
situation and the chosen level of
interaction (voice settings).
The system also asks short questions
(confirmation prompts) when it is not sure
of your request or when there are multiple
possible responses to your request.
When using voice commands, words and
icons may appear in the lower left status
bar indicating the status of the voice
command session (such as Listening,
Success, Failed, Paused or Try Again). How to Use Voice Commands The following are some of the
voice commands that you can
say at any time during a voice
command session.
Press the voice button and when
prompted say: Voice command
Main Menu
What Can I Say
Previous Page
Go Back
Help
Helpful Hints
• Make sure the interior of your vehicle is
as quiet as possible. Wind noise from
open windows and road vibrations may
prevent the system from correctly
recognizing spoken voice commands.
• After pressing the voice command icon,
wait until after the tone sounds and a
message appears before saying a voice
command. Any voice command spoken
prior to this does not register with the
system.
• Speak naturally, without long pauses
between words.
• At any time, you can interrupt the
system while it is speaking by pressing
the voice command icon.
Accessing a List of Available Voice
Commands
To access a list of available voice
commands you can do either of the
following.
414
Explorer (TUB), enUSA, First Printing MyFord Touch
™
(If Equipped)E142599
Page 422 of 541
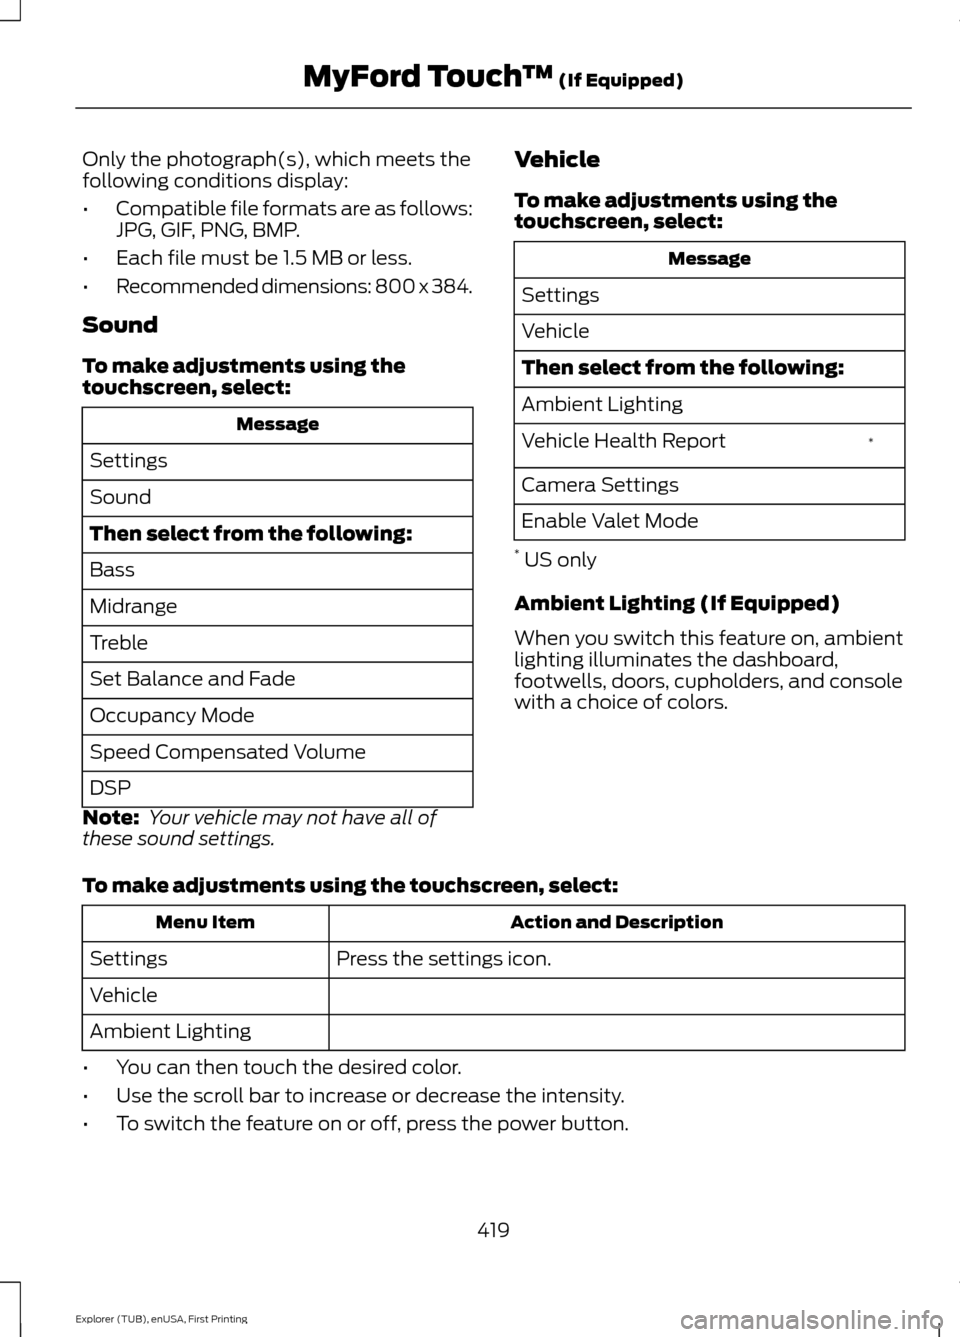
Only the photograph(s), which meets the
following conditions display:
•
Compatible file formats are as follows:
JPG, GIF, PNG, BMP.
• Each file must be 1.5 MB or less.
• Recommended dimensions: 800 x 384.
Sound
To make adjustments using the
touchscreen, select: Message
Settings
Sound
Then select from the following:
Bass
Midrange
Treble
Set Balance and Fade
Occupancy Mode
Speed Compensated Volume
DSP
Note: Your vehicle may not have all of
these sound settings. Vehicle
To make adjustments using the
touchscreen, select: Message
Settings
Vehicle
Then select from the following:
Ambient Lighting *
Vehicle Health Report
Camera Settings
Enable Valet Mode
* US only
Ambient Lighting (If Equipped)
When you switch this feature on, ambient
lighting illuminates the dashboard,
footwells, doors, cupholders, and console
with a choice of colors.
To make adjustments using the touchscreen, select: Action and Description
Menu Item
Press the settings icon.
Settings
Vehicle
Ambient Lighting
• You can then touch the desired color.
• Use the scroll bar to increase or decrease the intensity.
• To switch the feature on or off, press the power button.
419
Explorer (TUB), enUSA, First Printing MyFord Touch
™ (If Equipped)
Page 449 of 541
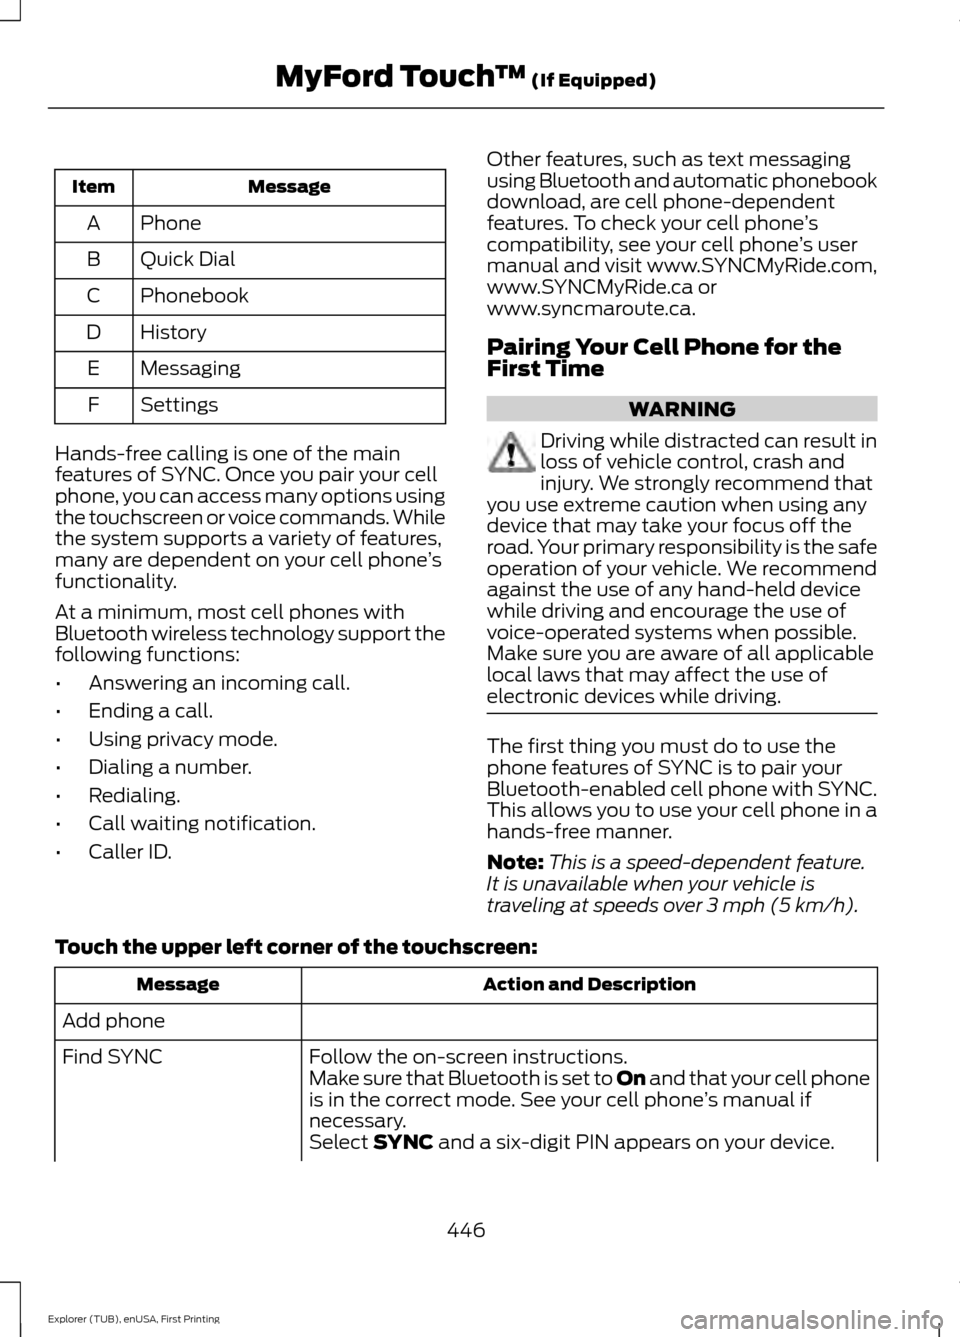
Message
Item
Phone
A
Quick Dial
B
Phonebook
C
History
D
Messaging
E
Settings
F
Hands-free calling is one of the main
features of SYNC. Once you pair your cell
phone, you can access many options using
the touchscreen or voice commands. While
the system supports a variety of features,
many are dependent on your cell phone ’s
functionality.
At a minimum, most cell phones with
Bluetooth wireless technology support the
following functions:
• Answering an incoming call.
• Ending a call.
• Using privacy mode.
• Dialing a number.
• Redialing.
• Call waiting notification.
• Caller ID. Other features, such as text messaging
using Bluetooth and automatic phonebook
download, are cell phone-dependent
features. To check your cell phone
’s
compatibility, see your cell phone ’s user
manual and visit www.SYNCMyRide.com,
www.SYNCMyRide.ca or
www.syncmaroute.ca.
Pairing Your Cell Phone for the
First Time WARNING
Driving while distracted can result in
loss of vehicle control, crash and
injury. We strongly recommend that
you use extreme caution when using any
device that may take your focus off the
road. Your primary responsibility is the safe
operation of your vehicle. We recommend
against the use of any hand-held device
while driving and encourage the use of
voice-operated systems when possible.
Make sure you are aware of all applicable
local laws that may affect the use of
electronic devices while driving. The first thing you must do to use the
phone features of SYNC is to pair your
Bluetooth-enabled cell phone with SYNC.
This allows you to use your cell phone in a
hands-free manner.
Note:
This is a speed-dependent feature.
It is unavailable when your vehicle is
traveling at speeds over 3 mph (5 km/h).
Touch the upper left corner of the touchscreen: Action and Description
Message
Add phone Follow the on-screen instructions.
Find SYNC
Make sure that Bluetooth is set to On
and that your cell phone
is in the correct mode. See your cell phone ’s manual if
necessary.
Select
SYNC and a six-digit PIN appears on your device.
446
Explorer (TUB), enUSA, First Printing MyFord Touch
™
(If Equipped)
Page 467 of 541
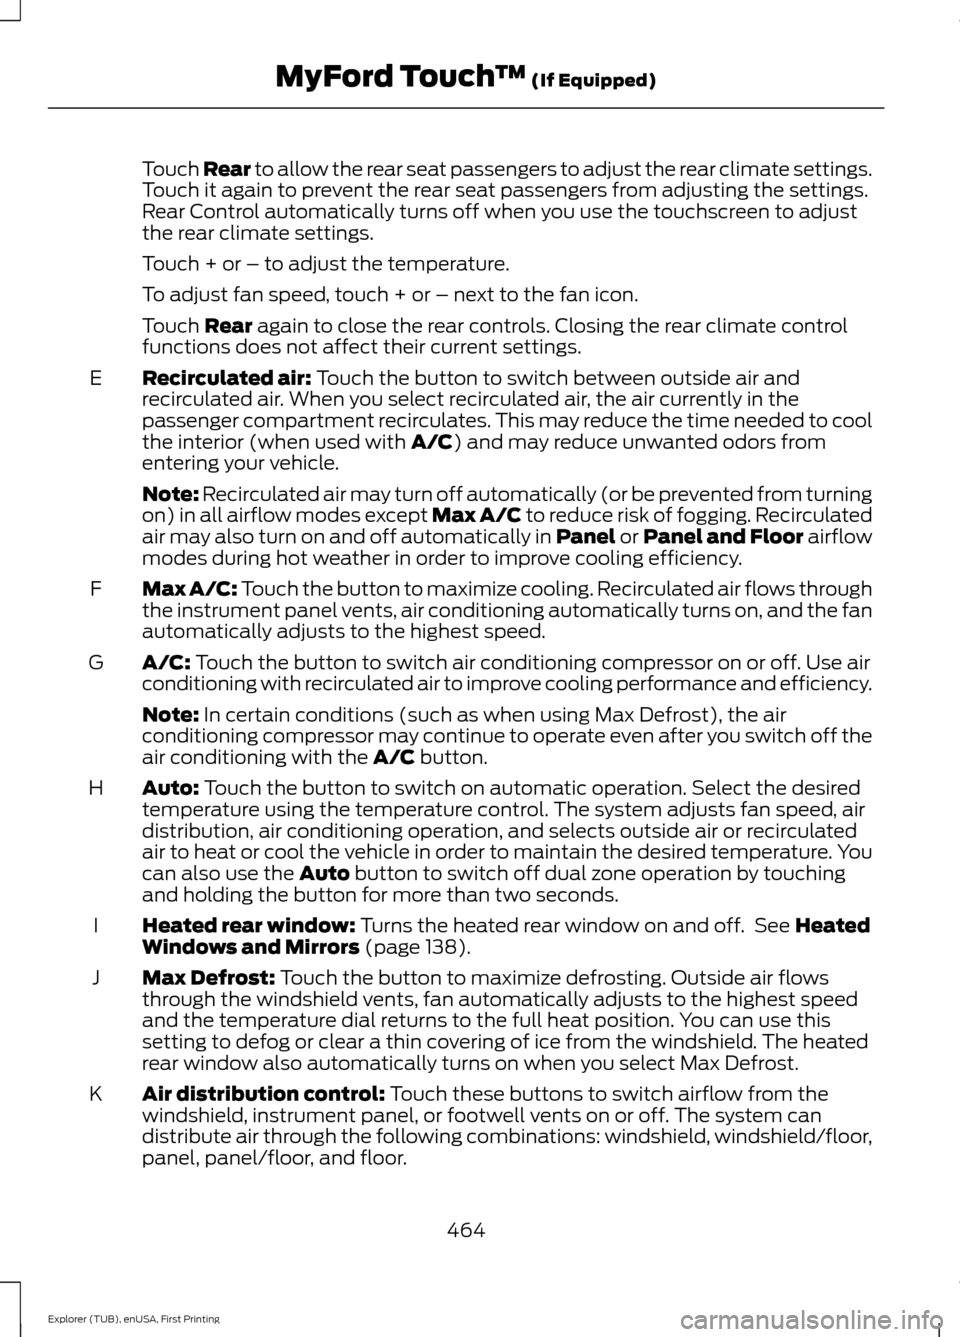
Touch Rear to allow the rear seat passengers to adjust the rear climate settings.
Touch it again to prevent the rear seat passengers from adjusting the settings.
Rear Control automatically turns off when you use the touchscreen to adjust
the rear climate settings.
Touch + or – to adjust the temperature.
To adjust fan speed, touch + or – next to the fan icon.
Touch
Rear again to close the rear controls. Closing the rear climate control
functions does not affect their current settings.
Recirculated air:
Touch the button to switch between outside air and
recirculated air. When you select recirculated air, the air currently in the
passenger compartment recirculates. This may reduce the time needed to cool
the interior (when used with
A/C) and may reduce unwanted odors from
entering your vehicle.
E
Note:
Recirculated air may turn off automatically (or be prevented from turning
on) in all airflow modes except Max A/C to reduce risk of fogging. Recirculated
air may also turn on and off automatically in Panel or Panel and Floor airflow
modes during hot weather in order to improve cooling efficiency.
Max A/C:
Touch the button to maximize cooling. Recirculated air flows through
the instrument panel vents, air conditioning automatically turns on, and the fan
automatically adjusts to the highest speed.
F
A/C:
Touch the button to switch air conditioning compressor on or off. Use air
conditioning with recirculated air to improve cooling performance and efficiency.
G
Note:
In certain conditions (such as when using Max Defrost), the air
conditioning compressor may continue to operate even after you switch off the
air conditioning with the
A/C button.
Auto:
Touch the button to switch on automatic operation. Select the desired
temperature using the temperature control. The system adjusts fan speed, air
distribution, air conditioning operation, and selects outside air or recirculated
air to heat or cool the vehicle in order to maintain the desired temperature. You
can also use the
Auto button to switch off dual zone operation by touching
and holding the button for more than two seconds.
H
Heated rear window:
Turns the heated rear window on and off. See Heated
Windows and Mirrors (page 138).
I
Max Defrost:
Touch the button to maximize defrosting. Outside air flows
through the windshield vents, fan automatically adjusts to the highest speed
and the temperature dial returns to the full heat position. You can use this
setting to defog or clear a thin covering of ice from the windshield. The heated
rear window also automatically turns on when you select Max Defrost.
J
Air distribution control:
Touch these buttons to switch airflow from the
windshield, instrument panel, or footwell vents on or off. The system can
distribute air through the following combinations: windshield, windshield/floor,
panel, panel/floor, and floor.
K
464
Explorer (TUB), enUSA, First Printing MyFord Touch
™
(If Equipped)
Page 474 of 541
Second Level Messages, Actions and Descriptions
Menu Item
Have the system reroute you to avoid
traffic incidents that develop and
impact the current route. The system
does not provide a traffic alert notific-
ation
Automatic
Have the system always provide a
traffic alert notification for traffic
incidents along the planned route.
You have a choice to accept or ignore
the notification before making the
route deviation.
Manual
Activate traffic alert notifications on or off.
Traffic alert notification
These icons will alert you to traffic and driving conditions
including accidents, closures and weather conditions.
You are also able to
switch on and off the 11
traffic map icons. Second Level Messages, Actions and Descriptions
Menu Item
Choose areas which you want the system to avoid when
calculating a route for you
Avoid Areas
Then select any of the following:
Once you make a selection, the system tries to avoid the
area(s) if possible for all routes. Select this button to program
an entry, then choose a destination entry method. You can
edit the name or location of a destination or remove it from
your selections.
Add
To remove an area from your selection, choose the listing on
the screen. The screen will change, then press delete and
confirm the deletion.
Delete
Map Mode
Press the green bar in the upper right area
of the touchscreen to view map mode. Map
mode shows advanced viewing comprised
of both 2D city maps as well as 3D
landmarks (when available). 2D city maps show detailed outlines of
buildings, visible land use and land
elements and detailed railway
infrastructure for the most essential cities
around the globe. These maps also contain
features, such as town blocks, building
footprints and railways.
471
Explorer (TUB), enUSA, First Printing MyFord Touch
™ (If Equipped)
Page 475 of 541
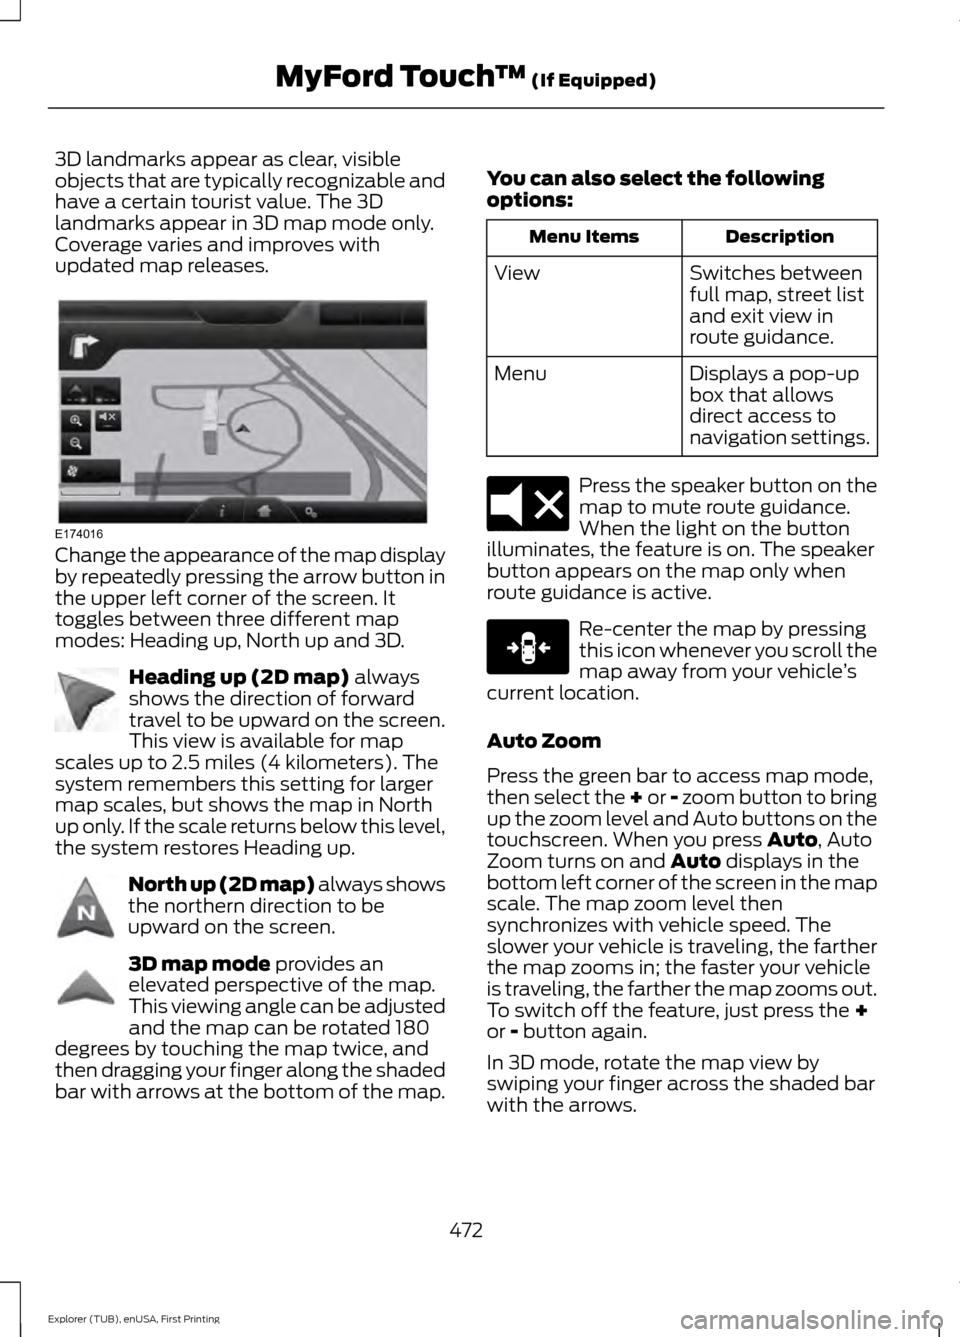
3D landmarks appear as clear, visible
objects that are typically recognizable and
have a certain tourist value. The 3D
landmarks appear in 3D map mode only.
Coverage varies and improves with
updated map releases.
Change the appearance of the map display
by repeatedly pressing the arrow button in
the upper left corner of the screen. It
toggles between three different map
modes: Heading up, North up and 3D.
Heading up (2D map) always
shows the direction of forward
travel to be upward on the screen.
This view is available for map
scales up to 2.5 miles (4 kilometers). The
system remembers this setting for larger
map scales, but shows the map in North
up only. If the scale returns below this level,
the system restores Heading up. North up (2D map) always shows
the northern direction to be
upward on the screen.
3D map mode
provides an
elevated perspective of the map.
This viewing angle can be adjusted
and the map can be rotated 180
degrees by touching the map twice, and
then dragging your finger along the shaded
bar with arrows at the bottom of the map. You can also select the following
options: Description
Menu Items
Switches between
full map, street list
and exit view in
route guidance.
View
Displays a pop-up
box that allows
direct access to
navigation settings.
Menu Press the speaker button on the
map to mute route guidance.
When the light on the button
illuminates, the feature is on. The speaker
button appears on the map only when
route guidance is active. Re-center the map by pressing
this icon whenever you scroll the
map away from your vehicle
’s
current location.
Auto Zoom
Press the green bar to access map mode,
then select the + or - zoom button to bring
up the zoom level and Auto buttons on the
touchscreen. When you press
Auto, Auto
Zoom turns on and Auto displays in the
bottom left corner of the screen in the map
scale. The map zoom level then
synchronizes with vehicle speed. The
slower your vehicle is traveling, the farther
the map zooms in; the faster your vehicle
is traveling, the farther the map zooms out.
To switch off the feature, just press the
+
or - button again.
In 3D mode, rotate the map view by
swiping your finger across the shaded bar
with the arrows.
472
Explorer (TUB), enUSA, First Printing MyFord Touch
™
(If Equipped)E174016 E142642 E142643 E142644 E174017 E146188