2016 FORD EXPLORER steering wheel
[x] Cancel search: steering wheelPage 217 of 541

Switching Cruise Control Off
Press and release OFF when the system
is in stand by mode or switch the ignition
off.
Note: You erase the set speed when you
switch the system off.
USING ADAPTIVE CRUISE
CONTROL
(If Equipped) WARNINGS
Always pay close attention to
changing road conditions when using
adaptive cruise control. The system
does not replace attentive driving. Failing
to pay attention to the road may result in
a crash, serious injury or death. Adaptive cruise control is not a crash
warning or avoidance system.
Adaptive cruise control does not
detect stationary or slow moving
vehicles below
6 mph (10 km/h).
Adaptive cruise control does not
detect pedestrians or objects in the
road.
Adaptive cruise control does not
detect oncoming vehicles in the
same lane.
Do not use adaptive cruise control
on winding roads, in heavy traffic or
when the road surface is slippery.
This could result in loss of vehicle control,
serious injury or death. Do not use adaptive cruise control
when towing a trailer that has trailer
brakes. The auto-brake component
of the adaptive cruise control system does
not operate the trailer brakes. Using
adaptive cruise control when towing a
trailer that has trailer brakes may result in
the loss of vehicle control, which could
result in serious injury. WARNINGS
Do not use tire sizes other than those
recommended because this can
affect the normal operation of the
system. Failing to do so may result in a loss
of vehicle control, which could result in
serious injury. The system adjusts your vehicle speed to
maintain the set gap between you and the
vehicle in front of you in the same lane.
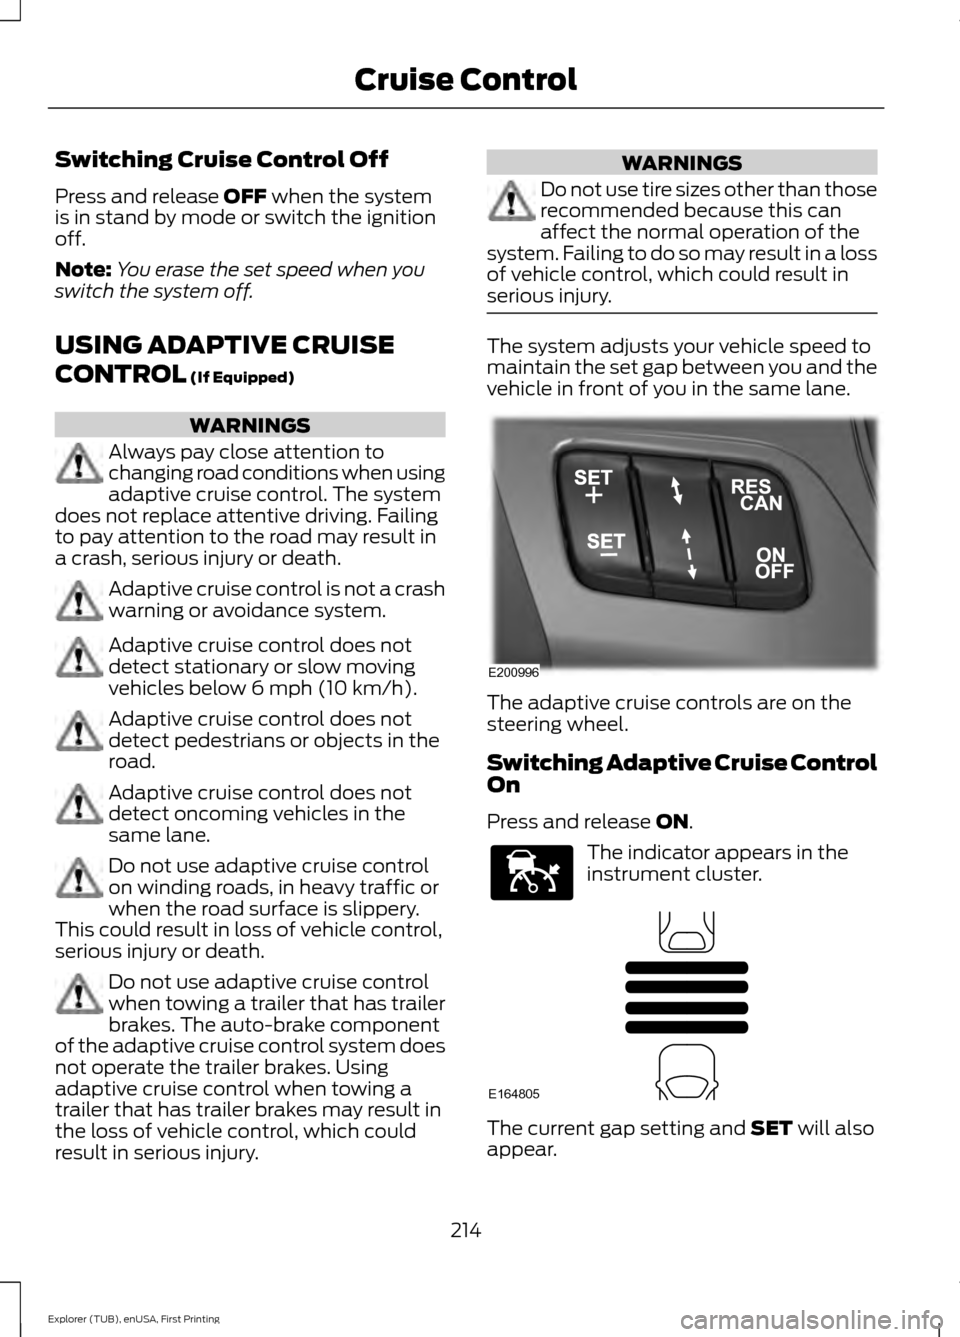
The adaptive cruise controls are on the
steering wheel.
Switching Adaptive Cruise Control
On
Press and release
ON.
The indicator appears in the
instrument cluster.
The current gap setting and
SET will also
appear.
214
Explorer (TUB), enUSA, First Printing Cruise ControlE200996 E144529 E164805
Page 223 of 541

DRIVER ALERT (If Equipped)
PRINCIPLE OF OPERATION WARNING
The driver alert system is designed
to aid you. It is not intended to
replace your attention and judgment.
You are still responsible to drive with due
care and attention. Note:
The system will store the on or off
setting in the information display menu
through ignition cycles.
Note: If enabled in the menu, the system
will be active at speeds above
40 mph
(64 km/h). When below the activation
speed, the information display will inform
the driver that the system is unavailable.
Note: The system works as long as one lane
marking can be detected by the camera.
Note: If the camera is blocked or if the
windshield is damaged, the system may not
function.
Note: The system may not be available in
poor weather or other low visibility
conditions.
The system automatically monitors your
driving behavior using various inputs
including the front camera sensor.
If the system detects that your driving
alertness is reduced below a certain
threshold, the system will alert you using
a chime and a message in the cluster
display.
USING DRIVER ALERT
Switching the System On and Off
Switch the system on or off using the
information display. See
General
Information (page 101). When activated, the system will monitor
your alertness level based upon your
driving behavior in relation to the lane
markings, and other factors.
System Warnings
Note:
The system will not issue warnings
below approximately
40 mph (64 km/h).
The warning system has two stages. At
first, the system issues a temporary
warning that you need to take a rest. This
message will only appear for a short time.
If the system detects further reduction in
driving alertness, it may issue another
warning that will remain in the information
display for a longer time. You can press OK
on the steering wheel control to clear the
warning.
Resetting the System
You can reset the system by either:
• Switching the ignition off and on.
• Stopping the vehicle and then opening
and closing the driver ’s door.
LANE KEEPING SYSTEM
(If
Equipped) WARNINGS
The system does not relieve you of
your responsibility to drive with due
care and attention.
At all times you are responsible for
controlling your vehicle, supervising
the system and intervening if
required. If the sensor becomes blocked the
system may not function.
In cold and severe weather
conditions the system may not
function. Rain, snow, spray can all
limit sensor performance.
220
Explorer (TUB), enUSA, First Printing Driving Aids
Page 224 of 541

WARNINGS
Large contrasts in lighting can limit
sensor performance.
The system will not operate if the
sensor cannot track the road lane
markings.
The vehicle should be taken to an
authorized dealer for inspection if
damage occurs in the immediate
area surrounding the sensor. Note:
The system works above 40 mph
(64 km/h).
Note: The system works as long as the
camera can detect one lane marking.
Note: The system may not function if the
camera is blocked or there is damage to the
windshield.
Note: When Aid mode is on and the system
detects no steering activity for a short
period, the system will alert you to put your
hands on the steering wheel. The system
may detect a light grip or touch on the
steering wheel as hands off driving.
The system notifies you to stay in your lane
through the steering system and the
instrument cluster display when the front
camera detects an unintentional drift out
of your lane is likely to occur. The system
automatically detects and tracks the road
lane markings using a camera mounted
behind the interior rear view mirror.
Switching the System On and Off
Note: The system on or off setting is stored
until it is manually changed, unless a MyKey
is detected. If the system detects a MyKey
it defaults to on and the mode is set to Alert.
Note: If a MyKey is detected, pressing the
button will not affect the on or off status of
the system. Press the button located on the
left steering wheel stalk to
switch the system on or off.
System Settings
The system has optional setting menus
available. To view or adjust the settings,
See General Information (page 101). The
system stores the last-known selection for
each of these settings. You do not need to
readjust your settings each time you turn
on the system.
Mode: This setting allows you to select
which of the system features you can
enable. Alert only – Provides a steering wheel
vibration when the system detects an
unintended lane departure.
221
Explorer (TUB), enUSA, First Printing Driving AidsE144813 E165515 E165516
Page 225 of 541

Aid only – Provides an assistance steering
torque input toward the lane center when
the system detects an unintended lane
departure.
Alert
A
AidB
Alert + Aid – Provides an assistance
steering torque input toward the lane
center. If your vehicle continues drifting out
of the lane, the system provides a steering
wheel vibration.
Note: The alert and aid diagrams illustrate
general zone coverage. They do not provide
exact zone parameters.
Intensity: This setting affects the intensity
of the steering wheel vibration used for the
alert and alert + aid modes. This setting
does not affect the aid mode.
• Low
• Normal
• High System Display
When you switch on the system, an
overhead graphic of a vehicle with lane
markings will display in the information
display. If you select aid mode when you
switch on the system, a separate white
icon will also appear or in some vehicles
arrows will display with the lane markings.
When you switch off the system, the lane
marking graphics will not display.
While the system is on, the color of the
lane markings will change to indicate the
system status.
Gray: Indicates that the system is
temporarily unable to provide a warning
or intervention on the indicated side(s).
This may be because:
•
Your vehicle is under the activation
speed.
• The turn indicator is active.
• Your vehicle is in a dynamic maneuver.
222
Explorer (TUB), enUSA, First Printing Driving AidsE165517 E151660
Page 235 of 541

Action
Cause
Clean the radar sensor cover or remove theobstruction
The radar sensor cover in the grille is dirty
or obstructed
Wait a short time. The radar may take
several minutes to reset after you remove the obstruction
The surface of the radar sensor cover is
clean but the message remains in the display
The Pre-Collision Assist system is tempor-
arily disabled. Shortly after weather condi-
tions improve, the collision warning systemautomatically reactivates
Heavy rain, spray, snow or fog in the air
interferes with the radar signals
The Pre-Collision Assist system is tempor-
arily disabled. Shortly after weather condi-
tions improve, the collision warning systemautomatically reactivates
Swirling water, snow or ice on the road
surface interferes with the radar signals
System Limitations WARNING
The Pre-Collision Assist system
’s
brake support only reduces collision
speed if you first apply your brakes.
You must brake as you would in any typical
braking situation. Due to the nature of radar technology,
there may be certain instances where
vehicles do not provide a collision warning.
These include:
•
Stationary vehicles or vehicles moving
below 6.2 mph (10 km/h).
• Pedestrians or objects in the roadway.
• Oncoming vehicles in the same lane.
• Severe weather conditions (see
blocked sensor section).
• Debris build-up on the grille near the
headlamps (see blocked sensor
section).
• Small distance to vehicle ahead.
• Large steering wheel and pedal
movements (very active driving style). Damage to the front end of your vehicle
may alter the radar sensor's coverage area.
This may result in missed or false collision
warnings. Have an authorized dealer check
your radar sensor for proper coverage and
operation.
232
Explorer (TUB), enUSA, First Printing Driving Aids
Page 251 of 541

•
Shift to a lower gear when driving down
a long or steep hill. Do not apply the
brakes continuously, as they may
overheat and become less effective.
• If your transmission is equipped with a
Grade Assist or Tow/Haul feature, use
this feature when towing. This provides
engine braking and helps eliminate
excessive transmission shifting for
optimum fuel economy and
transmission cooling.
• Allow more distance for stopping with
a trailer attached. Anticipate stops and
brake gradually.
• Avoid parking on a grade. However, if
you must park on a grade:
1. Turn the steering wheel to point your vehicle tires away from traffic flow.
2. Set your vehicle parking brake.
3. Place the automatic transmission in position P.
4. Place wheel chocks in front and back of the trailer wheels. (Chocks not
included with vehicle.)
Launching or Retrieving a Boat or
Personal Watercraft (PWC)
Note: Disconnect the wiring to the trailer
before
backing the trailer into the water.
Note: Reconnect the wiring to the trailer
after
removing the trailer from the water.
When backing down a ramp during boat
launching or retrieval:
• Do not allow the static water level to
rise above the bottom edge of the rear
bumper.
• Do not allow waves to break higher
than 6 inches (15 centimeters) above
the bottom edge of the rear bumper. Exceeding these limits may allow water to
enter vehicle components:
•
Causing internal damage to the
components.
• Affecting driveability, emissions, and
reliability.
Replace the rear axle lubricant anytime
the rear axle has been submerged in water.
Water may have contaminated the rear
axle lubricant, which is not normally
checked or changed unless a leak is
suspected or other axle repair is required.
TRANSPORTING THE VEHICLE If you need to have your vehicle towed,
contact a professional towing service or,
if you are a member of a roadside
assistance program, your roadside
assistance service provider.
248
Explorer (TUB), enUSA, First Printing TowingE143886
Page 252 of 541

We recommend the use of a wheel lift and
dollies or flatbed equipment to tow your
vehicle. Do not tow with a slingbelt. Ford
Motor Company has not approved a
slingbelt towing procedure. Vehicle
damage may occur if towed incorrectly, or
by any other means.
Ford Motor Company produces a towing
manual for all authorized tow truck
operators. Have your tow truck operator
refer to this manual for proper hook-up
and towing procedures for your vehicle.
It is acceptable to have your front-wheel
drive vehicle towed from the front if using
proper wheel lift equipment to raise the
front wheels off the ground. When towing
in this manner, the rear wheels can remain
on the ground.
Front-wheel drive vehicles must have the
front wheels placed on a tow dolly when
towing your vehicle from the rear using
wheel lift equipment. This prevents
damage to the transmission.
Towing a four-wheel drive vehicle requires
that all wheels be off the ground, such as
using a wheel lift and dollies or flatbed
equipment. This prevents damage to the
transmission, four-wheel drive system and
vehicle.
TOWING THE VEHICLE ON
FOUR WHEELS - 2.3L
ECOBOOST™
Emergency Towing
If your vehicle becomes inoperable
(without access to wheel dollies,
car-hauling trailer, or flatbed transport
vehicle), it can be flat-towed (all wheels
on the ground, regardless of the powertrain
and transmission configuration) under the
following conditions:
•
Your vehicle is facing forward for
towing in a forward direction.
• Place the transmission in position N. If
you cannot move the transmission into
N
, you may need to override it. See
Transmission (page 180).
• Maximum speed is 35 mph (56 km/h).
• Maximum distance is
50 mi (80 km). WARNING
If your vehicle has a steering wheel
lock make sure the ignition is in the
accessory or on position when being
towed. Recreational Towing
Note:
Put your climate control system in
recirculated air mode to prevent exhaust
fumes from entering the vehicle. See
Climate Control
(page 129).
Follow these guidelines if you have a need
for recreational (RV) towing. An example
of recreational towing would be towing
your vehicle behind a motorhome. We
designed these guidelines to prevent
damage to your transmission.
249
Explorer (TUB), enUSA, First Printing Towing
Page 253 of 541

Front-wheel drive vehicles CANNOT be
flat-towed (all wheels on the ground) as
vehicle or transmission damage may occur.
You must place the front wheels on a
two-wheel tow dolly. If you are using a tow
dolly, follow the instructions specified by
the equipment provider.
Four-wheel drive vehicles
CANNOT be
flat-towed (all wheels on the ground), as
vehicle or transmission damage may occur.
It is recommended to tow your vehicle with
all four (4) wheels off the ground such as
when using a car-hauling trailer. Otherwise,
you cannot recreational tow your vehicle.
TOWING THE VEHICLE ON
FOUR WHEELS - 3.5L
DURATEC/3.5L ECOBOOST™
Emergency Towing
If your vehicle becomes inoperable
(without access to wheel dollies or vehicle
transport trailer), it can be flat-towed (all
wheels on the ground, regardless of the
powertrain and transmission
configuration) under the following
conditions:
• Your vehicle is facing forward for
towing in a forward direction.
• Place the transmission in neutral (N).
If you cannot move the transmission
into neutral (N), you may need to
override it. See
Transmission (page
180).
• Maximum speed is 35 mph (56 km/h).
• Maximum distance is
50 mi (80 km). WARNING
If your vehicle has a steering wheel
lock make sure the ignition is in the
accessory or on position when being
towed. Recreational Towing
Note:
Put your climate control system in
recirculated air mode to prevent exhaust
fumes from entering the vehicle. See
Climate Control
(page 129).
Follow these guidelines if you have a need
for recreational (RV) towing. An example
of recreational towing would be towing
your vehicle behind a motorhome. We
designed these guidelines to prevent
damage to your transmission.
You can tow your 3.5L EcoBoost or 3.7L
Duratec (6F50 or 6F55 transmission)
equipped vehicle with all four wheels on
the ground.
If you tow your vehicle with all four wheels
on the ground:
• Tow only in the forward direction.
• Release the parking brake.
Vehicles with Keyless Start
1. Start the vehicle by pressing the brake pedal, and then pressing the keyless
start button until the vehicle starts.
2. Press the brake pedal and shift the gearshift into neutral (N).
3. Turn the vehicle off by pressing the keyless start button once.
4. Disconnect the negative (black) cable from the battery. You need the door
key to lock and unlock doors when the
battery cable is disconnected. See
Changing the 12V Battery (page 289).
Note: The anti-theft system does not work
until you reconnect the battery cable.
Start the engine within 15 minutes of
reconnecting the battery cable.
Vehicles with an Ignition Key
1. Start the vehicle by pressing the brake pedal, and then turning the ignition key
until the vehicle starts.
250
Explorer (TUB), enUSA, First Printing Towing