2016 FORD EXPLORER trailer
[x] Cancel search: trailerPage 193 of 541
PARKING BRAKE
WARNING
Always set the parking brake fully
and make sure the transmission is
locked in park (P). Failure to set the
parking brake and engage park could result
in vehicle roll-away, property damage or
bodily injury. To set the parking brake, press the parking
brake pedal down to its fullest extent. The
brake warning lamp in the instrument
cluster will illuminate and remains
illuminated until the parking brake is
released.
To release the parking brake, press the
parking brake pedal down again.
If you are parking your vehicle on a grade
or with a trailer, press and hold the brake
pedal down, then set the parking brake.
There may be a little vehicle movement as
the parking brake sets to hold the vehicle's
weight. This is normal and should be no
reason for concern. If needed, press and
hold the service brake pedal down, then
try reapplying the parking brake. Chock the
wheels if required. If the parking brake
cannot hold the weight of the vehicle, the
parking brake may need to be serviced or
the vehicle may be overloaded.
HILL START ASSIST
WARNINGS
The system does not replace the
parking brake. When you leave your
vehicle, always apply the parking
brake. Failure to leave your vehicle securely
parked may lead to a crash or injury. See
Parking Brake (page 190). WARNINGS
You must remain in your vehicle
when the system turns on. At all
times, you are responsible for
controlling your vehicle, supervising the
system and intervening, if required. Failure
to take care may result in the loss of
control of your vehicle, serious personal
injury or death. The system will turn off if a
malfunction is apparent or if you rev
the engine excessively. Failure to
take care may result in the loss of control
of your vehicle, serious personal injury or
death. The system makes it easier to pull away
when your vehicle is on a slope without the
need to use the parking brake.
When the system is active, your vehicle
remains stationary on the slope for two to
three seconds after you release the brake
pedal. This allows time to move your foot
from the brake to the accelerator pedal.
The system releases the brakes
automatically once the engine has
developed sufficient drive to prevent your
vehicle from rolling down the slope. This
is an advantage when pulling away on a
slope, for example from a car park ramp,
traffic lights or when reversing uphill into
a parking space.
Note:
The system only functions when you
bring your vehicle to a complete standstill
in an uphill gear (for example, drive when
facing uphill or reverse when facing
downhill).
Note: There is no warning light to indicate
the system is either on or off.
Using Hill Start Assist
1. Press the brake pedal to bring your vehicle to a complete standstill. Keep
the brake pedal pressed.
190
Explorer (TUB), enUSA, First Printing Brakes
Page 198 of 541
USING TERRAIN RESPONSE
The terrain management system optimizes
drivability and comfort as well as
maximizing traction while operating on
different types of terrain.
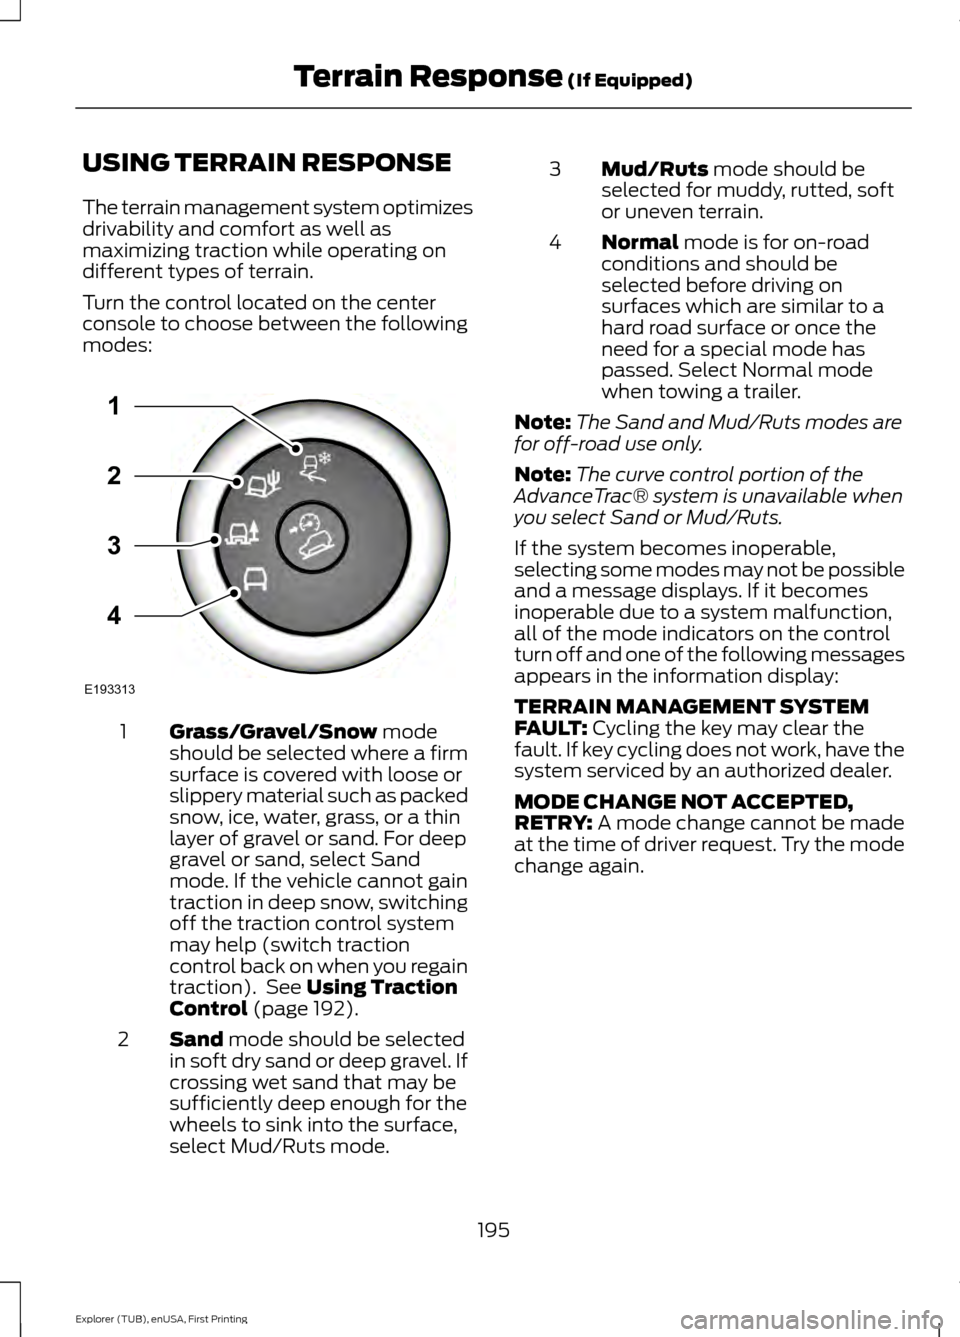
Turn the control located on the center
console to choose between the following
modes:
Grass/Gravel/Snow mode
should be selected where a firm
surface is covered with loose or
slippery material such as packed
snow, ice, water, grass, or a thin
layer of gravel or sand. For deep
1
gravel or sand, select Sand
mode. If the vehicle cannot gain
traction in deep snow, switching
off the traction control system
may help (switch traction
control back on when you regain
traction). See
Using Traction
Control (page 192).
Sand
mode should be selected
in soft dry sand or deep gravel. If
crossing wet sand that may be
sufficiently deep enough for the
wheels to sink into the surface,
select Mud/Ruts mode.
2 Mud/Ruts
mode should be
selected for muddy, rutted, soft
or uneven terrain.
3
Normal
mode is for on-road
conditions and should be
selected before driving on
surfaces which are similar to a
hard road surface or once the
need for a special mode has
passed. Select Normal mode
when towing a trailer.
4
Note: The Sand and Mud/Ruts modes are
for off-road use only.
Note: The curve control portion of the
AdvanceTrac® system is unavailable when
you select Sand or Mud/Ruts.
If the system becomes inoperable,
selecting some modes may not be possible
and a message displays. If it becomes
inoperable due to a system malfunction,
all of the mode indicators on the control
turn off and one of the following messages
appears in the information display:
TERRAIN MANAGEMENT SYSTEM
FAULT:
Cycling the key may clear the
fault. If key cycling does not work, have the
system serviced by an authorized dealer.
MODE CHANGE NOT ACCEPTED,
RETRY:
A mode change cannot be made
at the time of driver request. Try the mode
change again.
195
Explorer (TUB), enUSA, First Printing Terrain Response
(If Equipped)E193313
3
2
1
4
Page 201 of 541
PRINCIPLE OF OPERATION
WARNINGS
To help avoid personal injury, please
read and understand the limitations
of the system as contained in this
section. Sensing is only an aid for some
(generally large and fixed) objects when
moving on a flat surface at parking speeds.
Certain objects with surfaces that absorb
ultrasonic waves, surrounding vehicle's
parking aid systems, traffic control
systems, fluorescent lamps, inclement
weather, air brakes, and external motors
and fans may also affect the function of
the sensing system; this may include
reduced performance or a false activation. To help avoid personal injury, always
use caution when in reverse (R) and
when using the sensing system.
This system is not designed to
prevent contact with small or moving
objects. The system is designed to
provide a warning to assist the driver in
detecting large stationary objects to avoid
damaging your vehicle. The system may
not detect smaller objects, particularly
those close to the ground. Certain add-on devices such as large
trailer hitches, bike or surfboard racks
and any device that may block the
normal detection zone of the system, may
create false beeps. Note:
Keep the sensors, located on the
bumper or fascia, free from snow, ice and
large accumulations of dirt. If the sensors
are covered, the system ’s accuracy can be
affected. Do not clean the sensors with
sharp objects.
Note: If your vehicle sustains damage to
the bumper or fascia, leaving it misaligned
or bent, the sensing zone may be altered
causing inaccurate measurement of
obstacles or false alarms. Note:
The sensing system cannot be turned
off when a MyKey is present. See Principle
of Operation (page 54).
Note: If you attach certain add-on devices
such as a trailer or bike rack, the rear sensing
system may detect that add-on device and
therefore provide warnings. It is suggested
that you disable the rear sensing system
when you attach an add-on device to your
vehicle to prevent these warnings.
The sensing system warns the driver of
obstacles within a certain range of your
vehicle. The system turns on automatically
whenever you switch the ignition on.
The system can be switched off through
the information display menu or from the
pop-up message that appears once you
shift the transmission into reverse (R). See
General Information
(page 101).
Note: On vehicles with front parking aid you
can use the parking aid switch to switch the
system off.
If a fault is present in the system, a warning
message appears in the information
display. See
Information Messages
(page 115).
REAR PARKING AID
The rear sensors are only active when the
transmission is in reverse (R). As your
vehicle moves closer to the obstacle, the
rate of the audible warning increases.
When the obstacle is less than
12 in
(30 cm) away, the warning sounds
continuously. If the system detects a
stationary or receding object farther than
12 in (30 cm)
from the corners of the
bumper, the tone sounds for only three
seconds. Once the system detects an
object approaching, the warning sounds
again.
198
Explorer (TUB), enUSA, First Printing Parking Aids
Page 205 of 541

•
The anti-lock brake system is
activated.
• The traction control system is
activated.
ACTIVE PARK ASSIST
Parallel Parking, Perpendicular
Parking, Park Out Assist WARNINGS
You must remain in your vehicle
when the system turns on. You are
responsible at all times for
controlling your vehicle, supervising the
system and intervening if required. Failure
to take care may result in the loss of
control of your vehicle, serious personal
injury or death. The sensors may not detect objects
in heavy rain or other conditions that
cause disruptive reflections.
Note:
The driver is always responsible for
controlling the vehicle, supervising the
system and intervening if required by
grabbing the steering wheel or pushing the
active park assist button.
The system detects an available parallel
or perpendicular parking space and
automatically steers your vehicle into the
space (hands-free) while you control the
accelerator, gearshift and brakes. The
system visually and audibly guides you to
park your vehicle.
If you are uncomfortable with the proximity
to any vehicle or object, you may choose
to override the system.
Park Out Assist automatically steers your
vehicle out of a parallel parking space
(hands-free) while you control the
accelerator, gearshift and brakes. The
system visually and audibly guides you to
enter traffic. Note:
The Blind Spot Information System
does not detect traffic alongside or behind
your vehicle during a park assist maneuver.
The system may not correctly operate in
any of the following conditions:
• You use a spare tire or a tire
significantly worn more than the other
tires.
• You use a unauthorized tire size.
• You try to park on a tight curve.
• Something passes between the front
bumper and the parking space (a
pedestrian or cyclist).
• The edge of the neighboring parked
vehicle is high off the ground (for
example, a bus, tow truck or flatbed
truck).
• The weather conditions are poor
(heavy rain, snow, fog, etc).
Note: Keep the sensors, located on the
bumper or fascia, free from snow, ice and
large accumulations of dirt. Covered sensors
can affect the system's accuracy. Do not
clean the sensors with sharp objects.
Note: The sensors may not detect objects
with surfaces that absorb ultrasonic waves
or cause ultrasonic interference (motorcycle
exhaust, truck air brakes or horns).
Do not use the system if:
• You have attached a foreign object
(bike rack or trailer) to the front or rear
of your vehicle or close to the sensors.
• You have attached an overhanging
object (surfboard) to the roof.
• A foreign object damages or obstructs
the front or rear bumper or side
sensors.
• The correct tire size is not in use on your
vehicle (for example, a mini-spare tire).
202
Explorer (TUB), enUSA, First Printing Parking Aids
Page 211 of 541
REAR VIEW CAMERA
WARNINGS
The rear view camera system is a
reverse aid supplement device that
still requires the driver to use it in
conjunction with the interior and exterior
mirrors for maximum coverage. Objects that are close to either
corner of the bumper or under the
bumper, might not be seen on the
screen due to the limited coverage of the
camera system. Back up as slow as possible since
higher speeds might limit your
reaction time to stop your vehicle.
Use caution when using the rear
video camera and the luggage
compartment door is ajar. If the
luggage compartment door is ajar, the
camera will be out of position and the
video image may be incorrect. All
guidelines disappear when the luggage
compartment door is ajar. Use caution when turning camera
features on or off. Make sure your
vehicle is not moving.
The rear view camera system provides a
video image of the area behind your
vehicle.
During operation, lines appear in the
display which represent your vehicle
’s path
and proximity to objects behind your
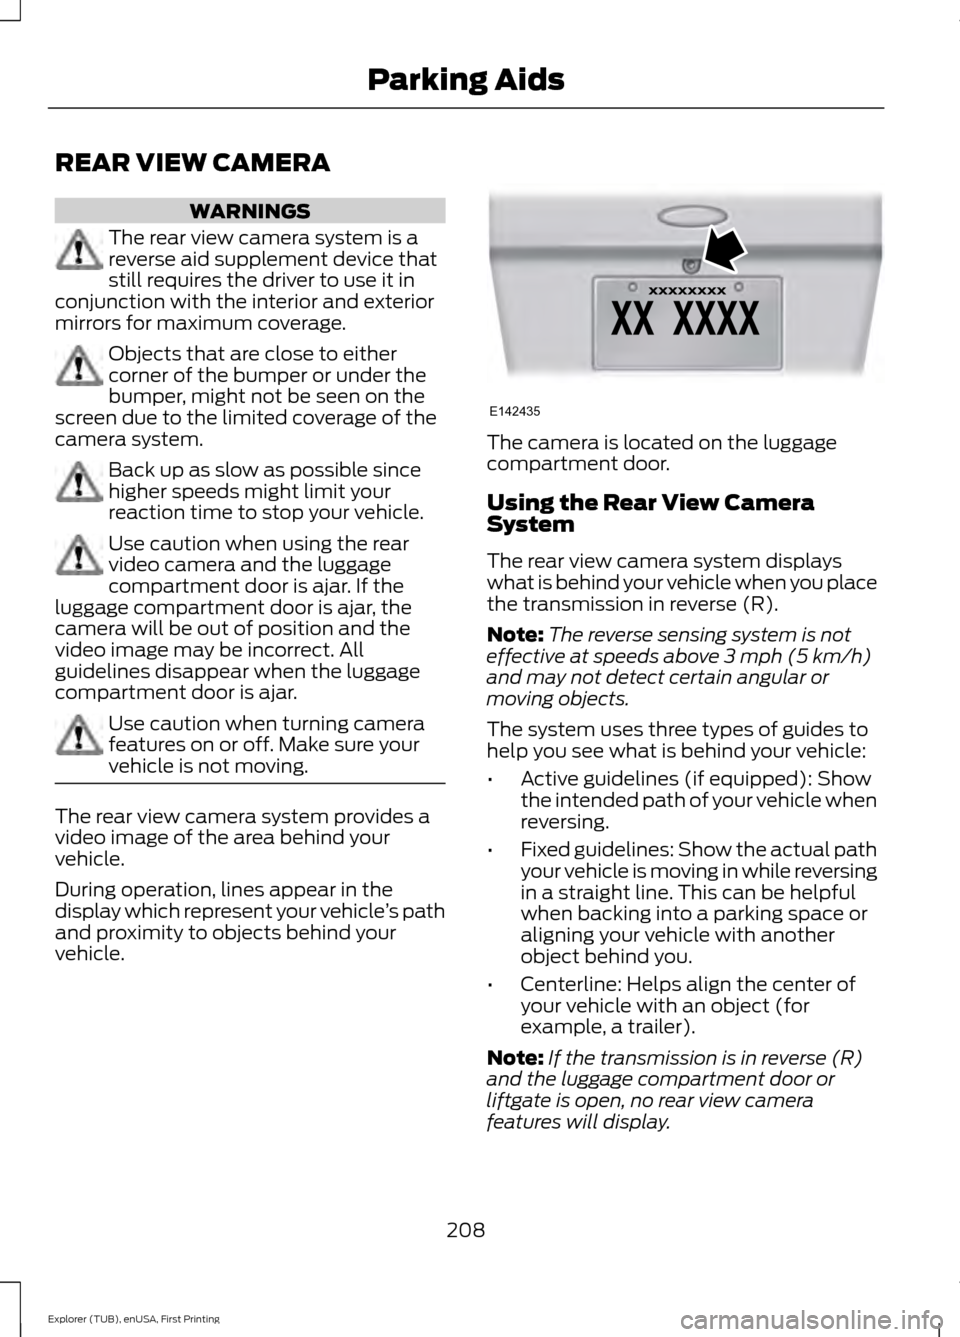
vehicle. The camera is located on the luggage
compartment door.
Using the Rear View Camera
System
The rear view camera system displays
what is behind your vehicle when you place
the transmission in reverse (R).
Note:
The reverse sensing system is not
effective at speeds above 3 mph (5 km/h)
and may not detect certain angular or
moving objects.
The system uses three types of guides to
help you see what is behind your vehicle:
• Active guidelines (if equipped): Show
the intended path of your vehicle when
reversing.
• Fixed guidelines: Show the actual path
your vehicle is moving in while reversing
in a straight line. This can be helpful
when backing into a parking space or
aligning your vehicle with another
object behind you.
• Centerline: Helps align the center of
your vehicle with an object (for
example, a trailer).
Note: If the transmission is in reverse (R)
and the luggage compartment door or
liftgate is open, no rear view camera
features will display.
208
Explorer (TUB), enUSA, First Printing Parking AidsE142435
Page 212 of 541
Note:
When towing, the camera only sees
what you are towing. This might not provide
adequate coverage as it usually provides in
normal operation and some objects might
not be seen. In some vehicles, the guidelines
may disappear when you connect the trailer
tow connector.
The camera may not operate correctly
under the following conditions:
• Nighttime or dark areas if one or both
reverse lamps are not operating.
• Mud, water or debris obstructs the
camera's view. Clean the lens with a
soft, lint-free cloth and non-abrasive
cleaner. You can also use the rear
washer to clean the camera. See Rear
Window Wiper and Washers (page
78).
• The rear of your vehicle is hit or
damaged, causing the camera to
become misaligned.
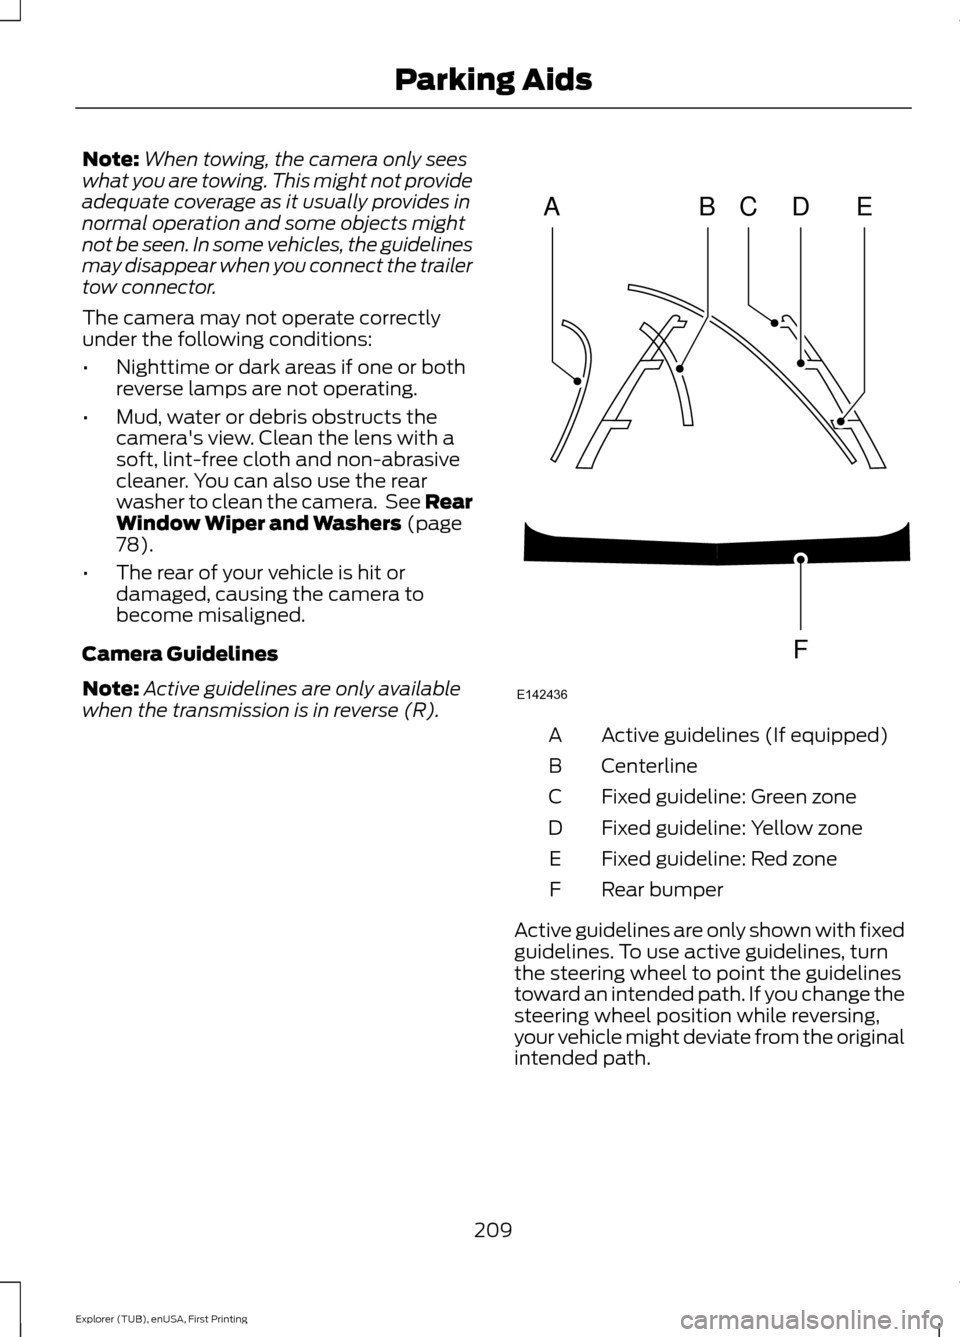
Camera Guidelines
Note: Active guidelines are only available
when the transmission is in reverse (R). Active guidelines (If equipped)
A
Centerline
B
Fixed guideline: Green zone
C
Fixed guideline: Yellow zone
D
Fixed guideline: Red zone
E
Rear bumper
F
Active guidelines are only shown with fixed
guidelines. To use active guidelines, turn
the steering wheel to point the guidelines
toward an intended path. If you change the
steering wheel position while reversing,
your vehicle might deviate from the original
intended path.
209
Explorer (TUB), enUSA, First Printing Parking AidsABCD
F
E
E142436
Page 217 of 541
Switching Cruise Control Off
Press and release OFF when the system
is in stand by mode or switch the ignition
off.
Note: You erase the set speed when you
switch the system off.
USING ADAPTIVE CRUISE
CONTROL
(If Equipped) WARNINGS
Always pay close attention to
changing road conditions when using
adaptive cruise control. The system
does not replace attentive driving. Failing
to pay attention to the road may result in
a crash, serious injury or death. Adaptive cruise control is not a crash
warning or avoidance system.
Adaptive cruise control does not
detect stationary or slow moving
vehicles below
6 mph (10 km/h).
Adaptive cruise control does not
detect pedestrians or objects in the
road.
Adaptive cruise control does not
detect oncoming vehicles in the
same lane.
Do not use adaptive cruise control
on winding roads, in heavy traffic or
when the road surface is slippery.
This could result in loss of vehicle control,
serious injury or death. Do not use adaptive cruise control
when towing a trailer that has trailer
brakes. The auto-brake component
of the adaptive cruise control system does
not operate the trailer brakes. Using
adaptive cruise control when towing a
trailer that has trailer brakes may result in
the loss of vehicle control, which could
result in serious injury. WARNINGS
Do not use tire sizes other than those
recommended because this can
affect the normal operation of the
system. Failing to do so may result in a loss
of vehicle control, which could result in
serious injury. The system adjusts your vehicle speed to
maintain the set gap between you and the
vehicle in front of you in the same lane.
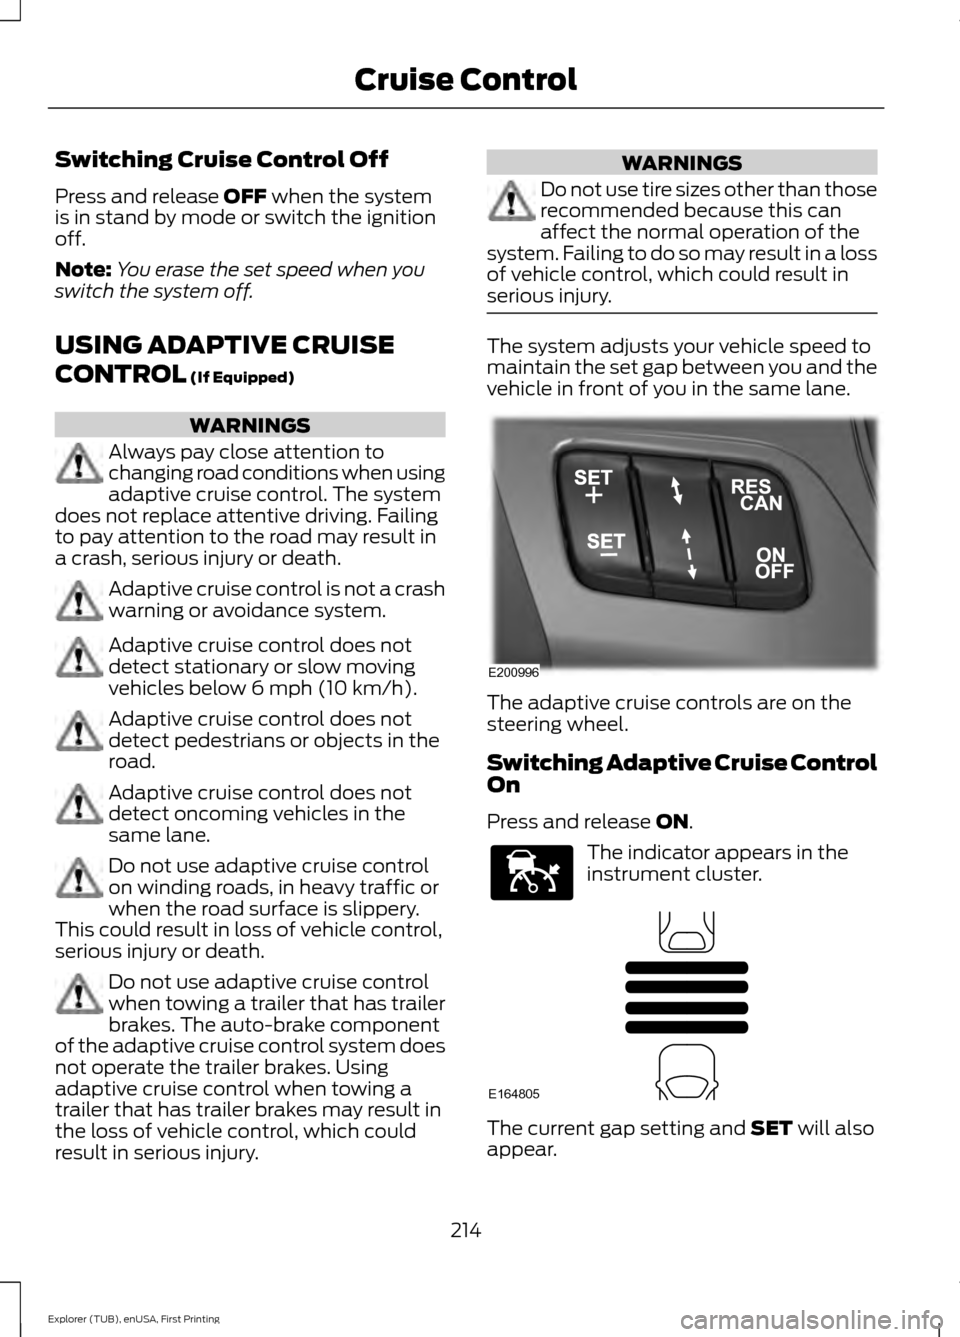
The adaptive cruise controls are on the
steering wheel.
Switching Adaptive Cruise Control
On
Press and release
ON.
The indicator appears in the
instrument cluster.
The current gap setting and
SET will also
appear.
214
Explorer (TUB), enUSA, First Printing Cruise ControlE200996 E144529 E164805
Page 229 of 541

If the system detects a degraded
performance condition, a message warning
of a blocked sensor or low visibility will
appear in the information display along
with a warning indicator. You can clear the
information display warning but the
warning indicator will remain illuminated.
When you remove a blockage, you can
reset the system in two ways:
•
While driving, the system detects at
least two objects.
• You cycle the ignition from on to off
and then back on.
If the blockage is still present after the key
cycle and driving in traffic, check again for
a blockage. Reasons for messages being displayed
Clean the fascia area in front
of the radar or remove the
obstruction.
The radar
surface is
dirty or
obstructed
Drive normally in traffic for
a few minutes to allow the
radar to detect passing
vehicles so it can clear the
blocked state.
The radar
surface is
not dirty or
obstructed
No action required. The
system automatically resets
to an unblocked state once
the rainfall or snowfall rate
decreases or stops. Do not
use the Blind Spot Informa-
tion System in these condi-
tions.
Heavy rain-
fall or
snowfall
interferes
with the
radar
signals
Detection Limitations
There may be instances where the system
will not always detect vehicles entering
and exiting the blind spot zone. Instances which may cause non-detection:
•
Debris build up on the rear bumper
panels in the area of the sensors.
• Certain maneuvering of vehicles
entering and exiting the blind spot
zone.
• Vehicles passing through the blind spot
zone at high speed.
• Severe weather conditions.
• Several vehicles passing through the
blind spot zone following each other
closely.
False Alerts
Note: If your vehicle has a trailer tow
module approved by us, the system will
detect a connected trailer and turn off. For
non-factory equipped tow bars, you may
want to turn the Blind Spot Information
System off manually.
There may be certain instances when there
is a false alert by the system that
illuminates the alert indicator with no
vehicle in the coverage zone. Some
amount of false alerts are normal; they are
temporary and self-correct.
Detection Errors
If the system senses a problem with the
left or right sensor, the Blind Spot
Information System warning indicator will
illuminate and a message will appear in
the information display.
All other system faults will display only
with a message in the information display.
See Information Messages (page 115).
226
Explorer (TUB), enUSA, First Printing Driving Aids