Page 270 of 541
Protected components
Fuse amp rating
Fuse or relay number
Powertrain control module power.
20A 1
1
Engine emissions (MIL).
20A 1
2
A/C clutch control relay coil.
20A 1
3
VACC.
Active grill shutters.
Ignition coils.
20A 1
4
Not used.
—
5
Not used.
—
6
Not used.
—
7
Not used.
—
8
Not used.
—
9
Heated mirrors.
15A 1
10
Right hand side electronic cooling fan 3
relay.
—
11
Heated rear window.
40A 2
12
Not used.
—
13
Powertrain control module relay.
—
14
Horn relay power.
20A 1
15
A/C clutch relay power.
10A 1
16
Rear heated window and heated mirrors
relay.
—
17
Rear blower motor relay.
—
18
Not used.
—
19
Left hand side cooling fan relay.
—
20
Cooling fans series/parallel relay.
—
21
Electronic fan relay 2.
25A 2
22
267
Explorer (TUB), enUSA, First Printing Fuses
Page 276 of 541
Protected components
Fuse amp rating
Fuse or relay number
Instrument cluster.
7.5A 2
13
Smart data link.
Steering column control module.
Not used.
—
14
Smart datalink connector power.
10A 2
15
Heads up display.
Not used.
—
16
Electronic finish panel.
5A 2
17
Push button start switch.
5A 2
18
Ignition switch.
Key inhibit.
Transmission control switch (tow haul).
7.5A 2
19
Not used.
—
20
Terrain management switch.
5A 2
21
Heads up display.
Humidity sensor.
Occupant classification sensor.
5A 2
22
Delayed accessory power.
10A 1
23
Power windows.
Moonroof.
Folding mirror relay.
DC inverter.
Window/moonroof switch illumination.
Central lock relay.
20A 1
24
Left-hand front smart window motor.
30A 1
25
Door zone module.
Right-hand front smart window motor.
30A 1
26
Door zone module.
Moonroof.
30A 1
27
Sony amplifier - 10 channel.
20A 1
28
Sony amplifier - 14 channel.
30A 1
29
273
Explorer (TUB), enUSA, First Printing Fuses
Page 294 of 541

Run the tip of your fingers over the edge of
the blade to check for roughness.
Clean the wiper blades with washer fluid
or water applied with a soft sponge or
cloth.
CHANGING THE WIPER
BLADES
Poor wiper quality can be improved by
cleaning the wiper blades and the
windshield.
Replace wiper blades annually for
optimum performance.
Front Wiper Blades
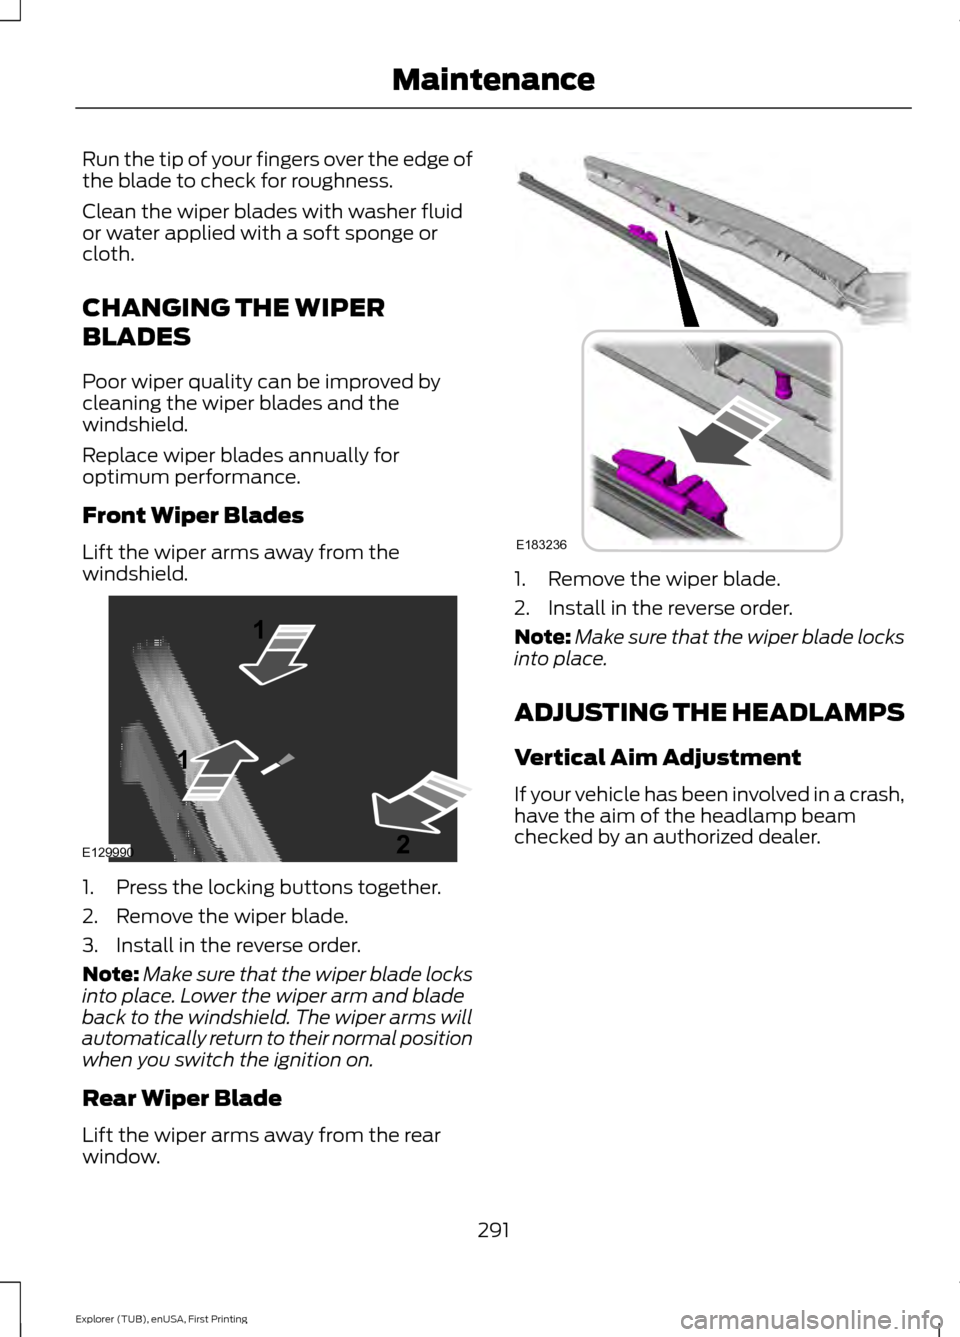
Lift the wiper arms away from the
windshield.
1. Press the locking buttons together.
2. Remove the wiper blade.
3. Install in the reverse order.
Note:
Make sure that the wiper blade locks
into place. Lower the wiper arm and blade
back to the windshield. The wiper arms will
automatically return to their normal position
when you switch the ignition on.
Rear Wiper Blade
Lift the wiper arms away from the rear
window. 1. Remove the wiper blade.
2. Install in the reverse order.
Note:
Make sure that the wiper blade locks
into place.
ADJUSTING THE HEADLAMPS
Vertical Aim Adjustment
If your vehicle has been involved in a crash,
have the aim of the headlamp beam
checked by an authorized dealer.
291
Explorer (TUB), enUSA, First Printing MaintenanceE129990
1
1 2 E183236
Page 296 of 541
5. Use a suitable tool, for example a
screwdriver or socket wrench, to turn
the adjuster clockwise or
counterclockwise to adjust the vertical
aim of the headlamp. The horizontal
edge of the brighter light should touch
the horizontal reference line.
6. Close the hood and switch off the lamps. REMOVING A HEADLAMP
To gain access to the headlamp securing
bolts and to remove the headlamp
assembly, you must first remove the front
fascia and front bumper assemblies. We
recommend you see an authorized dealer.
CHANGING A BULB
WARNINGS
Switch the lamps and the ignition off.
Failure to do so could result in
serious personal injury.
Bulbs become hot when in use. Let
them cool down before you remove
them.
Use the correct specification bulb. See
Bulb Specification Chart (page 297).
Install in the reverse order unless otherwise
stated.
293
Explorer (TUB), enUSA, First Printing MaintenanceE203691
5 E203692
Page 297 of 541
Headlamp
Headlamp high beam.
A
Front direction indicator.
B
Front Direction Indicator 1.
Switch all of the lamps and the ignition
off.
2. Disconnect the electrical connector. 3.
Turn the bulb holder counterclockwise
and remove it.
4. Remove the bulb by pulling it straight out.
Headlamp High Beam 1.
Switch all of the lamps and the ignition
off.
2. Carefully remove the cover.
3. Disconnect the electrical connector.
4. Turn the bulb holder counterclockwise
and remove it.
Note: You cannot separate the bulb from
the bulb holder.
Note: Do not touch the bulb glass.
294
Explorer (TUB), enUSA, First Printing MaintenanceE203696
AB E203698
4
23 E203697
2
3
4
4
Page 298 of 541
Front Fog Lamp (If Equipped)
1. Use a suitable tool, for example a
screwdriver, to carefully remove the
housing cover.
Note: To remove push pins, use a
flat-bladed screwdriver to pull up the center
release pin.
2. Disconnect the electrical connector. 3.
Turn the bulb holder counterclockwise
and remove it.
Note: You cannot separate the bulb from
the bulb holder.
Note: Do not touch the bulb glass. Rear Direction Indicator and
Reversing Lamp
1.
Switch all of the lamps and the ignition
off.
2. Use a suitable tool, for example a screwdriver, to carefully remove the
screw covers.
3. Remove the retaining bolts from the lamp assembly.
4. Gently pull the lamp assembly away from the vehicle.
295
Explorer (TUB), enUSA, First Printing MaintenanceE203699 E174588 23
4E203701
Page 305 of 541

•
Never wash or rinse any ignition coil,
spark plug wire or spark plug well, or
the area in and around these locations.
• Cover the battery, power distribution
box, and air filter assembly to prevent
water damage when cleaning the
engine.
CLEANING THE WINDOWS AND
WIPER BLADES
Car wash chemicals and environmental
fallout can result in windshield and wiper
blade contamination. Dirty windshield and
wipers will result in poor windshield wiper
operation. Keep the windshield and wiper
blades clean to maintain windshield wiper
performance.
To clean the windshield and wiper blades:
• Clean the windshield with a
non-abrasive glass cleaner. When
cleaning the interior of the windshield,
avoid getting any glass cleaner on the
instrument panel or door panels. Wipe
any glass cleaner off these surfaces
immediately.
• For windshields contaminated with
tree sap, chemicals, wax or bugs, clean
the entire windshield using steel wool
(no greater than 0000 grade) in a
circular motion and rinse with water.
• Clean the wiper blades with isopropyl
rubbing alcohol or windshield washer
concentrate.
Note: Do not use razor blades or other
sharp objects to clean or remove decals
from the inside of the heated rear window.
The vehicle warranty does not cover
damage caused to the heated rear window
grid lines. CLEANING THE INTERIOR WARNINGS
Do not use cleaning solvents, bleach
or dye on the vehicle
’s safety belts,
as these actions may weaken the
belt webbing. On vehicles equipped with
seat-mounted airbags, do not use
chemical solvents or strong
detergents. Such products could
contaminate the side airbag system and
affect performance of the side airbag in a
collision. For fabric, carpets, cloth seats, safety belts
and seats equipped with side airbags:
•
Remove dust and loose dirt with a
vacuum cleaner.
• Remove light stains and soil with
Motorcraft Professional Strength
Carpet & Upholstery Cleaner.
• If grease or tar is present on the
material, spot-clean the area first with
Motorcraft Spot and Stain Remover. In
Canada, use Motorcraft Multi-Purpose
Cleaner.
• If a ring forms on the fabric after spot
cleaning, clean the entire area
immediately (but do not oversaturate)
or the ring will set.
• Do not use household cleaning
products or glass cleaners, which can
stain and discolor the fabric and affect
the flame retardant abilities of the seat
materials.
302
Explorer (TUB), enUSA, First Printing Vehicle Care
Page 337 of 541
ENGINE SPECIFICATIONS - 2.3L ECOBOOST™
2.3L EcoBoost
Engine
138
Cubic inches
Minimum 87 octane
Required fuel
1-3-4-2
Firing order
Coil on plug
Ignition system
0.027 - 0.031 in (0.70 - 0.80 mm)
Spark plug gap
9.5:1
Compression ratio
Drivebelt Routing
2.3L EcoBoost Engine Long drivebelt is on first pulley
groove closest to engine.
A.
Short drivebelt is on second
pulley groove farthest from
engine.
B.
334
Explorer (TUB), enUSA, First Printing Capacities and SpecificationsE161383
A
B