2016 FORD EXPEDITION manual transmission
[x] Cancel search: manual transmissionPage 187 of 421

Note:
When towing, the camera only sees
what you are towing behind your vehicle.
This might not provide adequate coverage
as it usually provides in normal operation
and you might not see some objects. In
some vehicles, the guidelines may disappear
once you engage the trailer tow connector.
The camera may not operate correctly
under the following conditions:
• Nighttime or dark areas if one or both
reverse lamps are not operating.
• Mud, water or debris obstructs the
camera's view. Clean the lens with a
soft, lint-free cloth and non-abrasive
cleaner.
• The camera is misaligned due to
damage to the rear of your vehicle.
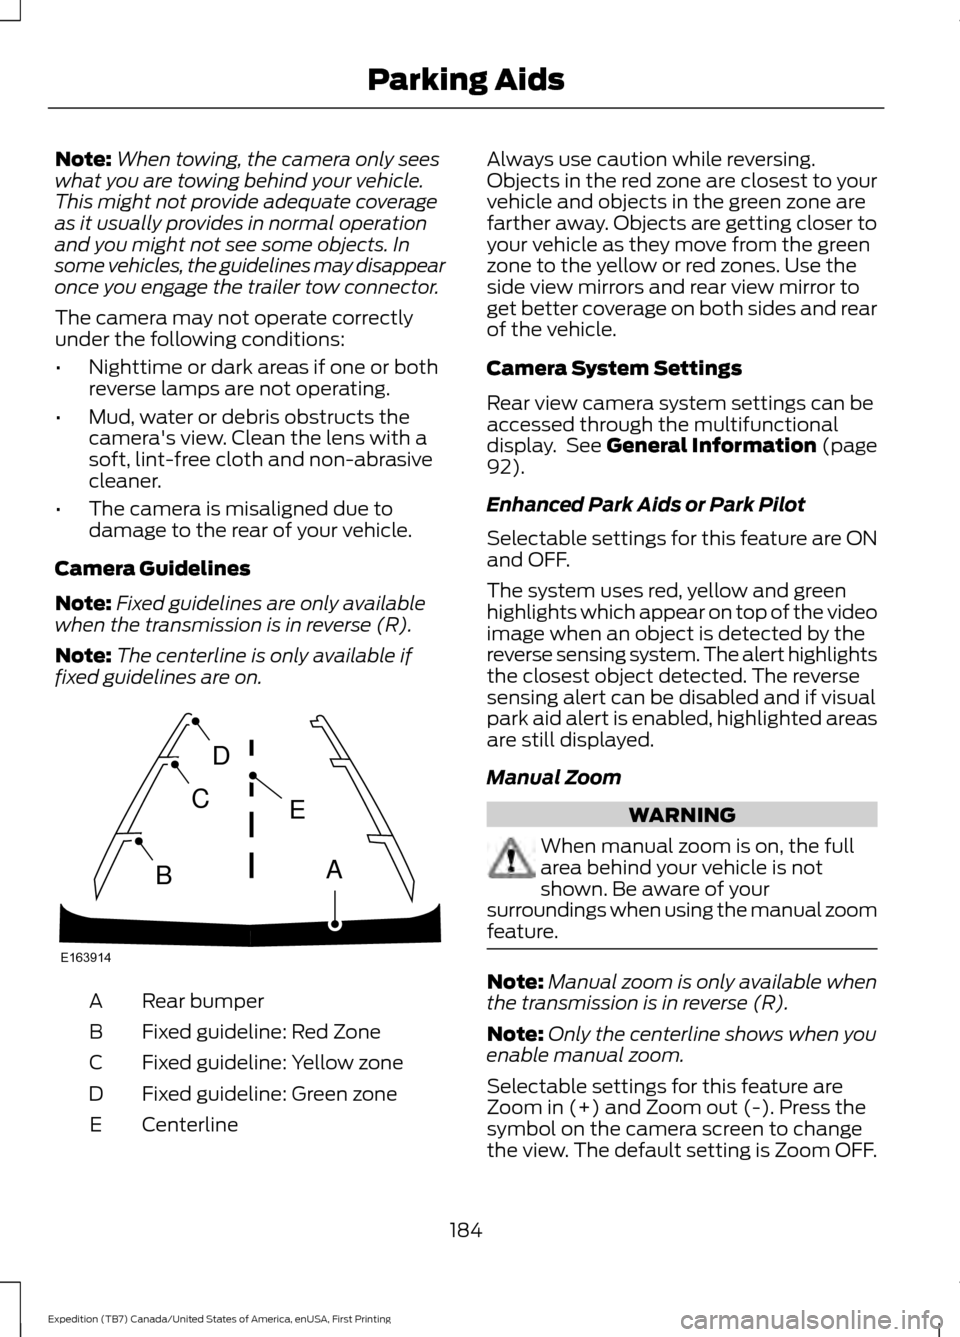
Camera Guidelines
Note: Fixed guidelines are only available
when the transmission is in reverse (R).
Note: The centerline is only available if
fixed guidelines are on. Rear bumper
A
Fixed guideline: Red Zone
B
Fixed guideline: Yellow zone
C
Fixed guideline: Green zone
D
Centerline
E Always use caution while reversing.
Objects in the red zone are closest to your
vehicle and objects in the green zone are
farther away. Objects are getting closer to
your vehicle as they move from the green
zone to the yellow or red zones. Use the
side view mirrors and rear view mirror to
get better coverage on both sides and rear
of the vehicle.
Camera System Settings
Rear view camera system settings can be
accessed through the multifunctional
display. See General Information (page
92).
Enhanced Park Aids or Park Pilot
Selectable settings for this feature are ON
and OFF.
The system uses red, yellow and green
highlights which appear on top of the video
image when an object is detected by the
reverse sensing system. The alert highlights
the closest object detected. The reverse
sensing alert can be disabled and if visual
park aid alert is enabled, highlighted areas
are still displayed.
Manual Zoom WARNING
When manual zoom is on, the full
area behind your vehicle is not
shown. Be aware of your
surroundings when using the manual zoom
feature. Note:
Manual zoom is only available when
the transmission is in reverse (R).
Note: Only the centerline shows when you
enable manual zoom.
Selectable settings for this feature are
Zoom in (+) and Zoom out (-). Press the
symbol on the camera screen to change
the view. The default setting is Zoom OFF.
184
Expedition (TB7) Canada/United States of America, enUSA, First Printing Parking AidsE163914
A
E
D
C
B
Page 191 of 421

BLIND SPOT INFORMATION
SYSTEM
WARNING
To help avoid injuries, NEVER use the
Blind Spot Information System as a
replacement for using the interior
and exterior mirrors or looking over your
shoulder before changing lanes. The Blind
Spot Information System is not a
replacement for careful driving. The Blind Spot Information System is
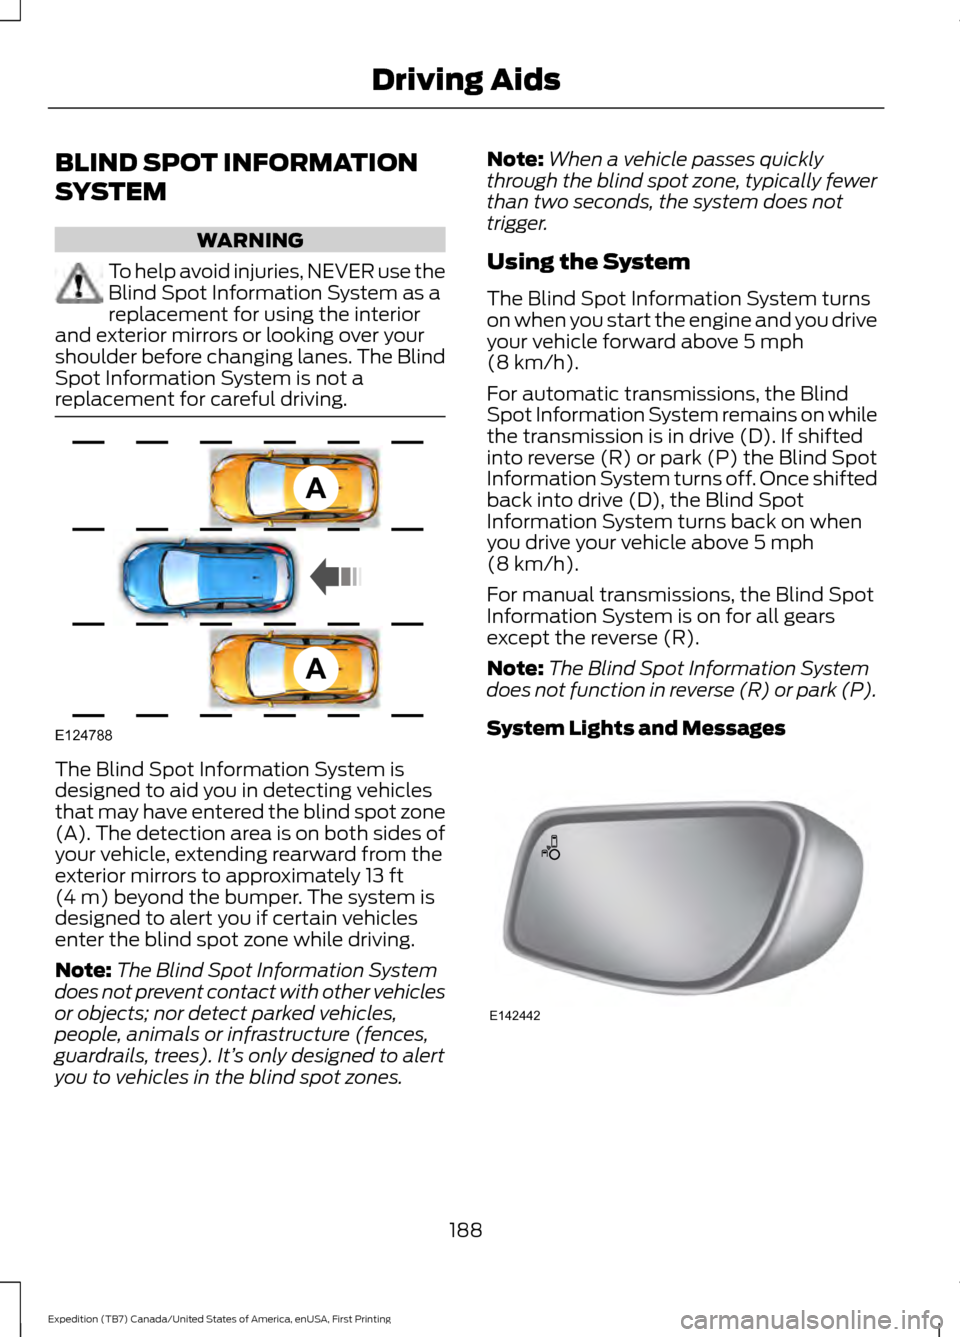
designed to aid you in detecting vehicles
that may have entered the blind spot zone
(A). The detection area is on both sides of
your vehicle, extending rearward from the
exterior mirrors to approximately 13 ft
(4 m) beyond the bumper. The system is
designed to alert you if certain vehicles
enter the blind spot zone while driving.
Note: The Blind Spot Information System
does not prevent contact with other vehicles
or objects; nor detect parked vehicles,
people, animals or infrastructure (fences,
guardrails, trees). It’ s only designed to alert
you to vehicles in the blind spot zones. Note:
When a vehicle passes quickly
through the blind spot zone, typically fewer
than two seconds, the system does not
trigger.
Using the System
The Blind Spot Information System turns
on when you start the engine and you drive
your vehicle forward above
5 mph
(8 km/h).
For automatic transmissions, the Blind
Spot Information System remains on while
the transmission is in drive (D). If shifted
into reverse (R) or park (P) the Blind Spot
Information System turns off. Once shifted
back into drive (D), the Blind Spot
Information System turns back on when
you drive your vehicle above
5 mph
(8 km/h).
For manual transmissions, the Blind Spot
Information System is on for all gears
except the reverse (R).
Note: The Blind Spot Information System
does not function in reverse (R) or park (P).
System Lights and Messages 188
Expedition (TB7) Canada/United States of America, enUSA, First Printing Driving AidsA
A
E124788 E142442
Page 193 of 421

If the system detects a degraded
performance condition, a message warning
of a blocked sensor will appear in the
information display. Also the BLIS alert
indicators will remain ON and BLIS will no
longer provide any vehicle warnings. You
can clear the information display warning
but the alert indicators will remain
illuminated.
A "blocked" condition can be cleared in
two ways:
•
After the blockage in front of the
sensors is removed or the
rainfall/snowfall rate decreases or
stops, drive for a few minutes in traffic
to allow the sensors to detect passing
vehicles.
• By cycling the ignition from ON to OFF
and then back ON.
Note: If your vehicle has a tow bar with a
factory equipped trailer tow module and it
is towing a trailer, the sensors will
automatically turn the Blind Spot
Information System off. If your vehicle has
a tow bar but no factory equipped trailer
tow module, it is recommended to turn the
Blind Spot Information System off
manually. Operating the Blind Spot
Information System with a trailer attached
will cause poor system performance.
System Errors
If the system senses a problem with the
left or right sensor, the telltale will
illuminate and a message will appear in
the information display. See Information
Messages (page 103). Switching the System Off and On
You can temporarily switch the Blind Spot
Information System off in the information
display. See
General Information (page
92). When the Blind Spot Information
System switches off, you will not receive
alerts and the information display shows
a system off message. The telltale in the
cluster also illuminates. When you switch
the Blind Spot Information System on or
off, the alert indicators flash twice.
Note: The Blind Spot Information System
remembers the last selected on or off
setting.
You can also have the Blind Spot
Information System switched off
permanently at an authorized dealer. Once
switched off permanently, the system can
only be switched back on at an authorized
dealer.
CROSS TRAFFIC ALERT WARNING
To help avoid personal injury, NEVER
use the Cross Traffic Alert system as
a replacement for using the interior
and exterior mirrors and looking over your
shoulder before backing out of a parking
space. Cross Traffic Alert is not a
replacement for careful driving. Cross Traffic Alert is designed to warn you
of vehicles approaching from the sides
when the transmission is in reverse (R).
Using the System
Cross Traffic Alert turns on when you start
the engine and you shift into reverse (R).
Once shifted out of reverse (R), Cross
Traffic Alert turns off.
Note:
Cross Traffic Alert only functions
while your transmission is in reverse (R).
190
Expedition (TB7) Canada/United States of America, enUSA, First Printing Driving Aids
Page 196 of 421

The following are other situations that may
limit the Cross Traffic Alert performance:
•
Adjacently parked vehicles or objects
obstructing the sensors.
• Approaching vehicles passing at
speeds greater than 37 mph
(60 km/h).
• Driving in reverse faster than
7 mph
(12 km/h).
• Backing out of an angled parking spot.
False Alerts
Note: If your vehicle has a tow bar with a
factory equipped trailer tow module and it
is towing a trailer, the sensors will
automatically turn the Cross Traffic Alert
off. If your vehicle has a tow bar but no
factory equipped trailer tow module, it is
recommended to turn the Cross Traffic Alert
off manually. Operating Cross Traffic Alert
with a trailer attached will cause poor Cross
Traffic Alert performance.
There may be certain instances when there
is a false alert by the Cross Traffic Alert
system that illuminates the alert indicator
with no vehicle in the coverage zone. Some
amount of false alerts are normal; they are
temporary and self-correct.
System Errors
If Cross Traffic Alert senses a problem with
the left or right sensor a message will
appear in the information display. See
Information Messages
(page 103).
Switching the System Off and On
You can temporarily switch Cross Traffic
Alert off in the information display. See
General Information
(page 92). When
you switch Cross Traffic Alert off, you will
not receive alerts and the information
display will display a system off message. Note:
The Cross Traffic Alert switches on
whenever the ignition is switched on and
ready to provide appropriate alerts when
the transmission is in reverse (R). Cross
Traffic Alert will not remember the last
selected on or off setting.
You can also have Cross Traffic Alert
switched off permanently at an authorized
dealer. Once switched off permanently,
the system can only be switched back on
at an authorized dealer.
STEERING
Electric Power Steering WARNINGS
The electric power steering system
has diagnostic checks that
continuously monitor the system. If
a fault is detected, a message displays in
the information display. Stop your vehicle
as soon as it is safe to do so. Switch the
ignition off. After at least 10 seconds,
switch the ignition on and watch the
information display for a steering system
warning message. If a steering system
warning message returns, have the system
checked by an authorized dealer. If the system detects an error, you
may not feel a difference in the
steering, however a serious condition
may exist. Obtain immediate service from
an authorized dealer, failure to do so may
result in loss of steering control. Your vehicle has an electric power steering
system. There is no fluid reservoir. No
maintenance is required.
If your vehicle loses electrical power while
you are driving, electric power steering
assistance is lost. The steering system still
operates and you can steer your vehicle
manually. Manually steering your vehicle
requires more effort.
193
Expedition (TB7) Canada/United States of America, enUSA, First Printing Driving Aids
Page 208 of 421

TOWING A TRAILER
WARNINGS
Do not exceed the GVWR or
the GAWR specified on the
certification label. Towing trailers beyond the
maximum recommended
gross trailer weight exceeds the
limit of the vehicle and could
result in engine damage,
transmission damage, structural
damage, loss of vehicle control,
vehicle rollover and personal
injury. Your vehicle may have electrical
items, such as fuses or relays,
related to towing. See the Fuses
chapter.
Your vehicle's load capacity
designation is by weight, not by
volume, so you cannot necessarily
use all available space when
loading a vehicle or trailer.
Towing a trailer places an extra
load on your vehicle's engine,
transmission, axle, brakes, tires
and suspension. Inspect these
components periodically during,
and after, any towing operation. Load Placement
To help minimize how trailer
movement affects your vehicle
when driving:
•
Load the heaviest items closest
to the trailer floor.
• Load the heaviest items
centered between the left and
right side trailer tires.
• Load the heaviest items above
the trailer axles or just slightly
forward toward the trailer
tongue. Do not allow the final
trailer tongue weight to go
above or below 10-15% of the
loaded trailer weight.
• Select a tow bar with the
correct rise or drop. When both
the loaded vehicle and trailer
are connected, the trailer frame
should be level, or slightly
angled down toward your
vehicle, when viewed from the
side.
When driving with a trailer or
payload, a slight takeoff vibration
or shudder may be present due to
the increased payload weight.
Additional information regarding
proper trailer loading and setting
your vehicle up for towing is
located in another chapter of this
manual. See
Load Limit (page
198).
You can also find information in
the
RV & Trailer Towing Guide
available at your authorized
dealer, or online.
205
Expedition (TB7) Canada/United States of America, enUSA, First Printing Towing
Page 331 of 421

USING SYNC™ WITH YOUR
PHONE
Hands-free calling is one of the main
features of SYNC. While the system
supports a variety of features, many are
dependent on your cell phone's
functionality. At a minimum, most cell
phones with Bluetooth wireless technology
support the following functions:
•
Answering an incoming call.
• Ending a call.
• Using privacy mode.
• Dialing a number.
• Redialing.
• Call waiting notification.
• Caller ID. Other features, such as text messaging
using Bluetooth and automatic phonebook
download, are cell phone-dependent
features. To check your cell phone's
compatibility, see your cell phone's manual
and visit www.SYNCMyRide.com,
www.SYNCMyRide.ca or
www.syncmaroute.ca.
Pairing a Cell Phone for the First
Time
Note:
SYNC can support downloading up
to approximately 1000 entries per
Bluetooth-enabled cell phone.
Note: Make sure to switch on the ignition
and the radio. Put the transmission in
position park (P) (automatic transmission)
or neutral with the parking brake applied
(manual transmission).
Note: To scroll through the menus, press
the up and down arrows on your audio
system.
Wirelessly pairing your cell phone with
SYNC allows you to make and receive
hands-free calls.
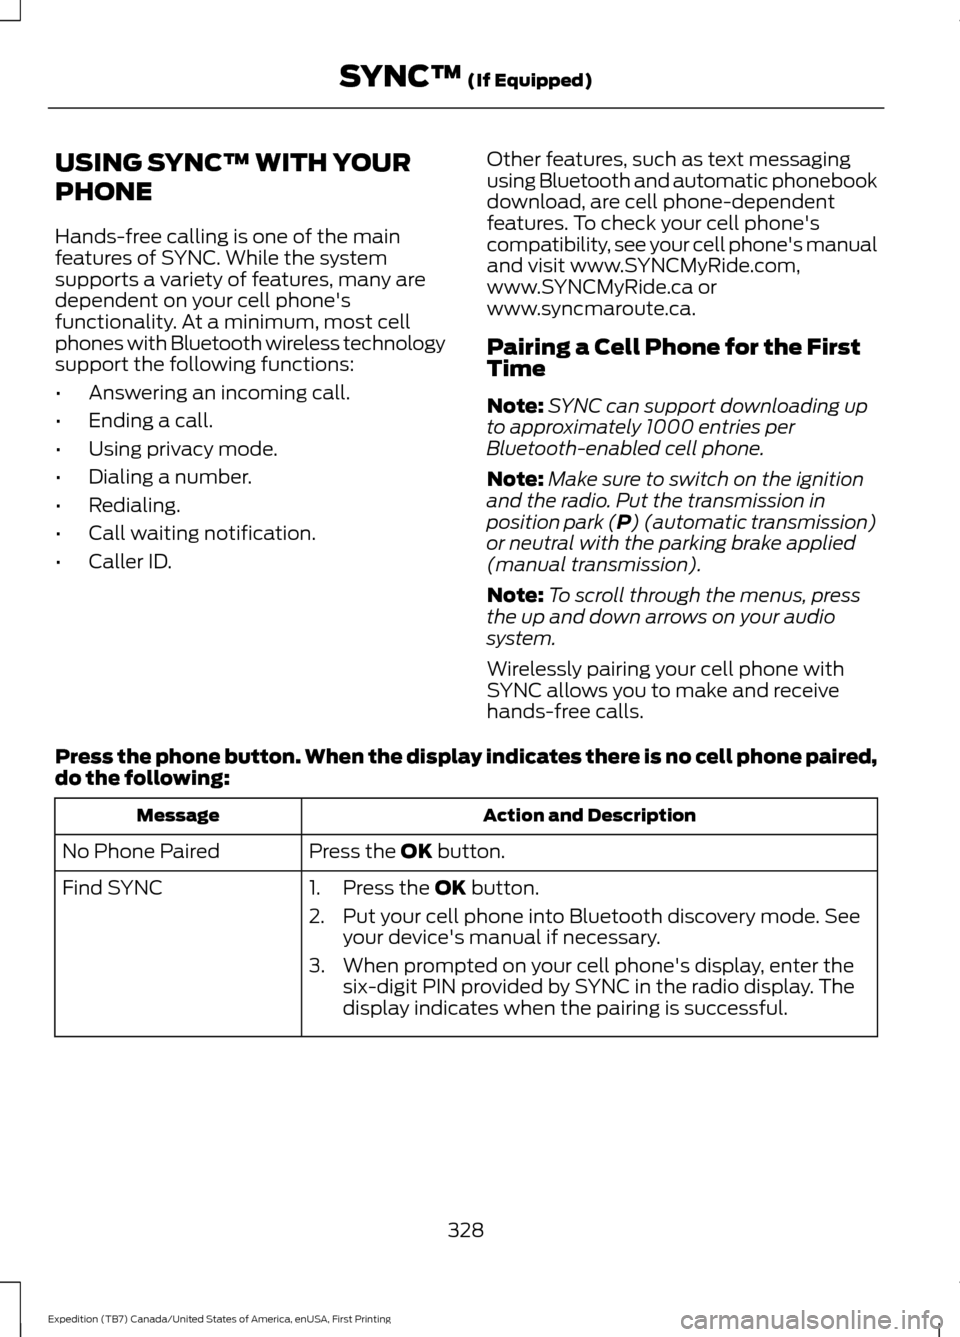
Press the phone button. When the display indicates there is no cell phone paired,
do the following: Action and Description
Message
Press the
OK button.
No Phone Paired
Find SYNC 1. Press the
OK button.
2. Put your cell phone into Bluetooth discovery mode. See your device's manual if necessary.
3. When prompted on your cell phone's display, enter the six-digit PIN provided by SYNC in the radio display. The
display indicates when the pairing is successful.
328
Expedition (TB7) Canada/United States of America, enUSA, First Printing SYNC™
(If Equipped)
Page 332 of 421

Depending on your cell phone's capability
and your market, the system may prompt
you with questions, such as setting the
current cell phone as the primary cell
phone (the cell phone SYNC automatically
tries to connect with first upon vehicle
start-up) and downloading your
phonebook.
Pairing Subsequent Cell Phones
Note:
To scroll through the menus, press
the up and down arrows on your audio
system.
Note: Make sure to switch on the ignition
and the radio. Put the transmission in
position park (P) (automatic transmission)
or neutral with the parking brake applied
(manual transmission).
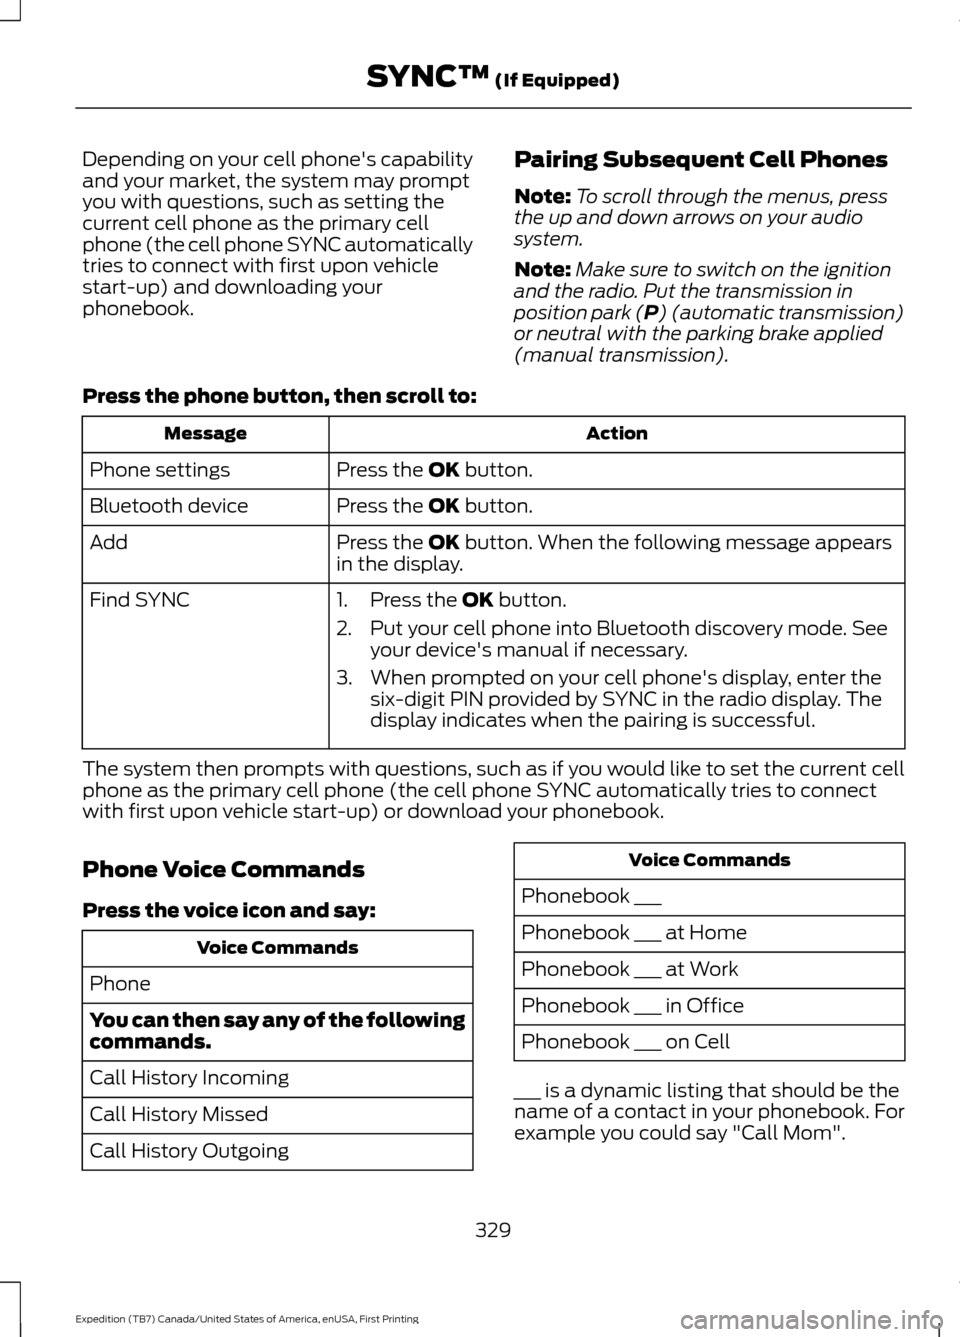
Press the phone button, then scroll to: Action
Message
Press the
OK button.
Phone settings
Press the
OK button.
Bluetooth device
Press the
OK button. When the following message appears
in the display.
Add
Find SYNC
1. Press the
OK button.
2. Put your cell phone into Bluetooth discovery mode. See your device's manual if necessary.
3. When prompted on your cell phone's display, enter the six-digit PIN provided by SYNC in the radio display. The
display indicates when the pairing is successful.
The system then prompts with questions, such as if you would like to set the current cell
phone as the primary cell phone (the cell phone SYNC automatically tries to connect
with first upon vehicle start-up) or download your phonebook.
Phone Voice Commands
Press the voice icon and say: Voice Commands
Phone
You can then say any of the following
commands.
Call History Incoming
Call History Missed
Call History Outgoing Voice Commands
Phonebook ___
Phonebook ___ at Home
Phonebook ___ at Work
Phonebook ___ in Office
Phonebook ___ on Cell
___ is a dynamic listing that should be the
name of a contact in your phonebook. For
example you could say "Call Mom".
329
Expedition (TB7) Canada/United States of America, enUSA, First Printing SYNC™
(If Equipped)
Page 410 of 421

4
4WD
See: Four-Wheel Drive..................................... 164
A
A/C See: Climate Control.......................................... 113
About This Manual...........................................7
ABS See: Brakes............................................................ 172
ABS driving hints See: Hints on Driving With Anti-Lock
Brakes................................................................. 172
Accessories....................................................368 Exterior Style....................................................... 368
Interior Style........................................................ 368
Lifestyle................................................................. 368
Peace of Mind..................................................... 368
Accessories See: Replacement Parts
Recommendation............................................. 11
Adjusting the Headlamps.........................255 Horizontal Aim Adjustment........................... 256
Vertical Aim Adjustment................................. 255
Adjusting the Pedals......................................71
Adjusting the Steering Wheel - Vehicles With: Column Shift/Manual Adjustable
Steering Column
.........................................66
Adjusting the Steering Wheel - Vehicles With: Floor Shift/Manual Adjustable
Steering Column
.........................................66
Adjusting the Steering Wheel - Vehicles With: Power Adjustable Steering
Column............................................................67
Easy Entry and Exit Feature............................. 68
End of Travel Position........................................ 68
Memory Feature................................................... 68
Airbag Disposal..............................................40
Air Conditioning See: Climate Control.......................................... 113
Air Filter See: Changing the Engine Air Filter.............262
Alarm See: Anti-Theft Alarm........................................ 63
Ambient Lighting............................................79 Anti-Theft Alarm
............................................63
Arming the Alarm................................................. 63
Disarming the Alarm........................................... 63
Appendices.....................................................391
Audible Warnings and Indicators..............91 Direction Indicator Chime.................................. 91
Headlamps On Warning Chime....................... 91
Key in Ignition Warning Chime......................... 91
Parking Brake On Warning Chime................... 91
Audio Control..................................................68 Media........................................................................\
69
Seek, Next or Previous....................................... 69
Type One................................................................. 68
Type Two................................................................. 69
Audio System
.................................................312
General Information........................................... 312
Audio Unit - Vehicles With: AM/FM/CD/ SYNC/Satellite Radio...............................313
Audio Unit - Vehicles With: Sony AM/ FM/CD............................................................315
Rear Seat Audio Controls................................. 317
Autolamps.........................................................75 Windshield Wiper Activated
Headlamps......................................................... 75
Automatic Climate Control
.......................116
Automatic Transmission...........................159
Brake-Shift Interlock......................................... 162
If Your Vehicle Gets Stuck In Mud or Snow.................................................................. 163
Selector Lever Positions.................................. 159
Understanding your SelectShift Automatic ™ Transmission........................ 160
Automatic Transmission Fluid Check............................................................250
Autowipers
........................................................72
Auxiliary Power Points................................142
110 Volt AC Power Point................................... 142
12 Volt DC Power Point..................................... 142
Locations............................................................... 142
B
Battery See: Changing the 12V Battery...................... 252
Blind Spot Information System
..............188
Switching the System Off and On...............190
System Errors...................................................... 190
Using the System............................................... 188
407
Expedition (TB7) Canada/United States of America, enUSA, First Printing Index