2016 FORD EXPEDITION keyless
[x] Cancel search: keylessPage 66 of 421

You must have two previously
programmed coded keys and the new
unprogrammed key readily accessible. See
your authorized dealer to have the spare
key programmed if two previously
programmed coded keys are not available.
Read and understand the entire procedure
before you begin.
1.
Insert the first previously programmed
coded key into the ignition.
2. Switch the ignition from off to on. Keep
the ignition on for at least three
seconds, but no more than 10 seconds.
3. Switch the ignition off and remove the
first coded key from the ignition.
4. After three seconds but within 10 seconds of switching the ignition off,
insert the second previously coded key
into the ignition.
5. Switch the ignition from off to on. Keep
the ignition on for at least three
seconds, but no more than 10 seconds.
6. Switch the ignition off and remove the
second previously programmed coded
key from the ignition.
7. After three seconds but within 10 seconds of switching the ignition off
and removing the previously
programmed coded key, insert the new
unprogrammed key into the ignition.
8. Switch the ignition from off to on. Keep
the ignition on for at least six seconds.
9. Remove the newly programmed coded
key from the ignition.
If the key has been successfully
programmed it will start the engine and
operate the remote entry system (if the
new key is an integrated keyhead
transmitter).
If programming was not successful, wait
10 seconds and repeat Steps 1 through 8.
If you are still unsuccessful, take your
vehicle to your authorized dealer. Programming a Spare Intelligent
Access Key
See your authorized dealer to have
additional keys programmed to your
vehicle.
ANTI-THEFT ALARM
The system will warn you of an
unauthorized entry to your vehicle. It will
be triggered if any door, the luggage
compartment or the hood is opened
without using the key, remote control or
keyless entry keypad.
The direction indicators will flash and the
horn will sound if unauthorized entry is
attempted while the alarm is armed.
Take all remote controls to an authorized
dealer if there is any potential alarm
problem with your vehicle.
Arming the Alarm
The alarm is ready to arm when there is
not a key in your vehicle. Electronically lock
your vehicle to arm the alarm.
Disarming the Alarm
Disarm the alarm by any of the following
actions:
•
Unlock the doors or luggage
compartment with the remote control
or keyless entry keypad.
• Switch your vehicle on or start your
vehicle.
• Use a key in the driver door to unlock
your vehicle, then switch your vehicle
on within 12 seconds.
Note: Pressing the panic button on the
remote control will stop the horn and signal
indicators, but will not disarm the system.
63
Expedition (TB7) Canada/United States of America, enUSA, First Printing Security
Page 136 of 421
To return the seatback to its original
position, lift the seatback until it latches
into place.
PowerFold™ Third Row Seat (If
Equipped)
Note: The power fold down seats operate
for 10 minutes after you switch the ignition
off. The transmission must be in park (P)
and the liftgate, or liftgate glass must be
open. Similar to the battery saver feature,
the power third row seat disables 10 minutes
after you switch the ignition off.
Note: Be sure that the head restraints are
folded down before powering the third row
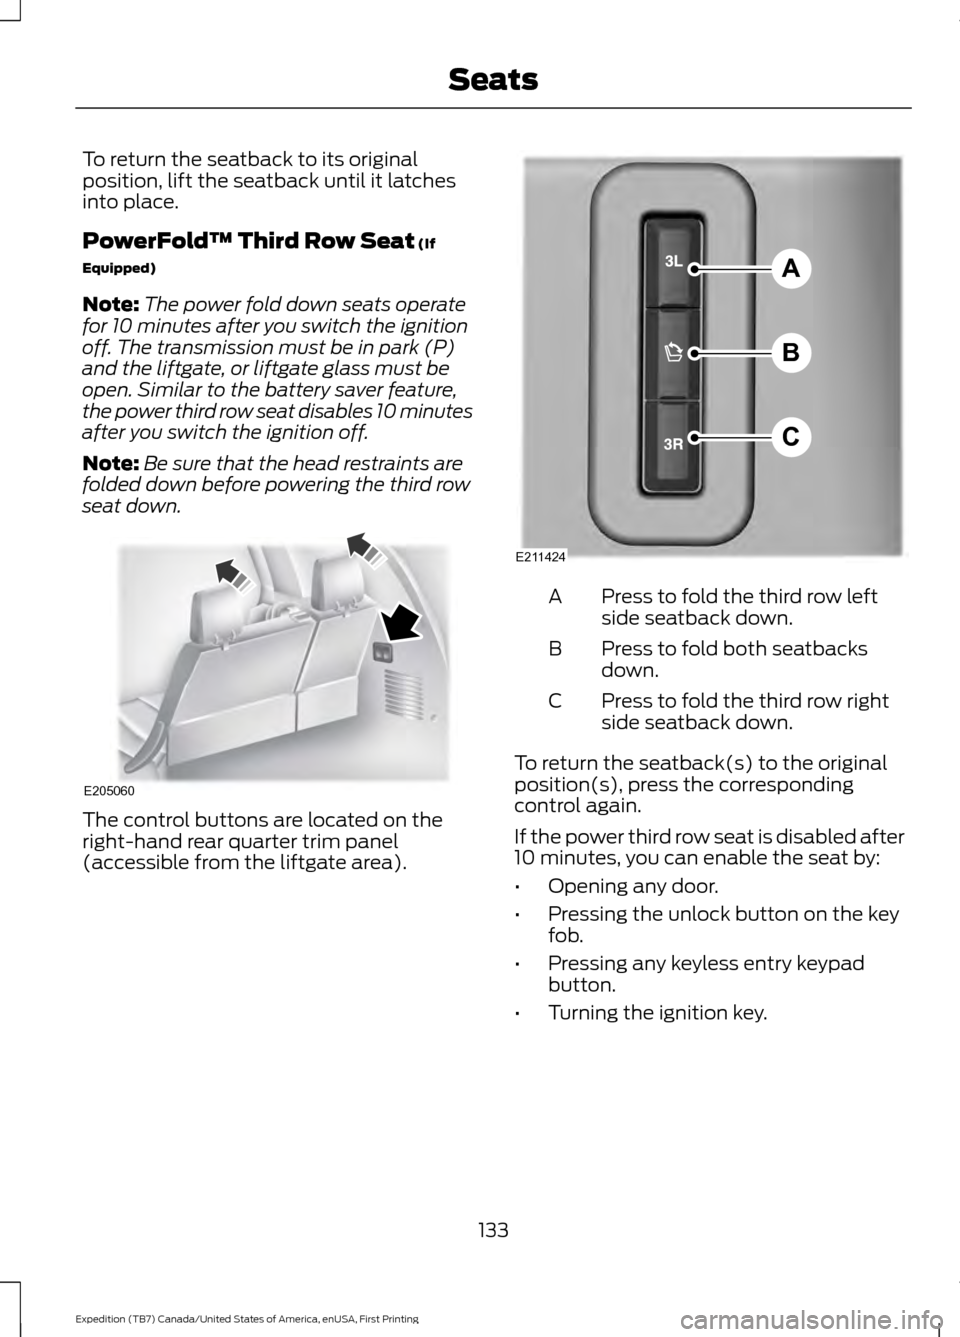
seat down. The control buttons are located on the
right-hand rear quarter trim panel
(accessible from the liftgate area). Press to fold the third row left
side seatback down.
A
Press to fold both seatbacks
down.
B
Press to fold the third row right
side seatback down.
C
To return the seatback(s) to the original
position(s), press the corresponding
control again.
If the power third row seat is disabled after
10 minutes, you can enable the seat by:
• Opening any door.
• Pressing the unlock button on the key
fob.
• Pressing any keyless entry keypad
button.
• Turning the ignition key.
133
Expedition (TB7) Canada/United States of America, enUSA, First Printing SeatsE205060 A
B
C
E211424
Page 148 of 421
GENERAL INFORMATION
WARNINGS
Extended idling at high engine
speeds can produce very high
temperatures in the engine and
exhaust system, creating the risk of fire or
other damage. Do not park, idle or drive your vehicle
on dry grass or other dry ground
cover. The emission system heats up
the engine compartment and exhaust
system, creating the risk of fire. Do not start the engine in a closed
garage or in other enclosed areas.
Exhaust fumes can be toxic. Always
open the garage door before you start the
engine. If you smell exhaust fumes inside
your vehicle, have your vehicle
checked by an authorized dealer
immediately. Do not drive your vehicle if
you smell exhaust fumes. If you disconnect the battery, your vehicle
may exhibit some unusual driving
characteristics for approximately 5 miles
(8 kilometers) after you reconnect it. This
is because the engine management system
must realign itself with the engine. You can
disregard any unusual driving
characteristics during this period.
The powertrain control system meets all
Canadian interference-causing equipment
standard requirements regulating the
impulse electrical field or radio noise.
When you start the engine, avoid pressing
the accelerator pedal before and during
operation. Only use the accelerator pedal
when you have difficulty starting the
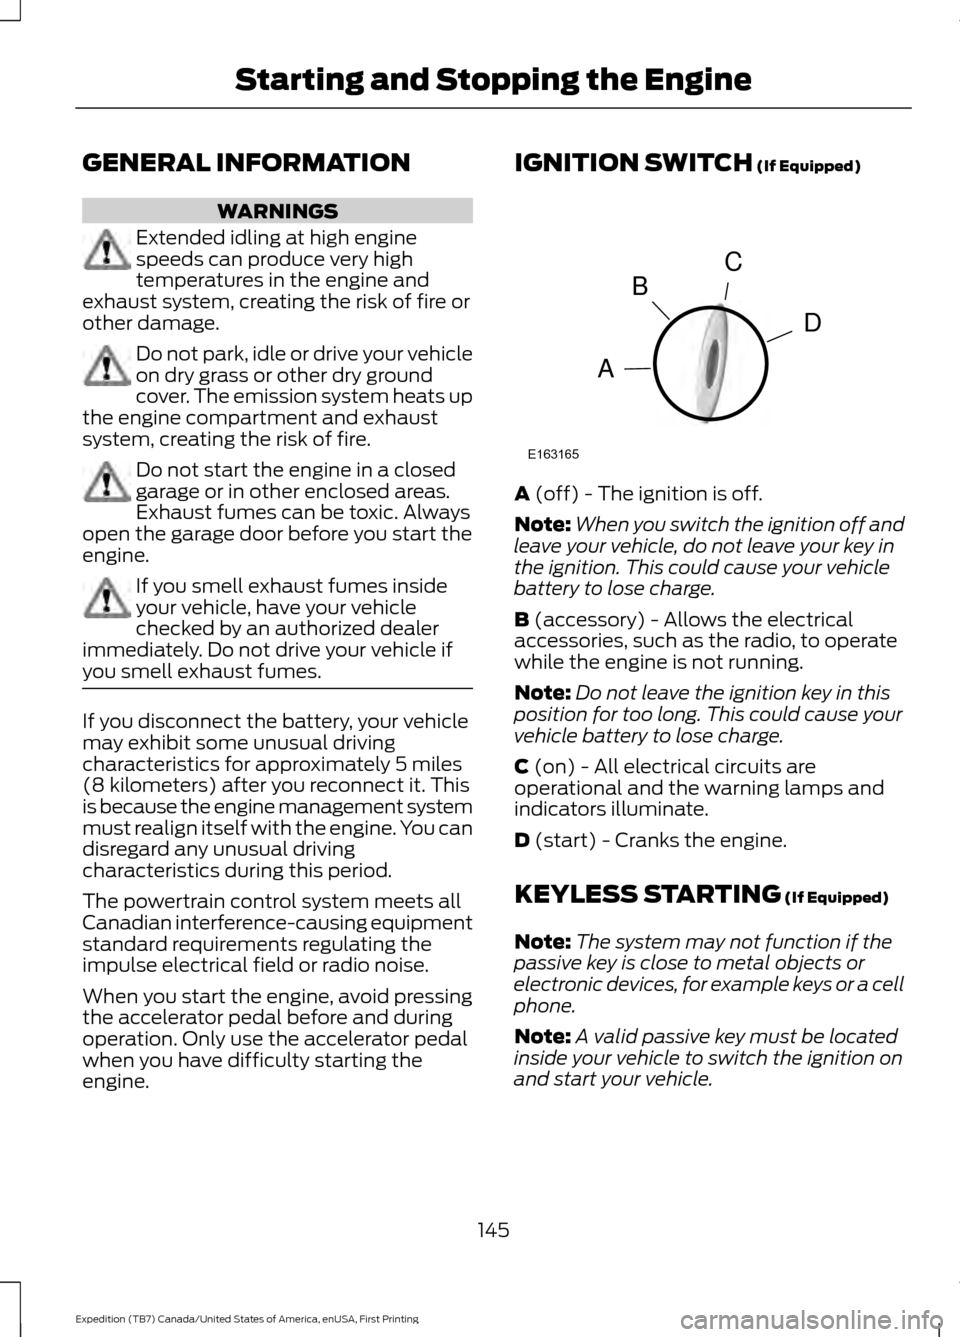
engine. IGNITION SWITCH (If Equipped)
A
(off) - The ignition is off.
Note: When you switch the ignition off and
leave your vehicle, do not leave your key in
the ignition. This could cause your vehicle
battery to lose charge.
B
(accessory) - Allows the electrical
accessories, such as the radio, to operate
while the engine is not running.
Note: Do not leave the ignition key in this
position for too long. This could cause your
vehicle battery to lose charge.
C
(on) - All electrical circuits are
operational and the warning lamps and
indicators illuminate.
D
(start) - Cranks the engine.
KEYLESS STARTING
(If Equipped)
Note: The system may not function if the
passive key is close to metal objects or
electronic devices, for example keys or a cell
phone.
Note: A valid passive key must be located
inside your vehicle to switch the ignition on
and start your vehicle.
145
Expedition (TB7) Canada/United States of America, enUSA, First Printing Starting and Stopping the EngineC
D
B
A
E163165
Page 149 of 421

Ignition Modes
The keyless starting system has three
modes:
Off: Turns the ignition off.
• Without applying the brake pedal,
press and release the button once
when the ignition is in the on mode, or
when the engine is running but your
vehicle is not moving.
On:
All electrical circuits are operational
and the warning lamps and indicators
illuminate.
• Without applying the brake pedal,
press and release the button twice.
Start:
Starts the engine.
• Press the brake pedal, and then press
the button for any length of time. An
indicator light on the button illuminates
when then ignition is on and when the
engine starts.
STARTING A GASOLINE
ENGINE
When you start the engine, the idle speed
increases. This helps to warm up the
engine. If the engine idle speed does not
slow down automatically, have your
vehicle checked by an authorized dealer. Note:
You can crank the engine for a total
of 60 seconds without the engine starting
before the starting system temporarily
disables. The 60 seconds does not have to
be all at once. For example, if you crank the
engine three times for 20 seconds each
time, without the engine starting, you
reached the 60-second time limit. A
message appears in the information display
alerting you that you exceeded the cranking
time. You cannot attempt to start the
engine for at least 15 minutes. After 15
minutes, you are limited to a 15-second
engine cranking time. You need to wait 60
minutes before you can crank the engine for
60 seconds again.
Before starting your vehicle, check the
following:
• Make sure all occupants have fastened
their safety belts.
• Make sure the headlamps and
electrical accessories are off.
• Make sure the parking brake is on.
• Make sure the transmission is in park
(P).
• Switch the ignition on. For vehicles with
a keyless ignition, see the following
instructions.
Vehicles with an Ignition Key
Note: Do not touch the accelerator pedal.
1. Fully depress the brake pedal.
2. Turn the key to the start position to start the engine.
Note: The engine may continue cranking
for up to 15 seconds or until it starts.
Note: If you cannot start the engine on the
first try, wait for a short period and try again.
Vehicles with Keyless Start
Note: Do not touch the accelerator pedal.
146
Expedition (TB7) Canada/United States of America, enUSA, First Printing Starting and Stopping the EngineE144447
Page 151 of 421
Automatic Engine Shutdown
For vehicles with a keyless ignition, this
feature automatically shuts down the
engine if it has been idling for an extended
period. The ignition also turns off in order
to save battery power. Before your vehicle
shuts down, a message appears in the
information display showing a timer
counting down from 30 seconds. If you do
not intervene within 30 seconds, your
vehicle shuts down. Another message
appears in the information display to
inform you that your vehicle has shut down
to save fuel. Start your vehicle as you
normally do.
Automatic Engine Shutdown Override
Note:
You cannot permanently switch off
the automatic shutdown feature. When you
switch it off temporarily, it turns on at the
next ignition cycle.
You can stop the shutdown, or reset the
timer, at any point before the 30-second
countdown has expired by doing any of the
following:
• You can reset the timer by interacting
with your vehicle, for example pressing
the brake or accelerator pedal.
• You can temporarily switch off the
shutdown feature any time the ignition
is on using the information display. See
Information Displays (page 92). The
feature only remains off for the current
ignition cycle.
• During the 30-second countdown, the
system prompts you to press OK or
RESET to temporarily switch the
feature off for the current ignition cycle
only.
Stopping the Engine When Your
Vehicle is Stationary
Vehicles with an Ignition Key
1. Shift into park (P). 2. Switch the ignition off.
3. Apply the parking brake.
Vehicles with Keyless Start
1. Shift into park (P).
2. Press the push button ignition switch.
3. Apply the parking brake.
Note:
The ignition, all electrical circuits and
all warning lamps and indicators will be
turned off.
Note: If the engine is idling for 30 minutes,
the ignition and engine automatically shut
down.
Stopping the Engine When Your
Vehicle is Moving WARNING
Switching off the engine when the
vehicle is still moving will result in a
loss of brake and steering assistance.
The steering will not lock, but higher effort
will be required. When the ignition is
switched off, some electrical circuits,
including air bags, warning lamps and
indicators may also be off. If the ignition
was turned off accidentally, you can shift
into neutral (N) and re-start the engine. Vehicles with an Ignition Key
1.
Shift into neutral and use the brakes to
bring your vehicle to a safe stop.
2. When your vehicle has stopped, shift into park (P) and switch the ignition
off.
3. Apply the parking brake.
Vehicles with Keyless Start
1. Shift into neutral and use the brakes to
bring your vehicle to a safe stop.
2. When your vehicle has stopped, shift into park (P).
148
Expedition (TB7) Canada/United States of America, enUSA, First Printing Starting and Stopping the Engine
Page 221 of 421
Note:
If completed successfully, the
information display shows NEUTRAL TOW
LEAVE IN N or NEUTRAL TOW ENABLED
LEAVE TRANSMISSION IN NEUTRAL.
This indicates that your vehicle is safe to
tow with all wheels on the ground.
Note: If you do not see the message in the
display, you must perform the procedure
again from the beginning.
Note: You may hear an audible noise as the
transfer case shifts into its neutral position.
This is normal.
6. Leave the transmission in position
N
and turn the ignition as far as it will go
toward the off position (it will not turn
fully off when the transmission is in
position
N). If your vehicle has an
ignition key, you must leave the key in
the ignition while towing. To lock and
unlock your vehicle, use the keyless
entry keypad or extra set of keys. If your
vehicle has intelligent access, press the
engine
START/STOP button once
without pressing the brake pedal. You
do not need to leave your keys in the
vehicle. You can lock and unlock your
vehicle as you normally do.
7. Release the brake pedal. WARNINGS
Do not disconnect the battery during
recreational towing. Doing so will
prevent the transfer case from
shifting properly and may cause the vehicle
to roll even if the transmission is in P
(Park). Shifting the transfer case to its
neutral position for recreational
towing may cause the vehicle to be
able to roll even if the transmission is in P
(Park). The driver or others could be
injured. Make sure the foot brake is
depressed and the vehicle is in a secure
and safe position while the transfer case
is being shifted to its neutral position. WARNINGS
Failing to put the transfer case in its
neutral position will damage vehicle
components.
Note:
You can check four-wheel-down
towing status at any time by opening the
driver's door or turning the ignition to the
accessory or on position and verifying the
NEUTRAL TOW ENABLED
message
displays in the cluster.
Exiting Four-wheel-down Towing
To exit four-wheel-down towing and return
the transfer case to its
2H position:
1. With your vehicle still properly secured
to the tow vehicle, put the ignition in
the on position, but do not start the
engine. If your vehicle has an ignition
key, turn the key to on. If your vehicle
has intelligent access, press the engine
START/STOP
button twice without
pressing the brake pedal.
2. Press and hold the brake pedal.
3. Shift the transmission out of N and into
any gear.
4. Release the brake pedal.
Note: If completed successfully, the
instrument cluster displays
4X2, and
NEUTRAL TOW DISABLED.
Note: If the indicator light and message do
not display, you must perform the procedure
again from the beginning.
Note: You may hear an audible noise as the
transfer case shifts out of its neutral
position. This is normal.
Note: If
SHIFT DELAY PULL FORWARD
displays in the instrument cluster, transfer
case gear tooth blockage is present. See the
instructions after this section.
5. Apply the parking brake, and then disconnect the vehicle from the tow
vehicle.
218
Expedition (TB7) Canada/United States of America, enUSA, First Printing Towing
Page 371 of 421

For a complete listing of the accessories
that are available for your vehicle, please
contact your authorized dealer or visit the
online store web site:
Web Address (United States)
www.Accessories.Ford.com Web Address (Canada)
www.Accessories.Ford.ca
Ford Accessories are available for your
vehicle through an authorized Ford dealer.
Ford Motor Company will repair or replace
any properly authorized dealer-installed
Ford Original Accessory found to be
defective in factory-supplied materials or
workmanship during the warranty period,
as well as any component damaged by the
defective accessories.
Ford Motor Company will warrant your
vehicle's accessories through the warranty
that provides the greatest benefit:
• 24 months, unlimited mileage.
• The remainder of your new vehicle
limited warranty.
Contact an authorized dealer for details
and a copy of the warranty.
Exterior Style
• Keyless entry.
• Side window deflectors.
• Splash guards.
Interior Style
• Floor mats.
• Rear seat entertainment system*.
• Seat covers. Lifestyle
•
Ash cup or coin holder.
• Cargo organization and management.
• Roof rack and carriers*.
• SUV camping tent*.
• Trailer hitches, wiring harnesses and
accessories.
Peace of Mind
• Back-up alarm.
• Bumper protector.
• Car cover*.
• Cargo area protector.
• Cargo security shade.
• Hood deflector.
• Locking fuel plug.
• Park assist sensors.
• Remote start.
• Vehicle security system.
• Wheel locks.
*Ford Licensed Accessory. The accessory
manufacturer designs, develops and
therefore warrants Ford Licensed
Accessories, and does not design or test
these accessories to Ford Motor Company
engineering requirements. Contact an
authorized Ford dealer for the accessory
manufacturer's limited warranty details
and request a copy of the Ford Licensed
Accessories product limited warranty from
the accessory manufacturer.
368
Expedition (TB7) Canada/United States of America, enUSA, First Printing Accessories
Page 414 of 421
Information Display Control.......................70
Information Displays.....................................92
General Information............................................ 92
Information Messages................................103
4WD Messages..................................................... 112
AdvanceTrac ™ / Traction Control
Messages.......................................................... 104
Alarm Messages................................................. 104
Battery and Charging System Messages.......................................................... 104
Blind Spot Information System Messages.......................................................... 105
Brake System Messages.................................. 105
Door Messages.................................................... 105
Engine Messages................................................ 106
Fuel Messages..................................................... 106
Keys and Intelligent Access Messages......................................................... 106
Maintenance Messages.................................... 107
MyKey ™ Messages............................................ 108
Off Road Messages........................................... 108
Park Aid Messages............................................. 109
Power Steering Messages............................... 109
Remote Start Messages................................... 110
Suspension System Messages....................... 110
Tire Messages....................................................... 110
Trailer Messages.................................................. 110
Transmission Messages..................................... 111
Installing Child Restraints
............................16
Child Seats............................................................... 16
Combining Safety Belt and LATCH Lower Anchors for Attaching Child Safety
Seats.................................................................... 20
Using Lap and Shoulder Belts ......................... 17
Using Lower Anchors and Tethers for CHildren (LATCH)............................................ 19
Using Tether Straps............................................. 20
Instrument Cluster
........................................85
Instrument Lighting Dimmer......................76
Interior Lamps.................................................78
Front Row Map and Dome Lamps.................78
Front Row Map Lamps....................................... 78
Rear Cargo Lamp.................................................. 79
Second Row Map Lamps.................................. 78
Interior Mirror
...................................................82
Auto-Dimming Mirror.......................................... 82
Introduction.........................................................7 J
Jump Starting the Vehicle........................225
Connecting the Jumper Cables.................... 225
Jump Starting...................................................... 226
Preparing Your Vehicle..................................... 225
Removing the Jumper Cables....................... 226
K
Keyless Entry
....................................................59
SECURICODE™ KEYLESS ENTRY
KEYPAD
.............................................................. 59
Unlocking and Locking the Doors................... 61
Keyless Starting............................................145 Ignition Modes..................................................... 146
Keys and Remote Controls
..........................41
Principle of Operation......................................... 41
L
Lighting Control
...............................................74
Headlamp Flasher................................................ 75
High Beams............................................................. 74
Lighting...............................................................74 General Information............................................ 74
Limited Slip Differential...............................171
Load Carriers See: Roof Racks and Load Carriers..............197
Load Carrying
.................................................196
Load Limit.......................................................198
Special Loading Instructions for Owners of
Pick-up Trucks and Utility-type
Vehicles............................................................ 204
Vehicle Loading - with and without a Trailer................................................................. 198
411
Expedition (TB7) Canada/United States of America, enUSA, First Printing Index