2016 FORD EXPEDITION climate control
[x] Cancel search: climate controlPage 121 of 421
Automatic Climate Control
Note:
Adjusting the settings when your
vehicle interior is extremely hot or cold is
not necessary. The system automatically
adjusts to heat or cool the cabin to your
selected temperature as quickly as possible.
For the system to function efficiently, the
instrument panel and side air vents should
be fully open. Note:
If you select AUTO during cold
outside temperatures, the system directs
airflow to the windshield and side window
vents. In addition, the fan may run at a
slower speed until the engine warms up.
Note: If you select AUTO during hot outside
temperatures, or when the inside of the
vehicle is hot, the system automatically uses
recirculated air to maximize interior cooling.
When the interior reaches the selected
temperature, the system automatically
switches to using outside air.
Heating the Interior Quickly Vehicle with automatic climate control
Vehicle with manual climate control
Press the
AUTO button.
Adjust the fan speed to a high speed
setting.
1
Adjust the temperature control to the
desired setting.
Adjust the temperature control to the
highest setting.
2
Select the footwell air vents using the
air distribution buttons.
3
Recommended Settings for Heating Vehicle with automatic climate control
Vehicle with manual climate control
Press the
AUTO button.
Adjust the fan speed to the center
setting.
1
Adjust the temperature control to the
desired setting. Use 72°F (22°C) as a
starting point, then adjust the setting as
necessary.
Adjust the temperature control to the
midway point of the hot settings.
2
Select the footwell air vents using the
air distribution buttons.
3
118
Expedition (TB7) Canada/United States of America, enUSA, First Printing Climate Control
Page 122 of 421
Cooling the Interior Quickly
Vehicle with automatic climate control
Vehicle with manual climate control
Press the MAX A/C button.
Adjust the temperature control to the
MAX A/C position.
1
Drive with the windows fully open until
you feel cold air through the air vents.
2
Recommended Settings for Cooling Vehicle with automatic climate control
Vehicle with manual climate control
Press the
AUTO button.
Adjust the fan speed to the center
setting.
1
Adjust the temperature control to the
desired setting. Use 72°F (22°C) as a
starting point, then adjust the setting as
necessary.
Adjust the temperature control to the
midway point of the cold settings.
2
Select the instrument panel air vents
using the air distribution buttons.
3
Side Window Defogging in Cold Weather Vehicle with automatic climate control
Vehicle with manual climate control
Press the defrost button.
Select the windshield air vents using the
air distribution buttons.
1
Adjust the temperature control to the
desired setting. Use 72°F (22°C) as a
starting point, then adjust the setting as
necessary.
Press the
A/C button.
2
Adjust the temperature control to the
desired setting.
3
Adjust the fan speed to the highest
setting.
4
119
Expedition (TB7) Canada/United States of America, enUSA, First Printing Climate Control
Page 123 of 421
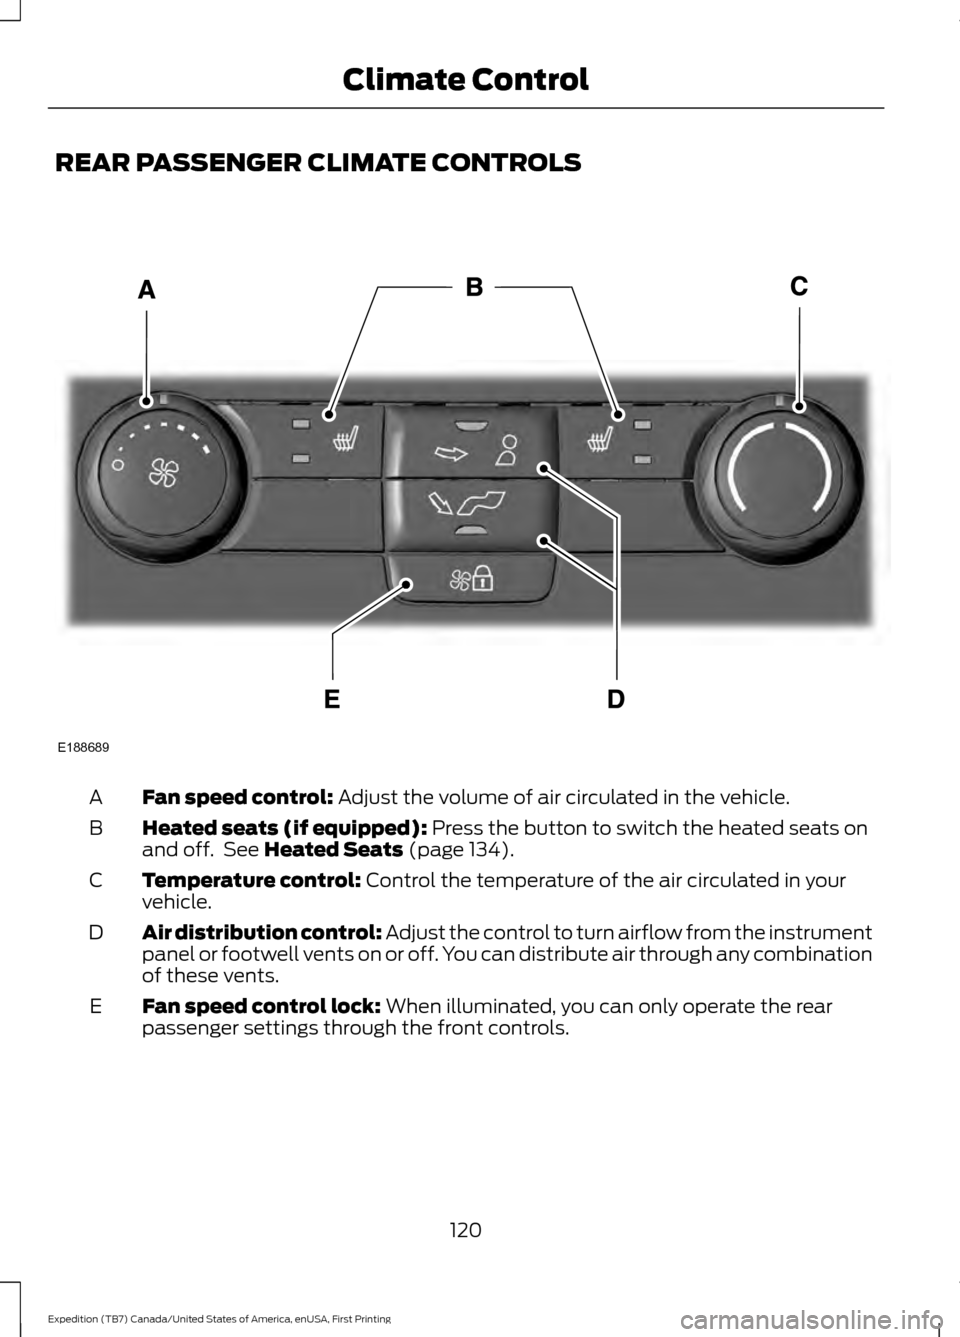
REAR PASSENGER CLIMATE CONTROLS
Fan speed control: Adjust the volume of air circulated in the vehicle.
A
Heated seats (if equipped):
Press the button to switch the heated seats on
and off. See Heated Seats (page 134).
B
Temperature control:
Control the temperature of the air circulated in your
vehicle.
C
Air distribution control:
Adjust the control to turn airflow from the instrument
panel or footwell vents on or off. You can distribute air through any combination
of these vents.
D
Fan speed control lock:
When illuminated, you can only operate the rear
passenger settings through the front controls.
E
120
Expedition (TB7) Canada/United States of America, enUSA, First Printing Climate ControlE188689
Page 124 of 421
HEATED WINDOWS AND
MIRRORS
Heated Rear Window
Note:
Make sure the engine is running
before operating the heated windows. Press the button to clear the
heated rear window of thin ice
and fog. The heated rear window
will automatically turn off after a short
period of time. Start the engine before you
switch the heated rear window on.
Note: Do not use razor blades or other
sharp objects to clean or remove decals
from the inside of the heated rear window.
The vehicle warranty does not cover
damage caused to the heated rear window
grid lines.
Heated Exterior Mirror (If Equipped)
When you switch the heated rear window
on, the heated exterior mirrors will
automatically turn on.
Note: Do not remove ice from the mirrors
with a scraper or adjust the mirror glass
when it is frozen in place.
Note: Do not clean the mirror housing or
glass with harsh abrasives, fuel or other
petroleum-based cleaning products.
REMOTE START
(If Equipped)
The remote start feature allows you to
pre-condition the interior of your vehicle.
The climate control system works to
achieve comfort according to your previous
settings.
Note: You cannot adjust the system during
remote start operation. Turn the ignition on to return the system
to its previous settings. You can now make
adjustments normally, but you need to turn
certain vehicle-dependent features back
on, such as:
•
Heated seats.
• Cooled seats.
• Heated steering wheel.
• Heated mirrors.
• Heated rear window.
You can adjust the default remote start
settings using the information display
controls. See
Information Displays
(page 92).
Automatic Settings
In hot weather, the system is set to
72°F
(22°C). The cooled seats are set to high
(if available, and selected to AUTO in the
information display).
In moderate weather, the system either
heats or cools (based on previous
settings). The rear defroster, heated
mirrors and heated seats do not
automatically turn on.
In cold weather, the system is set to
72°F
(22°C). The heated seats are set to high
(if available, and selected to AUTO in the
information display). The rear defroster
and heated mirrors automatically turn on.
121
Expedition (TB7) Canada/United States of America, enUSA, First Printing Climate ControlE184884
Page 138 of 421
Press the heated seat symbol to cycle
through the various heat settings and off.
More indicator lights indicate warmer
settings.
The heated seat module resets at every
ignition run cycle. While the ignition is on,
press the high or low heated seat switch
to enable heating mode. When activated,
they will turn off automatically when you
turn the engine off.
CLIMATE CONTROLLED SEATS
(If Equipped)
Heated Seats
WARNING
Persons who are unable to feel pain
to the skin because of advanced age,
chronic illness, diabetes, spinal cord
injury, medication, alcohol use, exhaustion,
or other physical conditions, must exercise
care when using the seat heater. The seat
heater may cause burns even at low
temperatures, especially if used for long
periods of time. Do not place anything on
the seat that insulates against heat, such
as a blanket or cushion, because this may
cause the seat heater to overheat. Do not
puncture the seat with pins, needles, or
other pointed objects because this may
damage the heating element which may
cause the seat heater to overheat. An
overheated seat may cause serious
personal injury. Note:
Do not do the following:
• Place heavy objects on the seat.
• Operate the seat heater if water or any
other liquid spill on the seat. Allow the
seat to dry thoroughly.
The heated seats will only function when
the engine is running. Press the heated seat symbol to cycle
through the various heat settings and off.
More indicator lights indicate warmer
settings.
Cooled Seats
The cooled seats will only function when
the engine is running.
Press the cooled seat symbol to cycle
through the various cooling settings and
off. More indicator lights indicate cooler
settings.
If the engine falls below 350 RPM while
the cooled seats are on, the feature will
turn itself off. You will need to reactivate
it.
Climate Controlled Seat Air Filter
Replacement
The climate controlled seat system
includes air filters. You must replace them
periodically. See Scheduled
Maintenance (page 372).
135
Expedition (TB7) Canada/United States of America, enUSA, First Printing SeatsE146322 E146309
Page 147 of 421

CENTER CONSOLE
Stow items in the cup holder carefully as
items may become loose during hard
braking, acceleration or crashes, including
hot drinks which may spill.
Available console features include:
Cup holder.
A
Utility compartment, coin holder,
tissue box holder, and USB ports.
B
Power point, rear climate
controls, and 110 volt AC power
point.
C
Rear cup holders.
D
OVERHEAD CONSOLE Press near the rear edge of the door to
open it.
144
Expedition (TB7) Canada/United States of America, enUSA, First Printing Storage CompartmentsE208344 E75193
Page 152 of 421
3.
Press and hold the push button ignition
switch, or press it three times within
two seconds.
4. Apply the parking brake.
Guarding Against Exhaust Fumes WARNING
If you smell exhaust fumes inside
your vehicle, have your vehicle
checked by your authorized dealer
immediately. Do not drive your vehicle if
you smell exhaust fumes. Carbon
monoxide is present in exhaust fumes.
Take precautions to avoid its dangerous
effects. Important Ventilating Information
If you stop your vehicle and then leave the
engine idling for long periods, we
recommend that you do one of the
following:
•
Open the windows at least 1 in (3 cm).
• Set your climate control to outside air.
ENGINE BLOCK HEATER (If
Equipped) WARNINGS
Failure to follow engine block heater
instructions could result in property
damage or serious personal injury.
Do not use your heater with
ungrounded electrical systems or
two-pronged adapters. There is a risk
of electrical shock. Do not fully close the hood, or allow
it to drop under its own weight when
using the engine block heater. This
could damage the power cable and may
cause an electrical short resulting in fire,
injury and property damage. Note:
The heater is most effective when
outdoor temperatures are below 0°F
(-18°C).
The heater acts as a starting aid by
warming the engine coolant. This allows
the climate control system to respond
quickly. The equipment includes a heater
element (installed in the engine block) and
a wire harness. You can connect the
system to a grounded 120-volt AC
electrical source.
We recommend that you do the following
for a safe and correct operation:
• Use a 16-gauge outdoor extension cord
that is product certified by
Underwriter ’s Laboratory (UL) or
Canadian Standards Association
(CSA). This extension cord must be
suitable for use outdoors, in cold
temperatures, and be clearly marked
Suitable for Use with Outdoor
Appliances. Do not use an indoor
extension cord outdoors. This could
result in an electric shock or become a
fire hazard.
• Use as short an extension cord as
possible.
• Do not use multiple extension cords.
• Make sure that when in operation, the
extension cord plug and heater cord
plug connections are free and clear of
water. This could cause an electric
shock or fire.
• Make sure your vehicle is parked in a
clean area, clear of combustibles.
• Make sure the heater, heater cord and
extension cord are firmly connected.
• Check for heat anywhere in the
electrical hookup once the system has
been operating for approximately 30
minutes.
149
Expedition (TB7) Canada/United States of America, enUSA, First Printing Starting and Stopping the Engine
Page 220 of 421
It is acceptable to have your two-wheel
drive vehicle towed with the front wheels
on the ground (without dollies) and the
rear wheels off the ground.
We recommend towing a four-wheel drive
vehicle with all wheels off the ground, such
as using a wheel lift and dollies or flatbed
equipment.
TOWING THE VEHICLE ON
FOUR WHEELS
WARNING
If your vehicle has a steering wheel
lock make sure the ignition is in the
accessory or on position when being
towed. Emergency Towing
If your vehicle becomes inoperable
(without access to wheel dollies,
car-hauling trailer, or flatbed transport
vehicle), it can be flat-towed (all wheels
on the ground, regardless of the powertrain
and transmission configuration) under the
following conditions:
•
Your vehicle is facing forward for
towing in a forward direction.
• Place the transmission in position N. If
you cannot move the transmission into
N
, you may need to override it. See
Transmission (page 159).
• Maximum speed is 35 mph (56 km/h).
• Maximum distance is
50 mi (80 km).
Recreational Towing
Note: Put your climate control system in
recirculated air mode to prevent exhaust
fumes from entering your vehicle. See
Climate Control
(page 113). Follow these guidelines if you have a need
for recreational towing, for example towing
your vehicle behind a motorhome. These
guidelines prevent damage to your
transmission.
Two Wheel Drive Vehicles
You cannot tow a two wheel drive vehicle
with any wheels on the ground as vehicle
or transmission damage may occur. You
must tow your vehicle with all four wheels
off the ground, for example when using a
car-hauling trailer.
Four Wheel Drive Vehicles
You can only tow a four wheel drive vehicle
with all wheels on the ground by placing
the transfer case in its neutral position and
engaging the four-wheel-down towing
feature. Perform the steps outlined in the
following section after positioning your
vehicle behind the tow vehicle and properly
securing them together.
Four-wheel-down Towing
Note:
Make sure you properly secure your
vehicle to the tow vehicle.
Entering Four-wheel-down Towing
1. Put the ignition in the on position, but do not start the engine. If your vehicle
has an ignition key, turn the key to on.
If your vehicle has intelligent access,
press the engine START/STOP button
twice without pressing the brake pedal.
2. Press and hold the brake pedal.
3. Rotate the four-wheel drive switch to 2H
.
4. Shift the transmission to position
N.
5. Rotate the four-wheel drive switch from
2H to 4L and back to 2H five
times within seven seconds.
217
Expedition (TB7) Canada/United States of America, enUSA, First Printing Towing