2016 FORD EXPEDITION EL climate control
[x] Cancel search: climate controlPage 121 of 421

Automatic Climate Control
Note:Adjusting the settings when yourvehicle interior is extremely hot or cold isnot necessary. The system automaticallyadjusts to heat or cool the cabin to yourselected temperature as quickly as possible.For the system to function efficiently, theinstrument panel and side air vents shouldbe fully open.
Note:If you select AUTO during coldoutside temperatures, the system directsairflow to the windshield and side windowvents. In addition, the fan may run at aslower speed until the engine warms up.
Note:If you select AUTO during hot outsidetemperatures, or when the inside of thevehicle is hot, the system automatically usesrecirculated air to maximize interior cooling.When the interior reaches the selectedtemperature, the system automaticallyswitches to using outside air.
Heating the Interior Quickly
Vehicle with automatic climate controlVehicle with manual climate control
Press the AUTO button.Adjust the fan speed to a high speedsetting.1
Adjust the temperature control to thedesired setting.Adjust the temperature control to thehighest setting.2
Select the footwell air vents using theair distribution buttons.3
Recommended Settings for Heating
Vehicle with automatic climate controlVehicle with manual climate control
Press the AUTO button.Adjust the fan speed to the centersetting.1
Adjust the temperature control to thedesired setting. Use 72°F (22°C) as astarting point, then adjust the setting asnecessary.
Adjust the temperature control to themidway point of the hot settings.2
Select the footwell air vents using theair distribution buttons.3
118
Expedition (TB7) Canada/United States of America, enUSA, First Printing
Climate Control
Page 122 of 421
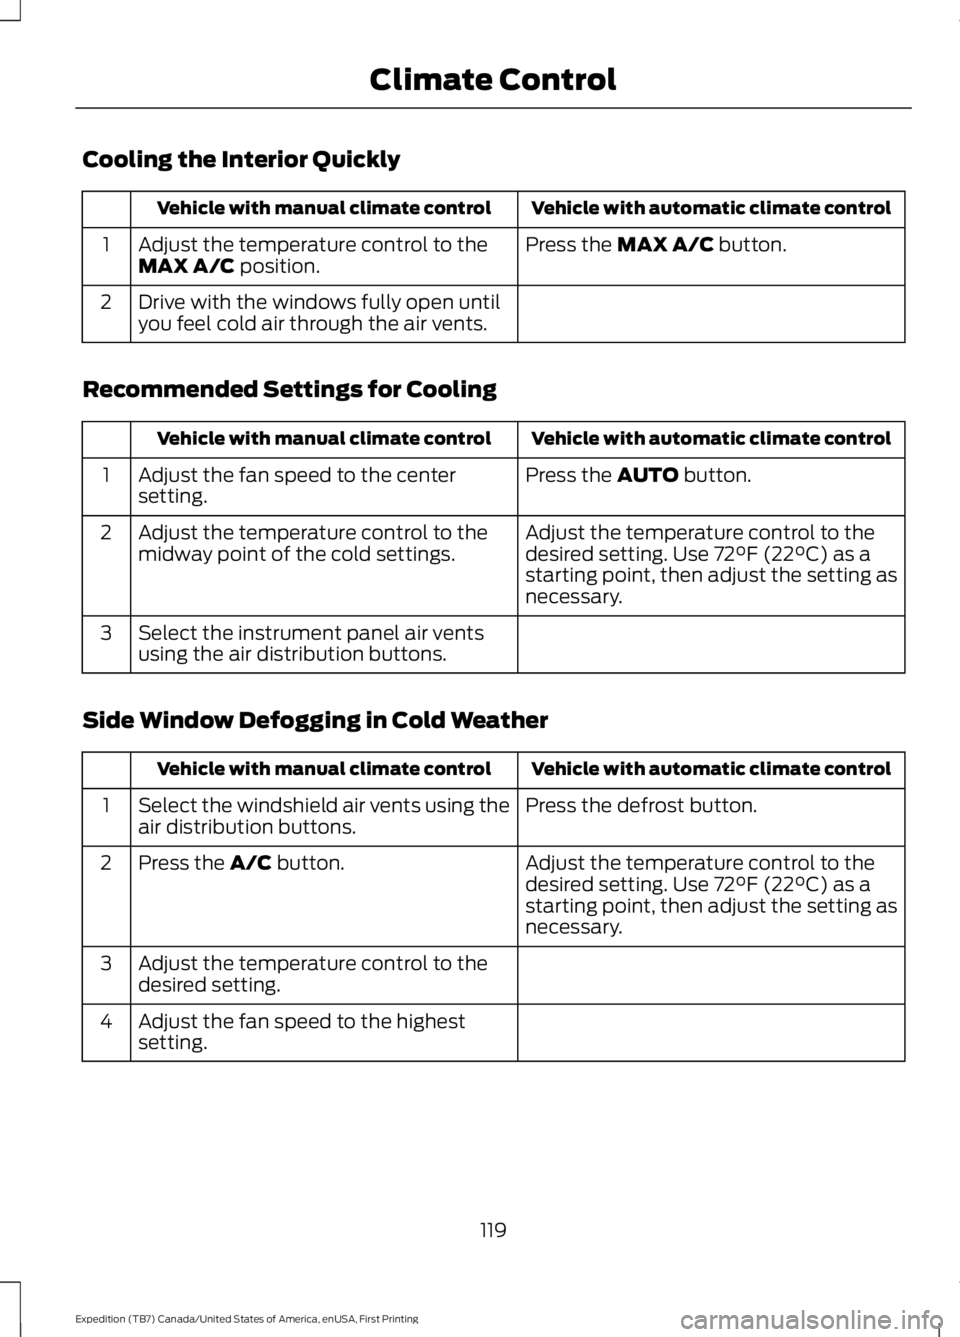
Cooling the Interior Quickly
Vehicle with automatic climate controlVehicle with manual climate control
Press the MAX A/C button.Adjust the temperature control to theMAX A/C position.1
Drive with the windows fully open untilyou feel cold air through the air vents.2
Recommended Settings for Cooling
Vehicle with automatic climate controlVehicle with manual climate control
Press the AUTO button.Adjust the fan speed to the centersetting.1
Adjust the temperature control to thedesired setting. Use 72°F (22°C) as astarting point, then adjust the setting asnecessary.
Adjust the temperature control to themidway point of the cold settings.2
Select the instrument panel air ventsusing the air distribution buttons.3
Side Window Defogging in Cold Weather
Vehicle with automatic climate controlVehicle with manual climate control
Press the defrost button.Select the windshield air vents using theair distribution buttons.1
Adjust the temperature control to thedesired setting. Use 72°F (22°C) as astarting point, then adjust the setting asnecessary.
Press the A/C button.2
Adjust the temperature control to thedesired setting.3
Adjust the fan speed to the highestsetting.4
119
Expedition (TB7) Canada/United States of America, enUSA, First Printing
Climate Control
Page 123 of 421
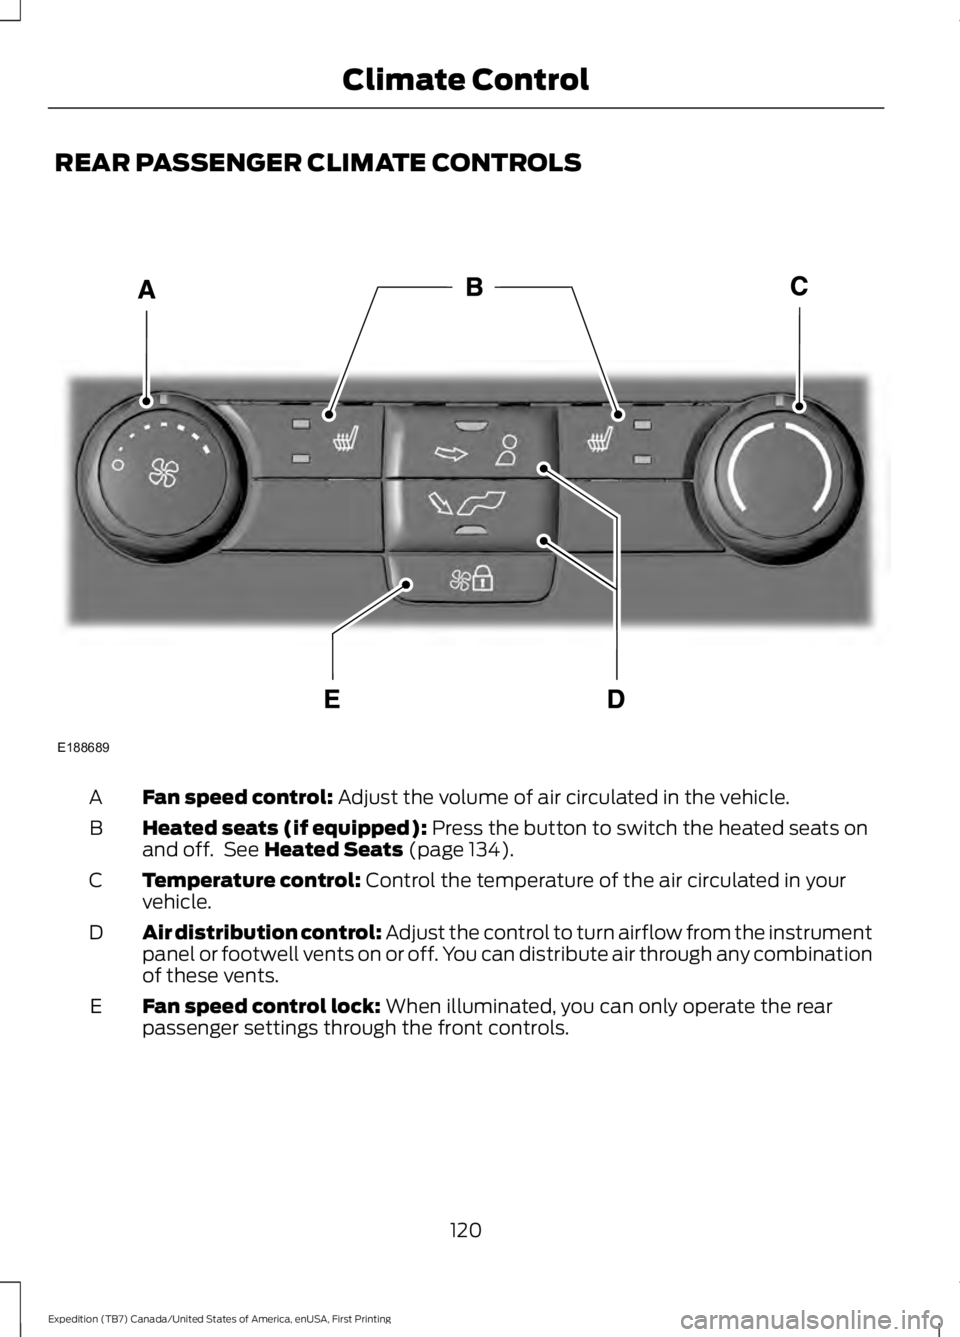
REAR PASSENGER CLIMATE CONTROLS
Fan speed control: Adjust the volume of air circulated in the vehicle.A
Heated seats (if equipped): Press the button to switch the heated seats onand off. See Heated Seats (page 134).B
Temperature control: Control the temperature of the air circulated in yourvehicle.C
Air distribution control: Adjust the control to turn airflow from the instrumentpanel or footwell vents on or off. You can distribute air through any combinationof these vents.
D
Fan speed control lock: When illuminated, you can only operate the rearpassenger settings through the front controls.E
120
Expedition (TB7) Canada/United States of America, enUSA, First Printing
Climate ControlE188689
Page 124 of 421
HEATED WINDOWS AND
MIRRORS
Heated Rear Window
Note:Make sure the engine is runningbefore operating the heated windows.
Press the button to clear theheated rear window of thin iceand fog. The heated rear windowwill automatically turn off after a shortperiod of time. Start the engine before youswitch the heated rear window on.
Note:Do not use razor blades or othersharp objects to clean or remove decalsfrom the inside of the heated rear window.The vehicle warranty does not coverdamage caused to the heated rear windowgrid lines.
Heated Exterior Mirror (If Equipped)
When you switch the heated rear windowon, the heated exterior mirrors willautomatically turn on.
Note:Do not remove ice from the mirrorswith a scraper or adjust the mirror glasswhen it is frozen in place.
Note:Do not clean the mirror housing orglass with harsh abrasives, fuel or otherpetroleum-based cleaning products.
REMOTE START (If Equipped)
The remote start feature allows you topre-condition the interior of your vehicle.The climate control system works toachieve comfort according to your previoussettings.
Note:You cannot adjust the system duringremote start operation.
Turn the ignition on to return the systemto its previous settings. You can now makeadjustments normally, but you need to turncertain vehicle-dependent features backon, such as:
•Heated seats.
•Cooled seats.
•Heated steering wheel.
•Heated mirrors.
•Heated rear window.
You can adjust the default remote startsettings using the information displaycontrols. See Information Displays(page 92).
Automatic Settings
In hot weather, the system is set to 72°F(22°C). The cooled seats are set to high(if available, and selected to AUTO in theinformation display).
In moderate weather, the system eitherheats or cools (based on previoussettings). The rear defroster, heatedmirrors and heated seats do notautomatically turn on.
In cold weather, the system is set to 72°F(22°C). The heated seats are set to high(if available, and selected to AUTO in theinformation display). The rear defrosterand heated mirrors automatically turn on.
121
Expedition (TB7) Canada/United States of America, enUSA, First Printing
Climate ControlE184884
Page 138 of 421
Press the heated seat symbol to cyclethrough the various heat settings and off.More indicator lights indicate warmersettings.
The heated seat module resets at everyignition run cycle. While the ignition is on,press the high or low heated seat switchto enable heating mode. When activated,they will turn off automatically when youturn the engine off.
CLIMATE CONTROLLED SEATS
(If Equipped)
Heated Seats
WARNING
Persons who are unable to feel painto the skin because of advanced age,chronic illness, diabetes, spinal cordinjury, medication, alcohol use, exhaustion,or other physical conditions, must exercisecare when using the seat heater. The seatheater may cause burns even at lowtemperatures, especially if used for longperiods of time. Do not place anything onthe seat that insulates against heat, suchas a blanket or cushion, because this maycause the seat heater to overheat. Do notpuncture the seat with pins, needles, orother pointed objects because this maydamage the heating element which maycause the seat heater to overheat. Anoverheated seat may cause seriouspersonal injury.
Note:Do not do the following:
•Place heavy objects on the seat.
•Operate the seat heater if water or anyother liquid spill on the seat. Allow theseat to dry thoroughly.
The heated seats will only function whenthe engine is running.
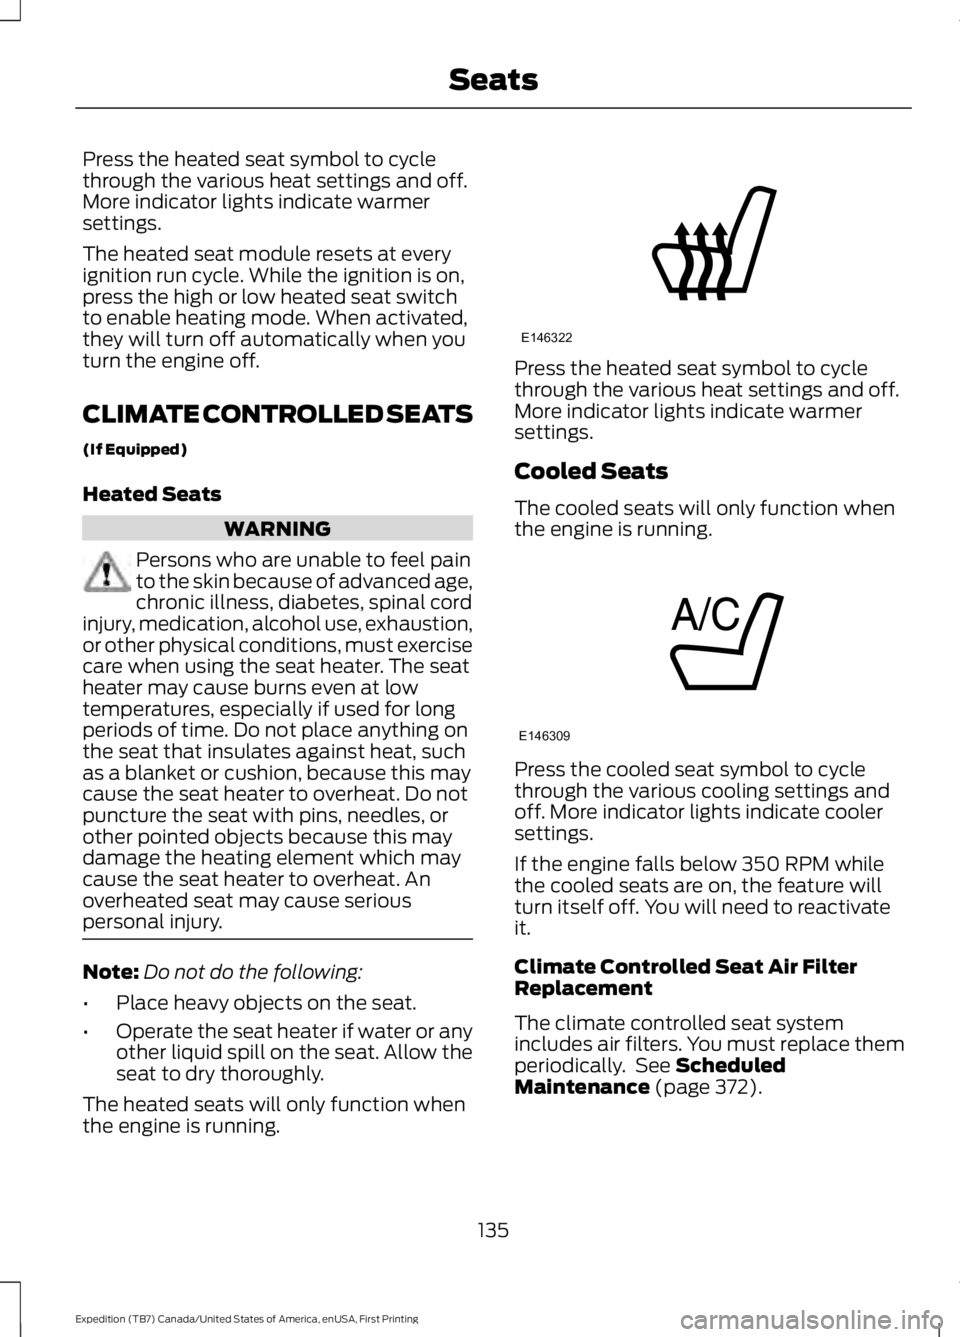
Press the heated seat symbol to cyclethrough the various heat settings and off.More indicator lights indicate warmersettings.
Cooled Seats
The cooled seats will only function whenthe engine is running.
Press the cooled seat symbol to cyclethrough the various cooling settings andoff. More indicator lights indicate coolersettings.
If the engine falls below 350 RPM whilethe cooled seats are on, the feature willturn itself off. You will need to reactivateit.
Climate Controlled Seat Air FilterReplacement
The climate controlled seat systemincludes air filters. You must replace themperiodically. See ScheduledMaintenance (page 372).
135
Expedition (TB7) Canada/United States of America, enUSA, First Printing
SeatsE146322 E146309
Page 147 of 421
CENTER CONSOLE
Stow items in the cup holder carefully asitems may become loose during hardbraking, acceleration or crashes, includinghot drinks which may spill.
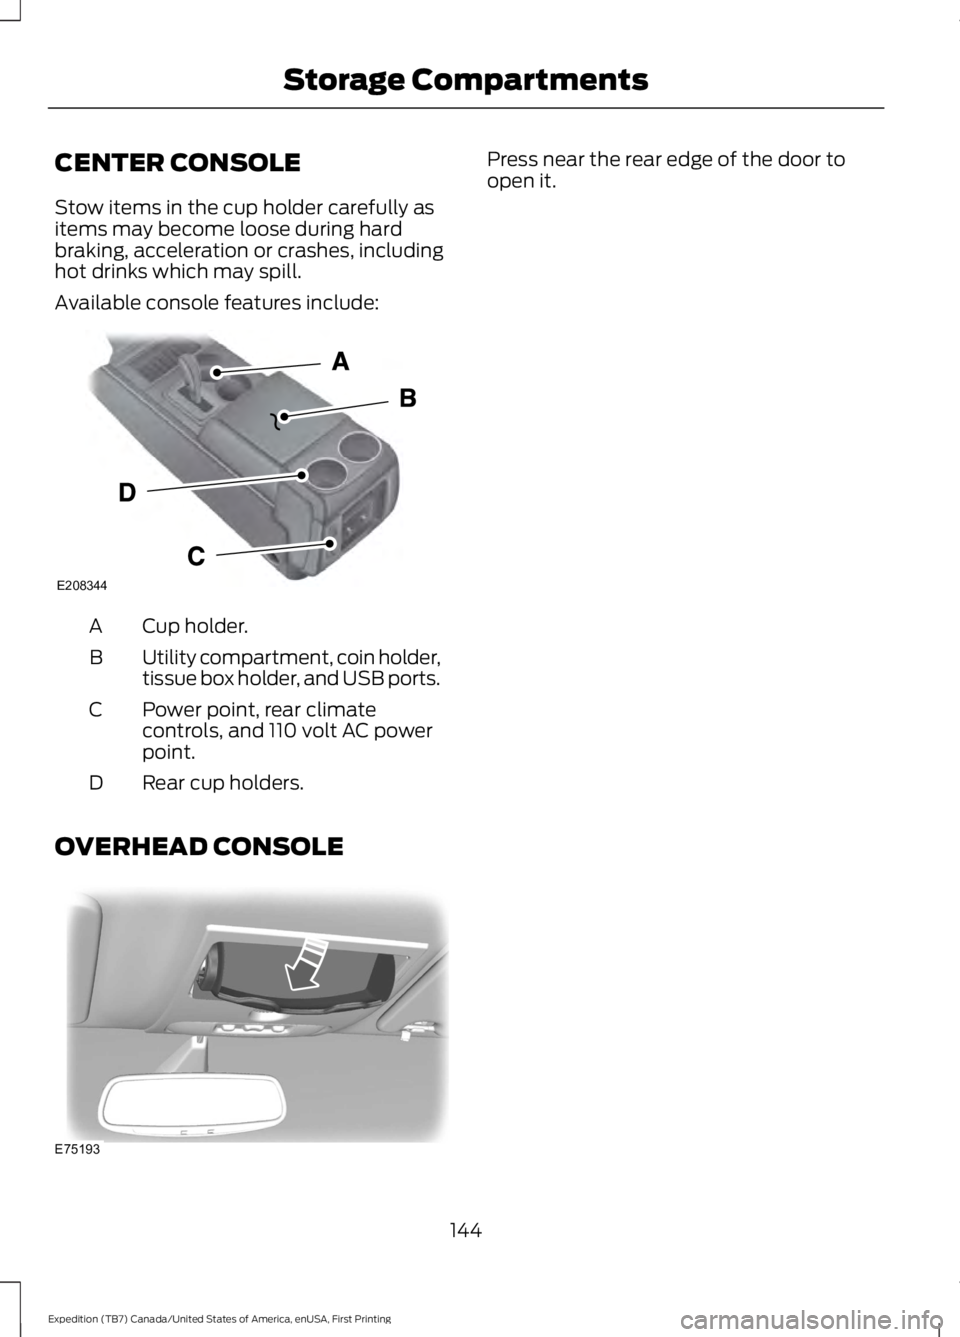
Available console features include:
Cup holder.A
Utility compartment, coin holder,tissue box holder, and USB ports.B
Power point, rear climatecontrols, and 110 volt AC powerpoint.
C
Rear cup holders.D
OVERHEAD CONSOLE
Press near the rear edge of the door toopen it.
144
Expedition (TB7) Canada/United States of America, enUSA, First Printing
Storage CompartmentsE208344 E75193
Page 152 of 421
3.Press and hold the push button ignitionswitch, or press it three times withintwo seconds.
4. Apply the parking brake.
Guarding Against Exhaust Fumes
WARNING
If you smell exhaust fumes insideyour vehicle, have your vehiclechecked by your authorized dealerimmediately. Do not drive your vehicle ifyou smell exhaust fumes. Carbonmonoxide is present in exhaust fumes.Take precautions to avoid its dangerouseffects.
Important Ventilating Information
If you stop your vehicle and then leave theengine idling for long periods, werecommend that you do one of thefollowing:
•Open the windows at least 1 in (3 cm).
•Set your climate control to outside air.
ENGINE BLOCK HEATER (If
Equipped)
WARNINGS
Failure to follow engine block heaterinstructions could result in propertydamage or serious personal injury.
Do not use your heater withungrounded electrical systems ortwo-pronged adapters. There is a riskof electrical shock.
Do not fully close the hood, or allowit to drop under its own weight whenusing the engine block heater. Thiscould damage the power cable and maycause an electrical short resulting in fire,injury and property damage.
Note:The heater is most effective whenoutdoor temperatures are below 0°F(-18°C).
The heater acts as a starting aid bywarming the engine coolant. This allowsthe climate control system to respondquickly. The equipment includes a heaterelement (installed in the engine block) anda wire harness. You can connect thesystem to a grounded 120-volt ACelectrical source.
We recommend that you do the followingfor a safe and correct operation:
•Use a 16-gauge outdoor extension cordthat is product certified byUnderwriter’s Laboratory (UL) orCanadian Standards Association(CSA). This extension cord must besuitable for use outdoors, in coldtemperatures, and be clearly markedSuitable for Use with OutdoorAppliances. Do not use an indoorextension cord outdoors. This couldresult in an electric shock or become afire hazard.
•Use as short an extension cord aspossible.
•Do not use multiple extension cords.
•Make sure that when in operation, theextension cord plug and heater cordplug connections are free and clear ofwater. This could cause an electricshock or fire.
•Make sure your vehicle is parked in aclean area, clear of combustibles.
•Make sure the heater, heater cord andextension cord are firmly connected.
•Check for heat anywhere in theelectrical hookup once the system hasbeen operating for approximately 30minutes.
149
Expedition (TB7) Canada/United States of America, enUSA, First Printing
Starting and Stopping the Engine
Page 220 of 421
It is acceptable to have your two-wheeldrive vehicle towed with the front wheelson the ground (without dollies) and therear wheels off the ground.
We recommend towing a four-wheel drivevehicle with all wheels off the ground, suchas using a wheel lift and dollies or flatbedequipment.
TOWING THE VEHICLE ON
FOUR WHEELS
WARNING
If your vehicle has a steering wheellock make sure the ignition is in theaccessory or on position when beingtowed.
Emergency Towing
If your vehicle becomes inoperable(without access to wheel dollies,car-hauling trailer, or flatbed transportvehicle), it can be flat-towed (all wheelson the ground, regardless of the powertrainand transmission configuration) under thefollowing conditions:
•Your vehicle is facing forward fortowing in a forward direction.
•Place the transmission in position N. Ifyou cannot move the transmission intoN, you may need to override it. SeeTransmission (page 159).
•Maximum speed is 35 mph (56 km/h).
•Maximum distance is 50 mi (80 km).
Recreational Towing
Note:Put your climate control system inrecirculated air mode to prevent exhaustfumes from entering your vehicle. SeeClimate Control (page 113).
Follow these guidelines if you have a needfor recreational towing, for example towingyour vehicle behind a motorhome. Theseguidelines prevent damage to yourtransmission.
Two Wheel Drive Vehicles
You cannot tow a two wheel drive vehiclewith any wheels on the ground as vehicleor transmission damage may occur. Youmust tow your vehicle with all four wheelsoff the ground, for example when using acar-hauling trailer.
Four Wheel Drive Vehicles
You can only tow a four wheel drive vehiclewith all wheels on the ground by placingthe transfer case in its neutral position andengaging the four-wheel-down towingfeature. Perform the steps outlined in thefollowing section after positioning yourvehicle behind the tow vehicle and properlysecuring them together.
Four-wheel-down Towing
Note:Make sure you properly secure yourvehicle to the tow vehicle.
Entering Four-wheel-down Towing
1. Put the ignition in the on position, butdo not start the engine. If your vehiclehas an ignition key, turn the key to on.If your vehicle has intelligent access,press the engine START/STOP buttontwice without pressing the brake pedal.
2. Press and hold the brake pedal.
3. Rotate the four-wheel drive switch to2H.
4. Shift the transmission to position N.
5. Rotate the four-wheel drive switchfrom 2H to 4L and back to 2H fivetimes within seven seconds.
217
Expedition (TB7) Canada/United States of America, enUSA, First Printing
Towing