Page 100 of 204
IN AN EMERGENCY
A punctured tyre or a burnt-out bulb?
At times, a problem may interfere with
our journey.
The pages on emergencies can help
you to deal with critical situations
independently and with calm.
In an emergency we recommend that
you call the freephone number found in
the Warranty Booklet.
It is also possible to call the national or
international universal freephone
number to search for the nearest Fiat
Dealership.HAZARD WARNING LIGHTS......99
BULB REPLACEMENT.........99
REPLACING FUSES..........106
CHANGING A WHEEL.........111
FIX&GO AUTOMATIC KIT.......115
EMERGENCY STARTING.......117
FUEL CUT-OFF SYSTEM.......119
AUTOMATIC TRANSMISSION. . . .119
TOWING THE VEHICLE........121
98
IN AN EMERGENCY
Page 101 of 204

HAZARD WARNING
LIGHTS
CONTROL
Press the fig. 88 button to switch the
lights on/off.
When the hazard warning lights are on,
the
andwarning lights flash.
IMPORTANT The use of hazard warning
lights is governed by the highway code
of the country you are driving in:
comply with legal requirements.
Emergency braking
In the event of emergency braking the
hazard warning lights switch on
automatically as well as warning lights
andin the instrument panel.
The lights switch off automatically when
emergency braking ceases.
BULB
REPLACEMENT
120) 121) 122)
32)
GENERAL
INSTRUCTIONS
Before replacing a bulb check the
contacts for oxidation;
replace blown bulbs with others of
the same type and power;
after replacing a headlight bulb,
always check its alignment;
when a light is not working, check
that the corresponding fuse is intact
before changing the bulb. For the
location of fuses, refer to the paragraph
"If a fuse blows" in this chapter.
IMPORTANT When the weather is cold
or damp or after heavy rain or washing,
the surface of headlights or rear lights
may steam up and/or form drops of
condensation on the inside. This is a
natural phenomenon due to the
difference in temperature and humidity
between the inside and the outside of
the glass which does not indicate a
fault and does not compromise the
normal operation of lighting devices.
The mist disappears quickly when the
lights are turned on, starting from the
centre of the diffuser, extending
progressively towards the edges.
8808016J0001EM
99
Page 108 of 204
IMPORTANT
32)Halogen bulbs must be handled
holding the metallic part only. Touching the
transparent part of the bulb with your
fingers may reduce the intensity of the
emitted light and even reduce the lifespan
of the bulb. In the event of accidental
contact, wipe the bulb with a cloth
moistened with alcohol and let the bulb dry.
REPLACING FUSES
GENERAL
123) 124) 125) 126)
33)
Fuses protect the electrical system:
they intervene (blow) in the event of a
failure or improper action on the
system.
Fuse extracting pliers
To replace a fuse, use the pliers hooked
inside the engine compartment fuse
box cover (see fig. 106 ).
The pliers have two different ends,
specifically designed to remove the
different types of fuses present in the
vehicle.
After use, refit the pliers in position.
FUSE LOCATION
The fuses are grouped in three control
units: on the dashboard, in the engine
compartment and inside the boot.
10608036J0002EM
106
IN AN EMERGENCY
Page 109 of 204

ENGINE COMPARTMENT
FUSE BOX
34)
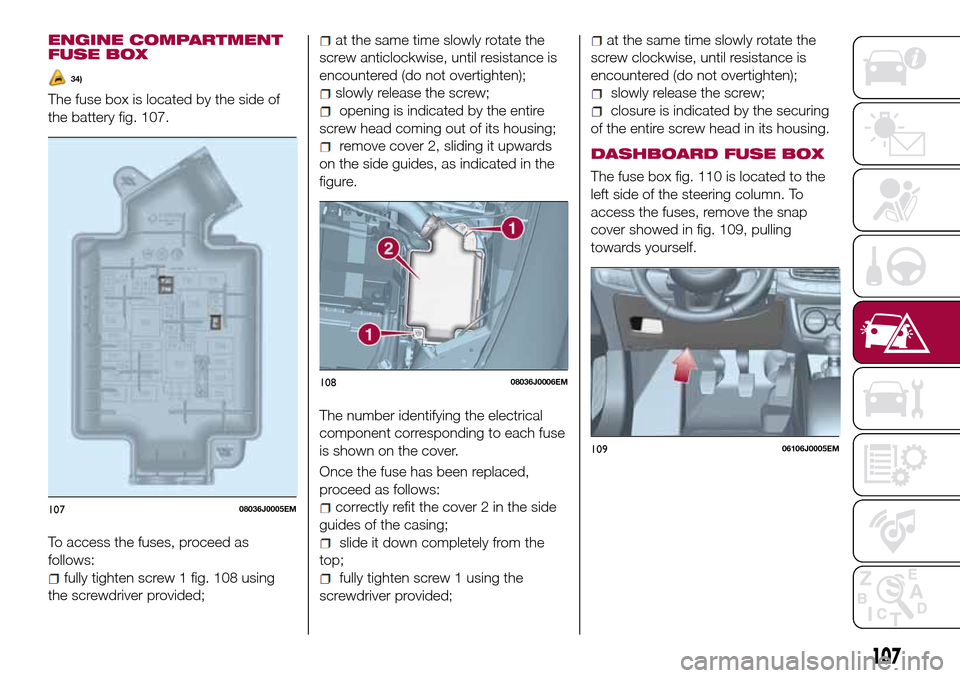
The fuse box is located by the side of
the battery fig. 107.
To access the fuses, proceed as
follows:
fully tighten screw 1 fig. 108 using
the screwdriver provided;
at the same time slowly rotate the
screw anticlockwise, until resistance is
encountered (do not overtighten);
slowly release the screw;
opening is indicated by the entire
screw head coming out of its housing;
remove cover 2, sliding it upwards
on the side guides, as indicated in the
figure.
The number identifying the electrical
component corresponding to each fuse
is shown on the cover.
Once the fuse has been replaced,
proceed as follows:
correctly refit the cover 2 in the side
guides of the casing;
slide it down completely from the
top;
fully tighten screw 1 using the
screwdriver provided;
at the same time slowly rotate the
screw clockwise, until resistance is
encountered (do not overtighten);
slowly release the screw;
closure is indicated by the securing
of the entire screw head in its housing.
DASHBOARD FUSE BOX
The fuse box fig. 110 is located to the
left side of the steering column. To
access the fuses, remove the snap
cover showed in fig. 109, pulling
towards yourself.
10708036J0005EM
10808036J0006EM
10906106J0005EM
107
Page 110 of 204
LUGGAGE
COMPARTMENT FUSE
BOX
Open the rear flap and then move the
section of the inner cover fig. 111 and
access the fuses in fuse box 2 fig. 112.
11008036J0009EM
11108036J0010EM
11208036J0011EM
108
IN AN EMERGENCY
Page 199 of 204

INDEX
ABS (system)...............57
Active safety systems...........57
Airbag
Front airbags..............77
Side bags................80
Airbag (SRS supplementary
restraint system)............77
Automatic climate control system.......................28
Automatic light control..........19
Automatic transmission......86,119
AUX source................185
Battery..................137
Battery recharging............139
Bluetooth® source...........184
Bodywork (cleaning and
maintenance).............144
Bonnet....................31
Boot.....................33
Brake lights (bulb replacement). . . .104
Carrying children safely.........67
Changing a wheel............111
Checking levels..............132
Child protection systems........67
Child safety device............12
Climate control...............25
CO2 emissions..............165
Control buttons............38,40Control panel and on-board
instruments...............36
CONTROLS
Controls on the front panel. . . .179
Daytime running lights (DRL)......19
Daytime running lights (DRL) (bulb
replacement)..............102
Dimensions................154
Dipped headlights.............19
Dipped headlights (bulb
replacement)..............102
Direction indicators............21
Display....................38
Doors.....................11
Driving assistance systems.......60
DTC (system)................57
Electric power steering.........32
Electric windows..............30
Electronic Cruise Control........90
Emergency starting...........117
Engine...................150
marking................149
Engine compartment..........132
Engine compartment (washing). . . .145
Engine oil (consumption)........137
Engine oil (level check).........137
ERM (system)................58
ESC (system)................57
External lights...............19
Fiat Code (system)............11
Fix&Go Automatic kit..........115
Fluids and lubricants..........159
Fog lights (bulb replacement).....103
Front ceiling light..............22
Front fog lights...............20
Front seat electric heating........14
Front seats (manual adjustments) . . .13
Fuel consumption............163
Fuel cut-off system...........119
Fuse boxes................106
Fuses (replacement)...........106
GSI (Gear Shift Indicator)........38
Hazard warning lights..........99
Emergency braking..........99
Headlight alignment adjustment....21
Headlight alignment corrector.....21
Headlights (cleaning)..........145
Headrests..................16
Heavy-duty use of the vehicle
(scheduled servicing)........131
HHC (system)................58
Identification data
chassis marking...........149
engine marking............149
identification data plate.......149
Ignition device...............10
Important information and
recommendations..........190