2016 FIAT TIPO 4DOORS child lock
[x] Cancel search: child lockPage 11 of 204

THE KEYS
KEY WITHOUT REMOTE
CONTROL
The metal insert of the key operates:
the ignition device and the driver's side
door lock.
KEY WITH REMOTE
CONTROL
1)
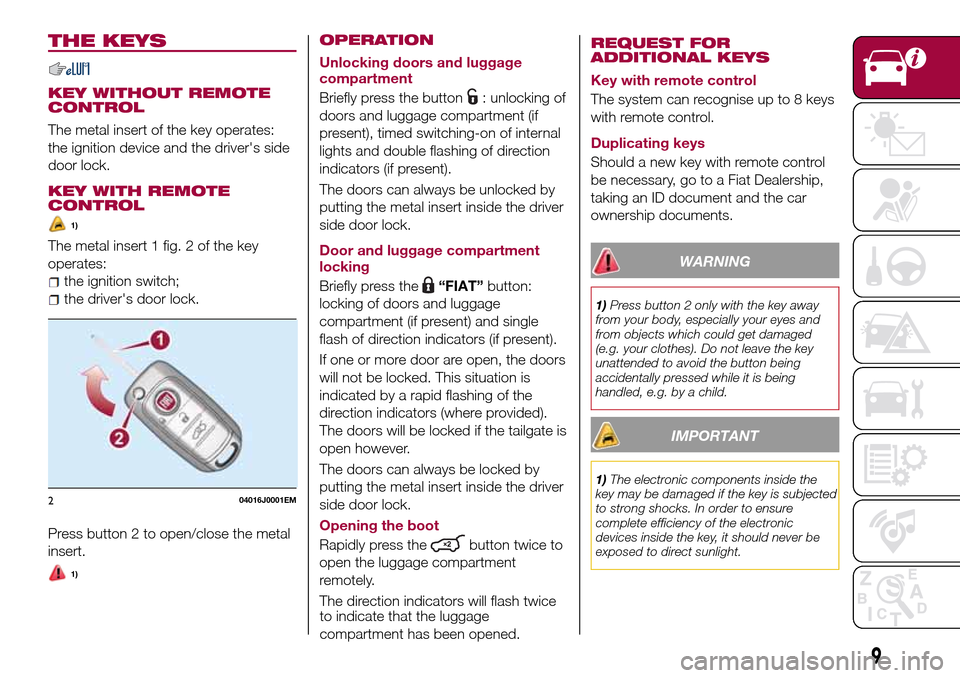
The metal insert 1 fig. 2 of the key
operates:
the ignition switch;
the driver's door lock.
Press button 2 to open/close the metal
insert.
1)
OPERATION
Unlocking doors and luggage
compartment
Briefly press the button
: unlocking of
doors and luggage compartment (if
present), timed switching-on of internal
lights and double flashing of direction
indicators (if present).
The doors can always be unlocked by
putting the metal insert inside the driver
side door lock.
Door and luggage compartment
locking
Briefly press the
“FIAT”button:
locking of doors and luggage
compartment (if present) and single
flash of direction indicators (if present).
If one or more door are open, the doors
will not be locked. This situation is
indicated by a rapid flashing of the
direction indicators (where provided).
The doors will be locked if the tailgate is
open however.
The doors can always be locked by
putting the metal insert inside the driver
side door lock.
Opening the boot
Rapidly press the
button twice to
open the luggage compartment
remotely.
The direction indicators will flash twice
to indicate that the luggage
compartment has been opened.
REQUEST FOR
ADDITIONAL KEYS
Key with remote control
The system can recognise up to 8 keys
with remote control.
Duplicating keys
Should a new key with remote control
be necessary, go to a Fiat Dealership,
taking an ID document and the car
ownership documents.
WARNING
1)Press button 2 only with the key away
from your body, especially your eyes and
from objects which could get damaged
(e.g. your clothes). Do not leave the key
unattended to avoid the button being
accidentally pressed while it is being
handled, e.g. by a child.
IMPORTANT
1)The electronic components inside the
key may be damaged if the key is subjected
to strong shocks. In order to ensure
complete efficiency of the electronic
devices inside the key, it should never be
exposed to direct sunlight.
204016J0001EM
9
Page 12 of 204

IGNITION DEVICE
OPERATION
The key can be turned to three different
positions fig. 3:
STOP: engine off, key can be
removed, steering column locked (with
key removed). Some electrical devices
(e.g. central door locking system, etc.)
are still available;
MAR: driving position. All electrical
devices are available;
AVV: engine starting.
The ignition device is fitted with a safety
system that requires the ignition key to
be turned back to STOP if the engine
does not start, before the starting
operation can be repeated.
On versions with automatic
transmission (if present) the ignition keycan only be removed when the gear
lever is at P (Park).
2) 3)
STEERING LOCK
Activation
When the key is in the STOP position,
remove the key and turn the steering
wheel until it locks.
IMPORTANT If the ignition key has been
moved from the MAR to the STOP
position, the steering lock cannot
engage until the key is removed from
the ignition device.
Deactivation
Move the steering wheel slightly and
turn the key to MAR.
4) 5) 6) 7)
WARNING
2)If the ignition device has been tampered
with (e.g. an attempted theft), have it
checked by a Fiat Dealership before driving
again.
3)Always take the key with you when you
leave your vehicle to prevent someone
from accidentally operating the controls.
Remember to engage the parking brake.
Never leave children unattended in the
vehicle.4)It is absolutely forbidden to carry out any
after-market operation involving steering
system or steering column modifications
(e.g. installation of anti-theft device) that
could adversely affect performance,
invalidate the warranty, cause serious
safety problems and also result in the car
not meeting type-approval requirements.
5)Never extract the mechanical key while
the vehicle is moving. The steering wheel
will automatically lock as soon as it is
turned. This holds true for cars being
towed as well.
6)Before exiting the vehicle, ALWAYS
engage the parking brake, steer the
wheels, engage the first gear if uphill and
the reverse if downhill. On versions with
automatic transmission (where present),
bring the gear lever to P (Park) and turn the
ignition device to bring it to STOP. If the
vehicle is parked on a steep slope, chock
the wheels with wedges or stones. When
leaving the vehicle, always lock all the
doors by pressing the button on the key.
7)On versions with automatic transmission
(where present), it is advisable to put the
transmission in P, release the brake pedal
safely and then stop the engine to release
the key smoothly.304026J0001EM
10
KNOWING YOUR CAR
Page 14 of 204

and the rear door. The LED will switch
off subsequently to the opening of any
door.
LOCKING/UNLOCKING
DOORS FROM THE
OUTSIDE
Locking from the outside
With the doors closed, press the
"
FIAT" button on the key or fit and then
turn its metal insert in the driver's door
lock.
The door lock can anyway be activated
with all doors locked and the rear flap
open (for versions/markets, where
provided). Once the
"FIAT" button
on the key is pressed, all locks are
closed, including the one for the open
rear flap. When the open rear flap is
closed, it will be locked and can no
longer be opened from outside.
8)
2) 3)
Door unlocking from the outside
Press the
button on the key or turn
its metal insert in the driver's door lock.
Door opening/closing mechanism
initialisation
If the battery is disconnected or the
protection fuse blows, the door
opening/closing mechanism must be
initialised as follows:
close all the doors;
press thebutton on the remote
control;
press thebutton on the remote
control.
CHILD SAFETY DEVICE
9) 10)
This system prevents the rear doors
from being opened from the inside.
This device 2 fig. 5 can be engaged
only with the doors open:
position A: device engaged (door
locked);
position B: device not engaged
(door may be opened from the inside).
The device remains engaged even if the
doors are electrically unlocked.
IMPORTANT The rear doors cannot be
opened from the inside when the child
safety device is engaged.
Passenger side front door and rear
door emergency locking device
Used to lock the doors when there is no
electrical power supply. Insert the metal
insert of the ignition key in position 1
indicated in fig. 5 (passenger side front
door) or 1 fig. 6 (rear doors) and then
turn the key clockwise and then remove
it from position 1.
To restore the starting condition of the
door locks (only if battery charge
restored) press the
button on the
remote control or the
button on the
dashboard or introduce the metal insert
of the ignition key in the driver's side
front door pawl and pull the door inner
handle.
504056J0008EM
604056J0007EM
12
KNOWING YOUR CAR
Page 15 of 204

WARNING
8)If the child lock was engaged and the
previously described locking procedure
carried out, operating the internal opening
handle will not open the door: in this case,
to open the door, the outside handle must
be used. The door central locking/
unlocking button is not disabled by the
engagement of the emergency lock.
9)NEVER leave children unattended inside
the car, let alone leave the car with the
doors unlocked in a place that children can
access easily. Children may seriously, or
even fatally, injure themselves. Also ensure
that children do not inadvertently operate
the parking brake, the brake pedal or the
automatic transmission lever (where
present).
10)Always use this device when carrying
children. After engaging the child lock on
both rear doors, check for effective
engagement by trying to open a door with
the internal handle.
IMPORTANT
2)Make sure to take the key with you once
a door or the tailgate is locked, to prevent
locking the same key inside the vehicle. If
the key has been locked in, it can only be
recovered using the second provided key.3)If the child lock was engaged and the
previously described locking procedure
carried out, operating the internal opening
handle will not open the door: in this case,
to open the door, the outside handle must
be used. The central locking/unlocking
button is not disabled by the engagement
of the emergency lock.
SEATS
FRONT SEATS WITH
MANUAL ADJUSTMENT
11)
4)
Longitudinal adjustment
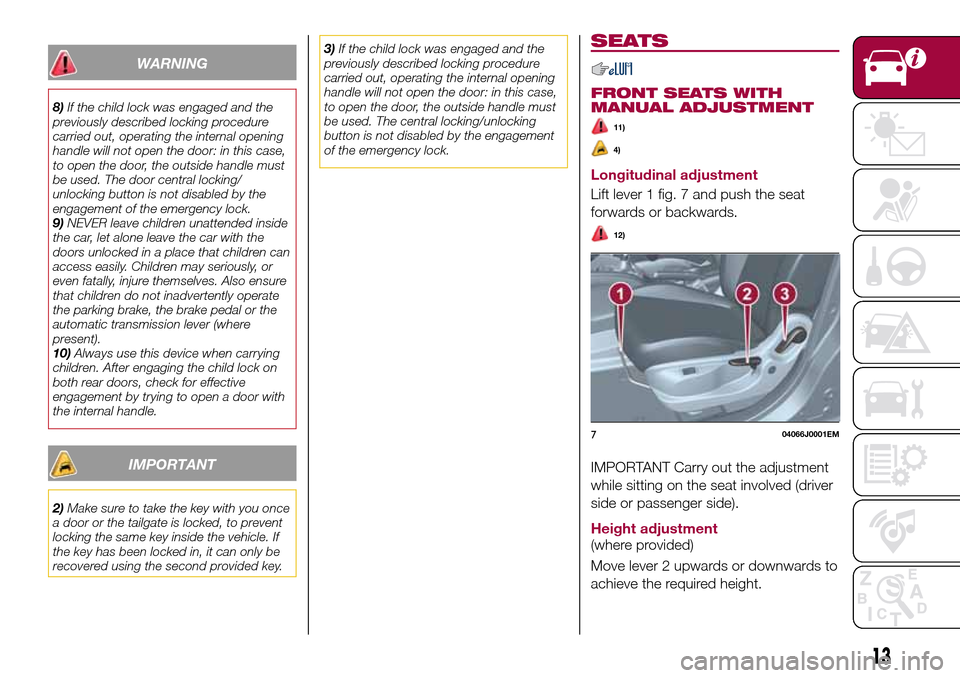
Lift lever 1 fig. 7 and push the seat
forwards or backwards.
12)
IMPORTANT Carry out the adjustment
while sitting on the seat involved (driver
side or passenger side).
Height adjustment
(where provided)
Move lever 2 upwards or downwards to
achieve the required height.
704066J0001EM
13
Page 64 of 204

OCCUPANT
PROTECTION
SYSTEMS
Some of the most important safety
equipment of the vehicle comprise the
following protection systems:
seat belts;
SBR (Seat Belt Reminder) system;
head restraints;
child restraint systems;
Front air bags, side air bags (if
present) and drop down air bags (if
present).
Read the information given the following
pages with the utmost care. It is of
fundamental importance that the
protection systems are used in the
correct way to guarantee the maximum
possible safety level for the driver and
the passengers.
For the description of the head restraint
adjustment see the "Head restraints"
paragraph in the "Knowing your vehicle"
chapter.
SEAT BELTS
All vehicle seats are equipped with seat
belts with three anchor points and a
retractor.
The retractor mechanism operates
locking the belt in the event of sharp
braking or strong deceleration due to
an impact. This allows the belt strap to
slide freely and to adapt to the body of
the occupant. In the event of an
accident, the belt will lock reducing the
risk of impact inside the passenger
compartment and of being projected
outside the vehicle.
The driver is responsible for respecting,
and ensuring that all the other
occupants of the vehicle also respect,
the local laws in force in relation to the
use of the seat belts.
Always fasten the seat belts before
setting off.
USING THE SEAT BELTS
The seat belt should be worn keeping
the chest straight and rested against
the backrest.
To fasten the seat belts, hold the
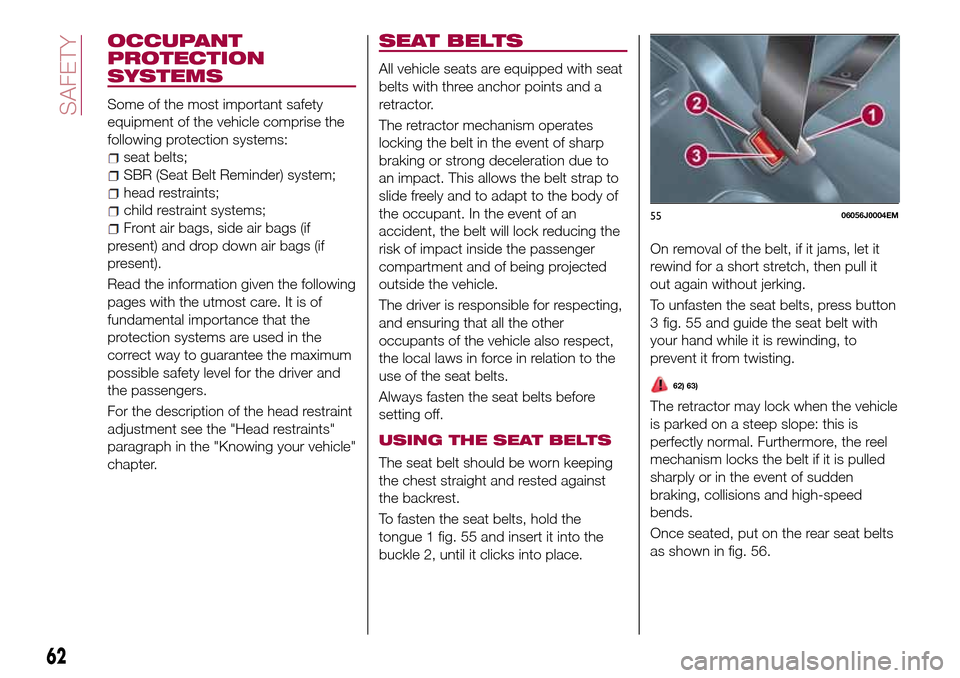
tongue 1 fig. 55 and insert it into the
buckle 2, until it clicks into place.On removal of the belt, if it jams, let it
rewind for a short stretch, then pull it
out again without jerking.
To unfasten the seat belts, press button
fig. 55 and guide the seat belt with
your hand while it is rewinding, to
prevent it from twisting.
62) 63)
The retractor may lock when the vehicle
is parked on a steep slope: this is
perfectly normal. Furthermore, the reel
mechanism locks the belt if it is pulled
sharply or in the event of sudden
braking, collisions and high-speed
bends.
Once seated, put on the rear seat belts
as shown in fig. 56.
5506056J0004EM
62
SAFETY
3
Page 143 of 204

Replacing the air cleaner
See the "Scheduled servicing plan" for
the correct servicing intervals.
It is advisable to replace it with a
genuine spare part, specifically
designed for this vehicle.
AIR CONDITIONING
SYSTEM MAINTENANCE
54) 55)
To ensure the best possible
performance, the air conditioning
system must be checked and undergo
maintenance at a Fiat Dealership at the
beginning of the summer.
WINDOWS
When cleaning the heated rear window
be careful, if the defrosting function is
active, regarding the temperature of the
glass; also make sure that children do
not come into contact with the heated
surface. The glass may be hot.
Never use an abrasive detergent to
clean the surface of the windows.
Do not use scrapers or sharp items that
might scratch the windows.
Spray the detergent on the cloth to be
used for cleaning the rear view mirror.
Do not spray the detergent directly on
the glass.Cleaning the window with hot water
could cause the removal of any labels.
WINDSCREEN WIPER
Replacing the windscreen wiper
blades
Proceed as follows:
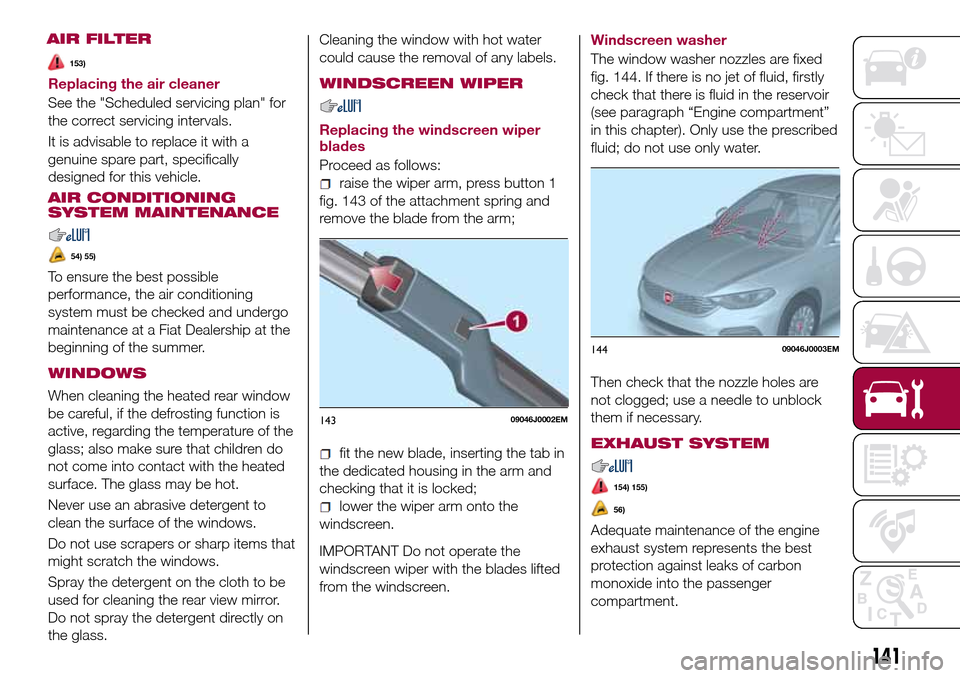
raise the wiper arm, press button 1
fig. 143 of the attachment spring and
remove the blade from the arm;
fit the new blade, inserting the tab in
the dedicated housing in the arm and
checking that it is locked;
lower the wiper arm onto the
windscreen.
IMPORTANT Do not operate the
windscreen wiper with the blades lifted
from the windscreen.
Windscreen washer
The window washer nozzles are fixed
fig. 144. If there is no jet of fluid, firstly
check that there is fluid in the reservoir
(see paragraph “Engine compartment”
in this chapter). Only use the prescribed
fluid; do not use only water.
Then check that the nozzle holes are
not clogged; use a needle to unblock
them if necessary.
EXHAUST SYSTEM
154) 155)
56)
Adequate maintenance of the engine
exhaust system represents the best
protection against leaks of carbon
monoxide into the passenger
compartment.
14309046J0002EM
14409046J0003EM
141
AIR FILTER
153)
Page 200 of 204

Interior lights................22
Interiors (cleaning)............146
ISOFIX child restraint system
(installation)...............71
iTPMS (indirect Tyre Pressure
Monitoring System)..........60
Jump starting..............117
Key removal (automatic
transmission).............120
Keys
key with remote control........9
Lever release (automatic
transmission).............119
Lifting the vehicle.............143
Light bulbs
types of bulbs............100
Luggage compartment
(extension)................14
Main beam headlights..........21
Main beam headlights (changing
a bulb)..................102
Main menu...............39,40
Manual climate control..........26
Manual gearbox..............86
Multifunction display...........36
Number plate lights (bulb
replacement)..............105
Occupant protection systems.....62
Paintwork (cleaning and
maintenance).............144Parking Brake...............85
Parking lights................20
Parking sensors..............91
Passenger compartment air
diffusers.................25
PBA (system)................58
Performance (top speed)........162
Periodic checks (scheduled
servicing)................131
Pre-tensioners...............65
Load limiters..............65
Prescriptions for handling the
vehicle at the end of its life.....166
Rain sensor................24
Rear current socket............34
Rear direction indicators (bulb
replacement)..............104
Rear seats..................14
Rear side lights (bulb
replacement)..............104
Rear view camera.............94
Rear View Camera............94
Rear view mirrors.............18
Reconfigurable Multifunction
Display..................37
Refuelling.................157
Refuelling procedure...........96
Emergency refuelling.........96
Refuelling the vehicle...........96
Replacing a bulb..............99Replacing an external bulb......102
Rims and tyres (dimensions)......152
SBR (Seat Belt Reminder).......64
SBR (Seat Belt Reminder) system.......................64
Scheduled servicing...........124
Scheduled Servicing Plan.......125
Screen wiper/washer...........23
Smart washing function.......23
Seat belts..................62
Seats.....................13
Servicing procedures..........140
Side bag...................80
Side direction indicators (bulb
replacement)..............103
Snow chains...............143
SRS (supplementary restraint
system)..................77
Starting the engine............84
Steering lock................10
Steering wheel...............17
Stop/Start system.............89
Symbols....................2
TC (system)................58
Technical data..............149
The keys...................9
Third brake light (bulb
replacement)..............105
Towing the vehicle............121
Towing trailers...............95
INDEX