2016 FIAT TIPO 4DOORS boot
[x] Cancel search: bootPage 9 of 204
KNOWING YOUR CAR
In-depth knowledge of your new vehicle
starts here.
The booklet that you are reading simply
and directly explains how it is made and
how it works.
That’s why we advise you to read it
seated comfortably on board, so that
you can see immediately what is
described here for yourself.INSTRUMENT PANEL...........8
THE KEYS..................9
IGNITION DEVICE............10
FIAT CODE.................11
DOORS...................11
SEATS....................13
HEADRESTS................16
STEERING WHEEL............17
REAR VIEW MIRRORS.........18
EXTERNAL LIGHTS...........19
INTERIOR LIGHTS............22
WINDSCREEN WASHER / WIPER . .23
CLIMATE CONTROL...........25
ELECTRIC WINDOWS..........30
BONNET..................31
DUALDRIVE ELECTRIC POWER
STEERING.................32
BOOT....................33
7
Page 11 of 204
THE KEYS
KEY WITHOUT REMOTE
CONTROL
The metal insert of the key operates:
the ignition device and the driver's side
door lock.
KEY WITH REMOTE
CONTROL
1)
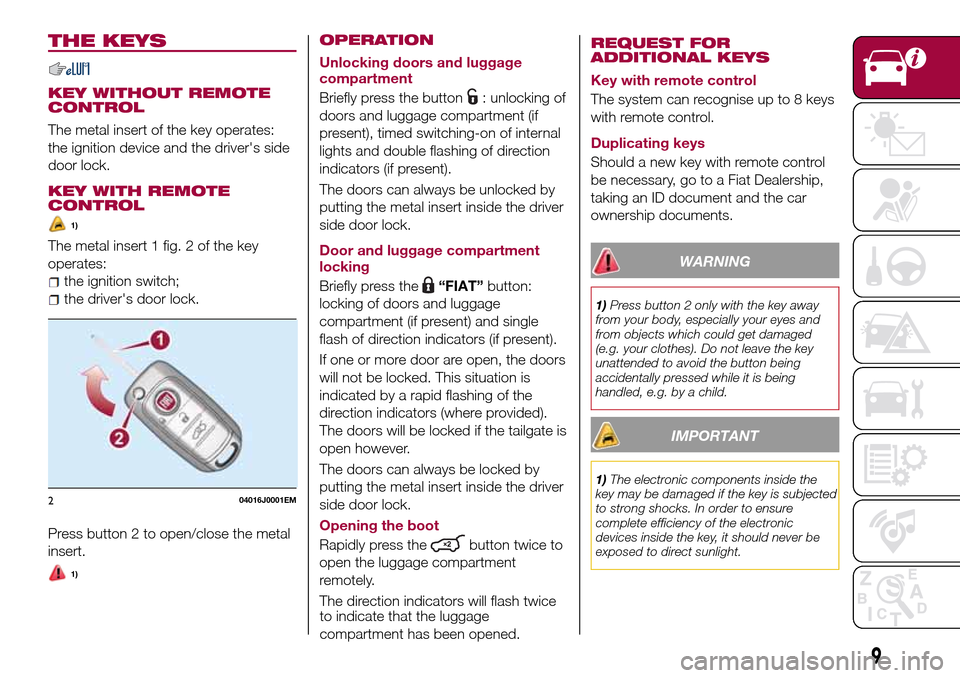
The metal insert 1 fig. 2 of the key
operates:
the ignition switch;
the driver's door lock.
Press button 2 to open/close the metal
insert.
1)
OPERATION
Unlocking doors and luggage
compartment
Briefly press the button
: unlocking of
doors and luggage compartment (if
present), timed switching-on of internal
lights and double flashing of direction
indicators (if present).
The doors can always be unlocked by
putting the metal insert inside the driver
side door lock.
Door and luggage compartment
locking
Briefly press the
“FIAT”button:
locking of doors and luggage
compartment (if present) and single
flash of direction indicators (if present).
If one or more door are open, the doors
will not be locked. This situation is
indicated by a rapid flashing of the
direction indicators (where provided).
The doors will be locked if the tailgate is
open however.
The doors can always be locked by
putting the metal insert inside the driver
side door lock.
Opening the boot
Rapidly press the
button twice to
open the luggage compartment
remotely.
The direction indicators will flash twice
to indicate that the luggage
compartment has been opened.
REQUEST FOR
ADDITIONAL KEYS
Key with remote control
The system can recognise up to 8 keys
with remote control.
Duplicating keys
Should a new key with remote control
be necessary, go to a Fiat Dealership,
taking an ID document and the car
ownership documents.
WARNING
1)Press button 2 only with the key away
from your body, especially your eyes and
from objects which could get damaged
(e.g. your clothes). Do not leave the key
unattended to avoid the button being
accidentally pressed while it is being
handled, e.g. by a child.
IMPORTANT
1)The electronic components inside the
key may be damaged if the key is subjected
to strong shocks. In order to ensure
complete efficiency of the electronic
devices inside the key, it should never be
exposed to direct sunlight.
204016J0001EM
9
Page 35 of 204

WARNING
28)It is absolutely forbidden to carry out
any after-market operation involving
steering system or steering column
modifications (e.g. installation of anti-theft
device) that could adversely affect
performance, invalidate the warranty, cause
serious safety problems and also result in
the car not meeting type-approval
requirements.
29)Before performing any maintenance
operations, always turn off the engine and
remove the key from the ignition to lock the
steering column (especially when the car
wheels are not touching the ground). If this
is not possible (for example if the key
needs to be turned to MAR or the engine
must be running), remove the main fuse
that protects the electric power steering.
BOOT
9)
IMPORTANT When travelling, do not
put any object on the rear parcel shelf
because they can injure passengers in
the event of an accident or sudden
braking.
OPENING
30)
Rear flap opening
When the central locking system is
unlocked, the rear boot flap can be
opened from outside the car using the
electric opening handle (where
provided) fig. 43 located under the
handle until the unlocking click is heard
or by pressing the
fig. 42 button on
the dashboard.The roof light inside the luggage
compartment will turn on when the rear
flap is opened; the roof light will
automatically switch off when the rear
flap is closed (see also "Interior lights").
If the rear flap is left open, the roof light
will automatically switch off to preserve
the battery charge.
Emergency opening from inside
Proceed as follows:
For versions with folding rear seat
backrests:
lower the head restraints and fold the
backrests;
4204206J0011EM
4304206J0001EM
33
Page 36 of 204

to mechanically release the rear flap,
using a screwdriver or the metal key
insert, operate the lever in the point
indicated in fig. 44 and release the lock.
For versions with fixed rear seat
backrests:
pull the cable located on the left side
below the rear seat cushion in fig. 45.
CLOSING
To close the rear flap, lower it onto the
lock until you hear it click.
IMPORTANT Before closing the rear
flap make sure that you have the keys,
since the rear flap is automatically
locked.
INITIALISATION
IMPORTANT If the battery is
disconnected or the protective fuse
blows, the rear flap opening/closing
mechanism must be reinitialised as
follows:
close all the doors and the rear flap;
press the"FIAT" button on the
remote control;
press thebutton on the remote
control.
REAR CURRENT SOCKET
This is located on the left-hand side of
the boot. This operation is possible only
with the key turned to MAR.
WARNING
30)Be careful not to hit objects on the
storage shelf when you open the rear boot
flap.
IMPORTANT
9)The dimensions of the platform permit a
maximum distributed weight capacity of
50 kg: do not load objects with a greater
weight.
4404206J0009EM
4504206J0010EM
34
KNOWING YOUR CAR
(for versions/markets, where provided)
Page 98 of 204
REFUELLING THE
VEHICLE
117) 118) 119)
PETROL ENGINES
Only use unleaded petrol with a number
of octanes (R.O.N.) not lower than 95
(EN228 specification).
DIESEL ENGINES
31)
Only use Diesel for motor vehicles
(EN590 specification).
When using or parking the vehicle for a
long time in the mountains or cold
areas, it is advisable to refuel using
locally available Diesel. In this case, it is
also advisable to keep the tank over
50% full.
REFUELLING
PROCEDURE
"Capless Fuel" is a device at the
opening for the fuel tank which opens
and recloses automatically when the
fuel supply gun is introduced/removed.
The "Capless Fuel" device is provided
with an inhibitor which prevents
refuelling with incorrect fuel.
Opening the flap
To refuel proceed as follows:
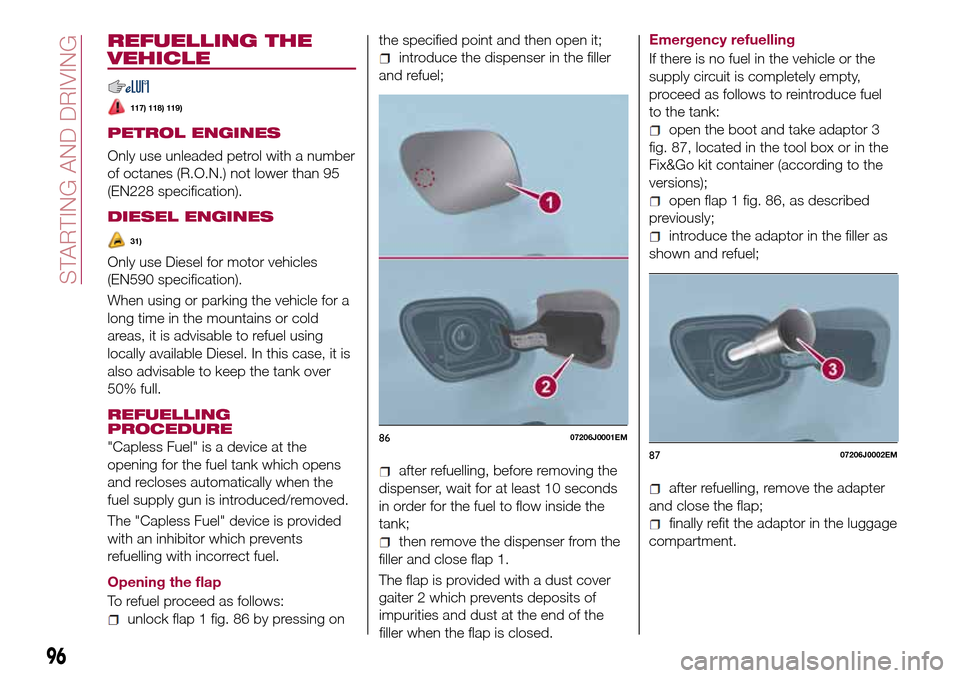
unlock flap 1 fig. 86 by pressing onthe specified point and then open it;
introduce the dispenser in the filler
and refuel;
after refuelling, before removing the
dispenser, wait for at least 10 seconds
in order for the fuel to flow inside the
tank;
then remove the dispenser from the
filler and close flap 1.
The flap is provided with a dust cover
gaiter 2 which prevents deposits of
impurities and dust at the end of the
filler when the flap is closed.Emergency refuelling
If there is no fuel in the vehicle or the
supply circuit is completely empty,
proceed as follows to reintroduce fuel
to the tank:
open the boot and take adaptor 3
fig. 87, located in the tool box or in the
Fix&Go kit container (according to the
versions);
open flap 1 fig. 86, as described
previously;
introduce the adaptor in the filler as
shown and refuel;
after refuelling, remove the adapter
and close the flap;
finally refit the adaptor in the luggage
compartment.
8607206J0001EM
8707206J0002EM
96
STARTING AND DRIVING
Page 108 of 204
IMPORTANT
32)Halogen bulbs must be handled
holding the metallic part only. Touching the
transparent part of the bulb with your
fingers may reduce the intensity of the
emitted light and even reduce the lifespan
of the bulb. In the event of accidental
contact, wipe the bulb with a cloth
moistened with alcohol and let the bulb dry.
REPLACING FUSES
GENERAL
123) 124) 125) 126)
33)
Fuses protect the electrical system:
they intervene (blow) in the event of a
failure or improper action on the
system.
Fuse extracting pliers
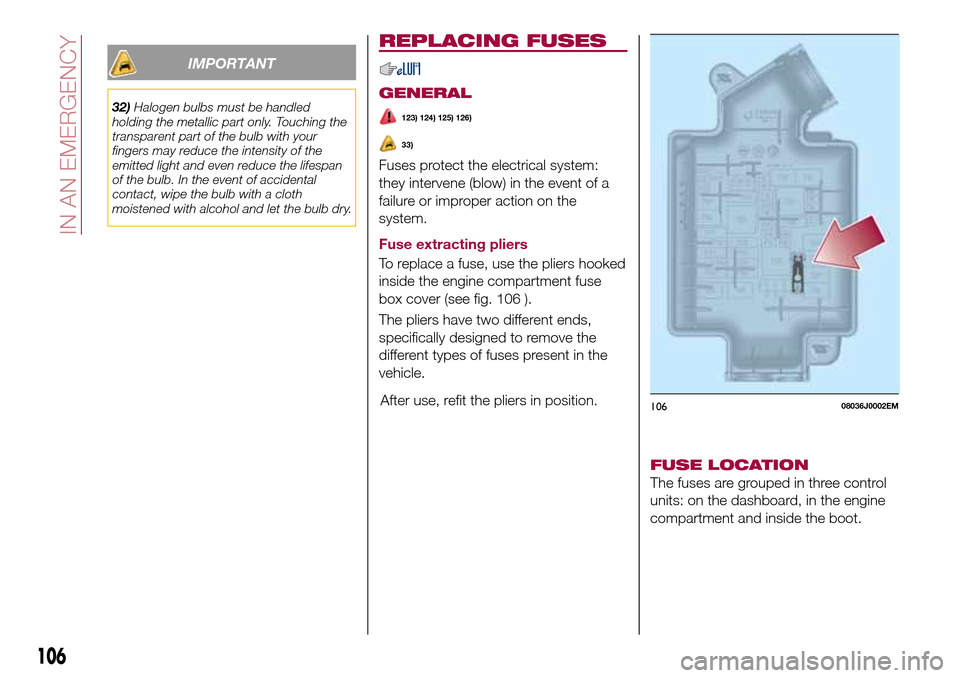
To replace a fuse, use the pliers hooked
inside the engine compartment fuse
box cover (see fig. 106 ).
The pliers have two different ends,
specifically designed to remove the
different types of fuses present in the
vehicle.
After use, refit the pliers in position.
FUSE LOCATION
The fuses are grouped in three control
units: on the dashboard, in the engine
compartment and inside the boot.
10608036J0002EM
106
IN AN EMERGENCY
Page 115 of 204
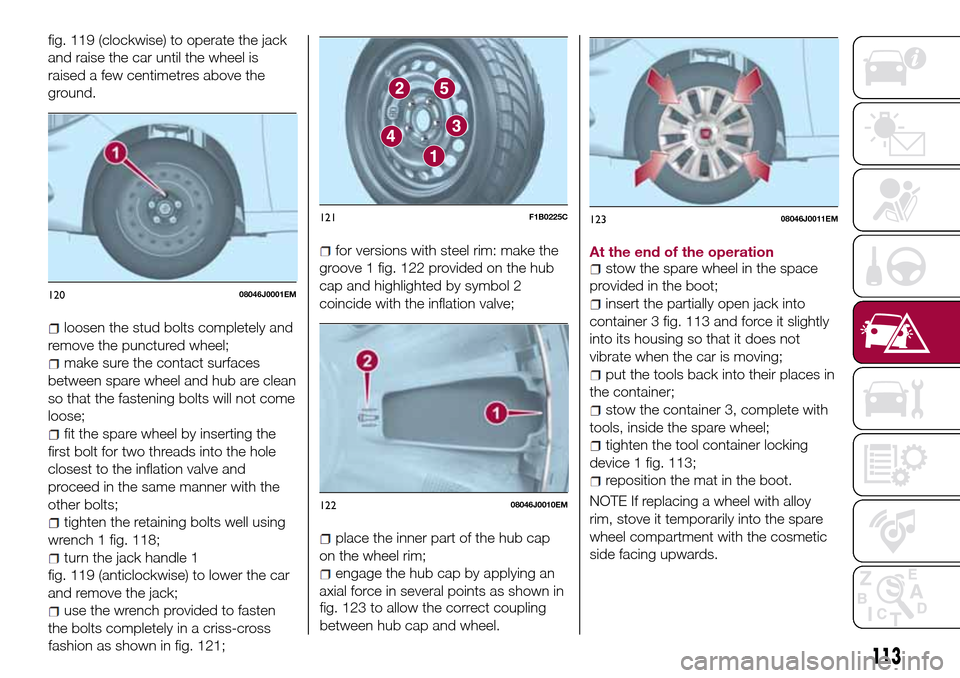
fig. 119 (clockwise) to operate the jack
and raise the car until the wheel is
raised a few centimetres above the
ground.
loosen the stud bolts completely and
remove the punctured wheel;
make sure the contact surfaces
between spare wheel and hub are clean
so that the fastening bolts will not come
loose;
fit the spare wheel by inserting the
first bolt for two threads into the hole
closest to the inflation valve and
proceed in the same manner with the
other bolts;
tighten the retaining bolts well using
wrench 1 fig. 118;
turn the jack handle 1
fig. 119 (anticlockwise) to lower the car
and remove the jack;
use the wrench provided to fasten
the bolts completely in a criss-cross
fashion as shown in fig. 121;
for versions with steel rim: make the
groove 1 fig. 122 provided on the hub
cap and highlighted by symbol 2
coincide with the inflation valve;
place the inner part of the hub cap
on the wheel rim;
engage the hub cap by applying an
axial force in several points as shown in
fig. 123 to allow the correct coupling
between hub cap and wheel.At the end of the operation
stow the spare wheel in the space
provided in the boot;
insert the partially open jack into
container 3 fig. 113 and force it slightly
into its housing so that it does not
vibrate when the car is moving;
put the tools back into their places in
the container;
stow the container 3, complete with
tools, inside the spare wheel;
tighten the tool container locking
device 1 fig. 113;
reposition the mat in the boot.
NOTE If replacing a wheel with alloy
rim, stove it temporarily into the spare
wheel compartment with the cosmetic
side facing upwards.
12008046J0001EM
121F1B0225C
12208046J0010EM
12308046J0011EM
113
Page 116 of 204

WARNING
127)If left in the passenger compartment,
the punctured wheel and jack constitute a
serious risk to the safety of occupants in
the event of accidents or sharp braking.
Therefore, always place both the jack and
punctured wheel in the dedicated housing
in the boot.
128)It is extremely dangerous to attempt
to change a wheel on the side of the
vehicle next to the driving lane: make sure
that the vehicle is at a sufficient distance
from the road, to avoid being run over.
129)Alert other drivers that the car is
stationary in compliance with local
regulations: hazard warning lights, warning
triangle, etc. Any passengers on board
should leave the car, especially if it is
heavily laden. Passengers should stay
away from on-coming traffic while the
wheel is being changed. For safety
reasons, always block the wheels with the
chocks provided.130)The jack is a tool developed and
designed only for changing a wheel, if a
tyre gets punctured or damaged, on the
vehicle with which it is supplied or on other
vehicles of the same model. Any other use,
e.g. to jack up other vehicle models or
different things, is strictly prohibited. Never
use it to carry out maintenance or repairs
under the vehicle or to change
summer/winter wheels and vice versa.
Never go under the raised vehicle. If any
work under the vehicle is necessary,
contact the Fiat Service Network. Incorrect
placing of the jack can cause the vehicle to
drop: use it only in the positions indicated.
Do not use the jack for loads higher than
the one shown on its label. Never start the
engine with vehicle raised. If the vehicle is
raised more than necessary, everything can
become more unstable, with the risk of the
vehicle dropping violently. Thus, lift the
vehicle only as needed in order to access
the spare wheel.
131)Never tamper with the inflation valve.
Never introduce tools of any kind between
the rim and the tyre. Check tyre and
space-saver wheel pressures regularly,
complying with the values given in the
"Technical specifications" chapter.132)The jack is a tool developed and
designed only for changing a wheel, if a
tyre gets punctured or damaged, on the
vehicle with which it is supplied or on other
vehicles of the same model. Any other use,
e.g. to jack up other vehicle models or
different things, is strictly prohibited. Never
use it to carry out maintenance or repairs
under the vehicle or to change
summer/winter wheels and vice versa: we
advise you to contact a Fiat Dealership.
Never go under the raised vehicle: use it
only in the positions indicated. Do not use
the jack for loads higher than the one
shown on its label. Never start the engine
with vehicle raised. If the vehicle is raised
more than necessary, everything can
become more unstable, with the risk of the
vehicle dropping violently. Thus, lift the
vehicle only as needed in order to access
the spare wheel.
IMPORTANT
35)When turning the jack handle make
sure that it can turn freely without scraping
your hand against the ground. The moving
components of the jack ("worm screw" and
joints) can also cause injuries: avoid
touching them. If you come into contact
with lubricating grease, clean yourself
thoroughly.
36)Contact a Fiat Dealership as soon as
possible to have the correct tightening of
the wheel bolts checked.
114
IN AN EMERGENCY