2016 FIAT TIPO 4DOORS automatic transmission
[x] Cancel search: automatic transmissionPage 88 of 204

MANUAL GEARBOX
105)
23)
To engage the gears, press the clutch
pedal fully and put the gear lever into
the required position (the diagram for
gear engagement is shown on the knob
).
To engage reverse R from neutral, lift
the ring 1 fig. 79 under the knob and at
the same time move the lever to the left
and then forwards.
To engage 6
thgear (if present), operate
the lever by pressing it towards the right
in order to avoid engaging 4
thgear by
mistake. The same applies to the shift
from 6
thto 5thgear.
IMPORTANT Reverse can only be
engaged when the vehicle is completelystationary. With the engine running, wait
for at least 2 seconds with the clutch
pedal fully pressed before engaging
reverse to prevent damage to the gears
and grating.
IMPORTANT The clutch pedal should
be used only for gear changes. Do not
drive with your foot resting on the
clutch pedal, however lightly. In some
circumstances, the electronic clutch
control could cut in by interpreting the
incorrect driving style as a fault.
WARNING
105)Depress the clutch pedal fully to
change gear correctly. It is therefore
essential that there is nothing under the
pedals: make sure the mats are lying flat
and do not get in the way of the pedals.
IMPORTANT
23)Do not drive with your hand resting on
the gear lever as the force exerted, even if
slight, could lead over time to premature
wear of the gearbox internal components.
AUTOMATIC
TRANSMISSION
GEAR LEVER
The fig. 80 lever has the following
positions:
P= Park
R= Reverse
N= Neutral
D= Drive, (automatic forward speed)
AutoStick: + shifting to higher gear
in sequential driving mode; – shifting to
lower gear in sequential driving mode.
The diagram for gear engagement is
shown on the trim at the side of the
gear lever.
The gear engaged is shown on the
display.
To select a gear, move the lever
forwards or backwards.
7907056J0001EM
8007076J0002EM
86
STARTING AND DRIVING
Page 89 of 204
To select the "sequential" mode, move
the lever from D (Drive) to the left: the
position + (upper gear) or – (lower gear)
can be reached; these are unstable
positions, which means that the lever
always returns to the central position.
The brake pedal and button 1 fig. 80 on
the knob must be pressed to exit
position P (Park).
Also to shift from position N (neutral) to
position D (drive) or R (reverse), you
need to press the brake pedal.
IMPORTANT DO NOT accelerate while
shifting from position P (or N) to another
position.
IMPORTANT After selecting a gear, wait
a few seconds before accelerating. This
precaution is particularly important with
engine cold.
AUTOMATIC DRIVING
MODE
To select the automatic driving mode,
you need to shift the gear lever to D
(Drive): the best ratio is selected by the
electronic transmission control unit
depending on vehicle speed, engine
load (accelerator pedal position) and
gradient of the road.
D can be selected from sequential
operation in any driving conditions.
AUTOSTICK - Sequential
mode
In the case of frequent gearshifting (e.g.
when the vehicle is driven with a heavy
load, on slopes, with strong headwind),
it is recommended to use the Autostick
(sequential shifting) mode to select and
keep a lower fixed ratio.
In these conditions, using a lower gear
improves vehicle performance and
prolongs the transmission's life, limiting
gearshifting and preventing overheating.
It is possible to shift from position D
(Drive) to the sequential mode
regardless of vehicle speed.
Activation
With gear lever in position D (Drive), to
activate the sequential drive mode,
move the lever to the left (– and +
indication of the trim). The gear
engaged will be shown on the display.
Gearshifting is made by moving the
gear lever forwards, towards symbol –
or backwards, towards symbol +.
Deactivation
To deactivate the sequential driving
mode, bring the gear lever back to
position D (Drive), automatic mode.
Important notes
Do not downshift on slippery
surfaces: the drive wheels might lose
grip with following risk for the vehicle toslip. This could cause accidents or
personal injuries.
The vehicle will keep the gear
selected by the driver until the safety
conditions allow it. This means, for
example, that the system will try to
prevent the engine from switching off,
automatically downshifting if the engine
speed is too low.
TRANSMISSION
EMERGENCY FUNCTION
(where provided)
Transmission operation is constantly
monitored to detect any fault. If a
condition that might damage the
transmission is detected, the "recovery"
function is activated.
In this condition, the transmission stays
in 3
thgear, regardless of the selected
gear.
Positions P (Parking), R (Reverse) and N
(Neutral) still work. Icon
might light
up on the display.
In the case of "recovery" operation
immediately contact the nearest Fiat
Dealership.
Temporary failure
In the event of a temporary failure,
correct transmission operation can be
restored for all the forwards gears by
proceeding as follows:
stop the vehicle;
87
Page 90 of 204
bring the transmission lever to P
(Park);
bring the ignition device to STOP;
wait for about 10 seconds, then
restart the engine;
select the desired gear: correct
transmission operation should be
restored.
IMPORTANT In the event of a
temporary failure it is in any case
recommended to contact a Fiat
Dealership as soon as possible.
GEAR ENGAGEMENT
DISABLING SYSTEM
WITHOUT BRAKE PEDAL
PRESSED
This system prevents you from moving
the gear lever from position P (Park)
and N (Neutral) if the brake pedal has
not been previously depressed.
To bring the gear lever to a position
other than P (Park) or from N (Neutral)
to R (Reverse), the ignition device must
be in position MAR (engine on or off)
and the brake pedal must be
depressed. Button 1 fig. 80 on the gear
lever knob must also be pressed. To
move the lever from position N (Neutral)
to position D (Drive, automatic forward
gear), you need to press the brake
pedal.
To facilitate parking manoeuvres, move
the lever from D to R (and vice versa)without pressing the brake if the lever
does not pass through the N position.
The lever will remain locked in the P
position in case of faults or flat battery.
See the “Automatic transmission” in the
“In an emergency” chapter for how to
release the lever manually.
WARNING
106)Never use position P (Park) instead of
the parking brake. Always engage the
parking brake when parking the vehicle to
avoid the accidental movement of the
vehicle.
107)If the P (Park) position is not engaged,
the vehicle could move and injure people.
Before leaving the vehicle, make sure that
the gear lever is in position P and that the
parking brake is engaged.
108)Do not shift the gear lever to N
(Neutral) and do not stop the engine when
driving on a downhill road. This type of
driving is dangerous and reduces the
possibility of intervening in the case of
variation of the road traffic or surface. You
risk losing control of your vehicle and
causing accidents.
IMPORTANT
24)Before moving the gear lever from
position P (Park), bring the ignition device
to position MAR and press the brake pedal.
Otherwise, the gear lever may get
damaged.25)Engage reverse only with the car
stationary, engine at idling speed and
accelerator fully released.
88
STARTING AND DRIVING
Page 91 of 204
STOP/START
SYSTEM
(where provided)
The Stop/Start system automatically
stops the engine each time the vehicle
is stationary and starts it again when
the driver wants to move off.
In this way, the vehicle efficiency is
increased, by reducing consumption,
dangerous gas emissions and sound
pollution.
109)
26)
OPERATING MODE
Stopping the engine
Versions with mechanical gearbox
With the vehicle stopped, the engine
stops with gearbox in neutral and clutch
pedal released.
Versions with automatic
transmission
With vehicle at a standstill and brake
pedal pressed, the engine switches off
if the gear lever is in a position other
than R.
The system does not operate when the
gear lever is in R, for making parking
manoeuvres easier.In the event of stops uphill, engine
switching off is disabled to make the
"Hill Hold Control" function available
(works only with running engine).
NOTE the engine can only be
automatically stopped after exceeding a
speed of 10 km/h.
The
warning light on the instrument
panel switches on to signal that the
engine was stopped.
Restarting the engine
Versions with mechanical gearbox
To restart the engine, press the clutch
pedal or the accelerator pedal.
If the vehicle does not start when the
clutch is pressed, place the gear lever
in neutral and repeat the procedure. If
the problem persists, contact a Fiat
Dealership.
Versions with automatic
transmission
To restart the engine, release the brake
pedal.
With brake pressed, if the gear lever is
in automatic mode - D (Drive) - the
engine can be restarted by moving the
lever to R (Reverse) or "AutoStick".
With brake pressed, if the gear lever is
in "AutoStick" mode, the engine can be
restarted by moving the lever to R
(Reverse).When the engine has been stopped
automatically, keeping the brake pedal
pressed, the brake can be released
keeping the engine off by quickly
shifting the gear lever to P (Park).
To restart the engine, just move the
lever out of position P.SYSTEM MANUAL
ACTIVATION/
DEACTIVATION
To activate/deactivate the system
manually, press the fig. 81 button
located on the dashboard in central
position.
System activation
Activation of the system is indicated by
the
warning light switching on and,
where provided, by a message on the
display.
8107126J0001EM
89
Page 93 of 204

the accelerator; when you release the
pedal, the vehicle goes back to the
speed stored previously.
When travelling downhill with the device
active, the vehicle speed may exceed
the set one.
IMPORTANT Before pressing the SET +
or SET – buttons, the vehicle must be
travelling at a constant speed on a flat
surface.
SPEED INCREASE
Once the electronic Cruise Control has
been activated, the speed can be
increased by pressing button SET +.
DECREASING SPEED
With the device activated, the speed
can be decreased by pressing button
SET–.
RECALLING THE SPEED
For versions with automatic
transmission (if present) operating in D
mode (Drive - automatic), press and
release the RES button to recall the
previously set speed.
For versions with manual gearbox or
automatic transmission (if present) in
Autostick (sequential) mode, before
recalling the previously set speed you
should accelerate until getting close to
it, then press and release the RES
button.
DEACTIVATING THE
DEVICE
Lightly pressing the brake pedal or
pressing the CANC button deactivates
the electronic Cruise Control without
deleting the stored speed.
The Cruise Control may be deactivated
also by applying the parking brake,
when the braking system is operated
(e.g. operation of the ESC system) or by
pressing the clutch pedal while shifting
gear.
DEACTIVATING THE
DEVICE
The electronic Cruise Control is
deactivated by pressing button 1
fig. 82 or bringing the ignition device to
STOP.
WARNING
110)When travelling with the device active,
never move the gear lever to neutral.
111)In case of a malfunction or failure of
the device, contact a Fiat Dealership.
112)The electronic Cruise Control can be
dangerous if the system cannot keep a
constant speed. In specific conditions
speed may be excessive, resulting in the
risk of losing control of the vehicle and
causing accidents. Do not use the device
in heavy traffic or on winding, icy, snowy or
slippery roads.
PARKING SENSORS
(where provided)
SENSORS
113)
27) 28) 29)
The parking sensors, located in the rear
bumper fig. 83, are used to detect the
presence of any obstacles near the rear
part of the vehicle.
The sensors warn the driver about the
presence of possible obstacles with an
intermittent acoustic signal and,
depending on the version, also with
visual indications on the instrument
panel display.
Activation
The sensors are automatically activated
when reverse gear is selected. As the
8307176J0001EM
91
Page 100 of 204
IN AN EMERGENCY
A punctured tyre or a burnt-out bulb?
At times, a problem may interfere with
our journey.
The pages on emergencies can help
you to deal with critical situations
independently and with calm.
In an emergency we recommend that
you call the freephone number found in
the Warranty Booklet.
It is also possible to call the national or
international universal freephone
number to search for the nearest Fiat
Dealership.HAZARD WARNING LIGHTS......99
BULB REPLACEMENT.........99
REPLACING FUSES..........106
CHANGING A WHEEL.........111
FIX&GO AUTOMATIC KIT.......115
EMERGENCY STARTING.......117
FUEL CUT-OFF SYSTEM.......119
AUTOMATIC TRANSMISSION. . . .119
TOWING THE VEHICLE........121
98
IN AN EMERGENCY
Page 113 of 204
CHANGING A WHEEL
JACK
132)
37)
Please note that:
the jack weight is 2.15 kg;
the jack cannot be repaired and in
the event of a fault it must be replaced
by another genuine one;
No tool other than its cranking device
may be fitted on the jack.
Servicing
Prevent any dirt from depositing on
the "worm screw";
Keep the "worm screw" lubricated;
Never modify the jack.
Conditions for non-use
Temperatures below −40°C;
On sandy or muddy ground;
On uneven ground;
On steep roads;
In extreme weather conditions:
thunderstorms, typhoons, hurricanes,
blizzards, storms, etc.
In direct contact with the engine or
for repairs under the vehicle.
On boats.
CHANGING PROCEDURE
127) 128) 129) 130) 131)
35) 36)
Proceed as follows:
stop the car in a position that is not
dangerous for oncoming traffic where
you can change the wheel safely. The
ground must be flat and sufficiently
compact;
stop the engine, engage the hazard
warning lights and the parking brake;
engage first gear or reverse or, for
versions with automatic transmission (if
present), move the lever to position P
(Park);
wear the reflective safety jacket
before getting out of the car (anyway
comply with the laws in force in the
country you are driving in);
open the luggage compartment and
lift up the mat;
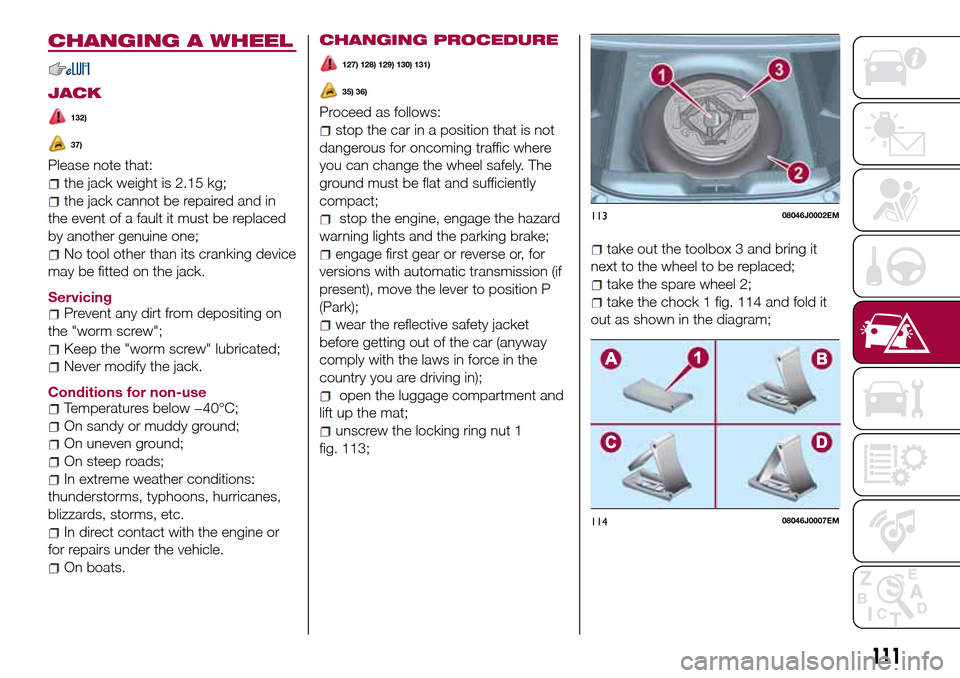
unscrew the locking ring nut 1
fig. 113;
take out the toolbox 3 and bring it
next to the wheel to be replaced;
take the spare wheel 2;
take the chock 1 fig. 114 and fold it
out as shown in the diagram;
11308046J0002EM
11408046J0007EM
111
Page 119 of 204
WARNING
133)The information required by the
applicable regulation is indicated on the
Fix&Go kit package label. Compliance with
the indications on the label is an essential
condition to ensure the safety and the
effectiveness of the Fix&Go kit. Carefully
read the label before use, avoid improper
use. Fix&Go is subject to expiration and
must be replaced periodically. The kit
should be used by adults and cannot be
used by children.
IMPORTANT
38)Show the package and the label to the
personnel charged with handling the tyre
treated with the tyre repair kit.
39)Fix&Go provides a temporary repair,
therefore the tyre must be examined and
repaired by a specialist as soon as
possible. The sealing fluid is effective at
temperatures between -40°C and +50°C. It
is possible to repair tyres which have been
damaged on tread up to a diameter of
4mm; however, tyres damaged on their
side cannot be repaired. Before using
Fix&Go kit, ensure that the tyre isn't
excessively damaged and that the rim is in
good condition, otherwise do not use it and
contact a Fiat Dealership. Do not remove
foreign bodies from the tyre. Do not let the
compressor turned on for more than 20
consecutive minutes - overheating hazard.
EMERGENCY
STARTING
If the battery is flat, a jump starting can
be performed using the battery and the
cables of another vehicle, or using an
auxiliary battery. In all cases, the battery
used must have a capacity equal to or
a little higher than the flat one.
40)
IMPORTANT NOTES
Do not use an auxiliary battery or any
other source of external supply with a
voltage above 12 V: the battery, the
starter, the alternator and the electrical
system of the vehicle could be
damaged.
Do not attempt jump starting if the
battery is frozen. The battery could
break and explode!
PREPARATION TO JUMP
STARTING
The vehicle battery is located in the
engine compartment, behind the left
light cluster.
134) 135) 136) 137)
IMPORTANT The positive terminal (+) of
the battery is shielded by a protective
element. Raise it to access the terminal.
Proceed as follows:
operate the parking brake, move the
lever to P (Park), for versions equipped
with automatic transmission (if present),
or neutral, for versions with manual
gearbox, then set the ignition device to
STOP;
switch off all the other electrical
devices in the vehicle;
should you be using the battery of
another vehicle, park the other vehicle
within the range of the cables used for
the connection, operate the parking
brake and ensure that its ignition is off.
IMPORTANT Never connect the
negative terminals of the two batteries
directly! If the auxiliary battery is
installed on another vehicle, check that
there is no accidental contact of metal
parts between the two vehicles, since
an earth connection may result, with
the risk of serious injury to any people
who may be nearby.
IMPORTANT If the procedure below is
carried out incorrectly, it can cause
severe injury to people or damage the
recharging system of one or both
vehicles. Carefully follow the
instructions given below.
Cable connection
41)
Proceed as follows to carry out a jump
starting fig. 128:
117