2016 FIAT FREEMONT seats
[x] Cancel search: seatsPage 233 of 412
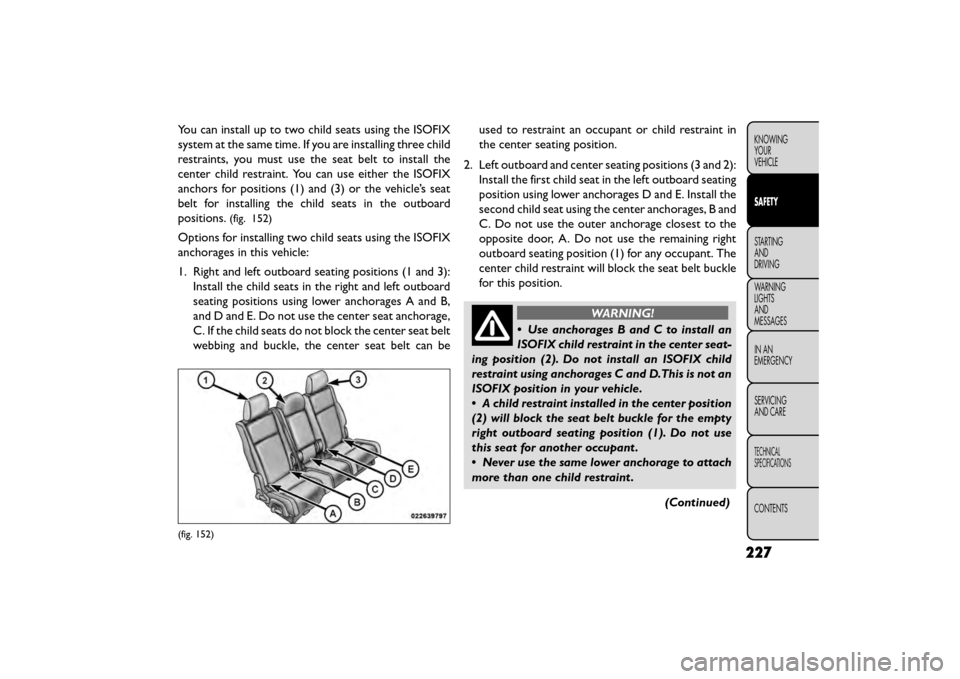
You can install up to two child seats using the ISOFIX
system at the same time. If you are installing three child
restraints, you must use the seat belt to install the
center child restraint. You can use either the ISOFIX
anchors for positions (1) and (3) or the vehicle’s seat
belt for installing the child seats in the outboard
positions.
(fig. 152)
Options for installing two child seats using the ISOFIX
anchorages in this vehicle:
1. Right and left outboard seating positions (1 and 3):Install the child seats in the right and left outboard
seating positions using lower anchorages A and B,
and D and E. Do not use the center seat anchorage,
C. If the child seats do not block the center seat belt
webbing and buckle, the center seat belt can be used to restraint an occupant or child restraint in
the center seating position.
2. Left outboard and center seating positions (3 and 2): Install the first child seat in the left outboard seating
position using lower anchorages D and E. Install the
second child seat using the center anchorages, B and
C. Do not use the outer anchorage closest to the
opposite door, A. Do not use the remaining right
outboard seating position (1) for any occupant. The
center child restraint will block the seat belt buckle
for this position.
WARNING!
• Use anchorages B and C to install an
IS OFIX
child restraint in the center seat-
ing position (2). Do not install an ISOFIX child
restraint using anchorages C and D.This is not an
ISOFIX position in your vehicle.
• A child restraint installed in the center position
(2) will block the seat belt buckle for the empty
right outboard seating position (1). Do not use
this seat for another occupant .
• Never use the same lower anchorage to attach
more than one child restraint .
(Continued)
(fig. 152)
227
KNOWING
YOUR
VEHICLE
SAFETY
STARTING
AND
DRIVING
WARNING
LIGHTS
AND
MESSAGES
IN
AN
EMERGENCY
SERVICING
AND CARE
TECHNICAL
SPECIFICATIONS
CONTENTS
Page 234 of 412
WARNING! (Continued)
• If you are installing three child restraints next
to each other, you must use the seat belt and the
center tether anchor for the center position.You
can then use either the ISOFIX anchors or the
vehicle’s seat belt for installing the child seats in
the outboard positions. Please refer to “Installing
the ISOFIX Child Restraint System” for typical
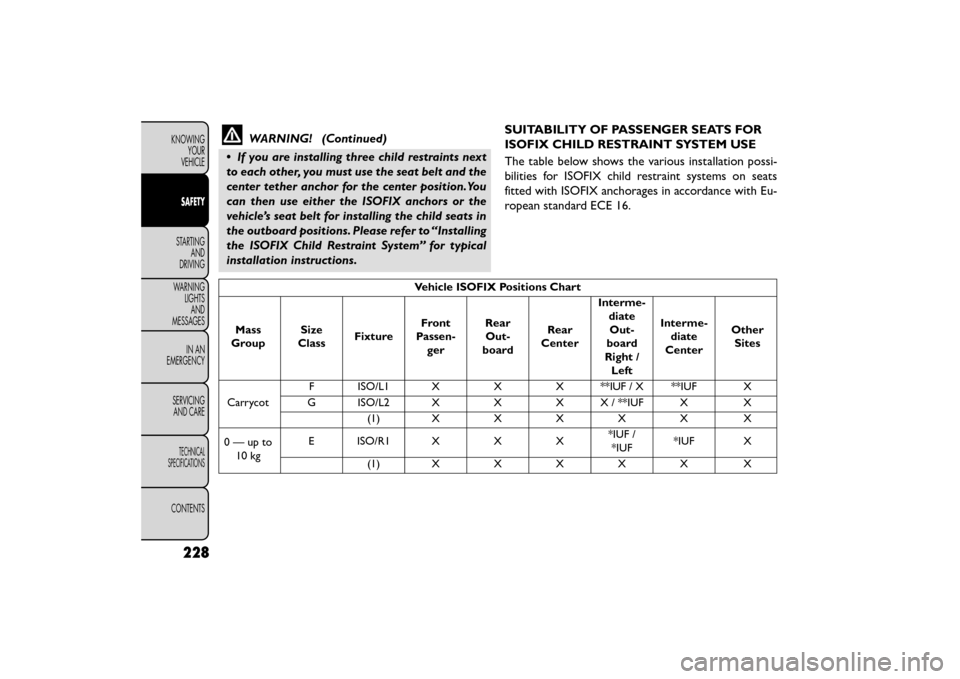
installation instructions. SUITABILITY OF PASSENGER SEATS FOR
ISOFIX CHILD RESTRAINT SYSTEM USE
The table below shows the various installation possi-
bilities for ISOFIX child restraint systems on seats
fitted with ISOFIX anchorages in accordance with Eu-
ropean standard ECE 16.
Vehicle ISOFIX Positions Chart
Mass
Group Size
Class Fixture Front
Passen- ger Rear
Out-
board Rear
Center Interme-
diateOut-
board
Right / Left Interme-
diate
Center Other
Sites
Carrycot F ISO/L1 X X X **IUF / X **IUF X
G ISO/L2 X X X X / **IUF X X (1)XXXXX X
0—upto 10 kg E ISO/R1 X X X
*IUF /
*IUF *IUF X
(1)XXXXX X
228
KNOWING YOUR
VEHICLE
SAFETY
STARTING AND
DRIVING
WARNING LIGHTSAND
MESSAGES
IN
AN
EMERGENCY
SERVICINGAND CARE
TECHNICAL
SPECIFICATIONS
CONTENTS
Page 237 of 412
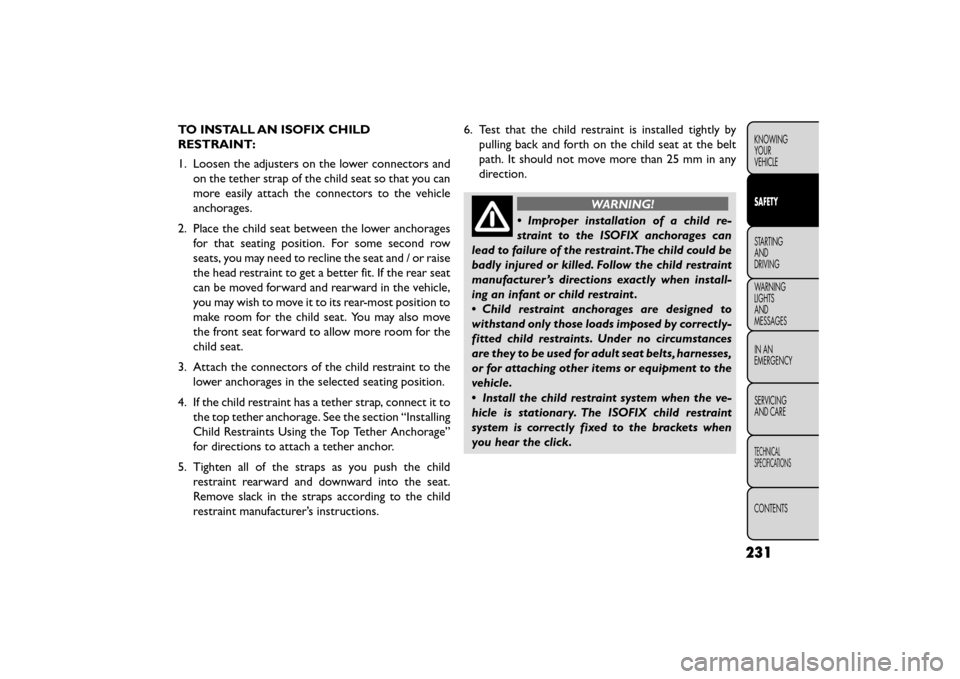
TO INSTALL AN ISOFIX CHILD
RESTRAINT:
1. Loosen the adjusters on the lower connectors andon the tether strap of the child seat so that you can
more easily attach the connectors to the vehicle
anchorages.
2. Place the child seat between the lower anchorages for that seating position. For some second row
seats, you may need to recline the seat and / or raise
the head restraint to get a better fit. If the rear seat
can be moved forward and rearward in the vehicle,
you may wish to move it to its rear-most position to
make room for the child seat. You may also move
the front seat forward to allow more room for the
child seat.
3. Attach the connectors of the child restraint to the lower anchorages in the selected seating position.
4. If the child restraint has a tether strap, connect it to the top tether anchorage. See the section “Installing
Child Restraints Using the Top Tether Anchorage”
for directions to attach a tether anchor.
5. Tighten all of the straps as you push the child restraint rearward and downward into the seat.
Remove slack in the straps according to the child
restraint manufacturer’s instructions. 6. Test that the child restraint is installed tightly by
pulling back and forth on the child seat at the belt
path. It should not move more than 25 mm in any
direction.
WARNING!
• Improper installation of a child re-
s t
raint to the ISOFIX anchorages can
lead to failure of the restraint .The child could be
badly injured or killed. Follow the child restraint
manufacturer ’s directions exactly when install-
ing an infant or child restraint .
• Child restraint anchorages are designed to
withstand only those loads imposed by correctly-
fitted child restraints. Under no circumstances
are they to be used for adult seat belts, harnesses,
or for attaching other items or equipment to the
vehicle.
• Install the child restraint system when the ve-
hicle is stationary. The ISOFIX child restraint
system is correctly fixed to the brackets when
you hear the click.
231
KNOWING
YOUR
VEHICLE
SAFETY
STARTING
AND
DRIVING
WARNING
LIGHTS
AND
MESSAGES
IN
AN
EMERGENCY
SERVICING
AND CARE
TECHNICAL
SPECIFICATIONS
CONTENTS
Page 239 of 412

WARNING!
• An incorrectly anchored tether strap
c ould
lead to increased head motion and
possible injury to the child. Use only the anchor-
age position directly behind the child seat to
secure a child restraint top tether strap.
• If your vehicle is equipped with a split rear
seat , make sure the tether strap does not slip into
the opening between the seatbacks as you re-
move slack in the strap.
WARNING!
The child restraint owner ’s manual pro-
vides ins
tructions for installing the child
restraint using the seat belt . Read and follow
these instructions to install the child seat
properly.
Transporting Pets
Air Bags deploying in the front seat could harm your
pet. An unrestrained pet could be thrown about and
possibly injured, or injure a passenger during panic
braking or in a collision.
Pets should be restrained in the rear seat in pet har-
nesses or pet carriers that are secured by seat belts.
SAFETY TIPS
Transporting Passengers
NEVER TRANSPORT PASSENGERS IN THE CARGO
AREA.
WARNING!
• Do not leave children or animals inside
par k
ed vehicles in hot weather. Interior
heat build-up may cause serious injury or death.
• It is extremely dangerous to ride in a cargo
area, inside or outside of a vehicle. In a collision,
people riding in these areas are more likely to be
seriously injured or killed.
• Do not allow people to ride in any area of your
vehicle that is not equipped with seats and seat
belts.
• Be sure everyone in your vehicle is in a seat and
using a seat belt properly.
• On seven passenger models, do not drive the
vehicle with the second row passenger seat in the
easy entry/exit position (seat cushion flipped up-
ward and seat moved forward), as this position is
only intended for entering and exiting the third
row seats. Failure to follow this warning may
result in personal injury.
(Continued)
233
KNOWING
YOUR
VEHICLE
SAFETY
STARTING
AND
DRIVING
WARNING
LIGHTS
AND
MESSAGES
IN
AN
EMERGENCY
SERVICING
AND CARE
TECHNICAL
SPECIFICATIONS
CONTENTS
Page 291 of 412

SPARE TIRE REMOVAL
NOTE:On seven-passenger models, fold the third-
row passenger seats flat. This will provide more space
when accessing the jacking tools and when operating
the winch mechanism.
1. Remove the jack-handle components 1, 2 and 3 from storage and assemble them. (fig. 171) NOTE:
Assemble components 2 and 3 by seating the
small ball at the end of component 2 in the small hole at
the end of component 3. This will lock these compo-
nents together. Assemble components 1 and 2 so that
the wheel nut socket at the end of component 1 faces
upward when seated on component 2. This will make it
easier to rotate the assembly when operating the
winch mechanism.
2. Fit the assembled jack-handle over the winch drive nut located in the jack storage area. Rotate the
jack-handle assembly counterclockwise until the
spare tire is on the ground with enough cable slack
to allow you to pull the spare tire out from under-
neath the vehicle.
The winch mechanism is designed for use
with the jack-handle only. Use of an air
wrench or other power tools is not rec-
ommended and it can damage the winch.
3. Pull the spare tire out from underneath the vehicle and raise it upright so the tire's tread is on the
ground.
(fig. 171)
Lowering/Raising Spare Tire
1 — Spare Tire Jack Handle
2 — Extension 1
3 — Extension 2
285
KNOWING
YOUR
VEHICLE
SAFETY
STARTING
AND
DRIVING
WARNING
LIGHTS
AND
MESSAGES
IN AN
EMERGENCY
SERVICING
AND
CARE
TECHNICAL
SPECIFICATIONS
CONTENTS
Page 314 of 412
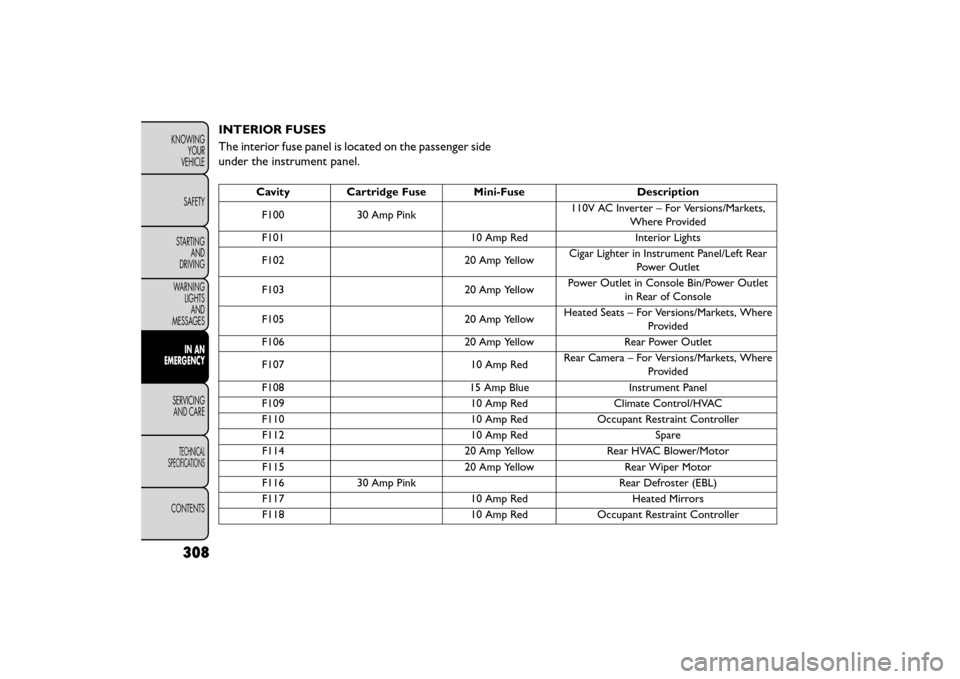
INTERIOR FUSES
The interior fuse panel is located on the passenger side
under the instrument panel.
CavityCartridge Fuse Mini-Fuse Description
F100 30 Amp Pink 110V AC Inverter – For Versions/Markets,
Where Provided
F101 10 Amp RedInterior Lights
F102 20 Amp YellowCigar Lighter in Instrument Panel/Left Rear
Power Outlet
F103 20 Amp YellowPower Outlet in Console Bin/Power Outlet
in Rear of Console
F105 20 Amp YellowHeated Seats – For Versions/Markets, Where
Provided
F106 20 Amp YellowRear Power Outlet
F107 10 Amp RedRear Camera – For Versions/Markets, Where
Provided
F108 15 Amp BlueInstrument Panel
F109 10 Amp RedClimate Control/HVAC
F110 10 Amp RedOccupant Restraint Controller
F112 10 Amp RedSpare
F114 20 Amp YellowRear HVAC Blower/Motor
F115 20 Amp YellowRear Wiper Motor
F116 30 Amp Pink Rear Defroster (EBL)
F117 10 Amp RedHeated Mirrors
F118 10 Amp RedOccupant Restraint Controller
308
KNOWING
YOUR
VEHICLE
SAFETY
STARTING AND
DRIVING
WARNING LIGHTSAND
MESSAGES
IN AN
EMERGENCY
SER VICING
AND
CARE
TECHNICAL
SPECIFICATIONS
CONTENTS
Page 362 of 412
Special Care
• If you drive on salted or dusty roads or if you drivenear the ocean, hose off the undercarriage at least
once a month.
• It is important that the drain holes in the lower edges of the doors, rocker panels, and cargo area be kept
clear and open.
• If you detect any stone chips or scratches in the paint, touch them up immediately. The cost of such
repairs is considered the responsibility of the owner.
• If your vehicle is damaged due to an accident or similar cause, which destroys the paint and protec-
tive coating, have your vehicle repaired as soon as
possible. The cost of such repairs is considered the
responsibility of the owner.
• If you carry special cargo such as chemicals, fertiliz- ers, de-icer salt, etc., be sure that such materials are
well packaged and sealed.
• If a lot of driving is done on gravel roads, consider mud or stone shields behind each wheel.
• Use Touch Up Paint or equivalent on scratches as soon as possible. Your authorized dealer has touch
up paint to match the color of your vehicle. Wheel And Wheel Trim Care
All wheels and wheel trim, especially aluminum and
chrome-plated wheels should be cleaned regularly with
a mild soap and water to prevent corrosion. To remove
heavy soil and/or excessive brake dust, use a nonabra-
sive, non-acidic cleaner. Do not use scouring pads, steel
wool, a bristle brush, or metal polishes. Do not use
oven cleaner. Avoid automatic car washes that use
acidic solutions or harsh brushes that may damage the
wheels’ protective finish.
Stain Repel Fabric Cleaning Procedure (for
versions/markets, where provided)
Stain Repel seats may be cleaned in the following
manner:
• Remove as much of the stain as possible by blotting
with a clean, dry towel.
• Blot any remaining stain with a clean, damp towel.
• For tough stains, apply a mild soap solution to a clean, damp cloth and remove the stain. Use a fresh,
damp towel to remove soap residue.
•
For grease stains, apply a Multi-Purpose Cleaner or
equivalent to a clean, damp cloth and remove the stain.
Use a fresh, damp towel to remove soap residue.
• Do not use any harsh solvents or any other form of protectants on Stain Repel products.
356
KNOWING YOUR
VEHICLE
SAFETY
STARTING AND
DRIVING
WARNING LIGHTSAND
MESSAGES
IN AN
EMERGENCY
SERVICINGAND C ARE
TECHNICAL
SPECIFICATIONS
CONTENTS
Page 394 of 412
ARRANGEMENTS FOR DEALING WITH THE VEHICLE AT THE END OF ITS LIFE
FIAT has been committed for many years to safeguarding the environment through the constant improvement of its
production processes and manufacturing products that are increasingly “eco-compatible”.
To give customers the best possible service in terms of respecting environmental laws and in response to European
Directive 2000/53/EC governing vehicles at the end of their life, FIAT is offering its customers the opportunity of handing
over their vehicle* at the end of its life without incurring any additional costs.
The European Directive sets out that when the vehicle is handed over the last keeper or owner should not incur any
expenses as a result of it having a zero or negative market value.
In all European Union countries, until 1st January 2007, only vehicles registered after 1st July 2002 were collected free of
charge, while since 2007 collection has been free of charge irrespective of the year of registration as long as the vehicle
contains its basic components (in particular, the engine and bodywork) and has no additional waste.
To hand your vehicle over at the end of its life without extra cost, go to one of our Dealerships or FIAT-authorized
collection and scrapping centres.
These centres have been carefully chosen to offer high quality service for the collection, treatment and recycling of unused
vehicles with respect to the environment.
You can find further information on these collection and scrapping centres either from a FIAT or FIAT Commercial Vehicle
Dealership or by calling the freephone number 00800 3428 0000 or by going on the FIAT website.
(*) Vehicle for transporting passengers with a maximum of nine seats and a total permitted weight of 3.5 t
388