Page 160 of 296
Protected device Fuse AmpereTO: Engine compartment fusebox – B: Optional wiring module 1(*) –
C: Optional wiring module 2
Webasto control unit F61 30
Passenger compartment
fan with WebastoF62 20
Trailer hook socket F63 20
Headlight washers F64 30
Trailer control unit F65 15
Trailer control unit F66 15
Trailer hook socket F67 20
(*) Only for 2.3 130/150 Multijet 2 versions
158
IN AN EMERGENCY
Page 162 of 296
Protected device Fuse AmpereTO: Engine compartment fusebox – B: Optional wiring module 1 –
C: Optional wiring module 2
Webasto control unit F61 30
Passenger compartment
fan with WebastoF62 20
Trailer hook socket F63 20
Headlight washers F64 30
Trailer control unit F65 15
Trailer control unit F66 15
Trailer hook socket F67 20
160
IN AN EMERGENCY
Page 164 of 296
Protected device Fuse AmpereTO: Engine compartment fusebox – B: Optional wiring module 1 –
C: Optional wiring module 2
Trailer hook socket F63 20
Headlight washers F64 30
Trailer control unit F65 15
Trailer control unit F66 15
Trailer hook socket F67 20
Methane tank valve (CNG) F68 10
Methane relay solenoid
valvesT51 30
162
IN AN EMERGENCY
Page 170 of 296

Message Signal Description
FMS1(2)
High beam, main beam Indicates active main beam headlight status
Low beam Indicates active dipped headlight status
Turn signals Indicates active direction indicator status
Hazard warning Indicates active hazard warning light status
Parking Brake Indicates parking brake engaged
Brake failure / brake system malfunction Indicates braking system fault
Hatch open Indicates rear door not shut
Fuel level Indicates fuel reserve warning light on
Engine coolant temperature Indicates engine coolant overheating warning light on
Battery charging condition Indicates insufficient battery charge warning light on
Engine oilIndicates insufficient engine oil pressure warning light
on
Position lights, side lights Indicates active side light status
Front fog lights Indicates active fog light status
Rear fog light Indicates active rear fog light status
Engine / Mil indicatorIndicates EOBD/injection system failure warning light
on
Service, call for maintenance Indicates scheduled service indicator displayed
Transmission failure / malfunction Indicates transmission system fault
Anti-lock brake system failure Indicates ABS failure warning light on
(2) The signal values are derived from information shown on the instrument panel
168
IN AN EMERGENCY
Page 181 of 296

VERSIONS WITH
START&STOP SYSTEM
To recharge, proceed as follows:
disconnect the connector A
(pressing the button B) from the sensor
C monitoring the battery conditions,
on the negative pole D of the battery;
connect the positive battery charger
lead to the positive battery terminal E
and the negative lead to the sensor
terminal F as in fig. 178;
turn on the charger;
at the end of the charging process,
switch the battery charger off;
after disconnecting the charger,
reconnect the connector A to the
sensor C as in fig. 178.
WARNING
168)Battery fluid is poisonous and
corrosive: avoid contact with your skin and
eyes. The battery should be charged in a
well ventilated place, away from naked
flames or possible sources of sparks:
danger of explosion and fire.
169)Do not attempt to charge a frozen
battery: it must be thawed first, otherwise it
may explode. If freezing has occurred, the
battery should be checked by skilled
personnel to make sure that the internal
elements are not damaged and that the
body is not cracked, with the risk of leaking
poisonous and corrosive acid.
FUEL CUT-OFF
SWITCH
The vehicle is fitted with a safety switch
that, in the event of a crash, comes
into operation by cutting off the fuel
supply and turning off the engine as a
consequence.
When the inertia switch cuts in, it cuts
off the fuel supply and also activates
the hazard warning lights, side lights
and courtesy lights while releasing
all the doors and displaying the relevant
message; they are deactivated by
pressing button A. On some versions,
there is also a safety relay that activates
in the event of impact to cut off the
electrical supply. In this way, fuel is
prevented from escaping if the pipes
are broken and the formation of sparks
or electrical discharges following
damage to the vehicle electrical
components is avoided.
170) 171)
IMPORTANT After an accident,
remember to remove the key from the
ignition device to prevent the battery
from running down. If no fuel leaks
or damage to vehicle's electrical
devices (e.g. headlights) are detected
after the impact and the vehicle is
able to set off again, reactivate the
automatic fuel cut-off switch.
178F1A0219
179
Page 182 of 296

Restoring the fuel cut-off switch
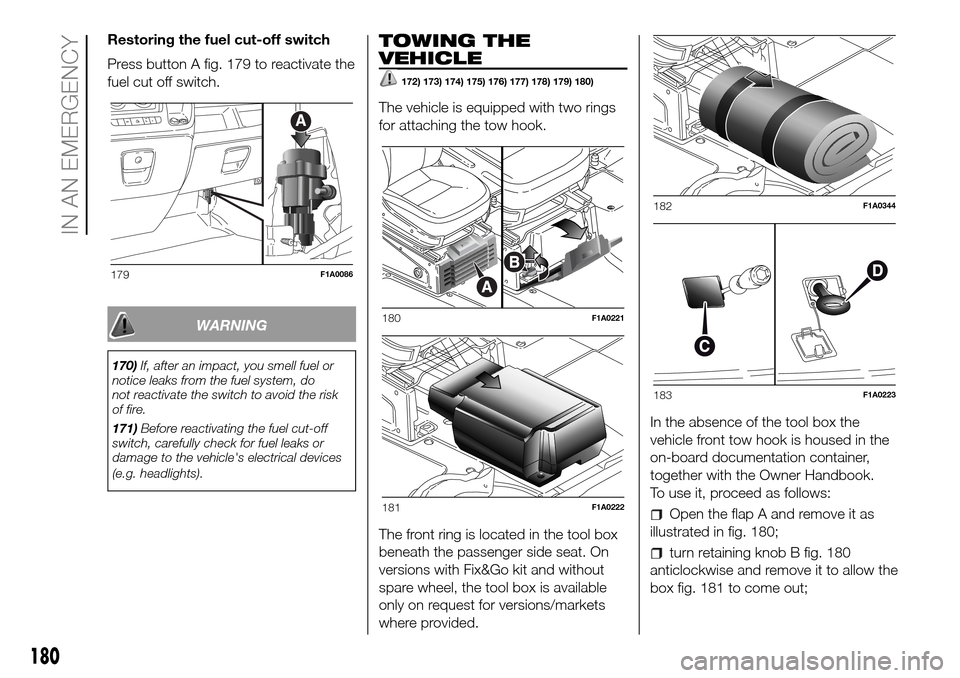
Press button A fig. 179 to reactivate the
fuel cut off switch.
WARNING
170)If, after an impact, you smell fuel or
notice leaks from the fuel system, do
not reactivate the switch to avoid the risk
of fire.
171)Before reactivating the fuel cut-off
switch, carefully check for fuel leaks or
damage to the vehicle's electrical devices
(e.g. headlights).
TOWING THE
VEHICLE
172) 173) 174) 175) 176) 177) 178) 179) 180)
The vehicle is equipped with two rings
for attaching the tow hook.
The front ring is located in the tool box
beneath the passenger side seat. On
versions with Fix&Go kit and without
spare wheel, the tool box is available
only on request for versions/markets
where provided.In the absence of the tool box the
vehicle front tow hook is housed in the
on-board documentation container,
together with the Owner Handbook.
To use it, proceed as follows:
Open the flap A and remove it as
illustrated in fig. 180;
turn retaining knob B fig. 180
anticlockwise and remove it to allow the
box fig. 181 to come out;
179F1A0086
180F1A0221
181F1A0222
182F1A0344
183F1A0223
180
IN AN EMERGENCY
Page 187 of 296

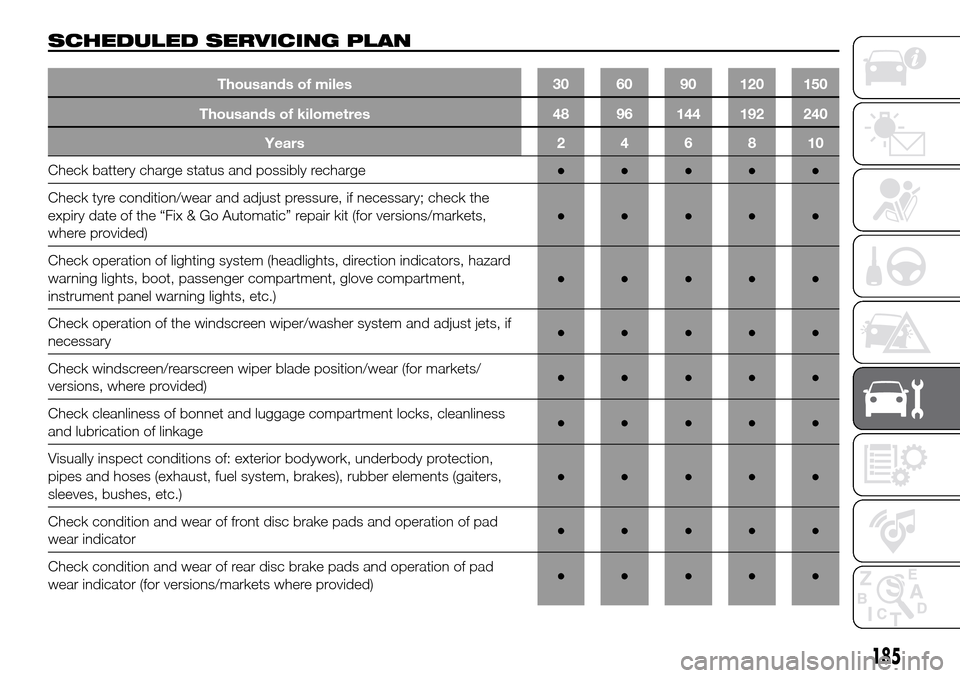
SCHEDULED SERVICING PLAN
Thousands of kilometres 48 96 144 192 240
Years 2 4 6 8 10
Check battery charge status and possibly recharge●●●●●
Check tyre condition/wear and adjust pressure, if necessary; check the
expiry date of the “Fix & Go Automatic” repair kit (for versions/markets,
where provided)●●●●●
Check operation of lighting system (headlights, direction indicators, hazard
warning lights, boot, passenger compartment, glove compartment,
instrument panel warning lights, etc.)●●●●●
Check operation of the windscreen wiper/washer system and adjust jets, if
necessary●●●●●
Check windscreen/rearscreen wiper blade position/wear (for markets/
versions, where provided)●●●●●
Check cleanliness of bonnet and luggage compartment locks, cleanliness
and lubrication of linkage●●●●●
Visually inspect conditions of: exterior bodywork, underbody protection,
pipes and hoses (exhaust, fuel system, brakes), rubber elements (gaiters,
sleeves, bushes, etc.)●●●●●
Check condition and wear of front disc brake pads and operation of pad
wear indicator●●●●●
Check condition and wear of rear disc brake pads and operation of pad
wear indicator (for versions/markets where provided)●●●●●
185
Thousands of miles 30 60 90 120 150
Page 191 of 296

Natural Power versions
Thousands of kilometres 40 80 120 160 200
Years246810
Check battery charge status and possibly recharge●●●●●
Check tyre conditions/wear and adjust pressure, if necessary●●●●●
Check operation of lighting system (headlights, direction indicators, hazard
warning lights, boot, passenger compartment, glove compartment,
instrument panel warning lights, etc.)●●●●●
Check operation of the windscreen wiper/washer system and adjust jets, if
necessary●●●●●
Check the position/wear of the windscreen/rear window wiper blades●●●●●
Check cleanliness of bonnet and luggage compartment locks, cleanliness
and lubrication of linkage●●●●●
Visually inspect conditions of: exterior bodywork, underbody protection,
pipes and hoses (exhaust, fuel system, brakes), rubber elements (gaiters,
sleeves, bushes, etc.)●●●●●
Visually inspect conditions and wear of front disc brake pads and operation
of pad wear indicator●●●●●
Visually inspect condition and wear of rear disc brake pads and operation of
pad wear indicator (for versions/markets, where provided)●●●●●
Check and, if necessary, top up fluid levels (engine coolant, hydraulic clutch/
brakes, windscreen washer, battery, etc.)●●●●●
Visually inspect accessory drive belt(s) (versions without automatic
tensioner)●●
189
Thousands of miles 30 60 90 120 150