2016 FIAT DOBLO PANORAMA wiper blades
[x] Cancel search: wiper bladesPage 44 of 323

A further stroke after approximately 6
seconds completes the cycle.
REAR WINDOW
WIPER/WASHER
This operates only with the ignition key
turned to MAR.
Activation
Turn the ring nut to
to operate the
rear window wiper:
❒in intermittent mode when the
windscreen wiper is not operating;
❒in synchronous mode (at half the
speed of the windscreen wiper) when
the windscreen wiper is operating;
❒in continuous mode with reverse gear
engaged and the control active.
With the windscreen wiper on and
reverse gear engaged, rear window
wiping will be continuous.
Pushing the stalk towards the
dashboard (unstable position) will
activate the rear window washer jet.
Keep the stalk pushed for more than
half a second to activate the rear
window wiper as well. Releasing the
stalk will activate the smart washing
function, as described for the
windscreen wiper.
The function stops when the stalk is
released.
5)
HEADLIGHT WASHERS
(for versions/markets, where provided)
They are activated when the dipped
headlights are on and the windscreen
washer is activated.
IMPORTANT Check jet function and
cleanliness at regular intervals.
6)
IMPORTANT
3) Do not use the windscreen wiper
to remove layers of snow or ice
from the windscreen. In such
conditions, the windscreen wiper
may be subjected to excessive
stress and the motor cut-out
switch, which prevents operation
for a few seconds, may intervene.
If operation is not restored (even
after turning the key and
restarting the engine), contact a
Fiat Dealership.
4) Do not operate the windscreen
wiper with the blades lifted from
the windscreen.5) Do not use the rear window wiper
to remove layers of snow or ice. In
such conditions, the wiper may
be subjected to excessive stress
and the motor protection, which
prevents operation for a few
seconds, may intervene. If
operation is not restored, contact
a Fiat Dealership.
6) The headlamp washer jet does not
function when the level of fluid in
the reservoir falls below 1.6 litres.
40
KNOW YOUR VEHICLE
Page 185 of 323

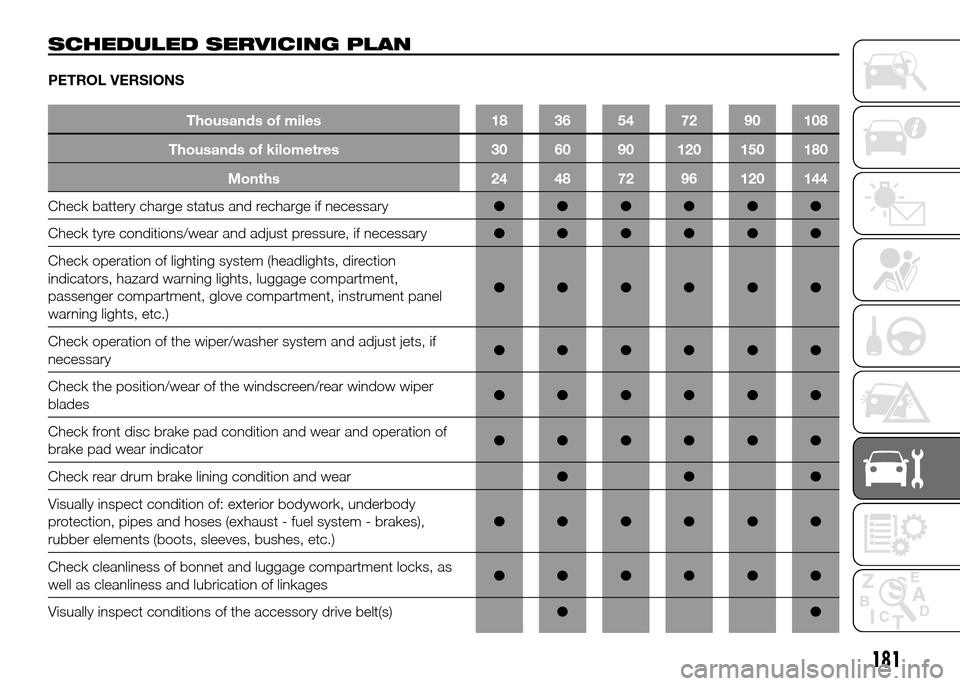
SCHEDULED SERVICING PLAN
PETROL VERSIONS
Thousands of miles 18 36 54 72 90 108
Thousands of kilometres 30 60 90 120 150 180
Months 24 48 72 96 120 144
Check battery charge status and recharge if necessary●●●●●●
Check tyre conditions/wear and adjust pressure, if necessary●●●●●●
Check operation of lighting system (headlights, direction
indicators, hazard warning lights, luggage compartment,
passenger compartment, glove compartment, instrument panel
warning lights, etc.)●●●●●●
Check operation of the wiper/washer system and adjust jets, if
necessary●●●●●●
Check the position/wear of the windscreen/rear window wiper
blades●●●●●●
Check front disc brake pad condition and wear and operation of
brake pad wear indicator●●●●●●
Check rear drum brake lining condition and wear●●●
Visually inspect condition of: exterior bodywork, underbody
protection, pipes and hoses (exhaust - fuel system - brakes),
rubber elements (boots, sleeves, bushes, etc.)●●●●●●
Check cleanliness of bonnet and luggage compartment locks, as
well as cleanliness and lubrication of linkages●●●●●●
Visually inspect conditions of the accessory drive belt(s)●●
181
Page 192 of 323

PERIODIC CHECKS
Every 1,000 km or before long
journeys, check and, if necessary, top
up the following:
❒engine coolant level;
❒brake fluid level;
❒windscreen washer fluid level;
❒tyre inflation pressure and condition;
❒operation of lighting system
(headlights, direction indicators,
hazard warning lights, etc.);
❒operation of screen washer/wiper
system and positioning/wear of
windscreen/rear screen wiper blades
(for versions/markets where
provided);
Every 3,000 km check and top up if
required: engine oil level.
DEMANDING
VEHICLE USE
If the vehicle is mostly used in one of
the following conditions:
❒towing a trailer or motorhome;
❒dusty roads;
❒short, repeated journeys (less than
7-8 km) at sub-zero outside
temperatures;
❒engine often idling or driving long
distances at low speeds or long
periods of inactivity;
the following checks must be carried
out more often than indicated in the
Scheduled Servicing Plan:
❒check front disc brake pad condition
and wear;
❒check cleanliness of bonnet and
luggage compartment locks,
cleanliness and lubrication of linkage;
❒visually inspect condition of: engine,
gearbox, transmission, pipes and
hoses (exhaust - fuel system -
brakes) and rubber elements (boots -
sleeves - bushes - etc.);
❒check battery charge and battery
fluid level (electrolyte);
❒visually inspect conditions of the
auxiliary drive belts;❒check and, if necessary, change
engine oil and replace oil filter;
❒check and, if necessary, replace
pollen filter;
❒replacement of air cleaner cartridge
every 15,000 km.
188
SERVICING AND MAINTENANCE
Page 206 of 323

❒after disconnecting the battery
charger, reconnect the quick-release
negative terminal A to the dummy
pole B.
Versions without dummy pole fig.
219
To recharge proceed as follows, paying
great care:
❒press button A to detach connector
B from battery status monitoring
sensor C (this is located on the
negative pole of the battery itself);
❒connect the positive cable (+) of the
battery charger to the battery positive
terminal (+);
❒connect the negative cable (–) of the
battery charger to the pin D of the
negative battery terminal (–);
❒turn on the charger;❒when you have finished, turn the
charger off before disconnecting
it from the battery;
❒reconnect the connector B to the
sensor C of the battery.
136) 137)
WARNING
136) Battery fluid is poisonous and
corrosive: avoid contact with
your skin and eyes. The battery
recharging operation must be
performed in a ventilated place,
away from naked flames or
possible sources of sparks to
avoid the risk of explosion and
fire.
137) Don't try to recharge a frozen
battery: it must be thawed first,
otherwise it may explode. If the
battery was frozen, have it
inspected by specialised
personnel before recharging to
check that the internal elements
are not damaged and that the
casing is not cracked, which
causes the risk of leakage
of poisonous, corrosive acid.
WINDSCREEN/REAR
WINDOW WIPER
(for versions/markets, where provided)
BLADES
Periodically clean the rubber part using
special products; TUTELA
PROFESSIONAL SC 35 is
recommended.
Replace the blades if the rubber edge is
deformed or worn. In any case, it is
advisable to replace them
approximately once a year.
A few simple precautions can reduce
the possibility of damage to the blades:
❒if the temperature falls below zero,
make sure that ice has not frozen
the rubber against the glass. Use a
de-icing product to release it if
required;
❒remove any snow from the glass: in
addition to protecting the blades,
this prevents effort on the motor and
overheating;
❒do not operate the windscreen and
rear window wipers on dry glass.
138)
219F0V0380
202
SERVICING AND MAINTENANCE
Page 207 of 323

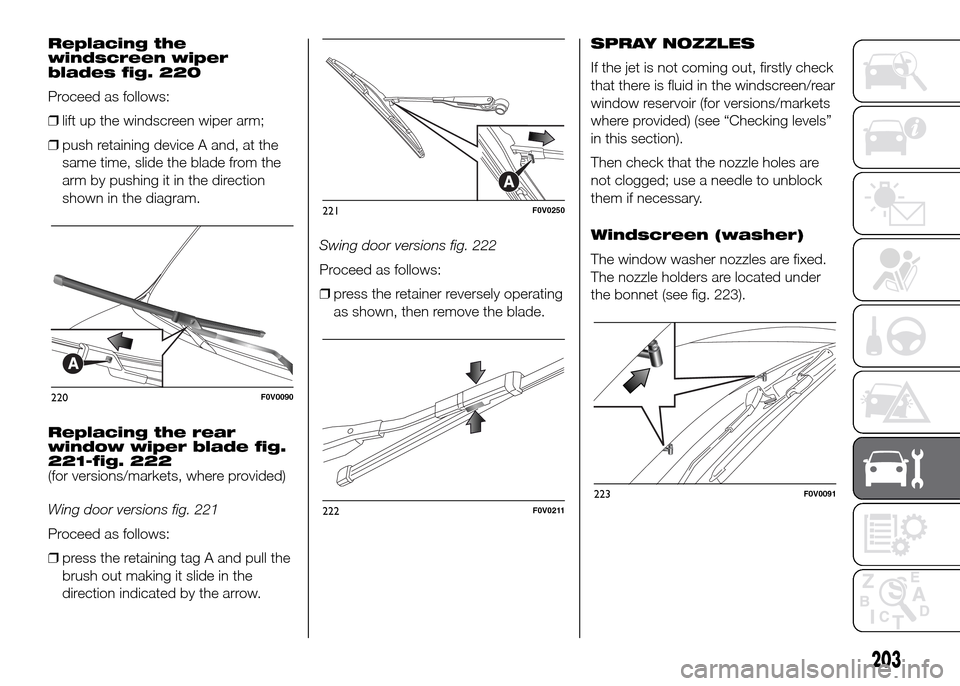
Replacing the
windscreen wiper
blades fig. 220
Proceed as follows:
❒lift up the windscreen wiper arm;
❒push retaining device A and, at the
same time, slide the blade from the
arm by pushing it in the direction
shown in the diagram.
Replacing the rear
window wiper blade fig.
221-fig. 222
(for versions/markets, where provided)
Wing door versions fig. 221
Proceed as follows:
❒press the retaining tag A and pull the
brush out making it slide in the
direction indicated by the arrow.Swing door versions fig. 222
Proceed as follows:
❒press the retainer reversely operating
as shown, then remove the blade.SPRAY NOZZLES
If the jet is not coming out, firstly check
that there is fluid in the windscreen/rear
window reservoir (for versions/markets
where provided) (see “Checking levels”
in this section).
Then check that the nozzle holes are
not clogged; use a needle to unblock
them if necessary.
Windscreen (washer)
The window washer nozzles are fixed.
The nozzle holders are located under
the bonnet (see fig. 223).
220F0V0090
221F0V0250
222F0V0211223F0V0091
203
Page 208 of 323

Rear window (washer)
The rear window washer jets are fixed.
The nozzle holder is located above
the rear window.
WARNING
138) Driving with worn windscreen
wiper blades is a serious hazard,
because visibility is reduced in
bad weather conditions.
WHEELS AND TYRES
Check the pressure of each tyre,
including the space-saver wheel,
approximately every two weeks and
before long journeys: the pressure
should be checked with the tyre rested
and cold.
It is normal for the pressure to increase
when the vehicle is used; for the correct
tyre inflation pressure, see “Wheels” in
the “Technical specifications” section.
Incorrect pressure causes abnormal
tyre wear fig. 224:
Anormal pressure: tread evenly worn;
Blow pressure: tread particularly worn
at the edges;
Chigh pressure: tread particularly worn
in the centre.The tyres must be replaced when the
tread is less than 1.6 mm thick. In
any case, follow the laws in force in the
country you are in.
IMPORTANT
❒As far as possible, avoid sharp
braking, screech starts and violent
shocks against pavements, potholes
or other hard obstacles. Driving for
long stretches over bumpy roads can
damage the tyres;
❒periodically check that the tyres have
no cuts in the side wall, abnormal
swelling or irregular tyre wear.
Contact a Fiat Dealership if required;
❒avoid overloading the vehicle when
travelling: this may cause serious
damage to the wheels and tyres;
❒if a tyre is punctured, stop
immediately and change it to avoid
damage to the tyre, the rim,
suspensions and steering system;
❒tyres age even if they are not used
much. Cracks in the tread and on
the side walls are a sign of ageing.
Have the tyres checked by
specialised personnel if they have
been fitted for longer than 6 years.
Remember to check the spare wheel
very carefully;
224F0V0161
204
SERVICING AND MAINTENANCE
Page 210 of 323

PROLONGED
VEHICLE INACTIVITY
If the vehicle needs to be off the road
for longer than one month, the following
precautions must be taken:
❒park the vehicle indoors in a dry and,
if possible, well-ventilated place;
❒engage a gear and check that the
handbrake is not engaged;
❒disconnect the negative terminal from
the battery pole (see paragraph
“Vehicle inactivity” in the "Dashboard
and controls" chapter) and check
the charge conditions (see paragraph
“Battery” in the “Care and
maintenance” chapter);
❒clean and protect the painted parts
using protective wax;
❒clean and protect the shiny metal
parts using special compounds
available commercially;
❒sprinkle talcum powder on the
windscreen and rear window wiper
rubber blades and lift them off the
glass;
❒slightly open the windows;❒cover the vehicle with a piece of
fabric or perforated plastic sheet. Do
not use compact plastic tarpaulins,
which prevent humidity from
evaporating from the surface of the
vehicle;
❒inflate tyres to +0.5 bar above the
standard specified pressure and
check it at intervals;
❒do not drain the engine cooling
system.
BODYWORK
PROTECTION AGAINST
ATMOSPHERIC AGENTS
The main causes of corrosion are the
following:
❒atmospheric pollution;
❒salty air and humidity (coastal areas,
or hot humid climates);
❒seasonal environmental conditions.
The abrasive action of wind-borne
atmospheric dust and sand, as well as
mud and gravel raised by other cars
is also not to be underestimated.
On your vehicle, Fiat has implemented
the best manufacturing technologies
to effectively protect the bodywork
against corrosion.
These include:
❒painting products and systems which
give the vehicle particular resistance
to corrosion and abrasion;
❒use of galvanised (or pretreated)
sheet metal, with high resistance
to corrosion;
❒spraying the underbody, engine
compartment, wheelhouse internal
parts and other parts with highly
protective wax products;
206
SERVICING AND MAINTENANCE