2016 FIAT DOBLO PANORAMA brake
[x] Cancel search: brakePage 141 of 323

EMERGENCY STARTING
In the case of emergency starting,
never connect the negative lead (–) of
the auxiliary battery to the negative pole
C of the vehicle battery, but rather to
either the dummy pole B or to an
engine/gearbox earth point fig. 149.
82) 83) 84) 85)
WARNING
81) If the battery needs to be
replaced, always contact a Fiat
Dealership. Replace the battery
with a new one of the same type
and specifications.82) Before opening the bonnet,
make sure that the vehicle is
switched off and the key is in the
OFF position. Please follow the
instructions on the decal near the
front crossmember. It is advisable
to extract the key when there
are other people in the vehicle.
83) The vehicle should always be
evacuated after the key has been
removed or turned to the OFF
position. When refuelling, make
sure that the vehicle is switched
off with the key in the OFF
position.
84) For vehicles with robotised
gearbox, in the event of automatic
engine stopping with the vehicle
on a slope, the engine should
be restarted by moving the gear
lever towards (+) or (–) without
releasing the brake pedal. For
vehicles with robotised gearbox
and Hill Holder function, in the
event of automatic engine
stopping with the vehicle on a
slope, the engine must be
restarted by moving the gear lever
towards (+) or (–) without
releasing the brake pedal, so that
the Hill Holder function, active
only with the engine running,
becomes available.85) If climate comfort is to be
favoured, the Start&Stop system
can be disabled, for a continuous
operation of the climate control
system.
149F0V0043
137
Page 146 of 323

Restoring the stored
speed
If the device has been deactivated, for
example by depressing the brake or
clutch pedal, the stored speed can be
restored as follows:
❒accelerate progressively until a speed
close to that stored is reached;
❒engage the gear selected at the time
that the speed was stored;
❒press button B fig. 150.
Increasing the stored
speed
This can be done in two ways:
❒by pressing the accelerator and
memorizing the new speed reached;
or
❒by moving the stalk upwards (+).
Each operation of the stalk will
correspond to a slight increase in
speed of about 1 km/h, while keeping
the stalk upwards will increase the
speed continuously.Reducing the stored
speed
This can be done in two ways:
❒by deactivating the device and then
storing the new speed
or
❒by moving the stalk downwards (-)
until the new speed, which will
automatically remain memorised, is
reached.
Each movement of the stalk will
correspond to a slight reduction in
speed of about 1 km/h, while keeping
the stalk held downwards will decrease
the speed continuously.
Deactivating the device
The device can be switched off by the
driver in the following ways:
❒by turning ring nut A to the OFF
position;
❒if the engine is stopped (leaving the
stalk ring nut at ON), when the
ignition key is next turned to ON,
Cruise Control will be activated
automatically.Deactivating the
function
The device can be switched off by the
driver in the following ways:
❒by pressing the brake pedal when the
device is adjusting the speed:
❒by pressing the clutch pedal when
the device is adjusting the speed;
❒by pressing button B fig. 150 when
the device is adjusting the speed
(for versions/markets, where
provided);
❒by pressing the accelerator pedal (in
this case the system is not actually
turned off but the acceleration
request takes priority; the cruise
control remains activated, without the
need to the press button B fig. 150
to restore the previous conditions
once the acceleration is over).
The device is automatically switched off
in the following cases:
❒if the ABS or ESC systems intervene
❒with the vehicle speed below the
set limit
❒in the event of system failure.
142
STARTING AND DRIVING
Page 149 of 323

The following conditions may influence
the performance of the parking
assistance system:
❒Reduced sensor sensitivity and a
reduction in the parking assistance
system performance could be due to
the presence on the surface of the
sensor of: ice, snow, mud, thick
paint.
❒The sensor may detect a non-
existent obstacle (echo noise) due to
mechanical noises, for example
when washing the vehicle, in case of
rain, strong wind, hail.
❒The signals sent out by the sensors
can be altered by dirt, snow or ice
deposited on the sensors or by
ultrasound systems (e.g. truck
pneumatic brakes or pneumatic drills)
near the vehicle.
❒The performance of the parking
assistance system may also be
affected by the position of the
sensors. For example by a change in
the ride setting (caused by the wear
of the shock absorbers, suspension),
changing the tyres, overloading the
vehicle and carrying out specific
tuning operations that require the
vehicle to be lowered.❒Detection of obstacles in the upper
part of the vehicle (particularly in the
case of vans or chassis cabs) may
not be guaranteed because the
system detects obstacles that could
strike the lower part of the vehicle.
❒The parking sensors work properly
with the swing doors closed.
❒If they are open, they can cause the
system to send false signals: always
close the rear doors.
❒Do not apply stickers to the sensors.
WARNING
97) The sensors must be clean of
mud, dirt, snow and ice in order
for the system to work. Be careful
not to scratch or damage the
sensors while cleaning them.
Avoid using dry, rough or hard
cloths. The sensors must be
washed using clean water, with
the addition of car shampoo if
necessary. When using special
washing equipment such as high
pressure jets or steam cleaning,
clean the sensors very quickly
keeping the jet more than 10 cm
away.98) Parking manoeuvres, however,
are always the driver’s
responsibility. While carrying out
these manoeuvres, always make
sure that no people (especially
children) or animals are in the
area concerned. The parking
sensor is designed to assist
drivers, who must still never allow
their attention to lapse during
potentially dangerous
manoeuvres even if performed at
low speed.
145
Page 153 of 323

TOWING TRAILERS
IMPORTANT
The vehicle must be equipped with a
type-approved tow hook and adequate
electrical system to tow trailers.
Installation should be carried out by
specialised personnel who will issue the
required papers for travelling on roads.
Install any specific and/or additional
door mirrors as specified by the
Highway Code.
Remember that when towing a trailer,
steep hills are harder to climb, braking
spaces increase and overtaking takes
longer depending on the overall weight.
Engage a low gear when driving
downhill, rather than constantly using
the brake.
The weight of the trailer on the vehicle
tow hook will reduce the loading
capacity of the vehicle by the same
amount.
To make sure that the maximum
towable weight is not exceeded (given
in the vehicle registration document)
account should be taken of the fully
laden trailer, including accessories and
luggage.Do not exceed the speed limits specific
to each country you are driving in, in
the case of vehicles towing trailers.
In any case, the top speed must not
exceed 80 km/h.
99) 100)
WARNING
99) The ABS device with which the
vehicle is equipped will not
control the braking system of the
trailer. Particular caution is
required on slippery roads.
100) Never modify the braking
system of the vehicle to control
the trailer brake. The trailer
braking system must be fully
independent from the hydraulic
system of the vehicle.
SNOW TYRES
Fiat Dealerships will be happy to
provide advice concerning the most
suitable type of tyres for the customer's
requirements.
For the type of tyre to be used, inflation
pressures and the specifications of
snow tyres, follow the instructions given
in the "Wheels" paragraph of the
"Technical specifications" section.
The winter features of these tyres are
reduced considerably when the tread
depth is below 4 mm. Replace them in
this case.
Due to snow tyre characteristics, under
normal conditions of use or on long
motorway journeys, the performance of
these tyres is lower than that of
standard tyres. Limit performance
according to the use for which they
were approved.
IMPORTANT When using snow tyres
with a maximum speed index below the
one that can be reached by the vehicle
(increased by 5%), place a notice in
the passenger compartment, plainly in
view, which states the maximum speed
allowed by the snow tyres (as per EC
Directive).
149
Page 158 of 323

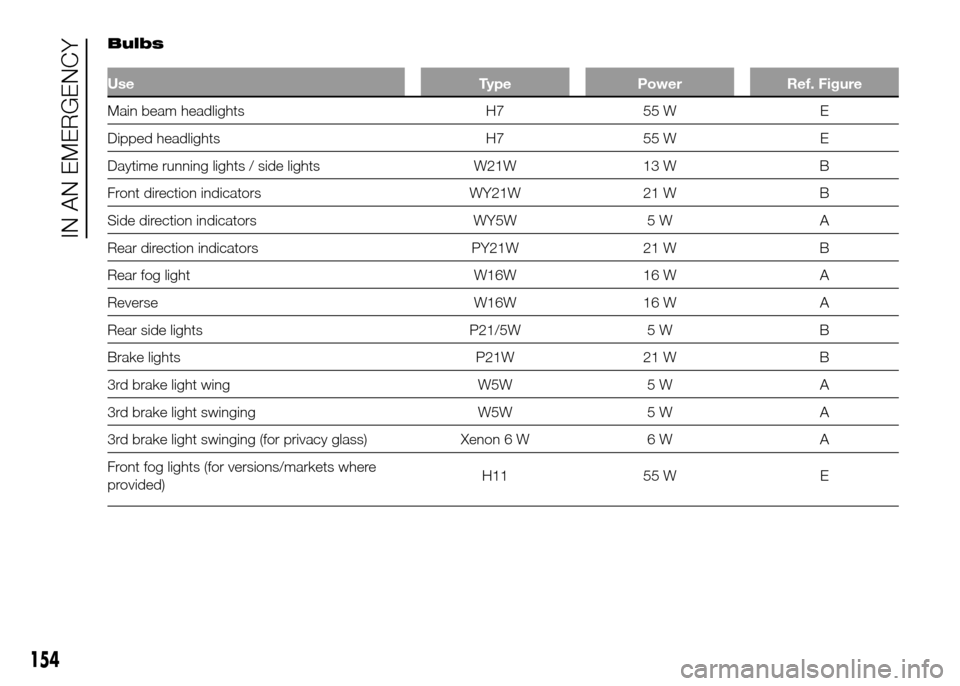
Bulbs
Use Type Power Ref. Figure
Main beam headlights H7 55 W E
Dipped headlights H7 55 W E
Daytime running lights / side lights W21W 13 W B
Front direction indicators WY21W 21 W B
Side direction indicators WY5W 5 W A
Rear direction indicators PY21W 21 W B
Rear fog light W16W 16 W A
Reverse W16W 16 W A
Rear side lights P21/5W 5 W B
Brake lights P21W 21 W B
3rd brake light wing W5W 5 W A
3rd brake light swinging W5W 5 W A
3rd brake light swinging (for privacy glass) Xenon 6 W 6 W A
Front fog lights (for versions/markets where
provided)H11 55 W E
154
IN AN EMERGENCY
Page 160 of 323

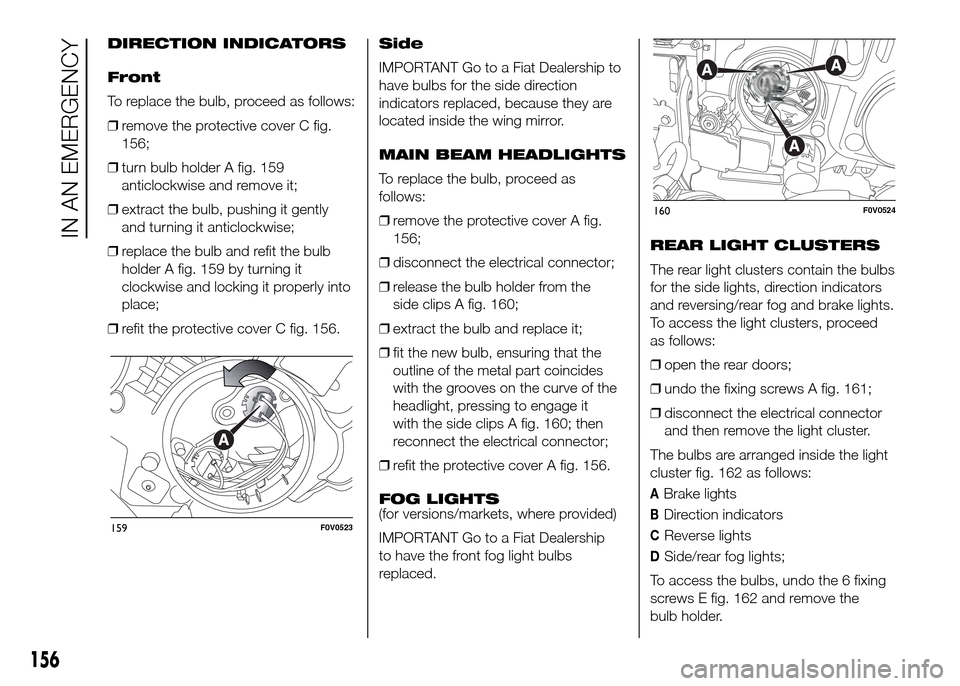
DIRECTION INDICATORS
Front
To replace the bulb, proceed as follows:
❒remove the protective cover C fig.
156;
❒turn bulb holder A fig. 159
anticlockwise and remove it;
❒extract the bulb, pushing it gently
and turning it anticlockwise;
❒replace the bulb and refit the bulb
holder A fig. 159 by turning it
clockwise and locking it properly into
place;
❒refit the protective cover C fig. 156.Side
IMPORTANT Go to a Fiat Dealership to
have bulbs for the side direction
indicators replaced, because they are
located inside the wing mirror.
MAIN BEAM HEADLIGHTS
To replace the bulb, proceed as
follows:
❒remove the protective cover A fig.
156;
❒disconnect the electrical connector;
❒release the bulb holder from the
side clips A fig. 160;
❒extract the bulb and replace it;
❒fit the new bulb, ensuring that the
outline of the metal part coincides
with the grooves on the curve of the
headlight, pressing to engage it
with the side clips A fig. 160; then
reconnect the electrical connector;
❒refit the protective cover A fig. 156.
FOG LIGHTS
(for versions/markets, where provided)
IMPORTANT Go to a Fiat Dealership
to have the front fog light bulbs
replaced.REAR LIGHT CLUSTERS
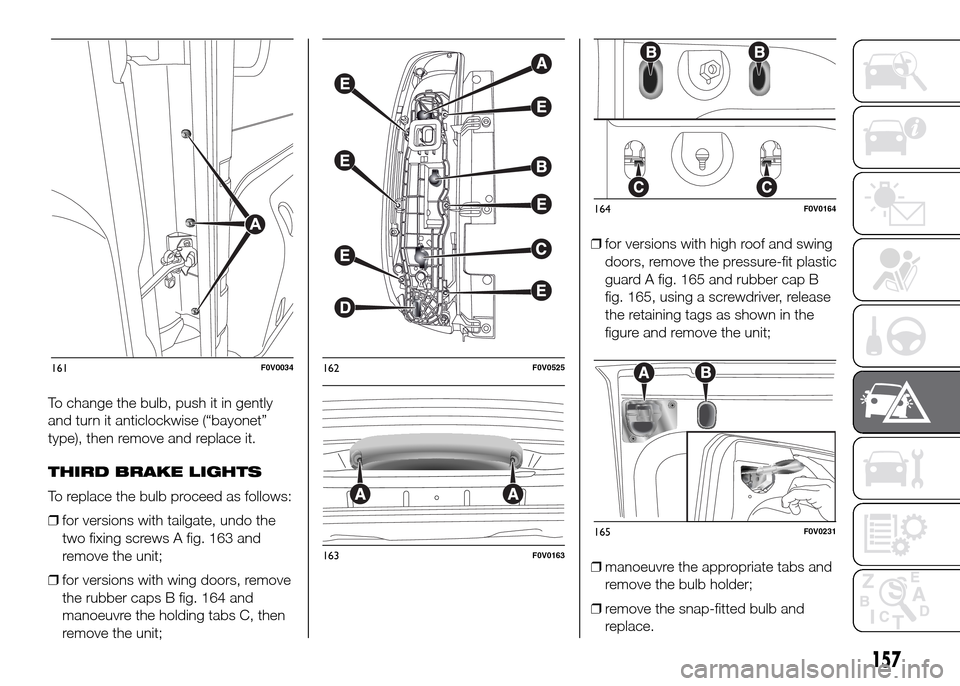
The rear light clusters contain the bulbs
for the side lights, direction indicators
and reversing/rear fog and brake lights.
To access the light clusters, proceed
as follows:
❒open the rear doors;
❒undo the fixing screws A fig. 161;
❒disconnect the electrical connector
and then remove the light cluster.
The bulbs are arranged inside the light
cluster fig. 162 as follows:
ABrake lights
BDirection indicators
CReverse lights
DSide/rear fog lights;
To access the bulbs, undo the 6 fixing
screws E fig. 162 and remove the
bulb holder.
159F0V0523
160F0V0524
156
IN AN EMERGENCY
Page 161 of 323

To change the bulb, push it in gently
and turn it anticlockwise (“bayonet”
type), then remove and replace it.
THIRD BRAKE LIGHTS
To replace the bulb proceed as follows:
❒for versions with tailgate, undo the
two fixing screws A fig. 163 and
remove the unit;
❒for versions with wing doors, remove
the rubber caps B fig. 164 and
manoeuvre the holding tabs C, then
remove the unit;❒for versions with high roof and swing
doors, remove the pressure-fit plastic
guard A fig. 165 and rubber cap B
fig. 165, using a screwdriver, release
the retaining tags as shown in the
figure and remove the unit;
❒manoeuvre the appropriate tabs and
remove the bulb holder;
❒remove the snap-fitted bulb and
replace.
161F0V0034162F0V0525
163F0V0163
164F0V0164
165F0V0231
157
Page 169 of 323

DEVICE PROTECTED FUSE AMPERE
Heated driver seat F1 10
Heated passenger seat F2 10
Cigar lighterF3 15
Third power socket on dashboard F4 20
Driver's side rear electric window F5 20
Passenger's side rear electric window F6 20
IMPORTANT
26) Never replace a blown fuse with metal wires or other material.
27) If you need to wash the engine compartment, take care not to directly hit the fuse box and the window wiper motors
with the water jet.
WARNING
105) If the replaced fuse blows again, contact a Fiat Dealership.
106) Never replace a fuse with another with a higher amp rating; DANGER OF FIRE. If a general protection fuse
(MEGA-FUSE, MIDI-FUSE) is activated, contact a Fiat Dealership. Before replacing a fuse, make sure that the ignition
key has been removed and that all the other services are switched off and/or disengaged.
107) Contact a Fiat Dealership if a safety system (airbags, brakes), engine system (engine, gearbox) or steering system
general protection fuse blows.
165