2016 FIAT DOBLO COMBI light
[x] Cancel search: lightPage 68 of 298

HEADLIGHTS
LIGHT BEAM ALIGNMENT
The correct alignment of the headlights
is essential for the comfort and safety
of the driver and other road users.
To ensure the best visibility when
travelling with the headlights on, the
headlight alignment must be correct.
Contact a Fiat Dealership to have
the headlights checked and adjusted.
HEADLIGHT ALIGNMENT
CORRECTOR
This device works with the ignition key
in the MAR position and the dipped
beam headlights on.
The vehicle tilts backwards when it is
laden, raising the beam. The beams
must therefore be realigned in this case.
Headlight alignment
adjustment
Press the
andfig. 110 buttons
on the control panel to adjust.
The display located on the instrument
panel provides a visual indication of the
adjustment position.
Position 0 - one or two people in the
front seats.
Position 1 - five people.
Position 2 - five people + load in the
luggage compartment.Position 3 - driver + maximum
permitted load stowed in the luggage
compartment.
IMPORTANT Check the light beam
alignment every time the load
transported changes.
FOG LIGHTS ALIGNMENT
(for versions/markets, where provided)
Contact a Fiat Dealership to have the
headlights checked and adjusted.ADJUSTING THE
HEADLIGHTS ABROAD
The dipped beam headlights are
aligned for operation in the country
where the vehicle was originally
purchased. In countries where vehicles
are driven on the other side of the
road, the beams are aligned by
applying a specially designed adhesive
film in order not to dazzle the vehicles
travelling in the opposite direction.
Such film is provided by Lineaccessori
Fiat and is available at Fiat Dealerships.
110F0V0506
64
KNOWING YOUR CAR
Page 69 of 298

RADIO
(for versions/markets, where provided)
For the operation of the radio with
CD/MP3 player (for versions/markets
where provided), read the Supplement
attached to this Owner's Handbook.
WIRING FOR
LIGHTWEIGHT SYSTEM
The system consists of:
radio supply leads;
front speaker cables (on door
mirrors trims);
front door panel speaker cables;
rear speaker cables (on the side of
the parcel shelf) (for versions/markets,
where provided);
radio housing;
aerial lead:
aerial.
WIRING FOR
HEAVYWEIGHT SYSTEM
The system consists of:
radio supply leads;
rear speaker cables (on the side of
the parcel shelf) (for versions/markets,
where provided);
no. 2 tweeters on door mirror trims;
no. 2 midwoofers on front door
lower part;
no. 2 rear speakers (on the side of
the parcel shelf) (for versions/markets,
where provided);
radio housing;
aerial lead:
aerial.
SOUND SYSTEM
INSTALLATION
The sound system must be installed in
the space occupied by the centre glove
compartment where you will find the
wiring. Press tabs A to remove the
compartment fig. 111.
46)
WARNING
46)For connection to the existing devices
supplied in the vehicle contact a Fiat
Dealership to prevent any problems that
could impair vehicle safety.
PROTECTING THE
ENVIRONMENT
The following devices are used for
reducing petrol fuel engine emissions:
three-way catalytic converter
(catalytic converter);
oxygen sensors;
evaporation control system.
In addition, do not let the engine run,
even for a test, with one or more spark
plugs disconnected.
The following devices are used for
reducing diesel fuel engine emissions:
oxidising catalytic converter;
exhaust gas recirculation system
(EGR);
particulate filter (DPF) (for versions/
markets, where provided).
DIESEL PARTICULATE
FILTER (DPF)
(for versions/markets, where provided)
The Diesel Particulate Filter is a
mechanical filter, integral with the
exhaust system, that physically traps
carbon particles present in the exhaust
gases of diesel engines.
The diesel particulate filter has been
adopted to eliminate almost all carbon
particles in compliance with current /
future legal regulations.
111F0V0508
65
Page 70 of 298

During normal use of the vehicle, the
Powertrain Control Module records
a set of data (travel time, type of route,
temperatures reached etc.) and
calculates how much particulate has
been trapped by the filter.
Since this filter physically traps
particulate, it should be regenerated
(cleaned) at regular intervals by burning
carbon particles. The regeneration
procedure is controlled automatically by
the Powertrain Control Module
according to the filter conditions and
vehicle usage conditions.
During regeneration, the following may
occur: a limited increase in the engine
speed, activation of the fan, a limited
increase in fumes and high
temperatures at the exhaust.
These are not faults; they do not impair
vehicle performance or damage the
environment.
If the dedicated message is displayed,
refer to paragraph "Warning lights
and messages".
66
KNOWING YOUR CAR
Page 71 of 298

KNOWING THE INSTRUMENT PANEL
This section of the booklet gives you all
the information you need to
understand, interpret and use the
instrument panel correctly.CONTROL PANEL AND
ON-BOARD INSTRUMENTS ........... 68
DIGITAL DISPLAY............................ 70
MULTIFUNCTION DISPLAY ............. 73
TRIP COMPUTER ........................... 80
EOBD SYSTEM............................... 82
WARNING LIGHTS AND
MESSAGES .................................... 83
- LOW BRAKE FLUID/HANDBRAKE
ENGAGED .......................................... 83
- EBD FAILURE .................................. 84
- AIRBAG FAILURE ............................. 84
- SEAT BELTS NOT FASTENED .......... 85
- ENGINE COOLANT TEMPERATURE
TOO HIGH .......................................... 85
- LOW BATTERY CHARGE ................. 86
- LOW ENGINE OIL PRESSURE ......... 87
-ENGINE OIL DETERIORATED ........... 87
-LOW ENGINE OIL LEVEL .................. 87
-INCOMPLETE DOOR LOCKING ........ 88
- INJECTION/EOBD SYSTEM
FAILURE ............................................. 89
- ABS FAILURE ................................... 90
-FUEL RESERVE ................................ 90
- GLOW PLUG PREHEATING/GLOW
PLUG PREHEATING FAILURE ............ 91
- WATER IN DIESEL FILTER ................ 91
-VEHICLE PROTECTION SYSTEM
FAILURE - FIAT CODE ........................ 92
- REAR FOG LIGHTS .......................... 92
-GENERIC FAILURE INDICATION ....... 92
-DPF (PARTICULATE FILTER)
CLEANING UNDERWAY ..................... 93
-WORN BRAKE PADS ........................ 94
-ASR SYSTEM DEACTIVATED ............ 94- TRACTION PLUS SYSTEM
ACTIVATION ....................................... 95
- TPMS ............................................... 95
-PARKING SENSOR FAILURE ............ 96
-START&STOP SYSTEM FAILURE ...... 96
- DIPPED BEAM HEADLIGHTS .......... 97
- FOLLOW ME HOME ........................ 97
- LEFT-HAND DIRECTION INDICATOR
............................................................ 97
- RIGHT-HAND DIRECTION
INDICATOR ........................................ 97
-FOG LIGHTS ..................................... 98
- CRUISE CONTROL .......................... 98
- MAIN BEAM HEADLIGHTS .............. 98
67
Page 72 of 298

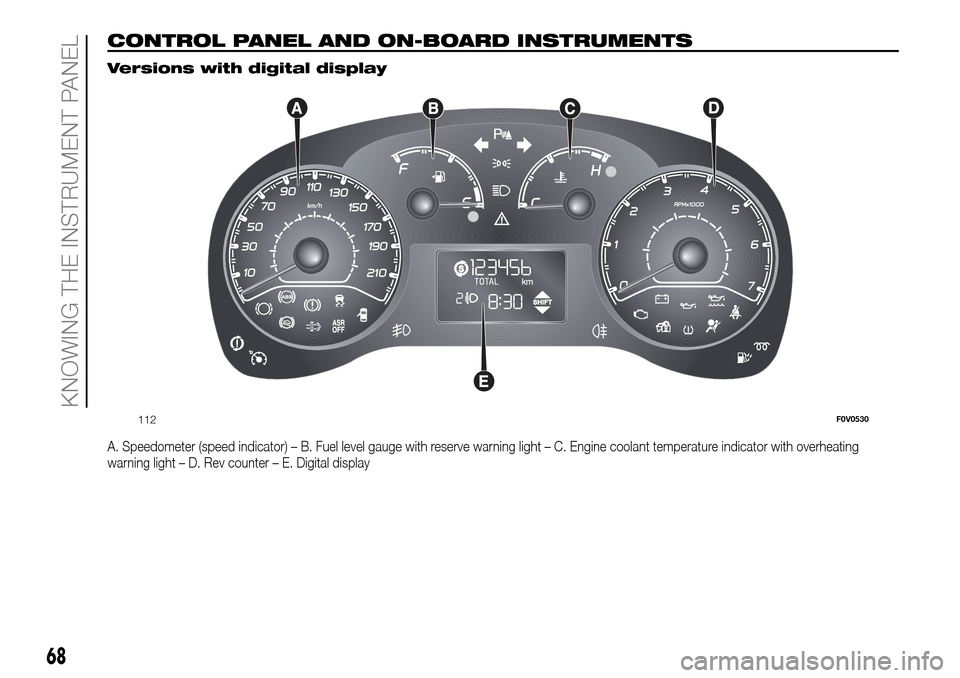
CONTROL PANEL AND ON-BOARD INSTRUMENTS.
Versions with digital display
A. Speedometer (speed indicator) – B. Fuel level gauge with reserve warning light – C. Engine coolant temperature indicator with overheating
warning light – D. Rev counter – E. Digital display
112F0V0530
68
KNOWING THE INSTRUMENT PANEL
Page 73 of 298

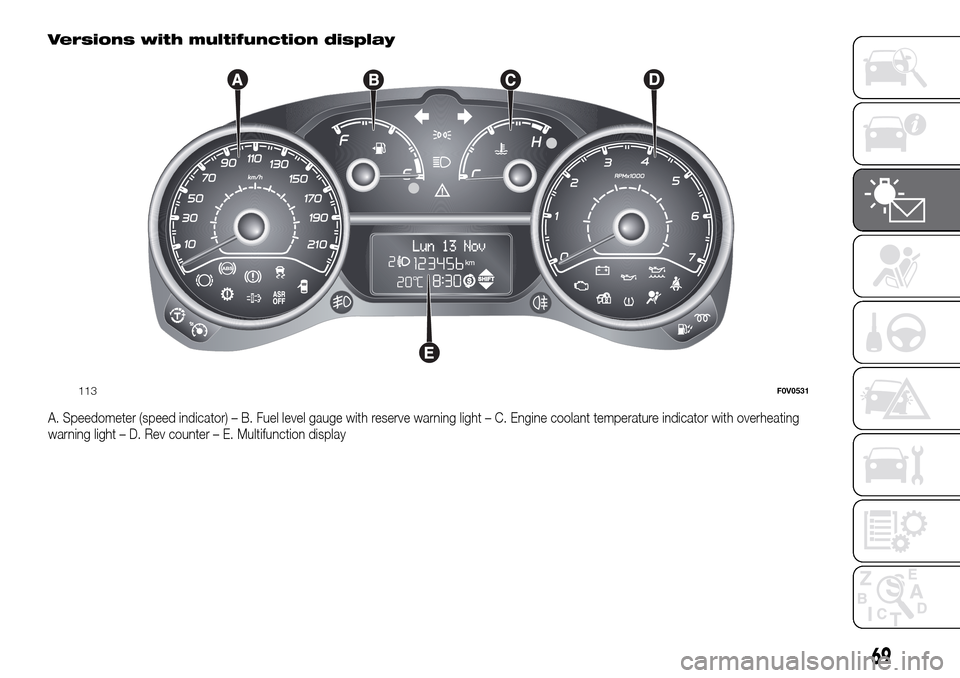
Versions with multifunction display
A. Speedometer (speed indicator) – B. Fuel level gauge with reserve warning light – C. Engine coolant temperature indicator with overheating
warning light – D. Rev counter – E. Multifunction display
113F0V0531
69
Page 74 of 298

SPEEDOMETER
This shows the speed at which the
vehicle is travelling.
REV COUNTER
The rev counter shows the engine rpm.
IMPORTANT The electronic injection
control system gradually shuts off
the flow of fuel when the engine
is “over-revving” resulting in a gradual
loss of engine power.
When the engine is idling, the rev
counter may indicate a gradual or
sudden increase of the speed.
This behaviour is standard as it takes
place during the activation of the
climate control system or the fan. It
should not be considered as a fault. In
such cases, a slight increase in engine
idle speed helps to sustain the battery
charge.
FUEL LEVEL GAUGE
This shows the amount of fuel left in the
fuel tank.
E tank empty.
F tank full (see the instructions provided
in the “Vehicle refuelling” paragraph).
The warning light on the gauge comes
on to indicate that approximately 8-10
litres of fuel are left in the tank.
Do not travel with the fuel tank almost
empty: any gaps in fuel supply could
damage the catalytic converter.IMPORTANT The needle will point to E
and warning light A will flash to indicate
a fault in the system. Contact a Fiat
Dealership to have the system
checked.
ENGINE COOLANT
TEMPERATURE
INDICATOR
This shows the temperature of the
engine coolant fluid and starts working
when the fluid temperature exceeds
approx. 50°C.
In normal usage, the needle should
hover around the middle of the scale.
C Low engine coolant temperature.
H High engine coolant temperature.
The warning light on the gauge may
light up (and a message on the
multifunction display may appear on
certain versions) to indicate that the
coolant fluid temperature is too high; in
this case, stop the engine and contact
a Fiat Dealership.
10)
WARNING
10)If the needle for the engine coolant
temperature reaches the red area, stop the
engine immediately and contact a Fiat
Dealership.
DIGITAL DISPLAY
STANDARD SCREEN
The standard screen fig. 114 can
display the following information:
AHeadlamp alignment position (only
with dipped headlamps on).
BMilometer (distance covered in km or
miles).
CTime (always displayed, even with the
key extracted and the front doors
closed).
DStart&Stop function indication (for
versions/markets, where provided).
EGear Shift Indication (for versions/
markets, where provided).
NoteWith key removed (when opening
at least one of the front doors) the
display turns on and shows the time
and distance covered for a few
seconds.
114F0V0011
70
KNOWING THE INSTRUMENT PANEL
Page 76 of 298

Adjusting the vehicle
interior lighting (ILLU)
This function is available, with the
dipped headlamps on and at night, to
adjust the brightness of the instrument
panel, buttons, sound system display
and automatic climate control display.
During the daytime, and with the
dipped headlamps on, the instrument
panel, buttons and sound system
and automatic climate control displays
are set to maximum brightness.
press theMENUbutton briefly:
the display will show the wording ILLU;
press buttonandto set the
required brightness level;
press theMENUbutton briefly
to return to the menu screen or hold
the button down to return to the
standard screen without storing.
Setting a speed limit
(SPEEd)
This function is used to set a speed
limit (km/h or mph); the driver is alerted
when this limit is exceeded (see
“Warning lights and messages”).
To set the desired speed limit, proceed
as follows:
- press theMENU
button briefly:
the display will show the wording
(SPEED) and the unit (km/h) or (mph)
previously set;- press
orto select speed limit
activation (On) or deactivation (Off);
- if the function is on, press
orto
select the required speed limit and then
pressMENU
to confirm;
NOTE The speed may be set in the
range from 30 to 200 km/h, or from 20
to 125 mph according to the previously
chosen unit (see “Setting the distance
unit”) described below. The setting
will increase/decrease by five units each
time the
/button is pressed. Hold
down the
/button to automatically
increase/decrease the setting rapidly.
Complete the adjustment with single
presses of the button when you
approach the desired value.
- press theMENU
button briefly to
return to the menu screen or hold the
button down to return to the standard
screen without storing.
To cancel the setting, proceed as
follows:
- briefly the pressMENU
button;
(On) will flash on the display;
- press the
button; (Off) will flash on
the display;
- press theMENU
button briefly to
return to the menu screen or hold the
button down to return to the standard
screen without storing.Setting the clock (Hour)
With this function, it is possible to set
the time.
To adjust, proceed as follows:
- briefly press theMENU
button;
the “hours” will flash on the display;
- press the
orbutton to adjust;
- briefly press theMENU ESC
button; the “minutes” will flash on
the display;
- press the
orbutton to adjust;
- press theMENU
button briefly to
return to the menu screen or hold the
button down to return to the standard
screen without storing.
Setting the distance unit
(Unit)
With this function it is possible to set
the unit.
To adjust, proceed as follows:
- press theMENU
button briefly:
the display will show the wording (Unit)
and the previously set unit (km) or (mi);
- press
orto select the required
unit.
- press theMENU
button briefly to
return to the menu screen or hold the
button down to return to the standard
screen without storing.
72
KNOWING THE INSTRUMENT PANEL