2016 FIAT 500L stop start
[x] Cancel search: stop startPage 14 of 476

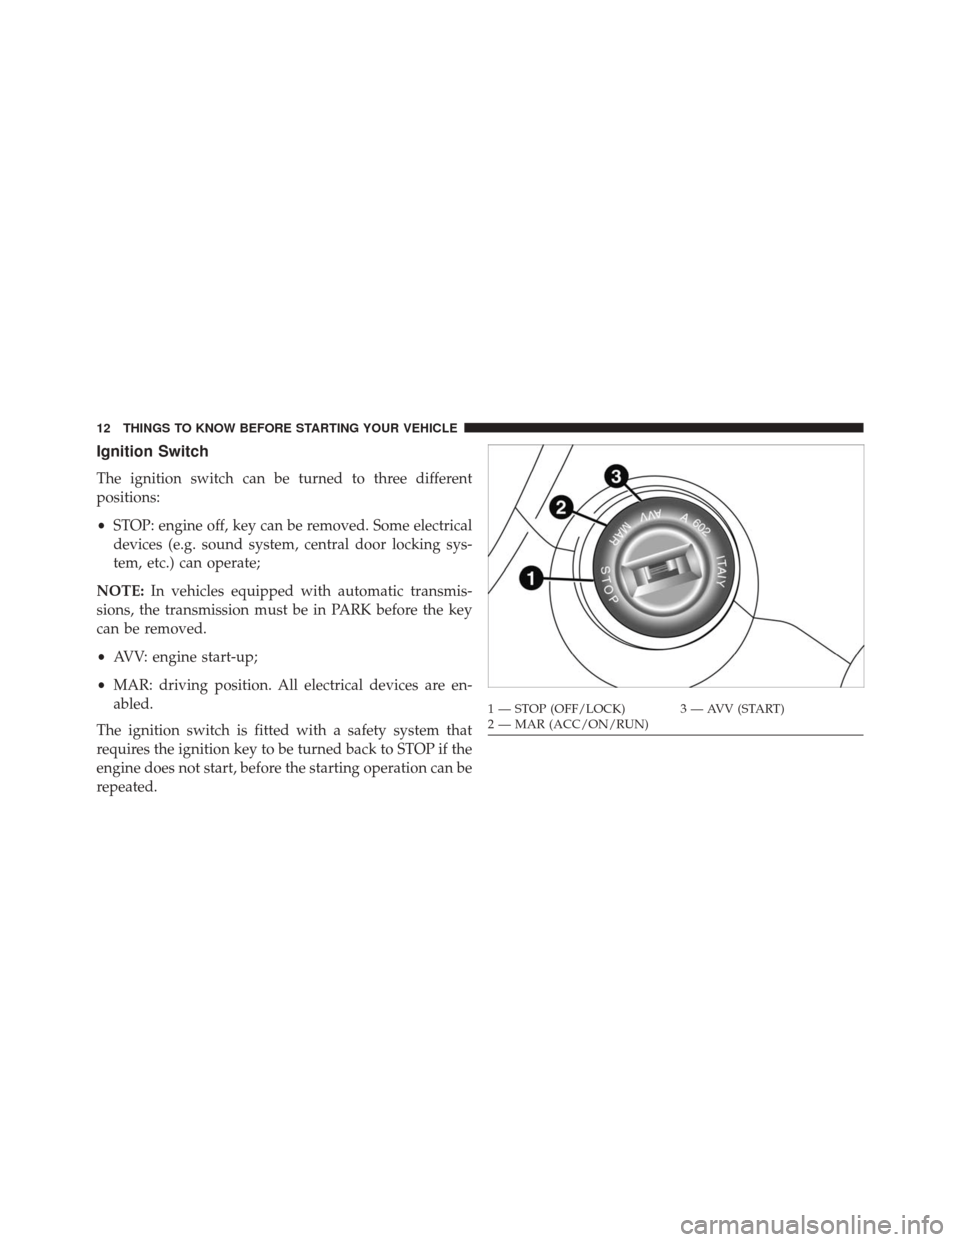
Ignition Switch
The ignition switch can be turned to three different
positions:
•STOP: engine off, key can be removed. Some electrical
devices (e.g. sound system, central door locking sys-
tem, etc.) can operate;
NOTE: In vehicles equipped with automatic transmis-
sions, the transmission must be in PARK before the key
can be removed.
• AVV: engine start-up;
• MAR: driving position. All electrical devices are en-
abled.
The ignition switch is fitted with a safety system that
requires the ignition key to be turned back to STOP if the
engine does not start, before the starting operation can be
repeated.
1 — STOP (OFF/LOCK) 3 — AVV (START)
2 — MAR (ACC/ON/RUN)
12 THINGS TO KNOW BEFORE STARTING YOUR VEHICLE
Page 29 of 476

NOTE:The power window switches will remain active
for up to three minutes after the ignition switch is cycled
to the OFF position. Opening either front door will cancel
this feature.
WARNING!
Never leave children unattended in a vehicle, and do
not let children play with power windows. Do not
leave the Key Fob in or near the vehicle, or in a
location accessible to children. Occupants, particu-
larly unattended children, can become entrapped by
the windows while operating the power window
switches. Such entrapment may result in serious
injury or death.
Auto-Down
The window switches have an Auto-Down feature. Push
the window switch for approximately one second, re-
lease, and the window will go down automatically. To
cancel the Auto-Down movement, operate the switch in
either the up or down direction and release the switch.
AUTO-Up Feature With Anti-Pinch Protection — If
Equipped
Lift the window switch to the second detent, release, and
the window will go up automatically.
To stop the window from going all the way up during the
AUTO-up operation, push down on the switch briefly.
To close the window part way, lift the window switch to
the first detent and release it when you want the window
to stop.
2
THINGS TO KNOW BEFORE STARTING YOUR VEHICLE 27
Page 30 of 476

NOTE:
•If the window runs into any obstacle during auto-
closure, it will reverse direction and then go back
down. Remove the obstacle and use the window
switch again to close the window.
• Any impact due to rough road conditions may trigger
the auto-reverse function unexpectedly during auto-
closure. If this happens, pull the switch lightly to the
first detent and hold to close the window manually.
WARNING!
There is no anti-pinch protection when the window
is almost closed. Be sure to clear all objects from the
window before closing.
Resetting The Auto Up Feature
Should the “Auto Up” feature stop working, the window
probably needs to be reset. To reset “Auto Up”:
1. Pull the window switch up to close the window completely and continue to hold the switch up for an
additional two seconds after the window is closed.
2. Push the window switch down firmly to the second detent to open the window completely and continue
to hold the switch down for an additional two seconds
after the window is fully open.
Wind Buffeting
Wind buffeting can be described as the perception of
pressure on the ears or a helicopter-type sound in the
ears. Your vehicle may exhibit wind buffeting with the
windows down, or the sunroof (if equipped) in certain
28 THINGS TO KNOW BEFORE STARTING YOUR VEHICLE
Page 36 of 476

sequence may repeat based on vehicle speed until the
driver and occupied outboard front seat passenger seat
belts are buckled. The driver should instruct all occu-
pants to buckle their seat belts.
Change Of Status
If the driver or outboard front seat passenger (if
equipped with outboard front passenger seat BeltAlert)
unbuckles their seat belt while the vehicle is traveling,
the BeltAlert warning sequence will begin until the seat
belts are buckled again. The outboard front passenger
seat BeltAlert is not active when the outboard front
passenger seat is unoccupied. BeltAlert may be triggered
when an animal or heavy object is on the outboard front
passenger seat or when the seat is folded flat (if
equipped). It is recommended that pets be restrained in
the rear seat (if equipped) in pet harnesses or pet carriers
that are secured by seat belts, and cargo is properly
stowed.BeltAlert can be activated or deactivated by your autho-
rized dealer. FCA US LLC does not recommend deacti-
vating BeltAlert.
NOTE:
If BeltAlert has been deactivated and the driver
or outboard front seat passenger is unbuckled the Seat
Belt Reminder Light will turn on and remain on until the
driver and outboard front seat passenger seat belts are
buckled.
Lap/Shoulder Belts
All seating positions in your vehicle are equipped with
lap/shoulder belts.
The seat belt webbing retractor will lock only during very
sudden stops or collisions. This feature allows the shoul-
der part of the seat belt to move freely with you under
normal conditions. However, in a collision the seat belt
will lock and reduce your risk of striking the inside of the
vehicle or being thrown out of the vehicle.
34 THINGS TO KNOW BEFORE STARTING YOUR VEHICLE
Page 38 of 476

WARNING!(Continued)
•A lap belt worn too high can increase the risk of
injury in a collision. The seat belt forces won’t be at
the strong hip and pelvic bones, but across your
abdomen. Always wear the lap part of your seat
belt as low as possible and keep it snug.
• A twisted seat belt may not protect you properly. In
a collision, it could even cut into you. Be sure the
seat belt is flat against your body, without twists. If
you can’t straighten a seat belt in your vehicle, take
it to your authorized dealer immediately and have
it fixed.
• A seat belt that is buckled into the wrong buckle
will not protect you properly. The lap portion could
ride too high on your body, possibly causing inter-
nal injuries. Always buckle your seat belt into the
buckle nearest you.
(Continued)
WARNING! (Continued)
•A seat belt that is too loose will not protect you
properly. In a sudden stop, you could move too far
forward, increasing the possibility of injury. Wear
your seat belt snugly.
•
A seat belt that is worn under your arm is dangerous.
Your body could strike the inside surfaces of the
vehicle in a collision, increasing head and neck
injury. A seat belt worn under the arm can cause
internal injuries. Ribs aren’t as strong as shoulder
bones. Wear the seat belt over your shoulder so that
your strongest bones will take the force in a collision.
• A shoulder belt placed behind you will not protect
you from injury during a collision. You are more
likely to hit your head in a collision if you do not
wear your shoulder belt. The lap and shoulder belt
are meant to be used together.
(Continued)
36 THINGS TO KNOW BEFORE STARTING YOUR VEHICLE
Page 57 of 476

Enhanced Accident Response System Reset
Procedure
After the event occurs, when the system is active, a
message regarding fuel cutoff is displayed. Turn the
ignition switch from ignition AVV/START or MAR/
ACC/ON/RUN to ignition STOP/OFF/LOCK. Care-
fully check the vehicle for fuel leaks in the engine
compartment and on the ground near the engine com-
partment and fuel tank before resetting the system and
starting the engine.
Depending on the nature of the event the left and right
turn signal lights, located in the instrument panel, may
both be blinking and will continue to blink. In order to
move your vehicle to the side of the road, you must
follow the system reset procedure.
Customer Action Customer Will See
1. Turn Ignition OFF.
(Turn Signal Switch Must Be Placed In Neutral State).
2. Turn Ignition ON. Left Turn Light Is OFF. Right Turn LightBLINKS.
3. Turn Right Turn Signal Switch ON. Right Turn Light Is ON
SOLID. Left Turn Light BLINKS.
4. Turn Left Turn Signal Switch ON. Left Turn Light Is ON
SOLID. Right Turn Signal Light BLINKS.
5. Turn Right Turn Signal Switch ON. Right Turn Light Is ON
SOLID. Left Turn Light BLINKS.
2
THINGS TO KNOW BEFORE STARTING YOUR VEHICLE 55
Page 58 of 476

Customer Action Customer Will See
6. Turn Left Turn Signal Switch ON. Left Turn Light Is ON
SOLID. Right Turn Light Is ON SOLID.
7. Turn Left Turn Signal
Switch OFF. (Turn Signal
Switch Must Be Placed In Neutral State). Left Turn light Is OFF.
Right Turn Light is OFF.
8. Turn Ignition OFF.
9. Turn Hazard Flashers OFF (Manually). System is now reset and
the engine may be started.
If a reset procedure step is not completed within 60
seconds, then the turn signal lights will blink and the
reset procedure must be performed again in order to be
successful.Air Bag Warning Light
The air bags must be ready to inflate for your
protection in a collision. The Occupant Re-
straint Controller (ORC) monitors the internal
circuits and interconnecting wiring associated
with air bag system electrical components.
The ORC monitors the readiness of the electronic parts of
the air bag system whenever the ignition switch is in the
AVV/START or MAR/ACC/ON/RUN position. If the
ignition switch is in the STOP/OFF/LOCK position the
air bag system is not on and the air bags will not inflate.
The ORC contains a backup power supply system that
may deploy the air bags even if the battery loses power or
it becomes disconnected prior to deployment.
The ORC turns on the Air Bag Warning Light in the
instrument panel for approximately four to eight seconds
for a self-check when the ignition switch is first turned to
56 THINGS TO KNOW BEFORE STARTING YOUR VEHICLE
Page 65 of 476

remain in a forward-facing child seat with a harness for
as long as possible, up to the highest weight or height
allowed by the child seat.
All children whose weight or height is above the
forward-facing limit for the child seat should use a
belt-positioning booster seat until the vehicle’s seat belts
fit properly. If the child cannot sit with knees bent over
the vehicle’s seat cushion while the child’s back is against
the seatback, they should use a belt-positioning booster
seat. The child and belt-positioning booster seat are held
in the vehicle by the seat belt.
WARNING!
•Improper installation can lead to failure of an
infant or child restraint. It could come loose in a
collision. The child could be badly injured or
killed. Follow the child restraint manufacturer ’s
(Continued)
WARNING! (Continued)
directions exactly when installing an infant or
child restraint.
• After a child restraint is installed in the vehicle, do
not move the vehicle seat forward or rearward
because it can loosen the child restraint attach-
ments. Remove the child restraint before adjusting
the vehicle seat position. When the vehicle seat has
been adjusted, reinstall the child restraint.
• When your child restraint is not in use, secure it in
the vehicle with the seat belt or LATCH anchor-
ages, or remove it from the vehicle. Do not leave it
loose in the vehicle. In a sudden stop or accident, it
could strike the occupants or seatbacks and cause
serious personal injury.2
THINGS TO KNOW BEFORE STARTING YOUR VEHICLE 63