2016 FIAT 500L LIVING USB
[x] Cancel search: USBPage 9 of 240
DASHBOARD
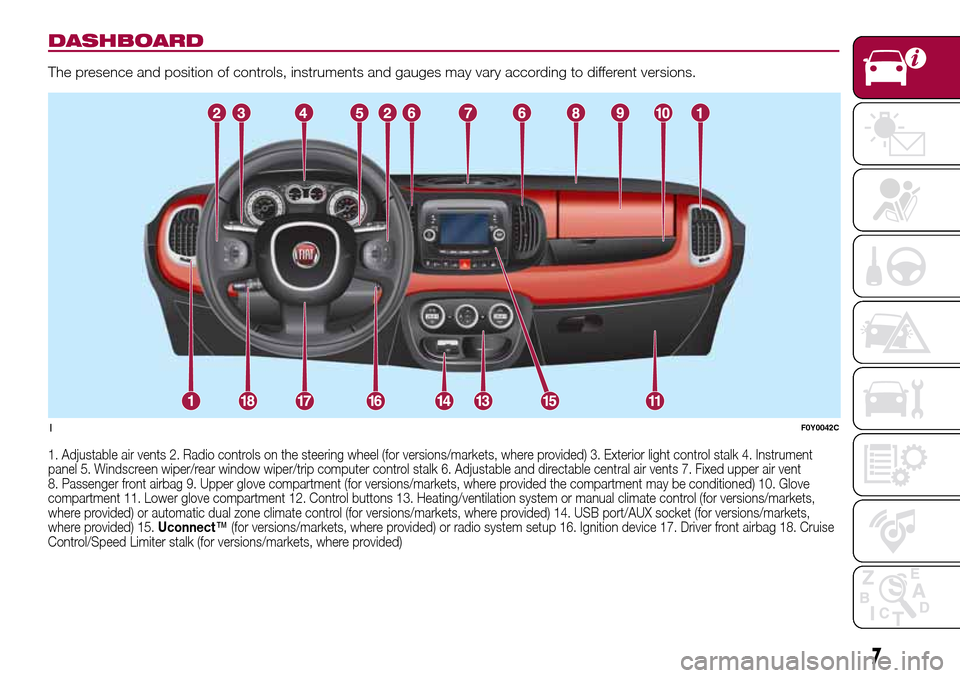
The presence and position of controls, instruments and gauges may vary according to different versions.
1. Adjustable air vents 2. Radio controls on the steering wheel (for versions/markets, where provided) 3. Exterior light control stalk 4. Instrument
panel 5. Windscreen wiper/rear window wiper/trip computer control stalk 6. Adjustable and directable central air vents 7. Fixed upper air vent
8. Passenger front airbag 9. Upper glove compartment (for versions/markets, where provided the compartment may be conditioned) 10. Glove
compartment 11. Lower glove compartment 12. Control buttons 13. Heating/ventilation system or manual climate control (for versions/markets,
where provided) or automatic dual zone climate control (for versions/markets, where provided) 14. USB port/AUX socket (for versions/markets,
where provided) 15.Uconnect™(for versions/markets, where provided) or radio system setup 16. Ignition device 17. Driver front airbag 18. Cruise
Control/Speed Limiter stalk (for versions/markets, where provided)
1F0Y0042C
7
Page 212 of 240
Front panel control summary table
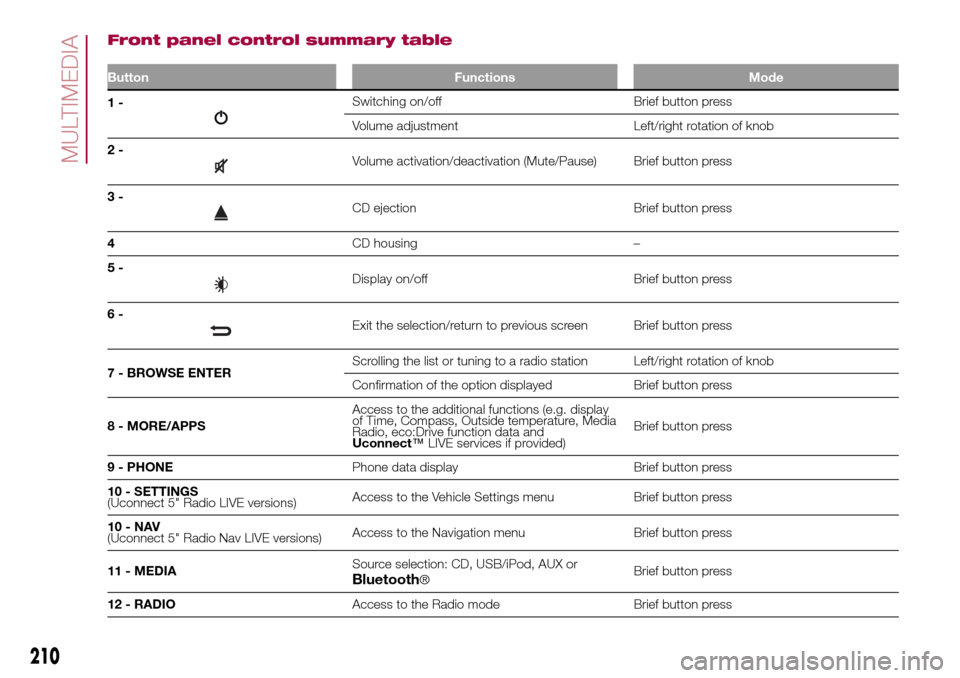
Button Functions Mode
1-Switching on/off Brief button press
Volume adjustment Left/right rotation of knob
2-
Volume activation/deactivation (Mute/Pause) Brief button press
3-
CD ejection Brief button press
4CD housing –
5-
Display on/off Brief button press
6-
Exit the selection/return to previous screen Brief button press
7 - BROWSE ENTERScrolling the list or tuning to a radio station Left/right rotation of knob
Confirmation of the option displayed Brief button press
8 - MORE/APPSAccess to the additional functions (e.g. display
of Time, Compass, Outside temperature, Media
Radio, eco:Drive function data and
Uconnect™LIVE services if provided)Brief button press
9 - PHONEPhone data display Brief button press
10 - SETTINGS
(Uconnect 5" Radio LIVE versions)Access to the Vehicle Settings menu Brief button press
10-NAV
(Uconnect 5" Radio Nav LIVE versions)Access to the Navigation menu Brief button press
11 - MEDIASource selection: CD, USB/iPod, AUX or
Bluetooth®Brief button press
12 - RADIOAccess to the Radio mode Brief button press
210
MULTIMEDIA
Page 214 of 240
Steering wheel control summary table
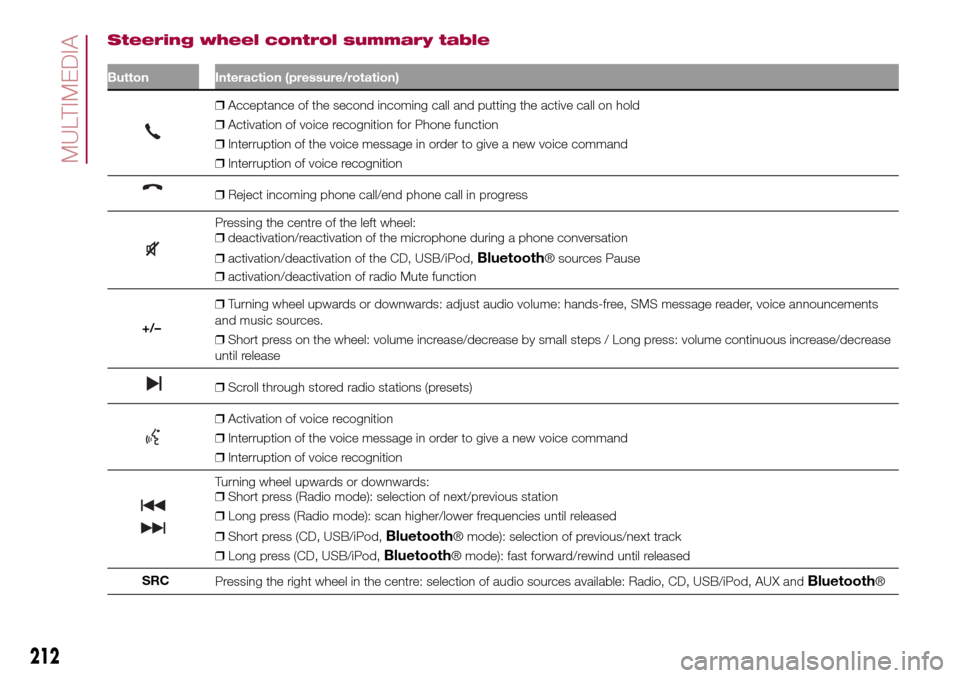
Button Interaction (pressure/rotation)
❒Acceptance of the second incoming call and putting the active call on hold
❒Activation of voice recognition for Phone function
❒Interruption of the voice message in order to give a new voice command
❒Interruption of voice recognition
❒Reject incoming phone call/end phone call in progress
Pressing the centre of the left wheel:
❒deactivation/reactivation of the microphone during a phone conversation
❒activation/deactivation of the CD, USB/iPod,
Bluetooth® sources Pause
❒activation/deactivation of radio Mute function
+/–❒Turning wheel upwards or downwards: adjust audio volume: hands-free, SMS message reader, voice announcements
and music sources.
❒Short press on the wheel: volume increase/decrease by small steps / Long press: volume continuous increase/decrease
until release
❒Scroll through stored radio stations (presets)
❒Activation of voice recognition
❒Interruption of the voice message in order to give a new voice command
❒Interruption of voice recognition
Turning wheel upwards or downwards:
❒Short press (Radio mode): selection of next/previous station
❒Long press (Radio mode): scan higher/lower frequencies until released
❒Short press (CD, USB/iPod,
Bluetooth® mode): selection of previous/next track
❒Long press (CD, USB/iPod,
Bluetooth® mode): fast forward/rewind until released
SRC
Pressing the right wheel in the centre: selection of audio sources available: Radio, CD, USB/iPod, AUX and
Bluetooth®
212
MULTIMEDIA
Page 215 of 240
"TOUCH SCREEN"
FUNCTION
The system uses the "touch screen"
function; to interact with the different
functions, press the "graphic buttons"
displayed.
Confirmation of a selection: press
the "OK" button.
Going back to the previous screen:
press the
(Delete) button or,
depending on the activated screen,
/Done.
USB/iPod/AUX SUPPORT
The vehicle has a USB/AUX port
located in the centre tunnel.
RADIO MODE
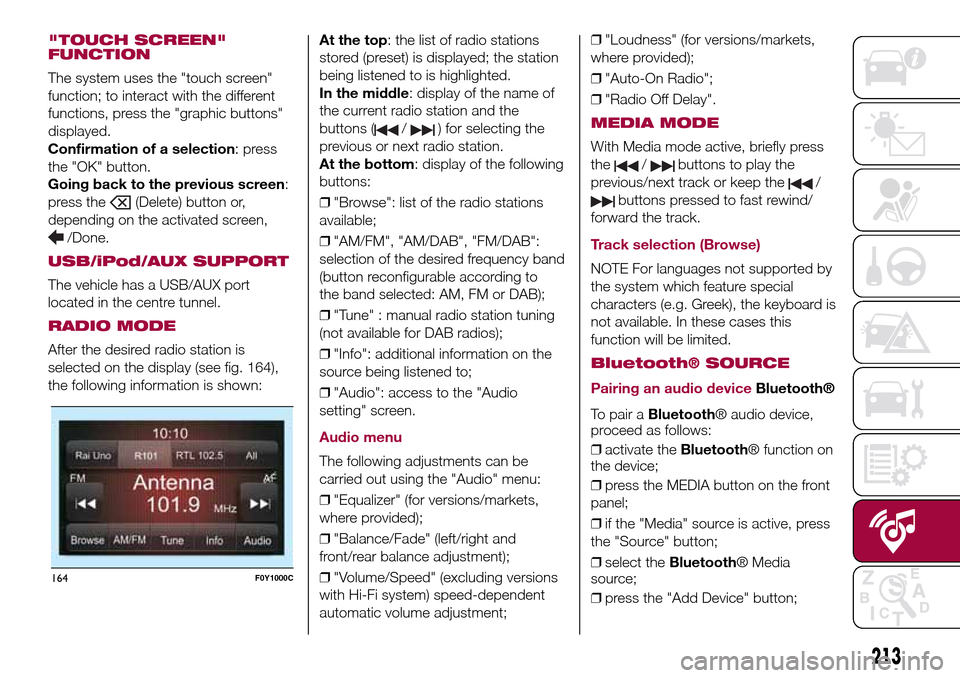
After the desired radio station is
selected on the display (see fig. 164),
the following information is shown:At the top: the list of radio stations
stored (preset) is displayed; the station
being listened to is highlighted.
In the middle: display of the name of
the current radio station and the
buttons (
/) for selecting the
previous or next radio station.
At the bottom: display of the following
buttons:
❒"Browse": list of the radio stations
available;
❒"AM/FM", "AM/DAB", "FM/DAB":
selection of the desired frequency band
(button reconfigurable according to
the band selected: AM, FM or DAB);
❒"Tune" : manual radio station tuning
(not available for DAB radios);
❒"Info": additional information on the
source being listened to;
❒"Audio": access to the "Audio
setting" screen.
Audio menu
The following adjustments can be
carried out using the "Audio" menu:
❒"Equalizer" (for versions/markets,
where provided);
❒"Balance/Fade" (left/right and
front/rear balance adjustment);
❒"Volume/Speed" (excluding versions
with Hi-Fi system) speed-dependent
automatic volume adjustment;❒"Loudness" (for versions/markets,
where provided);
❒"Auto-On Radio";
❒"Radio Off Delay".
MEDIA MODE
With Media mode active, briefly press
the
/buttons to play the
previous/next track or keep the
/
buttons pressed to fast rewind/
forward the track.
Track selection (Browse)
NOTE For languages not supported by
the system which feature special
characters (e.g. Greek), the keyboard is
not available. In these cases this
function will be limited.
Bluetooth® SOURCE
Pairing an audio device
Bluetooth®
To pair aBluetooth® audio device,
proceed as follows:
❒activate theBluetooth® function on
the device;
❒press the MEDIA button on the front
panel;
❒if the "Media" source is active, press
the "Source" button;
❒select theBluetooth® Media
source;
❒press the "Add Device" button;
164F0Y1000C
213
Page 219 of 240
Only for Uconnect™5" Radio Nav
LIVE: accessing theUconnect™LIVE
services enables the TomTom LIVE
services. Further information about the
LIVE functions is available in the
dedicated chapter.
eco:Drive™
Theeco:Drive™application allows you
to display your driving behaviour in
real time, in order to help you reach a
more efficient driving style as far as
consumption and emissions are
concerned.
In addition, the data can be saved on
an USB device or thanks to the
Uconnect™LIVEApp, and the data
analysis can be made on your personal
computer thanks to theeco:Drive™
application, available on www.fiat.it
or www.driveuconnect.eu.
Evaluation of the driving style is
dependent on four indices that monitor
the following parameters:
❒Acceleration
❒Deceleration
❒Gearbox/transmission
❒Speed
Display of the eco:Drive™
Press theeco:Drive™button to
interact with the function. A screen will
be displayed showing the 4 indices
described above. These indices are
grey until the system has enough data
to evaluate the driving style.
Once sufficient data are available, the
indices will have 5 colours depending
on the evaluation: dark green (very
good), light green, yellow, orange and
red (very bad).
"Current route index" refers to the entire
value calculated in real time based on
the average of the described indices. It
represents eco-friendliness of the
driving style: from 0 (low) to 100 (high).
In the event of extended inactivity the
display will show the average of the
indices until that moment (the "Average
index"), then the indices will be
coloured again in real time as soon as
the vehicle is restarted.
To check the data average of previous
route (the "route" starts when the
ignition key is turned to MAR and stops
when it is turned to STOP), select the
"Previous route" button.
The details of the previous trip can also
be displayed by pressing the "Details"
button, in which journey duration (time
and mileage) and average speed will be
reported.Trip data storage and transfer
The trip data can be stored in
the system memory and transferred
through a properly configured USB
memory stick or by theUconnect™
LIVE App.
This allows you to display the history of
the collected data, showing the
complete analysis of the trip data and
of your driving style.
For further information visit the
www.driveuconnect.eu website.
217
Page 220 of 240
IMPORTANT Do not remove the USB
memory stick nor unpair the
smartphone and theApp Uconnect™
LIVEbefore the system has
downloaded the data, since these
could be lost. During the data transfer
phase on the devices, the display of
Uconnect™could show messages to
properly carry out the operation: refer
to the information provided. These
messages are only displayed with the
ignition key at STOP and when a delay
in the system switching off is set.
Uconnect™. The data are
automatically transferred to the devices
when the engine is switched off. The
data transferred are deleted from the
system memory. You can choose
to store the trip data or not, by pressing
the "Settings" button and by setting
the storage activation and the USB or
Cloud transfer mode.
When the USB memory stick is full, the
dedicated messagesUconnect™
are shown on the radio display.
When theeco:Drive™data are not
transferred to USB memory stick for a
long time, the internal memory of the
systemUconnect™may be
exhausted: in this case follow the
recommendations provided by the
messages on the display.my:Car
my:Car allows you to keep the "health
condition" of your vehicle always under
control. The my:Car application can
detect malfunction in real time and
inform the driver about the expiry of the
servicing interval.
To interact with the application press
the "my: Car" button: the display will
show a screen with the "care:Index"
section, which provides all the detailed
information about the status of the
vehicle. Pressing the "Active warnings"
button it is possible to show (if present)
the details of the vehicle faults which
caused a warning light to switch on.
The vehicle status can be shown both
on www.driveuconnect.eu or through
theUconnect™LIVEapplication.
"SETTINGS" MENU
"Settings" menu display
Versions with Uconnect 5" Radio LIVE:
press the SETTINGS button on the
front panel.
Versions with Uconnect 5" Radio Nav
LIVE: press the "Settings" button on the
display.
The menu comprises the following
options:
❒Display;
❒Clock & Date;❒Safety/Assistance (for versions/
markets, where provided);
❒Lights (for versions/markets where
provided);
❒Doors & Locks;
❒Audio;
❒Phone/Bluetooth;
❒Radio;
❒Restore default settings;
❒Clear Personal Data.
NAVIGATION MODE(Uconnect 5" Radio Nav LIVE versions
only)
Programming a route
IMPORTANT In the interest of safety
and to reduce distractions while you are
driving, you should always plan a route
before you start driving.
To plan a route, do the following:
❒tap the screen to display the Main
menu;
❒select "Navigate to" or "Drive to";
❒select "Address": you can change the
country or state setting by tapping the
flag before you select a city;
❒enter the town or city name, or the
postcode. Towns with similar names
are shown in the list while you type;
Tip: Tap the arrow to the right of the list
to expand the list of suggested towns.
218
MULTIMEDIA
Page 221 of 240
When the correct city or town appears
in the list, tap the name to select the
destination.
❒enter the street name. Streets with
similar names are shown in the list while
you type. When the correct street
name appears in the list, tap the name
to select the destination;
❒enter the house number, then tap
"Done";
❒the location is shown on the map.
Tap "Select" to continue or tap "Back"
to enter another address;
Tip: If you want your final destination to
be a car park, tap "Car park" and
select a location from the list of car
parks close to your general destination.
❒when the new route is shown, tap
"Done". For more information about the
route, tap "Details". To change your
route, for example, to travel via a
particular location or to select a new
destination, tap "Change route". You
are guided to your destination, using
spoken instructions and on-screen
directions.MAP UPDATE(Uconnect 5" Radio Nav LIVE versions
only)
The map can be updated in two
different ways:
❒most recent maps guarantee:ifa
new map is available for your system
within 90 day of initial use, it can be
downloaded once free of charge.
❒map update: it is possible to
purchase a new version of the map
installed on your system.
Preparing a USB device
To update the map, a USB device that
meets the following requirements must
be used:
❒ideally, the USB device should be
empty;
❒the USB device must have at least
8 GB of memory free;
❒the USB must use a FAT-32 file
system;
❒the USB device must not be blocked
and must allow files to be saved.
NOTE The use of a memory stick is
recommended, while the use of mass
storage devices, such as mobile
phones or multimedia players, is not
recommended.To prepare a USB device, proceed as
follows:
❒ensure that the map you wish to
update is active in the navigation
system. If the navigation system has
several maps and you wish to update a
map which is not currently active,
activate the map. To do this, select
"Change map" in the "Settings" menu
of the navigation application;
❒select "Navigation updates" in the
"Settings" menu. You are asked
whether you wish to prepare a USB
device for downloading updates;
❒select "Yes";
❒insert the USB device.
The system starts to prepare the USB
device.
When the USB device is ready, the
display shows a dedicated message.
Remove the USB device and connect it
to the computer. The new map can
now be downloaded to the USB
device.
TomTom HOME installation
To install TomTom HOME and create a
MyTomTom account, proceed as
follows:
❒download and install the TomTom
HOME application on the computer. On
the computer, access
www.tomtom.com/getstarted. Select
"Download TomTom HOME", then
follow the instructions provided.
219
Page 222 of 240
❒connect the prepared USB device to
the computer: TomTom HOME is
launched automatically.
❒select "Enter" in the top right corner
of TomTom HOME;
❒select "Create account" and enter the
required details to create a MyTomTom
account. A MyTomTom account is
required to receive map updates.
After the account is created, you are
asked whether you wish to connect the
Uconnect™system to your account.
The USB device prepared represents
theUconnect™system.
❒select "Connect device", then select
"Close".
A map can now be downloaded to the
USB device.
Download the map
To check whether you are entitled to
download a free map update using the
Most Recent Maps Guarantee, select
"Tools", "Use most recent maps
guarantee" in TomTom HOME.
To purchase a map update, select
"Purchase maps" in TomTom HOME.
If an update has already been
purchased, select "Update device" in
TomTom HOME.
Downloading a map
If a map update is available for the
system, this update is included in the
list of updates available.
NOTE If the most recent map is already
installed on the system, the update is
not proposed.
Select the map that you wish to
download, then select "Update and
install". The map is downloaded and
copied to the USB device.
Select "Done" when the process is
complete.
NOTE Don’t disconnect the USB device
from the computer while map
downloading and copying is in
progress.
The map can now be installed on the
system.
Installing the map
NOTES
❒The update must be carried out
with engine on and might last more
than 30 minutes.
❒Never remove the USB stick in
order not do jeopardize the map
update.
After downloading a map to the USB
device, it can be installed on the
system.Proceed as follows:
❒insert the USB device containing the
new map in theUconnect™system.
The system detects a new map on
the USB device;
❒select "Start": the system starts
updating the map.
NOTE Do not remove the USB device
and do not disconnect the system’s
power supply before the update is
complete. The system cannot be used
until the update is completed correctly.
If the system update is interrupted, start
it again.
Once the map has been updated, the
display shows a dedicated message:
select "Close". The new map is now
available on the system.
Troubleshooting
The following problems may occur
during the update:
❒the map on the USB device is not
valid. In this case, download the map to
the USB device again, using TomTom
HOME. It may be necessary to prepare
the USB device again;
❒the version of the map on the USB
device is the same as or is a previous
version of the one already on the
system. If this occurs, download the
map to the USB device again, using
TomTom HOME. It may be necessary to
prepare the USB device again.
220
MULTIMEDIA