2016 FIAT 500L LIVING AUX
[x] Cancel search: AUXPage 9 of 240
DASHBOARD
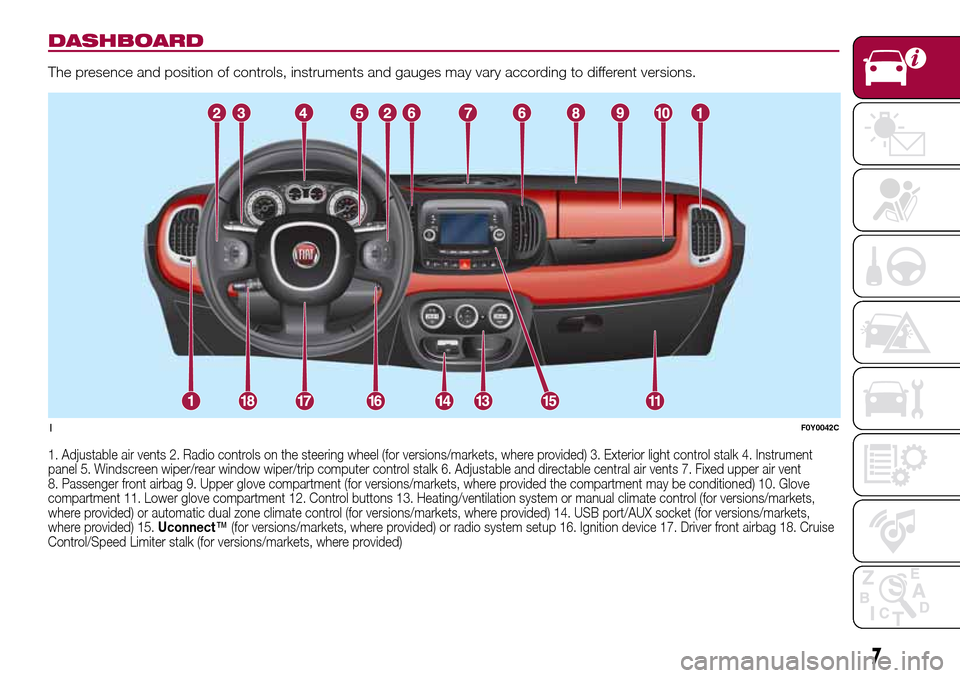
The presence and position of controls, instruments and gauges may vary according to different versions.
1. Adjustable air vents 2. Radio controls on the steering wheel (for versions/markets, where provided) 3. Exterior light control stalk 4. Instrument
panel 5. Windscreen wiper/rear window wiper/trip computer control stalk 6. Adjustable and directable central air vents 7. Fixed upper air vent
8. Passenger front airbag 9. Upper glove compartment (for versions/markets, where provided the compartment may be conditioned) 10. Glove
compartment 11. Lower glove compartment 12. Control buttons 13. Heating/ventilation system or manual climate control (for versions/markets,
where provided) or automatic dual zone climate control (for versions/markets, where provided) 14. USB port/AUX socket (for versions/markets,
where provided) 15.Uconnect™(for versions/markets, where provided) or radio system setup 16. Ignition device 17. Driver front airbag 18. Cruise
Control/Speed Limiter stalk (for versions/markets, where provided)
1F0Y0042C
7
Page 107 of 240
In addition to the electrical branches,
the car's electrical system can be
connected only to the supply cable for
an electric brake and to the cable for an
internal trailer light, though not more
than 15 W. To connect, use the preset
control unit with a battery cable with
cross-section no less than 2.5 mm
2.
IMPORTANT The use of auxiliary loads
other than external lights (electric brake,
winch, etc.) must occur with engine
running.
IMPORTANT To install a tow hook
contact a Fiat Dealership.
WARNING
112)The ABS with which the vehicle is
equipped will not control the braking
system of the trailer. Take particular care
when travelling on slippery roads.
113)Never modify the braking system of
the vehicle to control the trailer brake. The
trailer braking system must be fully
independent of the vehicle’s hydraulic
system.
114)After fitting, fixing screw holes must
be sealed to prevent an exhaust gas inlet.
REFUELLING THE
VEHICLE
115) 116) 117)61)
During refuelling, switch the engine off,
engage the handbrake, turn the ignition
key to STOP and do not smoke.
PETROL ENGINES
Use unleaded petrol only, with octane
number (RON) no lower than 95.
DIESEL ENGINES
Only use Diesel for motor vehicles (EN
590 specification).
When using or parking the car for a
long time in the mountains or cold
areas, it is advisable to refuel using
locally available diesel. In this case, it is
also advisable to keep the tank over
50% full.
REFUELLING
PROCEDURE
Diesel and petrol versions
Proceed as follows:
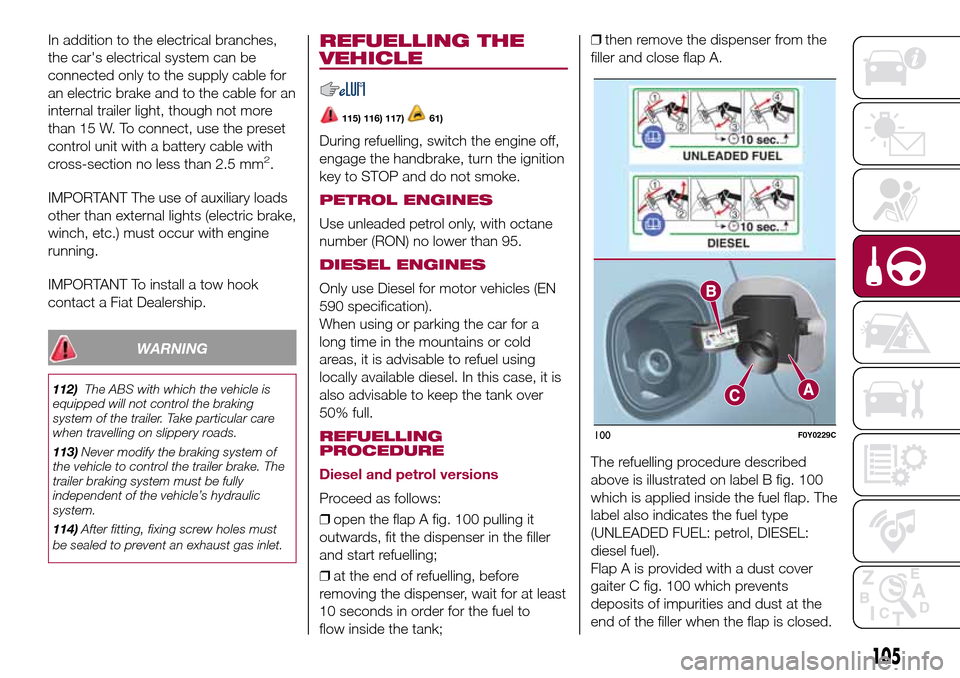
❒open the flap A fig. 100 pulling it
outwards, fit the dispenser in the filler
and start refuelling;
❒at the end of refuelling, before
removing the dispenser, wait for at least
10 seconds in order for the fuel to
flow inside the tank;❒then remove the dispenser from the
filler and close flap A.
The refuelling procedure described
above is illustrated on label B fig. 100
which is applied inside the fuel flap. The
label also indicates the fuel type
(UNLEADED FUEL: petrol, DIESEL:
diesel fuel).
Flap A is provided with a dust cover
gaiter C fig. 100 which prevents
deposits of impurities and dust at the
end of the filler when the flap is closed.
100F0Y0229C
105
Page 130 of 240
JUMP STARTING
If the battery is flat, a jump starting can
be performed using the battery and
the cables of another vehicle, or using a
booster battery.
IMPORTANT
When a booster battery is used, comply
with the utilisation and precaution
instructions specified by the producer.
Do not use the booster battery or
any other source of external supply with
a voltage above 12 V: the battery, the
starter, the alternator and the electrical
system of the vehicle could be
damaged.
Do not attempt jump starting if the
battery is frozen. The battery could
break and explode!
PREPARATION TO JUMP
STARTING
140) 141) 142)68)
IMPORTANT The positive terminal (+) of
the battery is shielded by a protective
cover. Lift the cover to access the
positive terminal.
Proceed as follows:
❒engage the handbrake, move the
Dualogic gear lever to P (Park) or,
for versions with manual gearbox, to
neutral and bring the ignition key to
STOP;❒switch off all the other electrical
devices in the vehicle;
❒if another vehicle is ready for jump
starting, park the vehicle within the
reach of the cables to be used for
starting, operate the handbrake and
make sure that the ignition is
deactivated.
IMPORTANT Avoid contact between
the two vehicles since this could cause
a connection to earth and may result
in serious injury to any people nearby.
PROCEDURE FOR JUMP
STARTING
IMPORTANT If the procedure below is
carried out incorrectly, it can cause
severe injury to people or damage the
recharging system of one or both
vehicles. Carefully follow the
instructions given below.
Cable connection
Proceed as follows to carry out a jump
starting:
❒connect one end of the cable used
for positive (+) to the positive terminal
(+) of the vehicle with flat battery;
❒connect the other end of the cable
used for positive (+) to the positive
terminal (+) of the auxiliary battery;❒connect one end of the cable used
for negative (–) to the negative terminal
(–) of the auxiliary battery;
❒connect the other end of the cable
used for negative (–) to an engine earth
(the visible metal part of the vehicle
engine with flat battery) away from the
battery and the fuel injection system;
❒start the vehicle engine with the
auxiliary battery, let it run for a
few minutes at idling. Start the engine
of the vehicle with flat battery.
Cable disconnection
Once the engine has been started,
remove the cables proceeding as
follows:
❒disconnect the end of the cable used
for negative (–) from the engine earth
of the vehicle with flat battery;
❒disconnect the other end of the cable
used for negative (–) from the negative
terminal (–) of the auxiliary battery;
❒disconnect the end of the cable used
for positive (+) from the positive terminal
(+) of the auxiliary battery;
❒disconnect one end of the cable
used for positive (+) from the positive
terminal (+) of the vehicle with flat
battery.
128
IN AN EMERGENCY
Page 212 of 240
Front panel control summary table
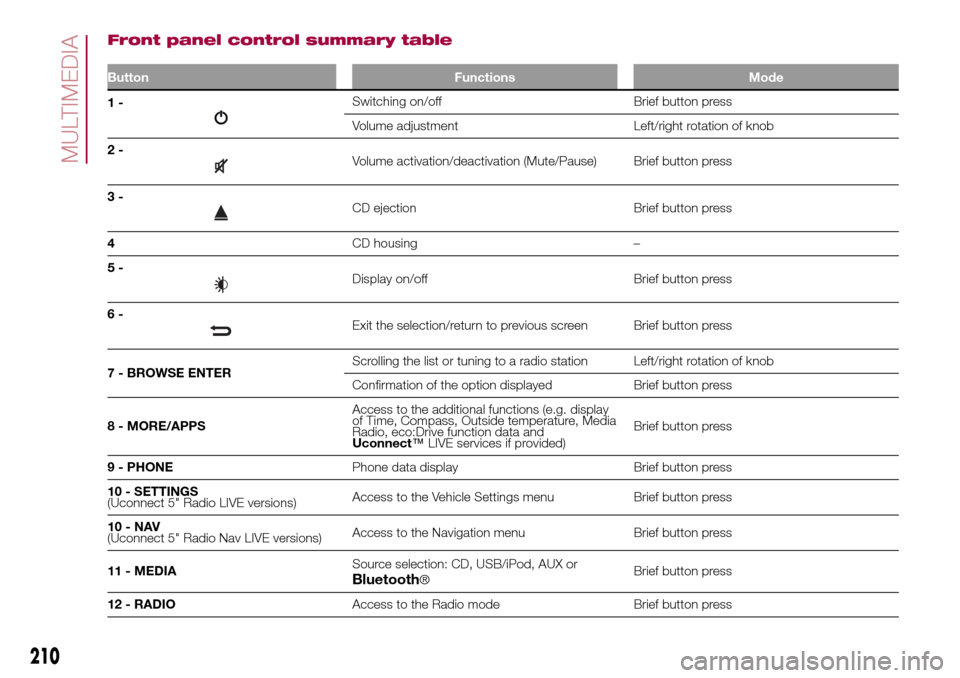
Button Functions Mode
1-Switching on/off Brief button press
Volume adjustment Left/right rotation of knob
2-
Volume activation/deactivation (Mute/Pause) Brief button press
3-
CD ejection Brief button press
4CD housing –
5-
Display on/off Brief button press
6-
Exit the selection/return to previous screen Brief button press
7 - BROWSE ENTERScrolling the list or tuning to a radio station Left/right rotation of knob
Confirmation of the option displayed Brief button press
8 - MORE/APPSAccess to the additional functions (e.g. display
of Time, Compass, Outside temperature, Media
Radio, eco:Drive function data and
Uconnect™LIVE services if provided)Brief button press
9 - PHONEPhone data display Brief button press
10 - SETTINGS
(Uconnect 5" Radio LIVE versions)Access to the Vehicle Settings menu Brief button press
10-NAV
(Uconnect 5" Radio Nav LIVE versions)Access to the Navigation menu Brief button press
11 - MEDIASource selection: CD, USB/iPod, AUX or
Bluetooth®Brief button press
12 - RADIOAccess to the Radio mode Brief button press
210
MULTIMEDIA
Page 214 of 240
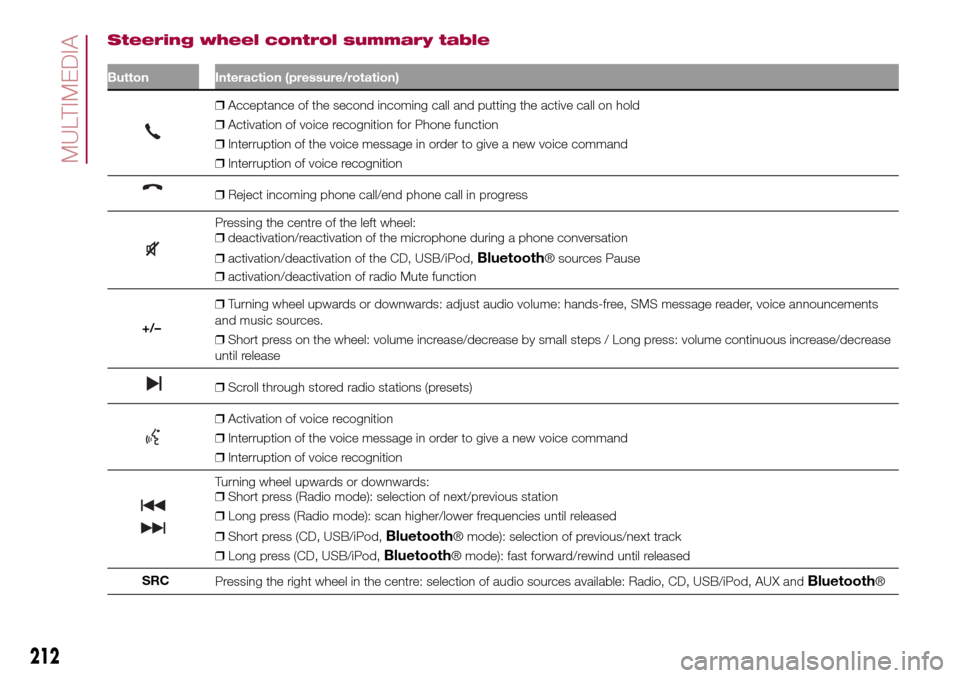
Steering wheel control summary table
Button Interaction (pressure/rotation)
❒Acceptance of the second incoming call and putting the active call on hold
❒Activation of voice recognition for Phone function
❒Interruption of the voice message in order to give a new voice command
❒Interruption of voice recognition
❒Reject incoming phone call/end phone call in progress
Pressing the centre of the left wheel:
❒deactivation/reactivation of the microphone during a phone conversation
❒activation/deactivation of the CD, USB/iPod,
Bluetooth® sources Pause
❒activation/deactivation of radio Mute function
+/–❒Turning wheel upwards or downwards: adjust audio volume: hands-free, SMS message reader, voice announcements
and music sources.
❒Short press on the wheel: volume increase/decrease by small steps / Long press: volume continuous increase/decrease
until release
❒Scroll through stored radio stations (presets)
❒Activation of voice recognition
❒Interruption of the voice message in order to give a new voice command
❒Interruption of voice recognition
Turning wheel upwards or downwards:
❒Short press (Radio mode): selection of next/previous station
❒Long press (Radio mode): scan higher/lower frequencies until released
❒Short press (CD, USB/iPod,
Bluetooth® mode): selection of previous/next track
❒Long press (CD, USB/iPod,
Bluetooth® mode): fast forward/rewind until released
SRC
Pressing the right wheel in the centre: selection of audio sources available: Radio, CD, USB/iPod, AUX and
Bluetooth®
212
MULTIMEDIA
Page 215 of 240
"TOUCH SCREEN"
FUNCTION
The system uses the "touch screen"
function; to interact with the different
functions, press the "graphic buttons"
displayed.
Confirmation of a selection: press
the "OK" button.
Going back to the previous screen:
press the
(Delete) button or,
depending on the activated screen,
/Done.
USB/iPod/AUX SUPPORT
The vehicle has a USB/AUX port
located in the centre tunnel.
RADIO MODE
After the desired radio station is
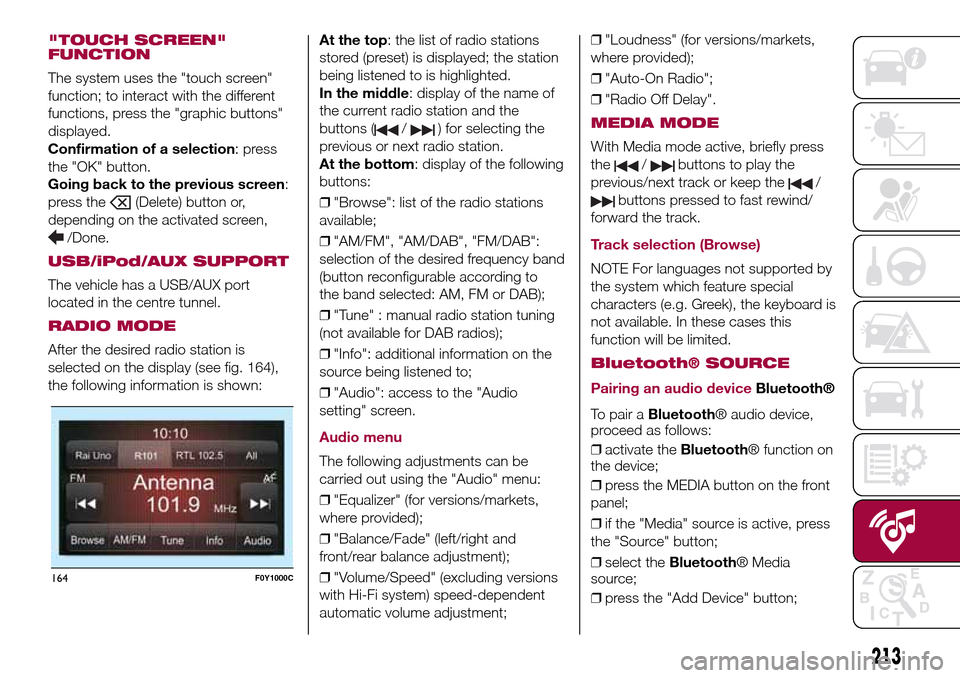
selected on the display (see fig. 164),
the following information is shown:At the top: the list of radio stations
stored (preset) is displayed; the station
being listened to is highlighted.
In the middle: display of the name of
the current radio station and the
buttons (
/) for selecting the
previous or next radio station.
At the bottom: display of the following
buttons:
❒"Browse": list of the radio stations
available;
❒"AM/FM", "AM/DAB", "FM/DAB":
selection of the desired frequency band
(button reconfigurable according to
the band selected: AM, FM or DAB);
❒"Tune" : manual radio station tuning
(not available for DAB radios);
❒"Info": additional information on the
source being listened to;
❒"Audio": access to the "Audio
setting" screen.
Audio menu
The following adjustments can be
carried out using the "Audio" menu:
❒"Equalizer" (for versions/markets,
where provided);
❒"Balance/Fade" (left/right and
front/rear balance adjustment);
❒"Volume/Speed" (excluding versions
with Hi-Fi system) speed-dependent
automatic volume adjustment;❒"Loudness" (for versions/markets,
where provided);
❒"Auto-On Radio";
❒"Radio Off Delay".
MEDIA MODE
With Media mode active, briefly press
the
/buttons to play the
previous/next track or keep the
/
buttons pressed to fast rewind/
forward the track.
Track selection (Browse)
NOTE For languages not supported by
the system which feature special
characters (e.g. Greek), the keyboard is
not available. In these cases this
function will be limited.
Bluetooth® SOURCE
Pairing an audio device
Bluetooth®
To pair aBluetooth® audio device,
proceed as follows:
❒activate theBluetooth® function on
the device;
❒press the MEDIA button on the front
panel;
❒if the "Media" source is active, press
the "Source" button;
❒select theBluetooth® Media
source;
❒press the "Add Device" button;
164F0Y1000C
213
Page 225 of 240
DASHBOARD
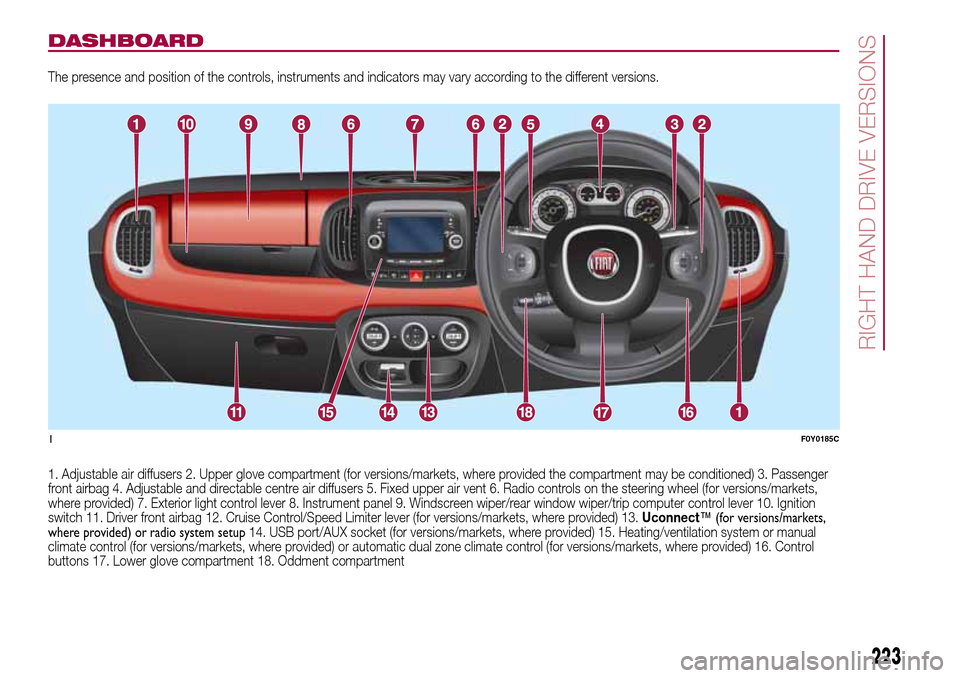
The presence and position of the controls, instruments and indicators may vary according to the different versions.
1. Adjustable air diffusers 2. Upper glove compartment (for versions/markets, where provided the compartment may be conditioned) 3. Passenger
front airbag 4. Adjustable and directable centre air diffusers 5. Fixed upper air vent 6. Radio controls on the steering wheel (for versions/markets,
where provided) 7. Exterior light control lever 8. Instrument panel 9. Windscreen wiper/rear window wiper/trip computer control lever 10. Ignition
switch 11. Driver front airbag 12. Cruise Control/Speed Limiter lever (for versions/markets, where provided) 13.Uconnect™ (for versions/markets,
where provided) or radio system setup14. USB port/AUX socket (for versions/markets, where provided) 15. Heating/ventilation system or manual
climate control (for versions/markets, where provided) or automatic dual zone climate control (for versions/markets, where provided) 16. Control
buttons 17. Lower glove compartment 18. Oddment compartment
1F0Y0185C
223
RIGHT HAND DRIVE VERSIONS