2016 FIAT 500L LIVING dashboard
[x] Cancel search: dashboardPage 8 of 240
GETTING TO KNOW YOUR CAR
In-depth knowledge of your new vehicle
starts here.
The handbook that you are reading
simply and directly explains how it
is made and how it works.
That’s why we advise you to read it
seated comfortably on board, so that
you can see immediately what is
described here for yourself.DASHBOARD ................................. 7
THE FIAT CODE SYSTEM ............... 8
THE KEYS....................................... 8
IGNITION DEVICE ........................... 10
SEATS ............................................ 11
HEAD RESTRAINTS ........................ 13
STEERING WHEEL ......................... 14
REAR VIEW MIRRORS .................... 15
CLIMATE CONTROL SYSTEM ....... 16
EXTERIOR LIGHTS ......................... 19
WINDOW CLEANING ...................... 21
ROOF LIGHTS ................................ 23
FIXED GLASS ROOF ....................... 23
ELECTRIC SUN ROOF .................... 24
DOORS ........................................... 26
ELECTRIC WINDOWS .................... 28
LUGGAGE COMPARTMENT ........... 29
BONNET ......................................... 31
DUALDRIVE ELECTRIC POWER
STEERING ...................................... 32
VERSION WITH LPG SYSTEM ........ 33
VERSION WITH METHANE
SYSTEM (NATURAL POWER) ......... 36
6
GETTING TO KNOW YOUR CAR
Page 9 of 240
DASHBOARD
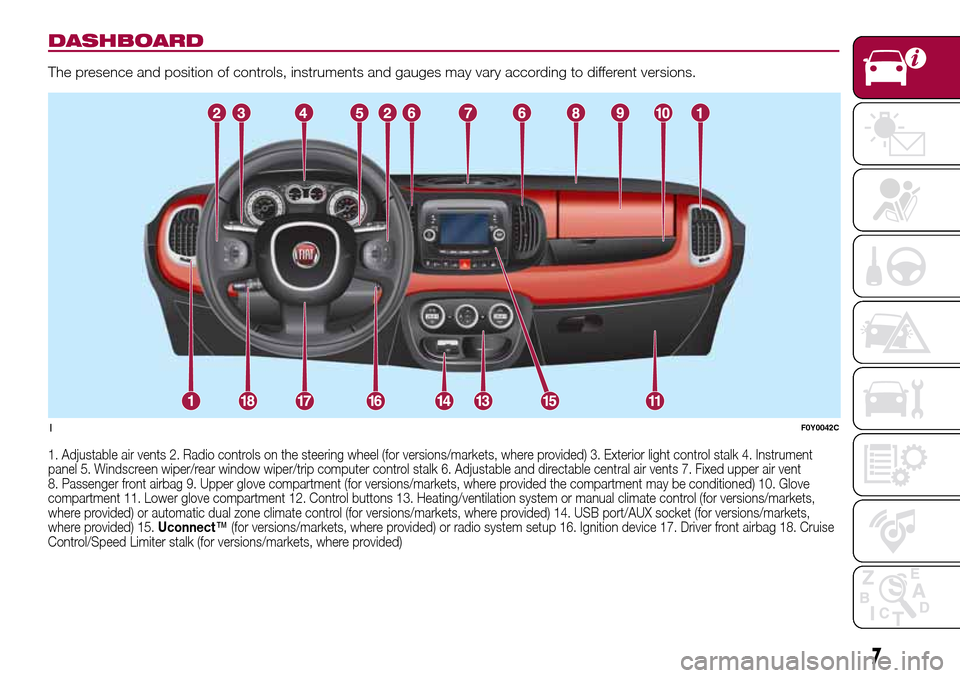
The presence and position of controls, instruments and gauges may vary according to different versions.
1. Adjustable air vents 2. Radio controls on the steering wheel (for versions/markets, where provided) 3. Exterior light control stalk 4. Instrument
panel 5. Windscreen wiper/rear window wiper/trip computer control stalk 6. Adjustable and directable central air vents 7. Fixed upper air vent
8. Passenger front airbag 9. Upper glove compartment (for versions/markets, where provided the compartment may be conditioned) 10. Glove
compartment 11. Lower glove compartment 12. Control buttons 13. Heating/ventilation system or manual climate control (for versions/markets,
where provided) or automatic dual zone climate control (for versions/markets, where provided) 14. USB port/AUX socket (for versions/markets,
where provided) 15.Uconnect™(for versions/markets, where provided) or radio system setup 16. Ignition device 17. Driver front airbag 18. Cruise
Control/Speed Limiter stalk (for versions/markets, where provided)
1F0Y0042C
7
Page 24 of 240
With ring nut A in position, the
windscreen wiper will automatically
adapt its operating speed to the speed
of the vehicle.
With the windscreen wipers
operational, if reverse gear is engaged,
the rear window wiper is automatically
activated.
"Smart washing" function
Pull the lever towards the steering
wheel (unstable position) to activate the
windscreen washer.
Keeping the stalk pulled for more than
half a second, with just one movement
it is possible to operate the washer
jet and the wiper at the same time.
The wiper stops working three strokes
after the stalk is released.
On some versions, a further stroke after
approximately 6 seconds completes
the cycle.
RAIN SENSOR(for versions/markets, where provided)
22)8) 9)This is located behind the interior rear
view mirror, in contact with the
windscreen and can detect the
presence of rain and, consequently,
manage the cleaning of the windscreen
in accordance with the amount of
water on the screen.Activation: rotate the ring nut A fig. 26
to position
: the windscreen wiper
stroke frequency is thus adjusted in
accordance with the amount of water
on the windscreen. The activation of the
sensor is signalled by a "stroke" to
show that the command has been
acquired.
Deactivation: move the stalk ring nut
away from the position
or turn
the ignition key to STOP. If the ignition
key is turned to the STOP position
leaving the ring nut A in position
,
no wiping cycle is performed at the next
startup (ignition key to the MAR
position) even in the case of rain.
REAR WINDOW
WIPER/WASHER
10)This operates only with the ignition key
turned to MAR.
Activation: turn the ring nut B fig. 26
from position
to positionto
activate the rear window wiper
as follows:
❒in intermittent mode when the
windscreen wiper is not operating;
❒in synchronous mode (at half the
speed of the windscreen wiper) when
the windscreen wiper is operating;
❒in continuous mode with reverse
engaged.With the windscreen wiper on and
reverse gear engaged, rear window
wiping will be continuous in the same
way.
Pushing the stalk towards the
dashboard (unstable position) the rear
window washer jet will activate. Keep
the stalk pushed for more than half
a second to activate the rear window
wiper as well. Releasing the stalk will
activate the smart washing function, as
described for the windscreen wiper.
Deactivation: release the lever.
WARNING
22)Make sure the device is switched off
whenever the windscreen must be
cleaned.
WARNING
6)Do not use the screen wiper to remove
layers of snow or ice from the windscreen.
In such conditions, the windscreen wiper
may be subjected to excessive stress
and the motor cut-out switch, which
prevents operation for a few seconds, may
intervene. If operation is not restored
(even after turning the key and restarting
the vehicle engine), contact a Fiat
Dealership.
7)Do not operate the windscreen wiper
with blades lifted from the windscreen.
22
GETTING TO KNOW YOUR CAR
Page 29 of 240
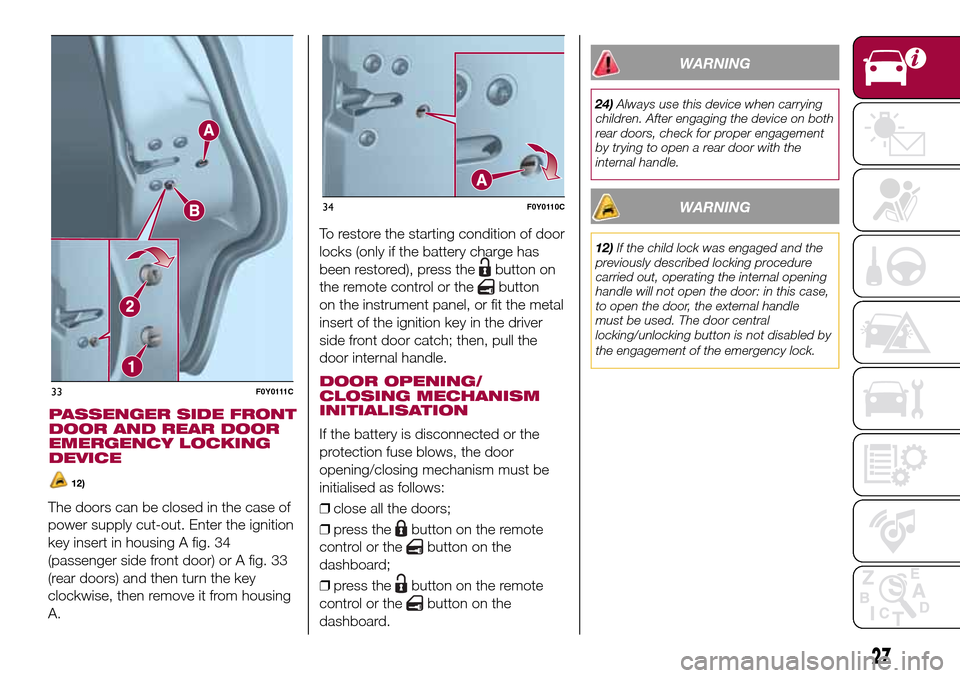
The doors can be closed in the case of
power supply cut-out. Enter the ignition
key insert in housing A fig. 34
(passenger side front door) or A fig. 33
(rear doors) and then turn the key
clockwise, then remove it from housing
A.To restore the starting condition of door
locks (only if the battery charge has
been restored), press the
button on
the remote control or the
button
on the instrument panel, or fit the metal
insert of the ignition key in the driver
side front door catch; then, pull the
door internal handle.
DOOR OPENING/
CLOSING MECHANISM
INITIALISATION
If the battery is disconnected or the
protection fuse blows, the door
opening/closing mechanism must be
initialised as follows:
❒close all the doors;
❒press the
button on the remote
control or the
button on the
dashboard;
❒press the
button on the remote
control or the
button on the
dashboard.
WARNING
24)Always use this device when carrying
children. After engaging the device on both
rear doors, check for proper engagement
by trying to open a rear door with the
internal handle.
WARNING
12)If the child lock was engaged and the
previously described locking procedure
carried out, operating the internal opening
handle will not open the door: in this case,
to open the door, the external handle
must be used. The door central
locking/unlocking button is not disabled by
the engagement of the emergency lock.
.33F0Y0111C
34F0Y0110C
27
PASSENGER SIDE FRONT
DOOR AND REAR DOOR
EMERGENCY LOCKING
DEVICE
12)
Page 65 of 240
LED ON DASHBOARD TRIM
Warning light What it means
PASSENGER AIRBAG/SIDE BAGS DEACTIVATED
(for versions/markets, where provided)
The LED is located on the instrument panel and switches on deactivating the front passenger airbag and
the side bag.
With front passenger airbag on, when the ignition key is turned to MAR, the
LED switches on
constantly for several seconds and then it should switch off.
35)
WARNING
35)TheLED indicates anywarning light faults. This condition is indicated by intermittent flashing of theLED for more than 4
seconds. In this case, thewarning light may not indicate possible failures of the restraint systems. Before resuming driving, contact a Fiat
Dealership immediately to have the system checked
63
Page 87 of 240
Main recommendations to carry
children safely
❒Install the child restraint systems on
the rear seat, which is the most
protected position in the event of an
impact.
❒Keep children in rearward facing child
restraint systems for as long as
possible, until 3–4 years old if possible.
❒Should a rearward facing child
restraint system be installed on the rear
seats, it is advisable to position it as
far forward as the position of the front
seat allows.
❒If the passenger's front airbag is
deactivated always check the
dedicated LED on the trim located on
the dashboard switches on, to make
sure that it has actually been
deactivated.
❒Carefully follow the instructions
supplied with the child restraint system
itself. Keep the instructions in the
vehicle along with the other documents
and this handbook. Do not use
second-hand child restraint systems
without instructions.
❒Only one child is to be strapped into
each restraint system; never carry
two children using one child restraint
system.
❒Always check that the seat belts do
not rest on the child’s neck.❒Always check that the seat belt is
well fastened by pulling on it.
❒While travelling, do not let the child sit
incorrectly or unfasten the belts.
❒Never allow a child to put the belt's
diagonal section under an arm or
behind their back.
❒Never carry children on your lap,
even newborns. No one can hold
a child in the case of an accident.
❒In the event of an accident, replace
the child restraint system with a new
one.
WARNING
75)SEVERE DANGER When a front
passenger airbag is fitted, do not install
rearward facing child restraint systems on
the front passenger seat. Deployment of
the airbag in an accident could cause fatal
injuries to the child regardless of the
severity of the collision. It is advisable to
always carry children in a child restraint
system on the rear seat, which is the most
protected position in the event of an
impact.
76)On the sun visor there is a label with
suitable symbols reminding the user that it
is compulsory to deactivate the airbag if
a rearward facing child restraint system is
fitted. Always comply with the instructions
on the passenger's side sun visor (see
the "Supplementary Restraint System
(SRS) - Airbag" paragraph).77)Should it be necessary to carry a child
on the passenger side front seat in a
rearward facing child restraint system, the
passenger side front airbag and side bag
must be deactivated through the display
main Menu (see the instructions in the
"Display" paragraph, "Knowing the
instrument panel" chapter), verifying
deactivation by checking whether the LED
has switched on in the trim located
on the dashboard. Move the passenger's
seat as far back as possible to avoid
contact between the child restraint system
and the dashboard.
78)Do not adjust the front or rear seat if a
child is seated on it or on the dedicated
child restraint system.
79)Incorrect fitting of the child restraint
system may result in an inefficient
protection system. In the event of an
accident the child restraint system may
become loose and the child may be
injured, even fatally. When fitting a restraint
system for newborns or children, strictly
comply with the instructions provided
by the Manufacturer.
80)When the child restraint system is not
used, secure it with the seat belt or with
the ISOFIX anchorages, or remove it from
the vehicle. Do not leave it unsecured
inside the passenger compartment. In this
way, in the case of sudden braking or an
accident, it will not cause injuries to the
occupants.
81)After installing a child restraint system,
do not move the seat: always remove
the child restraint system before making
any adjustment.
85
Page 88 of 240
82)Always make sure that the chest
section of the seat belt does not pass
under the arms or behind the back of the
child. In the event of an accident the seat
belt will not be able to secure the child,
with the risk of injury, including fatal injury.
Therefore the child must always wear
the seat belt correctly.
83)Do not use the same lower anchorage
to install more than one child restraint
system.
84)If a Universal ISOFIX child restraint
system is not fixed to all three anchorages,
it will not be able to protect the child
correctly. In a crash, the child could be
seriously or fatally injured.
85)Fit the child restraint system only when
the vehicle is stationary. The child restraint
system is correctly fixed to the brackets
when you hear the click. Follow the
instructions for assembly, disassembly and
positioning that the Manufacturer must
supply with the child restraint system.SUPPLEMENTARY
RESTRAINT SYSTEM
(SRS) - AIRBAG
The vehicle is equipped with:
❒front driver airbag;
❒front passenger airbag;
❒driver knee bag (for versions/
markets, where provided);
❒front side bags for pelvis, chest and
shoulder protection of driver and
passenger (for versions/markets, where
provided);
❒side bags for head protection of front
seat passengers and rear side seat
passengers (window bag).
FRONT AIRBAGS
The front driver/passenger airbags and
the driver's knee bag (for versions/
markets, where provided) protect the
front seat occupants in the event of
frontal impacts of medium/high severity,
by placing the bag between the
occupant and the steering wheel or
dashboard.
Therefore non-activation in other types
of collisions (side collisions, rear shunts,
roll-overs, etc.) is not a system
malfunction.Driver and passenger front airbags are
not a replacement of but
complementary to the seat belts, which
should always be worn, as specified
by law in Europe and most non-
European countries.
In the event of impact, those not
wearing a seat belt are projected
forwards and may come into contact
with the bag which is still inflating. The
protection offered by the bag is
compromised in these circumstances.
The front airbags may not activate in
the case of a frontal impact against
highly deformable objects not involving
the front surface of the vehicle (e.g.
wing collision against guard rail) or in
the case of the vehicle wedging under
other vehicles or protective barriers
(e.g. under trucks or guard rails).
Failure to activate in the conditions
described above is due to the fact that
they may not provide any additional
protection compared with seat belts, so
their activation would be inappropriate.
In these cases, non-deployment does
not indicate a system malfunction.
86
SAFETY
Page 89 of 240
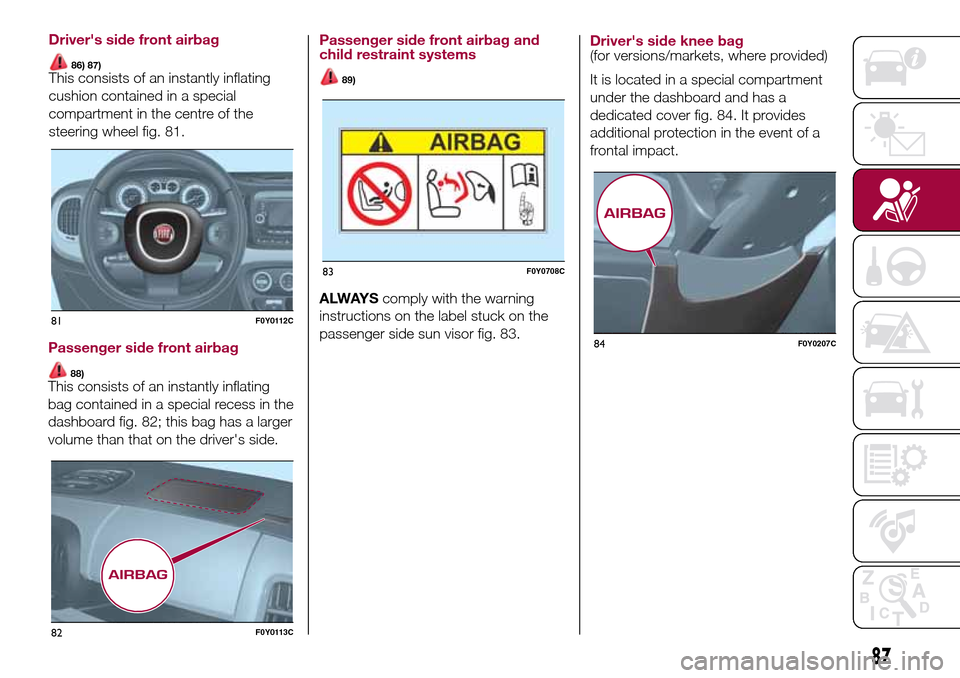
Passenger side front airbag
88)This consists of an instantly inflating
bag contained in a special recess in the
dashboard fig. 82; this bag has a larger
volume than that on the driver's side.
Passenger side front airbag and
child restraint systems
89)
ALWAYScomply with the warning
instructions on the label stuck on the
passenger side sun visor fig. 83.
Driver's side knee bag(for versions/markets, where provided)
It is located in a special compartment
under the dashboard and has a
dedicated cover fig. 84. It provides
additional protection in the event of a
frontal impact.
81F0Y0112C
82F0Y0113C
83F0Y0708C
84F0Y0207C
87
Driver's side front airbag
86) 87)This consists of an instantly inflating
cushion contained in a special
compartment in the centre of the
steering wheel fig. 81.