2016 FIAT 500E service
[x] Cancel search: servicePage 62 of 132

PRE-DEFINED VOICE TEXT REPLY RESPONSES
Ye s.Stuck in Traffic.See you later.
No.Start without me.I’ll be Late.
Okay.Where are you?
I will be
late.
Call me.Are you there yet?
I’ll call you later.I need directions.
See you in
minutes.
I’m on my way.
Can’t talk right now.
I’m lost.Thanks.
NOTE:
Voice texting reply and voice texting features require a compatible mobile device enabled
with Bluetooth Message Access Profile (MAP).iPhone and some other smartphones do
not currently support Bluetooth MAP.Visit UconnectPhone.com for system and device
compatibility.
Want to dictate a personal message? You must first register with Uconnect Access (U.S.
residents only) to take advantage of a new, cloud-based Voice Texting service, an enhance-
ment to Voice Text Reply.
USB/AUX CONTROL
To select a specific audio source, push the
MEDIA button on the faceplate.To allow
music to play from your portable device
through the vehicle’s speakers, press the
“Source” button then select one of the
following modes:
USB/iPod
•USB/iPod Mode is entered by either in-
serting a USB Jump Drive or iPod cable
into the USB port or by pushing the
MEDIA button on the faceplate located
left of the display.
Audio Jack (AUX)
•The AUX allows a portable device, such
as an MP3 player or an iPod, to be
plugged into the radio and utilize the vehicle’s audio system, using a 3.5 mm audio
cable, to amplify the source and play through the vehicle speakers.
•The functions of the portable device are controlled using the device buttons, not the
buttons on the radio.The volume may be controlled using the radio or portable
device.
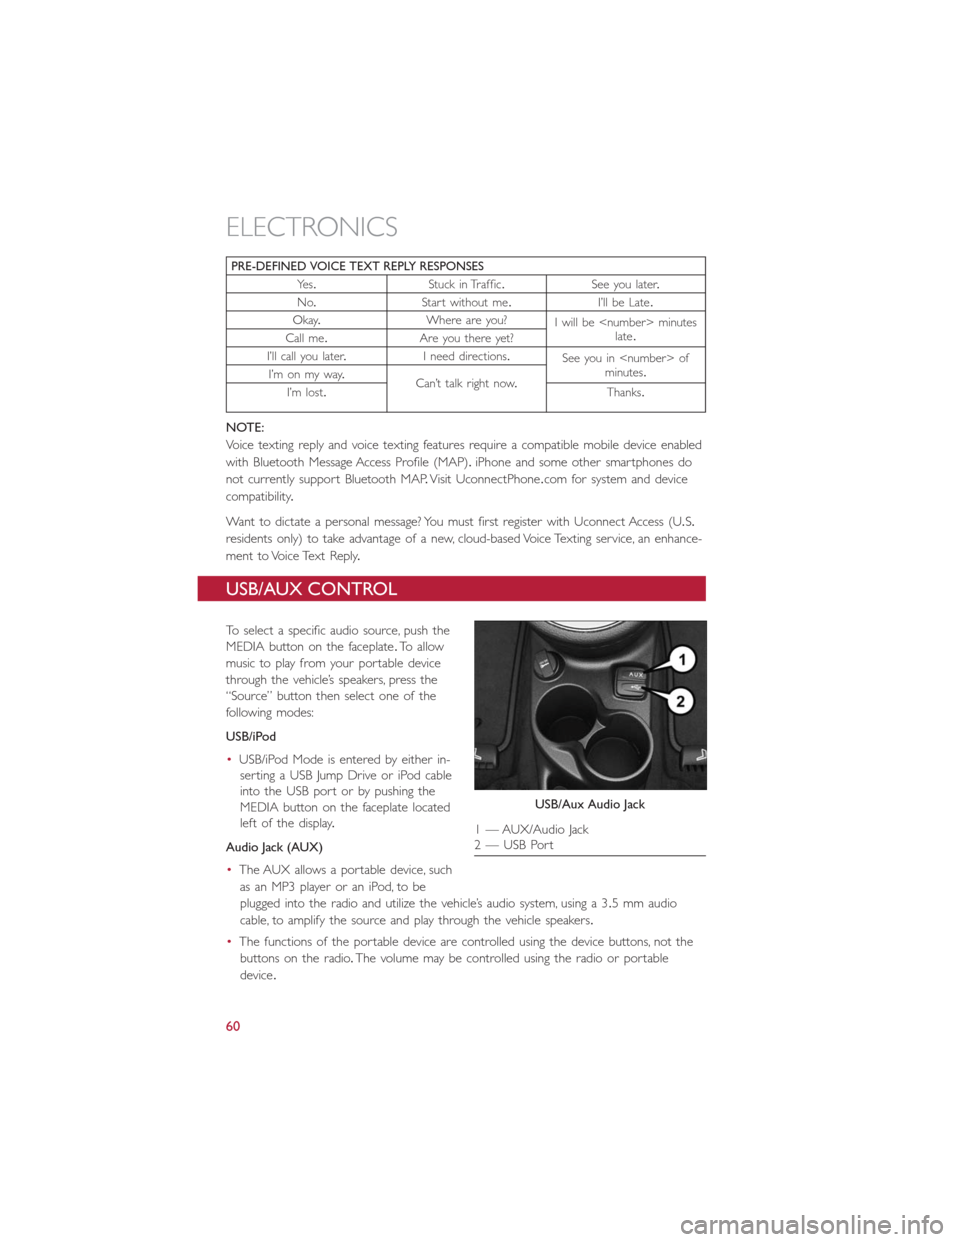
USB/Aux Audio Jack
1 — AUX/Audio Jack
2 — USB Port
ELECTRONICS
60
Page 69 of 132

Additional Information
© 2015 FCA US LLC.All rights reserved.Mopar, Mopar Owner Connect and Uconnect
are registered trademarks of FCA US LLC.Android is a trademark of Google Inc.
SiriusXM and all related marks and logos are trademarks of SiriusXM Radio Inc.Yelp, Yelp
logo, Yelp burst and related marks are registered trademarks of Yelp.
Uconnect System Support:
•U.S.residents visit DriveUconnect.com or call: 1-877-855-8400 (24 hours a day 7 days
a week)
•Canadian residents visit DriveUconnect.ca or call: 1-800-465-2001 (English) or
1-800-387-9983 (French)
Mon.– Fri., 8:00 am – 8:00 pm, ET
Sat., 9:00 am – 5:00 pm, ET
Sun., Closed
Uconnect Access Services Support 1-855-792-4241.Please have your Uconnect Security
PIN ready when you call.
ELECTRONICS
67
Page 85 of 132

ROADSIDE ASSISTANCE
•If your FIAT 500e requires jump start assistance, tire service, lockout service or towing
due to a defect covered under the Basic Limited Warranty, dial toll-free
1-888-242-6342.See your Warranty booklet for further details.
•Provide your name, vehicle identification number and license plate number.
•Provide your location, including telephone number, from which you are calling.
•Briefly describe the nature of the problem and answer a few simple questions.
•You will be given the name of the service provider and an estimated time of arrival.If
you feel you are in an “unsafe situation”, please let us know.With your consent, we will
contact local police or safety authorities.
WARNING AND INDICATOR LIGHTS
IMPORTANT:The warning / indicator lights switch on in the instrument panel together
with a dedicated message and/or acoustic signal when applicable.These indications are
indicative and precautionary and as such must not be considered as exhaustive and/or
alternative to the information contained in the Owner’s Manual, which you are advised to
read carefully in all cases.Always refer to the information in this chapter in the event of a
failure indication.
All active telltales will display first if applicable.The system check menu may appear differ-
ent based upon equipment options and current vehicle status.
This guide illustrates and describes the operation of warning and indicator telltales that
are either standard or optional based on the vehicle build.FCA reserves the right to
make changes in design and specifications and/or make additions to or improvements to
its products without imposing any obligation upon itself to install them on products previ-
ously manufactured.
Instrument Cluster Warning Lights
– Electric Vehicle System Warning Light
This indicator will illuminate when there is a malfunction in the Electric Vehicle System.If
the EVS malfunction light comes on while driving or charging see your authorized dealer
as soon as possible.
– Regenerative Brake System Warning Light
If the light turns on and remains on while driving, it suggests that there is a potential
problem with the Regenerative Brake System (RBS) and the need for system service.See
your authorized dealer as soon as possible.
WHAT TO DO IN EMERGENCIES
83
Page 86 of 132

– 12 Volt Charging System Light
This light shows the status of the 12 Volt electrical charging system.If the charging system
light remains on, it means that the vehicle is experiencing a problem with the charging
system.
It is recommended that you do not continue driving if the charging system light is on.
Have the vehicle serviced immediately.
– Anti-Lock Brake (ABS) Light
This light monitors the Anti-Lock Brake System (ABS).
If the light is not on during startup, stays on, or turns on while driving we recommend
you contact the nearest authorized dealer and have the vehicle serviced immediately.
– Air Bag Warning Light
If the light is not on during startup, stays on, or turns on while driving have the vehicle
serviced by an authorized dealer immediately.
– Seat Belt Reminder Light
When the ignition switch is first turned to the ON/RUN position, this light will turn on
for four to eight seconds as a bulb check.During the bulb check, if the driver's seat belt
is unbuckled, a chime will sound.After the bulb check or when driving, if the driver or
front passenger seat belt remains unbuckled, the Seat Belt Indicator Light will flash or
remain on continuously.Refer to “Seat Belt Systems” in “Things To Know Before Starting”
in your Owner’s Manual on the DVD for further information.
– Power Steering System Warning
This light is used to manage the electrical warning of the EPS (Electric Power Steering
System).When the ignition is turned to the ON/RUN position, the warning light will illu-
minate momentarily.If the warning light stays on, cycle the ignition to the OFF position
and back to ON/RUN.If the warning light stays on, contact your authorized dealer.
If the warning light switches on while driving, you may not have steering assistance.Al-
though it will still be possible to steer the car, the effort needed to operate the steering
wheel could be increased: contact an authorized dealer as soon as possible.
– Service Propulsion System Warning Light
The Service Propulsion System Warning Light will illuminate if there is a malfunction de-
tected with the Propulsion System.If the light comes on or remains on while driving, see
your authorized dealer.
WHAT TO DO IN EMERGENCIES
84
Page 91 of 132

TIRE SERVICE KIT
Small punctures up to 1/4 inch (6 mm) in the tire tread can be sealed with Tire Service
Kit.Foreign objects (e.g., screws or nails) should not be removed from the tire.Tire Ser-
vice Kit can be used in outside temperatures down to approximately -4°F (-20°C).
This kit will provide a temporary tire seal, allowing you to drive your vehicle up to
100 miles (160 km) with a maximum speed of 55 mph (90 km/h).
Tire Service Kit Storage
The Tire Service Kit is located in the rear cargo area.
Tire Service Kit
WHAT TO DO IN EMERGENCIES
89
Page 92 of 132

Tire Service Kit Components And Operation
Using The Mode Select Knob And Hoses
Your Tire Service Kit is equipped with the
following symbols to indicate the air or
sealant mode.
•
Selecting Air Mode
Push in the Mode Select Knob (5) and turn
to this position for air pump operation
only.Use the Black Air Pump Hose (7)
when selecting this mode.
•
Selecting Sealant Mode
Push in the Mode Select Knob (5) and turn
to this position to inject the Tire Service Kit
Sealant and to inflate the tire.Use the Seal-
ant Hose (clear hose) (6) when selecting
this mode.
•
Using The Power Button
Push and release the Power Button (4)
once to turn On the Tire Service Kit.Push
and release the Power Button (4) again to
turn Off the Tire Service Kit.
•
Using The Deflation Button
Push the Deflation Button (2) to reduce
the air pressure in the tire if it becomes
over - inflated.
Tire Service Kit Usage Precautions
•Replace the Tire Service Kit Sealant Bottle (1) and Sealant Hose (6) prior to the expi-
ration date (printed at the lower right hand corner on the bottle label) to assure opti-
mum operation of the system.Refer to “Sealing a Tire with Tire Service Kit” section
(F) “Sealant Bottle and Hose Replacement”.
•The Sealant Bottle (1) and Sealant Hose (6) are a one tire application use and need to
be replaced after each use.Always replace these components immediately at your
original equipment vehicle dealer.
•When the Tire Service Kit sealant is in a liquid form, clean water, and a damp cloth will
remove the material from the vehicle or tire and wheel components.Once the sealant
dries, it can easily be peeled off and properly discarded.
Tire Service Kit Components
1 — Sealant Bottle
2 — Deflation Button
3 — Pressure Gauge
4 — Power Button
5 — Mode Select Knob
6 — Sealant Hose (Clear)
7 — Air Pump Hose (Black)
8 — Power Plug (located on the bottom
side of the Tire Service Kit)
WHAT TO DO IN EMERGENCIES
90
Page 93 of 132

•For optimum performance, make sure the valve stem on the wheel is free of debris
before connecting the Tire Service Kit.
•You can use the Tire Service Kit air pump to inflate bicycle tires.The kit also comes
with two needles, located in the Accessory Storage Compartment (on the bottom of
the air pump) for inflating sport balls, rafts, or similar inflatable items.However, use
only the Air Pump Hose (7) and make sure the Mode Select Knob (5) is in the Air
Mode when inflating such items to avoid injecting sealant into them.The Tire Service
Kit Sealant is only intended to seal punctures less than 1/4 inch (6 mm) diameter in
the tread of your vehicle.
•Do not lift or carry the Tire Service Kit by the hoses.
WARNING!
•Do not attempt to seal a tire on the side of the vehicle closest to traffic.Pull far
enough off the road to avoid the danger of being hit when using the Tire Service
Kit.
•Do not use Tire Service Kit or drive the vehicle under the following circumstances:
•If the puncture in the tire tread is approximately 1/4 inch (6 mm) or larger.
•If the tire has any sidewall damage.
•If the tire has any damage from driving with extremely low tire pressure.
•If the tire has any damage from driving on a flat tire.
•If the wheel has any damage.
•If you are unsure of the condition of the tire or the wheel.
•Keep Tire Service Kit away from open flames or heat source.
•A loose Tire Service Kit thrown forward in a collision or hard stop could endanger
the occupants of the vehicle.Always stow the Tire Service Kit in the place pro-
vided.Failure to follow these warnings can result in injuries that are serious or
fatal to you, your passengers, and others around you.
•Take care not to allow the contents of Tire Service Kit to come in contact with
hair, eyes, or clothing.Tire Service Kit sealant is harmful if inhaled, swallowed, or
absorbed through the skin.It causes skin, eye, and respiratory irritation.Flush im-
mediately with plenty of water if there is any contact with eyes or skin.Change
clothing as soon as possible, if there is any contact with clothing.
•Tire Service Kit Sealant solution contains latex.In case of an allergic reaction or
rash, consult a physician immediately.Keep Tire Service Kit out of reach of chil-
dren.If swallowed, rinse mouth immediately with plenty of water and drink plenty
of water.Do not induce vomiting! Consult a physician immediately.
WHAT TO DO IN EMERGENCIES
91
Page 94 of 132

Sealing A Tire With Tire Service Kit
(A) Whenever You Stop To Use Tire Service Kit:
1.Pull over to a safe location and turn on the vehicle’s Hazard Warning flashers.
2.Verify that the valve stem (on the wheel with the deflated tire) is in a position that is
near to the ground.This will allow the Tire Service Kit Hoses (6) and (7) to reach the
valve stem and keep the Tire Service Kit flat on the ground.This will provide the best
positioning of the kit when injecting the sealant into the deflated tire and running the
air pump.Move the vehicle as necessary to place the valve stem in this position be-
fore proceeding.
3.Place the transmission in PARK (auto transmission) or in Gear (manual transmission)
and place the ignition in the OFF position.
4.Set the parking brake.
(B) Setting Up To Use Tire Service Kit:
1.Push in the Mode Select Knob (5) and turn to the Sealant Mode position.
2.Uncoil the Sealant Hose (6) and then remove the cap from the fitting at the end of
the hose.
3.Place the Tire Service Kit flat on the ground next to the deflated tire.
4.Remove the cap from the valve stem and then screw the fitting at the end of the
Sealant Hose (6) onto the valve stem.
5.Uncoil the Power Plug (8) and insert the plug into the vehicle’s 12 Volt power outlet.
NOTE:
Do not remove foreign objects (e.g., screws or nails) from the tire.
(C) Injecting Tire Service Kit Sealant Into The Deflated Tire:
•Always start the engine before turning ON the Tire Service Kit.
NOTE:
Manual transmission vehicles must have the parking brake engaged and the gear selector
in NEUTRAL.
•After pushing the Power Button (4), the sealant (white fluid) will flow from the Sealant
Bottle (1) through the Sealant Hose (6) and into the tire.
NOTE:
Sealant may leak out through the puncture in the tire.
WHAT TO DO IN EMERGENCIES
92