2016 FIAT 500E ad blue
[x] Cancel search: ad bluePage 74 of 132

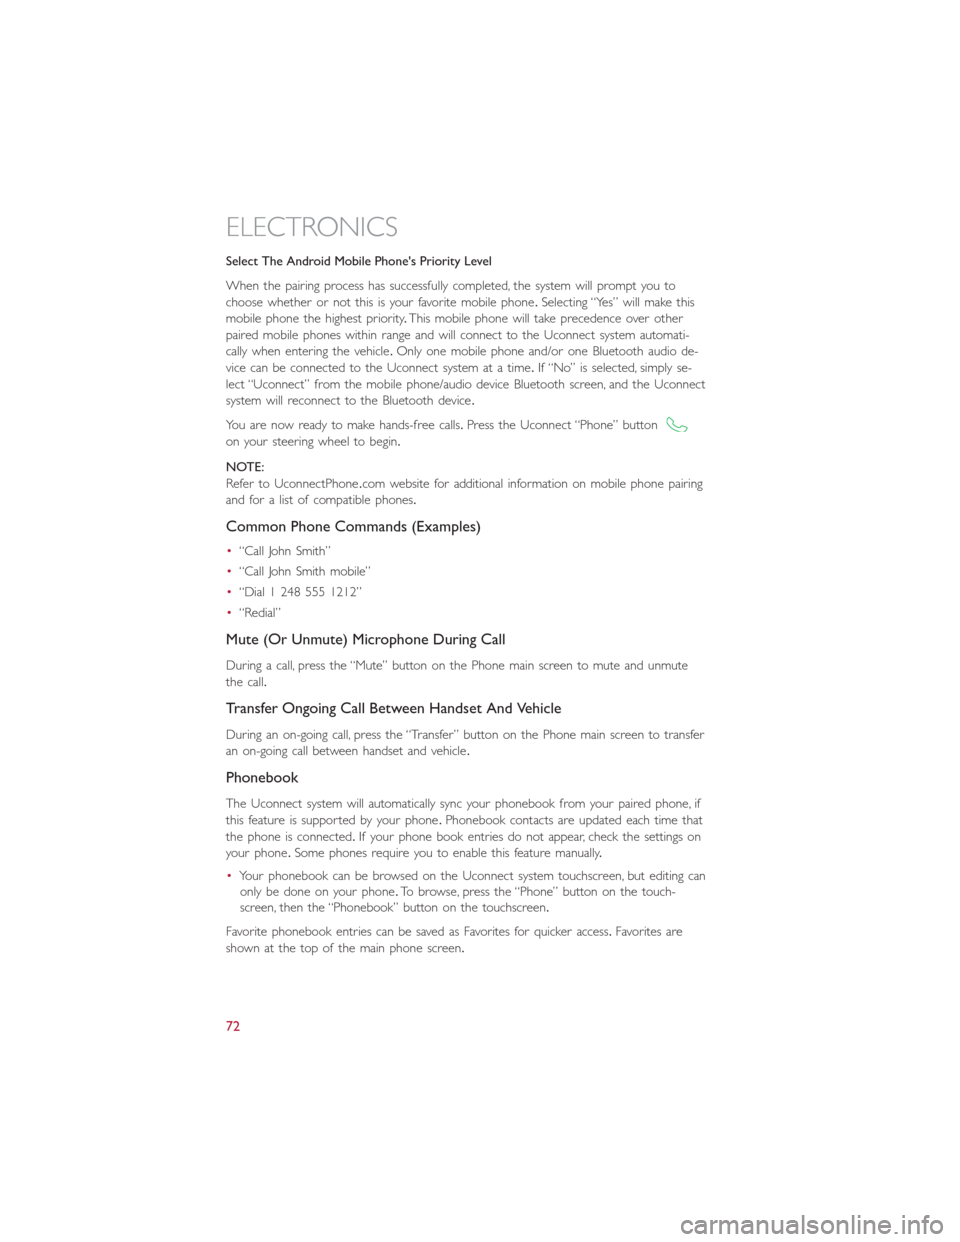
Select The Android Mobile Phone's Priority Level
When the pairing process has successfully completed, the system will prompt you to
choose whether or not this is your favorite mobile phone.Selecting “Yes” will make this
mobile phone the highest priority.This mobile phone will take precedence over other
paired mobile phones within range and will connect to the Uconnect system automati-
cally when entering the vehicle.Only one mobile phone and/or one Bluetooth audio de-
vice can be connected to the Uconnect system at a time.If “No” is selected, simply se-
lect “Uconnect” from the mobile phone/audio device Bluetooth screen, and the Uconnect
system will reconnect to the Bluetooth device.
You are now ready to make hands-free calls.Press the Uconnect “Phone” button
on your steering wheel to begin.
NOTE:
Refer to UconnectPhone.com website for additional information on mobile phone pairing
and for a list of compatible phones.
Common Phone Commands (Examples)
•“Call John Smith”
•“Call John Smith mobile”
•“Dial 1 248 555 1212”
•“Redial”
Mute (Or Unmute) Microphone During Call
During a call, press the “Mute” button on the Phone main screen to mute and unmute
the call.
Transfer Ongoing Call Between Handset And Vehicle
During an on-going call, press the “Transfer” button on the Phone main screen to transfer
an on-going call between handset and vehicle.
Phonebook
The Uconnect system will automatically sync your phonebook from your paired phone, if
this feature is supported by your phone.Phonebook contacts are updated each time that
the phone is connected.If your phone book entries do not appear, check the settings on
your phone.Some phones require you to enable this feature manually.
•Your phonebook can be browsed on the Uconnect system touchscreen, but editing can
only be done on your phone.To browse, press the “Phone” button on the touch-
screen, then the “Phonebook” button on the touchscreen.
Favorite phonebook entries can be saved as Favorites for quicker access.Favorites are
shown at the top of the main phone screen.
ELECTRONICS
72
Page 75 of 132

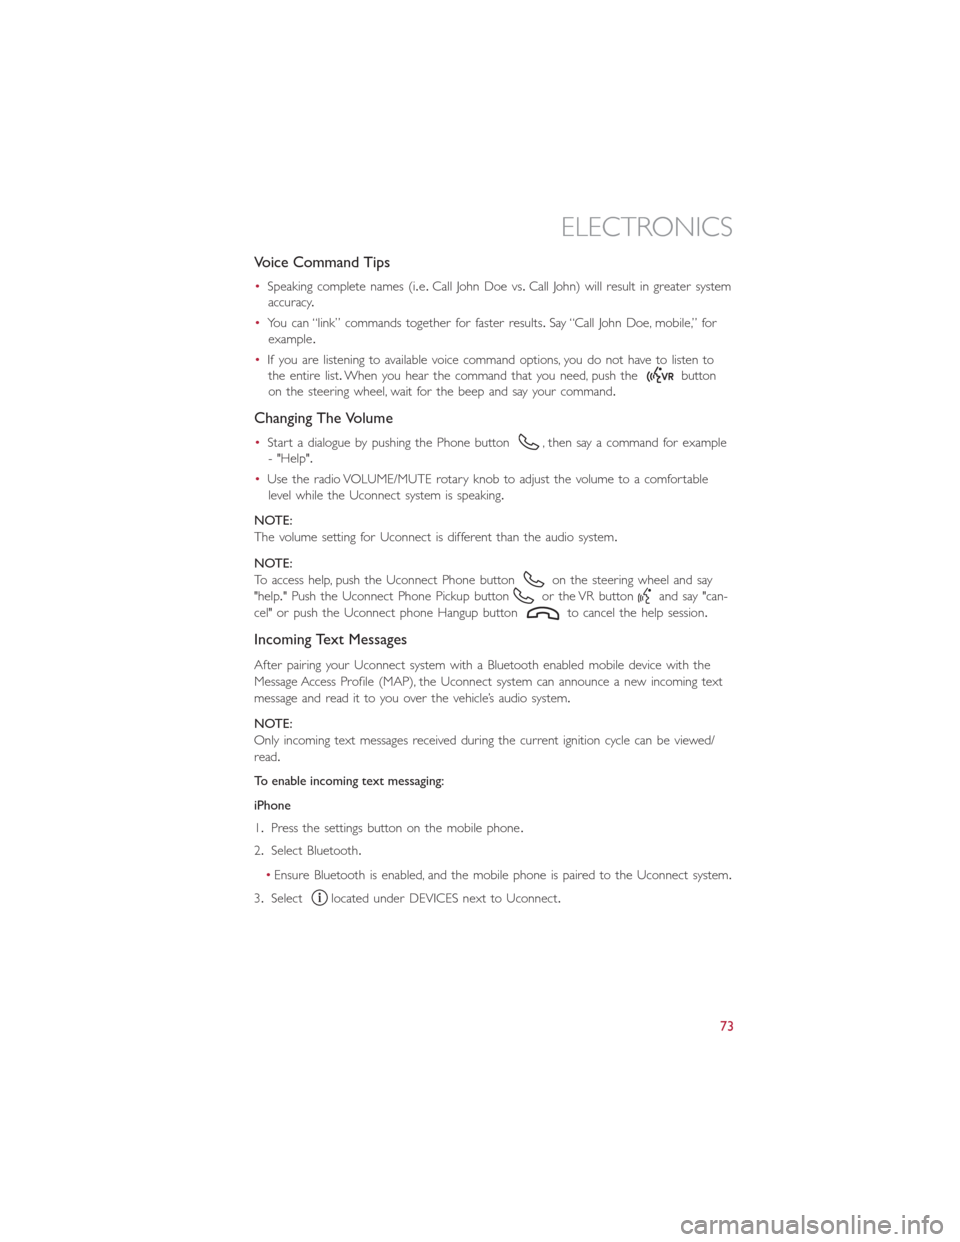
Voice Command Tips
•Speaking complete names (i.e.Call John Doe vs.Call John) will result in greater system
accuracy.
•You can “link” commands together for faster results.Say “Call John Doe, mobile,” for
example.
•If you are listening to available voice command options, you do not have to listen to
the entire list.When you hear the command that you need, push the
button
on the steering wheel, wait for the beep and say your command.
Changing The Volume
•Start a dialogue by pushing the Phone button, then say a command for example
- "Help".
•Use the radio VOLUME/MUTE rotary knob to adjust the volume to a comfortable
level while the Uconnect system is speaking.
NOTE:
The volume setting for Uconnect is different than the audio system.
NOTE:
To access help, push the Uconnect Phone button
on the steering wheel and say
"help." Push the Uconnect Phone Pickup button
or the VR buttonand say "can-
cel" or push the Uconnect phone Hangup button
to cancel the help session.
Incoming Text Messages
After pairing your Uconnect system with a Bluetooth enabled mobile device with the
Message Access Profile (MAP), the Uconnect system can announce a new incoming text
message and read it to you over the vehicle’s audio system.
NOTE:
Only incoming text messages received during the current ignition cycle can be viewed/
read.
To enable incoming text messaging:
iPhone
1.Press the settings button on the mobile phone.
2.Select Bluetooth.
•Ensure Bluetooth is enabled, and the mobile phone is paired to the Uconnect system.
3.Select
located under DEVICES next to Uconnect.
ELECTRONICS
73
Page 77 of 132

Voice Text Reply (Not Compatible With iPhone)
NOTE:
Voice texting reply and voice texting features require a compatible mobile device enabled
with Bluetooth Message Access Profile (MAP).iPhone, and some other smartphones, may
not entirely support Bluetooth MAP.Visit UconnectPhone.com for the latest system and
device compatibility.
•Due to the extremely large number of mobile phone manufacturers, your mobile de-
vice may not be listed.For further assistance, contact Uconnect Customer Care @
1-877-855-8400 for U.S.residents or, 1-800-465-2001 (English) / 1-800-387-9983
(French) for Canadian residents.
Once your Uconnect system is paired with a compatible mobile device, the system can
announce a new incoming text message, and read it to your over the vehicle audio sys-
tem.You can reply to the message using Voice Recognition by selecting, or saying, one of
the 18 pre-defined messages.
Here’s How:
1.Push the Uconnect Phone button
and wait for the beep, then say “reply.”
Uconnect will give the following prompt: “Please say the message you would like to
send.”
2.Wait for the beep and say one of the pre-defined messages.(If you are not sure, you
can say “help”).Uconnect will then read the pre-defined messages allowed.
3.As soon as you hear the message you would like to send, you can interrupt the list of
prompts by pushing the Uconnect phone button and saying the phrase.Uconnect will
confirm the message by reading it back to you.
4.Push the Phone button and say “Send.”
PRE-DEFINED VOICE TEXT REPLY RESPONSES
Ye s.Stuck in Traffic.See you later.
No.Start without me.I’ll be Late.
Okay.Where are you?
I will be <5, 10, 15,...etc.>
minutes late.
Call me.Are you there yet?
I’ll call you later.I need directions.
See you in <5, 10, 15,...etc.>
of minutes.
I’m on my way.
Can’t talk right now.
I’m lost.Thanks.
NOTE:
To make the SMS voice reading function available, the SMS notification option on phone
must be enabled; this option is usually available on the phone, in the Bluetooth connec-
tions menu for a device registered as Uconnect.After enabling this function on the mo-
bile phone, it must be disconnected and reconnected with the Uconnect system in order
to make it effective.
ELECTRONICS
75
Page 78 of 132

Helpful Tips And Common Questions To Improve Bluetooth Performance
With Your Uconnect System
Mobile Phone won’t reconnect to system after pairing:
•Set mobile phone to auto-connect or trusted device in mobile phone Bluetooth set-
tings (Blackberry devices).
•Perform a factory reset on your mobile phone.Refer to your mobile phone manufac-
turer or cellular provider for instructions.
•Many mobile phones do not automatically reconnect after being restarted (hard re-
boot).Your mobile phone can still be connected manually.Close all applications that
may be operating (refer to mobile phone manufacturer’s instructions), and follow “Pair-
ing (Wirelessly Connecting) Your Mobile Phone To The Uconnect System”.
Mobile Phone won’t pair to system:
•Perform a hard reset in the mobile phone by removing the battery (if removable —
see your mobile phone’s owner manual).
•Delete pairing history in mobile phone and Uconnect system; usually found in phone’s
Bluetooth connection settings.
•Verify you are selecting “Uconnect” in the discovered Bluetooth devices on your mo-
bile phone.
•If your vehicle system generates a pin code the default is 0000.
Mobile Phonebook didn’t download:
•Check “Do not ask again,” then accept the “phonebook download” request on your
mobile phone.
•Up to 2,000 contact names with six numbers per contact will transfer to the
Uconnect 5.0/5.0N system phonebook.
Text messaging won’t work:
•Check “Do not ask again,” then accept the “connect to your messages” request on
your mobile phone.
•Verify that your mobile phone has the Bluetooth feature (Message Access Profile).
Can’t make a conference call:
•CDMA (Code-Division Multiple Access) carriers do not support conference calling.
Refer to your mobile phone user’s manual for further information.
Making calls while connected to AUX:
•Plugging in your mobile phone to AUX while connected to Bluetooth will disable
Hands-Free Calling.Do not make calls while your mobile phone is plugged into the
AUX jack.
ELECTRONICS
76
Page 81 of 132

Uconnect Customer Programmable Features
The Uconnect system allows you to access Customer Programmable feature settings.
To change a setting:
1.Push the SETTINGS
button located on the right side of the display.
2.Select a programmable feature you would like to adjust.
3.Make your selection highlighting the button.
Depending on the vehicles options, the following feature settings are available:
•Display•Audio
•Clock & Date•Phone/Bluetooth
•Safety/Assistance•SiriusXM Setup
•Lights•Voice
•Doors & Locks•Restore Settings
•Engine Off Options•Units
•Clear Personal Data•Charging Schedule
TRIP BUTTON
The Trip button is located on the end of
the wiper lever to the right of the steering
column.The trip button can be used to
display and reset the following functions:
•Motor Power (Kilowatts)
•Trip A
•Trip B
•Tire Pressure
•Short push (less than 1 second) to dis-
play different functions.
•Long push (more than 1 second) to re-
set and start a new trip.
Trip Button
ELECTRONICS
79
Page 83 of 132

NOTE:
•Do not exceed the maximum power of 160 Watts (13 Amps) at 12 Volts.If the
160 Watt (13 Amp) power rating is exceeded, the fuse protecting the system will need
to be replaced.
•Power outlets are designed for accessory plugs only.Do not insert any other object in
the power outlet as this will damage the outlet and blow the fuse.Improper use of
the power outlet can cause damage not covered by your new vehicle warranty.
F15 Fuse 15 Amp Blue Cigar/Power Outlet Front Console
ELECTRONICS
81
Page 113 of 132

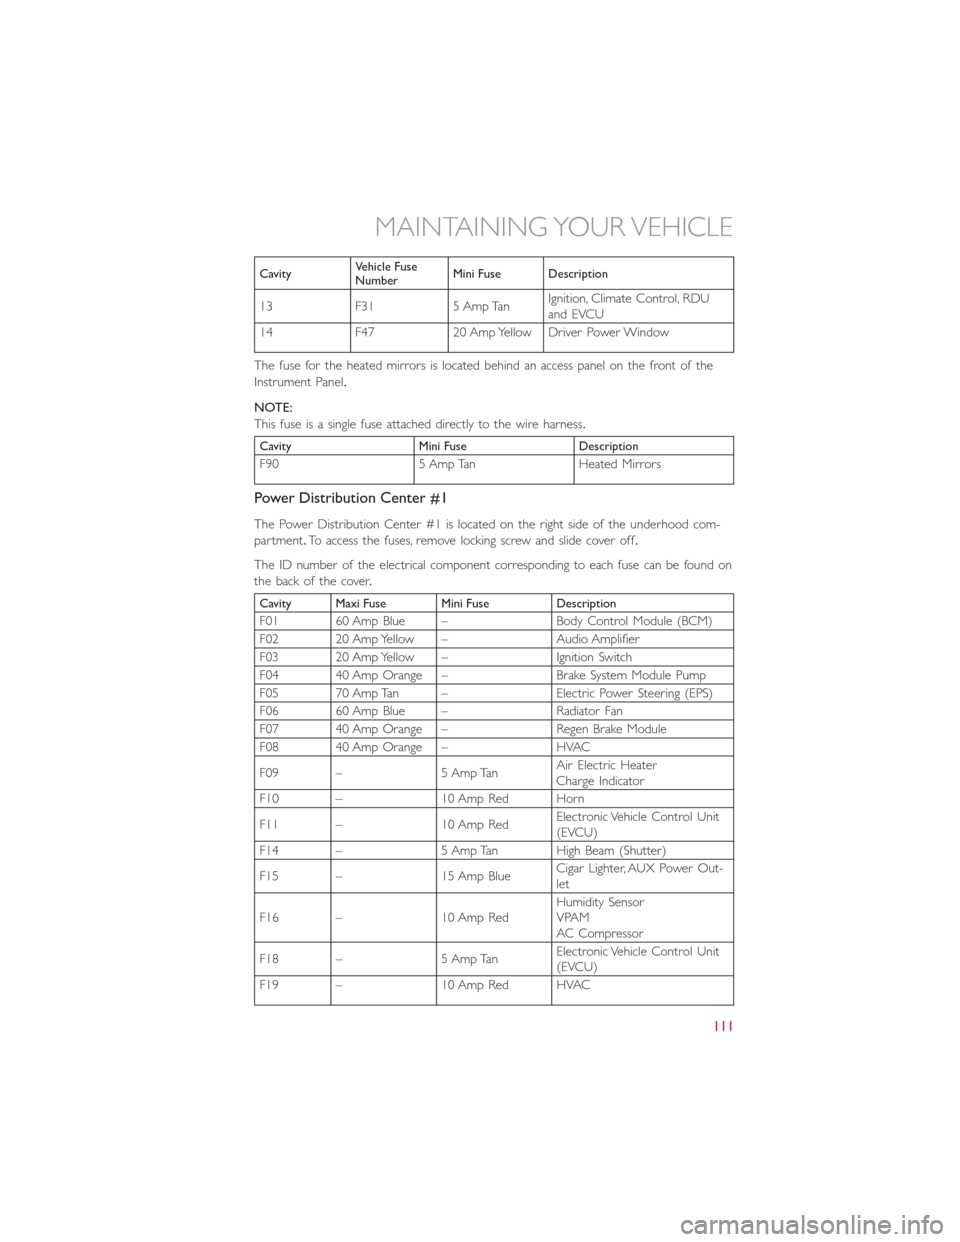
CavityVehicle Fuse
NumberMini Fuse Description
13 F31 5 Amp TanIgnition, Climate Control, RDU
and EVCU
14 F47 20 Amp Yellow Driver Power Window
The fuse for the heated mirrors is located behind an access panel on the front of the
Instrument Panel.
NOTE:
This fuse is a single fuse attached directly to the wire harness.
Cavity Mini Fuse Description
F90 5 Amp Tan Heated Mirrors
Power Distribution Center #1
The Power Distribution Center #1 is located on the right side of the underhood com-
partment.To access the fuses, remove locking screw and slide cover off.
The ID number of the electrical component corresponding to each fuse can be found on
thebackofthecover.
Cavity Maxi Fuse Mini Fuse Description
F01 60 Amp Blue – Body Control Module (BCM)
F02 20 Amp Yellow – Audio Amplifier
F03 20 Amp Yellow – Ignition Switch
F04 40 Amp Orange – Brake System Module Pump
F05 70 Amp Tan – Electric Power Steering (EPS)
F06 60 Amp Blue – Radiator Fan
F07 40 Amp Orange – Regen Brake Module
F08 40 Amp Orange – HVAC
F09 – 5 Amp TanAir Electric Heater
Charge Indicator
F10 – 10 Amp Red Horn
F11 – 10 Amp RedElectronic Vehicle Control Unit
(EVCU)
F14 – 5 Amp Tan High Beam (Shutter)
F15 – 15 Amp BlueCigar Lighter, AUX Power Out-
let
F16 – 10 Amp RedHumidity Sensor
VPAM
AC Compressor
F18 – 5 Amp TanElectronic Vehicle Control Unit
(EVCU)
F19 – 10 Amp Red HVAC
MAINTAINING YOUR VEHICLE
111
Page 114 of 132

Cavity Maxi Fuse Mini Fuse Description
F20 – 15 Amp Blue Heated Seats – If Equipped
F21 – 20 Amp Yellow Radio
F23 – 25 Amp Clear Anti-Lock Brake Valves
F24 – 7.5 Amp BrownEPS
YAW Sensor
F30 – 15 Amp Blue Fog Lamps
F81 30 Amp Green – Electronic Shifter (ESM)
F82 30 Amp Green – Sunroof
F84 – 25 Amp Clear Regen Brake Module
F85 30 Amp Green – Rear Window Heater
F87 – 5 Amp Tan Electronic Shifter (ESM)
Power Distribution Center (PDC) #2
The Power Distribution Center #2 is located next to the battery in the underhood com-
partment.To access the fuses, pull the release tabs and remove the cover.
Cavity Maxi Fuse Mini Fuse Description
FPT9 – 15 Amp Blue Battery Pack Control Mod-
ule (BPCM)
Power Inverter Module
(PIM)
FPT13 – 10 Amp Red EAC (AC Compressor)
On Board Charging Module
(OBCM)
FPT16 – 5 Amp Tan Intelligent Battery Sensor
(IBS)
FPT17 – 10 Amp Red EAC (AC Compressor)
Radiator Fan
FPT20 – 10 Amp Red Electronic Vehicle Control
Unit (EVCU)
Cavity Cartridge Fuse Description
FPT3 25 Amp White Battery Coolant Pump
FPT5 20 Amp Lt.Blue Inverter Coolant Pump
FPT6 40 Amp Green Supply for fuses F9, F13,
F16, F17 and F20
MAINTAINING YOUR VEHICLE
112