Page 211 of 634
•For example: If approaching the left side of the lane
the steering wheel will turn to the right.
• When the LaneSense system senses the lane has been
approached and is in a lane departure situation, the
left thick lane line flashes yellow (on/off) and the left thin line remains solid yellow. The LaneSense indicator
changes from solid yellow to flashing yellow. At this
time torque is applied to the steering wheel in the
opposite direction of the lane boundary.
• For example: If approaching the left side of the lane
the steering wheel will turn to the right.
Lane Sensed (Solid Yellow Thick Line, Solid Yellow
Thin Line/Solid Yellow Indicator)
3
UNDERSTANDING THE FEATURES OF YOUR VEHICLE 209
Page 213 of 634

P")
•The system will not apply torque to the steering wheel
whenever a safety system engages. (anti-lock brakes,
traction control system, electronic stability control,
forward collision warning, etc.)
PARKSENSE REAR PARK ASSIST — IF
EQUIPPED
The ParkSense Rear Park Assist system provides visual
and audible indications of the distance between the rear
fascia and a detected obstacle when backing up, e.g.
during a parking maneuver. Refer to “ParkSense System
Usage Precautions” in this section for limitations of this
system and recommendations.
ParkSense will retain the last system state (enabled or
disabled) from the last ignition cycle when the ignition is
changed to the ON/RUN position.
ParkSense can be active only when the gear selector is in
REVERSE. If ParkSense is enabled at this gear selector position, the system will remain active until the vehicle
speed is increased to approximately 7 mph (11 km/h) or
above. The system will become active again if the vehicle
speed is decreased to speeds less than approximately
6 mph (9 km/h).
ParkSense Sensors
The four ParkSense sensors, located in the rear fascia/
bumper, monitor the area behind the vehicle that is
within the sensors’ field of view. The sensors can detect
obstacles from approximately 12 inches (30 cm) up to 79
inches (200 cm) from the rear fascia/bumper in the
horizontal direction, depending on the location, type and
orientation of the obstacle.
ParkSense Warning Display
The ParkSense Warning screen will only be displayed if
Sound and Display is selected from the Uconnect System.
Refer to
�Uconnect Settings” in “Understanding Your
Instrument Panel” for further information.
3
UNDERSTANDING THE FEATURES OF YOUR VEHICLE 211
Page 222 of 634
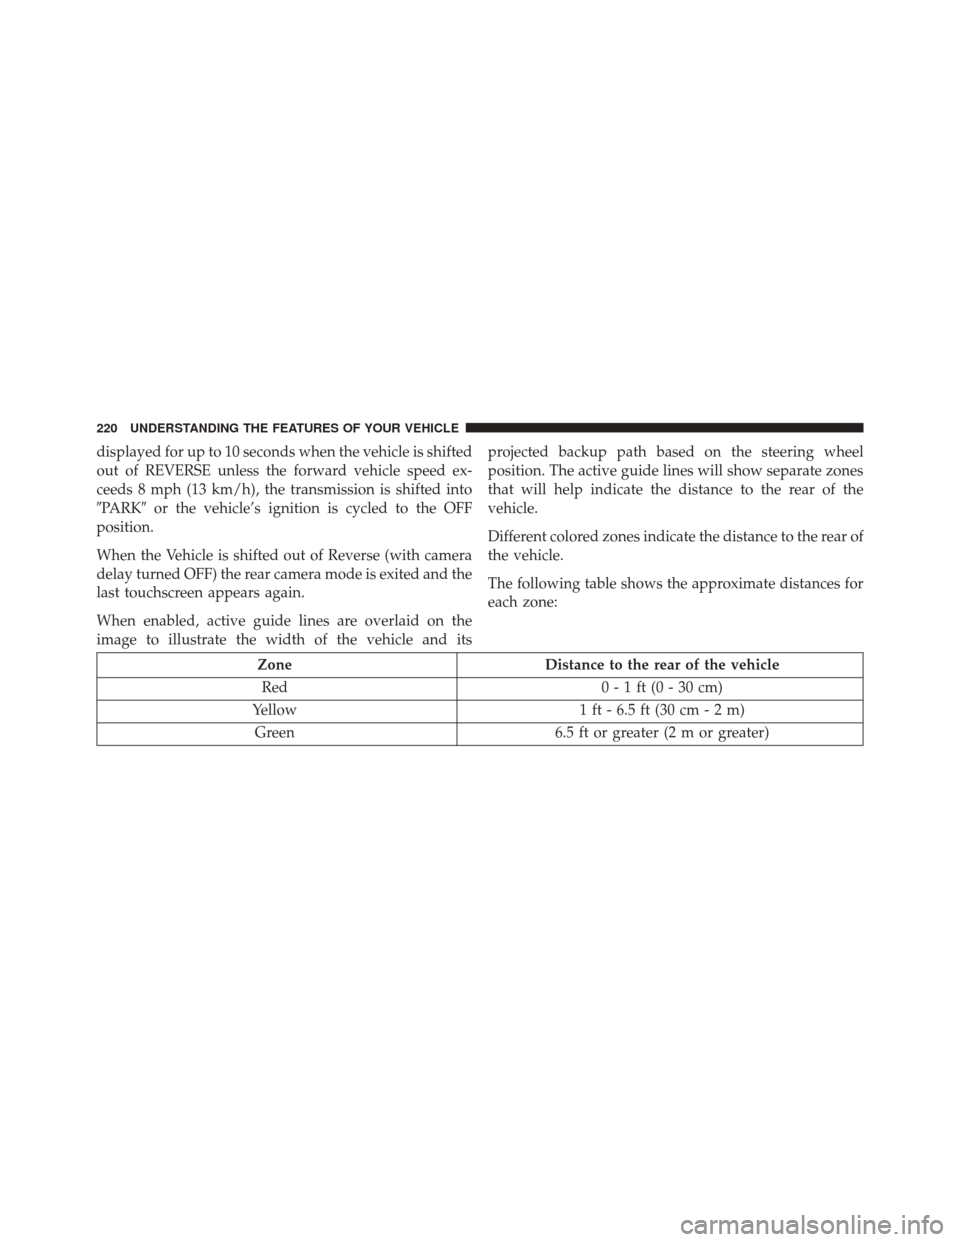
displayed for up to 10 seconds when the vehicle is shifted
out of REVERSE unless the forward vehicle speed ex-
ceeds 8 mph (13 km/h), the transmission is shifted into
�PARK�or the vehicle’s ignition is cycled to the OFF
position.
When the Vehicle is shifted out of Reverse (with camera
delay turned OFF) the rear camera mode is exited and the
last touchscreen appears again.
When enabled, active guide lines are overlaid on the
image to illustrate the width of the vehicle and its projected backup path based on the steering wheel
position. The active guide lines will show separate zones
that will help indicate the distance to the rear of the
vehicle.
Different colored zones indicate the distance to the rear of
the vehicle.
The following table shows the approximate distances for
each zone:
Zone
Distance to the rear of the vehicle
Red 0 - 1 ft (0 - 30 cm)
Yellow 1 ft - 6.5 ft (30 cm - 2 m)
Green 6.5 ft or greater (2 m or greater)
220 UNDERSTANDING THE FEATURES OF YOUR VEHICLE
Page 250 of 634

▫SRT PERFORMANCE PAGES ............325
▫ SRT Drive Modes .....................337
▫ RACE OPTIONS ..................... .350
▫ VALET MODE ...................... .354
▫ ECO Mode ......................... .357
� UCONNECT RADIOS — IF EQUIPPED ......357
� AUX/USB/MP3 CONTROL ...............358
� STEERING WHEEL AUDIO CONTROLS — IF
EQUIPPED .......................... .359
▫ Radio Operation ..................... .360
� RADIO OPERATION AND MOBILE DEVICES . .360
▫ Regulatory And Safety Information .........360
� CLIMATE CONTROLS ...................362 ▫
Dual Zone Automatic Climate Controls With
Touchscreen ........................ .362
▫ Climate Control Functions ...............368
▫ Automatic Temperature Control (ATC) ......369
▫ Operating Tips ...................... .371
� PERSONALIZED MENU BAR ..............374
� UCONNECT VOICE RECOGNITION QUICK
TIPS ............................... .374
▫ Introducing Uconnect ...................374
▫ Get Started ......................... .375
▫ Basic Voice Commands ..................377
▫ Radio ............................. .378
▫ Media ............................. .379
▫ Phone ............................. .380
248 UNDERSTANDING YOUR INSTRUMENT PANEL
Page 285 of 634
Cruise Control Engaged Indicator Light
Green TelltaleLight What It Means
Cruise Control Engaged Indicator Light
This light will turn on when the cruise control has been engaged.
LaneSense Indicator Light — If Equipped
Green Telltale
Light What It Means
LaneSense Indicator Light — If Equipped
The LaneSense indicator is solid green when both lane markings have been detected and
the system is “armed” to provide visual warnings in the EVIC/DID and a torque warning
in the steering wheel if an unintentional lane departure occurs. Refer to “LaneSense — If
Equipped�
in “Understanding The Features Of Your Vehicle” for further information.
4
UNDERSTANDING YOUR INSTRUMENT PANEL 283
Page 289 of 634
DRIVER INFORMATION DISPLAY (DID)
The Driver Information Display (DID) features an inter-
active display which is located in the instrument cluster.
This system conveniently allows the driver to select a
variety of useful information by pushing the arrowbuttons located on the left side of the steering wheel. The
DID Menu Items consists of the following:
•
Speedometer
• Vehicle Info
• Performance
• Driver Assist — If Equipped
• Fuel Economy
• Trip
• Audio
• Messages
• Screen Setup
• Speed Warning — If Equipped
• Diagnostics — If Equipped
Driver Information Display (DID) Display
4
UNDERSTANDING YOUR INSTRUMENT PANEL 287
Page 290 of 634
The system allows the driver to select information by
pushing the following buttons mounted on the steering
wheel:UP And DOWN Arrow Buttons:
Using the UPorDOWN arrows allows you to
cycle through the Main Menu Items.
Changes the Main Screen area and Menu Title
area.
LEFT And RIGHT Arrow Buttons: Using the LEFTorRIGHT arrow buttons
allows you to cycle through the submenu items
of the Main menu item.
NOTE:
• Holding the UP/DOWNorLEFT/RIGHT
arrow buttons will loop the user through the
currently selected menu or options pre-
sented on the screen.
DID Controls
288 UNDERSTANDING YOUR INSTRUMENT PANEL
Page 292 of 634

is duty cycle based, which means the engine oil change
interval may fluctuate, dependent upon your personal
driving style.
Unless reset, this message will continue to display each
time you place the ignition in the ON/RUN position. To
turn off the message temporarily, push and release the
OKor arrow buttons. To reset the oil change indicator
system (after performing the scheduled maintenance),
refer to the following procedure.
Vehicles Equipped With Keyless Enter-N-Go
Your vehicle is equipped with an engine oil change
indicator system. The “Oil Change Required” message
will display in the DID for five seconds after a single
chime has sounded to indicate the next scheduled oil
change interval. The engine oil change indicator system
is duty cycle based, which means the engine oil change
interval may fluctuate, dependent upon your personal
driving style. Use the steering wheel DID controls for the following
procedure(s):
1. Without pushing the brake pedal, push the ENGINE
START/STOP button and place the ignition in the
ON/RUN position (do not start the engine).
2. Push and release the DOWN
arrow button to
scroll downward through the main menu to “Ve-
hicle Info.”
3. Push and release the RIGHTarrow button to
access the ”Oil Life” screen.
4. Push and hold the OKbutton to rest oil life. If
conditions are met, the gauge and numeric display
will update to show 100%. If conditions are not met a
popup message of �To reset oil life engine must be off
with ignition in run� will be displayed (for 5 seconds),
and the user will remain at the Oil Life screen.
290 UNDERSTANDING YOUR INSTRUMENT PANEL


The Driver Information Display (DID) features an inter-
active display which is located in the instrument cluster.
This system conveniently allows the driver to select")
