Page 4 of 595

.
.
Jumpy _en_Chap00a_sommaire_ed01-2016
Over view
Instrument panels 14
Indicator and warning lamps 1 7
Engine coolant temperature
3
1
Distance recorders
3
8
Lighting dimmer
3
9
Trip computer
4
0
Touch screen
4
3
Setting the date and time
4
6
Key
47
K
ey, remote control
4
7
"Keyless Entry and Starting"
5
5
Locking / unlocking from inside
7
2
Front doors
7
4
Manual sliding side door(s)
7
5
Electric sliding side door(s)
7
8
Hands-free sliding side door(s)
87
S
ide-hinged rear doors
9
1
Tailgate
9
4
Alarm
9
5
Electric windows
9
8Steering wheel adjustment
9
9
Front seats
9
9
2-seat front bench seat
1
04
Moduwork
1
06
Fixed one-piece bench seat
1
10
Fixed rear seat and bench seat
1
13
Fixed crew cab 1 17
Interior fittings 1 19
Loading area fittings
1
22
Seating area fittings
1
23
Heating / Ventilation
1
25
Manual air conditioning
1
26
Dual-zone automatic air conditioning
1
28
Front demist - defrost
1
32
Door mirrors demist - defrost
1
33
Rear screen demist - defrost
1
34
Rear Heating - Air Conditioning
1
37
Programmable Heating / Ventilation
1
38
Courtesy lamp(s)
1
41Mir ror s
14
3
Lighting control stalk
1
46
Daytime running lamps
1
49
Automatic illumination of headlamps
1
49
Automatic headlamp dipping
1
53
Manual headlamp beam height adjustment 1 55
Wiper control stalk 1 56
Automatic rain sensitive wipers
1
57
Hazard warning lamps
1
60
Emergency or assistance call
1
60
Horn
161
Electronic stability control (ESC)
1
61
Grip control
1
64
Seat belts
1
66
Airbags
1
70
Child seats
1
74
Deactivating the passenger's front
airbag
1
77
ISOFIX mountings
1
86
Manual child lock
1
94
Electric child lock
1
94
Child lock on rear windows
1
95
Eco-driving
Instruments
Access Ease of use and comfort
Lighting and visibility
Safety
Labels 11
Contents
Page 101 of 595

99
Jumpy _en_Chap03_ergonomie-et-confort_ed01-2016
Steering wheel adjustment
F When stationary, lower the control lever
to release the steering wheel adjustment
mechanism.
F
A
djust the height and reach to suit your
driving position.
F
P
ull the control lever to lock the steering
wheel adjustment mechanism.
As a safety precaution, these
operations should only be carried out
while the vehicle is stationary.
Front seats with manual adjustments
F Raise the control and slide the seat for wards or backwards. F
I f fitted to your vehicle, pull the control
upwards to raise or push it downwards to
lower, as many times as required to obtain
the position required.
Forwards-backwards Height
As a safety measure, seat adjustments should only be carried out when stationary.
Before moving the seat backwards, ensure that there is nothing that might prevent the full
travel of the seat, so as to avoid the risk of jamming the seat caused by the presence of
objects on the floor behind the seat or rear passengers. If the seat jams, stop the movement
immediately. For more information on the Seat belts ,
refer to the corresponding section.
3
Ease of use and comfort
Page 104 of 595
102
Jumpy _en_Chap03_ergonomie-et-confort_ed01-2016
Electric front seat
Forwards-backwardsBackrest angleHeight
To avoid discharging the battery, carry out
these adjustments with the engine running.
For more information on the Seat belts
,
refer to the corresponding section.
F
P
ush the control for wards or rear wards to
slide the seat. F
T
ilt the control for wards or rear wards to
adjust the angle of the seat backrest. F
T
ilt the control upwards or downwards to
obtain the desired height.
Before moving the seat backwards, ensure that there is nothing that might prevent the full
travel of the seat, so as to avoid the risk of jamming the seat caused by the presence of
objects on the floor behind the seat or rear passengers. If the seat jams, stop the movement
immediately.
Ease of use and comfort
Page 105 of 595

103
Jumpy _en_Chap03_ergonomie-et-confort_ed01-2016
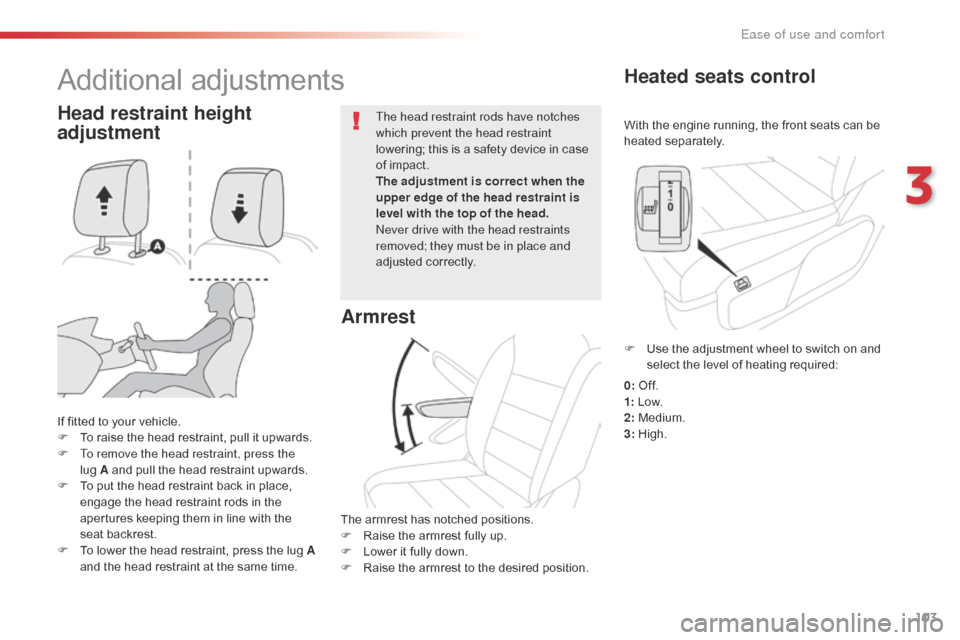
With the engine running, the front seats can be
heated separately.
Heated seats control
If fitted to your vehicle.
F T o raise the head restraint, pull it upwards.
F
T
o remove the head restraint, press the
lug
A and pull the head restraint upwards.
F
T
o put the head restraint back in place,
engage the head restraint rods in the
apertures keeping them in line with the
seat backrest.
F
T
o lower the head restraint, press the lug A
and the head restraint at the same time. The head restraint rods have notches
which prevent the head restraint
lowering; this is a safety device in case
of impact.
The adjustment is correct when the
upper edge of the head restraint is
level with the top of the head.
Never drive with the head restraints
removed; they must be in place and
adjusted correctly.
Head restraint height
adjustment
Additional adjustments
Armrest
The armrest has notched positions.
F
R aise the armrest fully up.
F
L
ower it fully down.
F
R
aise the armrest to the desired position. F
U
se the adjustment wheel to switch on and
select the level of heating required:
0: Of f.
1: Low.
2: Medium.
3: High.
3
Ease of use and comfort
Page 106 of 595

104
Jumpy _en_Chap03_ergonomie-et-confort_ed01-2016
Head restraint height
adjustment
F To raise the head restraint, pull it upwards.
F T o remove the head restraint, press the
lug
A and pull the head restraint upwards.
F
T
o put the head restraint back in place,
engage the head restraint stems in the
openings keeping them in line with the seat
back.
F
T
o lower the head restraint, press the lug A
and the head restraint at the same time. The head restraint rods have notches
which prevent the head restraint
lowering; this is a safety device in case
of impact.
The adjustment is correct when the
upper edge of the head restraint is
level with the top of the head.
Never drive with the head restraints
removed; they must be in place and
adjusted correctly.
2-seat front bench seat
If fitted to your vehicle, this is fixed and has a seat belt on the backrest for the seat alongside the
driver.
For more information on the Seat belts,
refer to the corresponding section.
Ease of use and comfort
Page 157 of 595
155
Jumpy _en_Chap04_eclairage-et-visibilite_ed01-2016
To avoid causing a nuisance to
other road users, the beams of
the halogen headlamps should be
adjusted according to the load in
the vehicle.
0 -
1 o
r 2 people in the front seats.
1 -
5 p
eople.
2 -
6 t
o 9 people.
3 -
D
river + maximum authorised loads. The initial setting is position "0" .
The initial setting is position "0" .
Manual headlamp beam height adjustment
To avoid causing a nuisance to
other road users, the beams of
the halogen headlamps should be
adjusted according to the load in
the vehicle.
0
U
nladen.
1
P
art load.
2
M
edium load.
3
M
aximum authorised load.
4
Lighting and visibility
Page 168 of 595

166
Jumpy _en_Chap05_securite_ed01-2016
Seat belts
Front seat beltsFastening
Unfastening
F Press the red button on the buckle.
F G uide the seat belt as it reels in.
The front seat belts are fitted with a
pretensioning and force limiting system.
This system improves safety in the front
seats in the event of a front or side impact.
Depending on the severity of the impact, the
pretensioning system instantly tightens the seat
belts against the body of the occupants.
The pretensioning seat belts are active when
the ignition is on.
The force limiter reduces the pressure of the
seat belt on the chest of the occupant, so
improving their protection.
Height adjustment
The upper part of the diagonal strap
should lie across the shoulder.
F
T
o lower the attachment point, while
moving control A downwards, slide the
assembly down to the desired position.
F
T
o raise the attachment point, slide the
assembly up to the desired position.
F
P
ull the strap, then insert the tongue in the
buckle.
F
C
heck that the seat belt is fastened
correctly by pulling the strap.
Safety
Page 224 of 595

222
Jumpy _en_Chap06_conduite_ed01-2016
1. On.
2. Off (long press).
3.
Br
ightness adjustment.
4.
D
isplay height adjustment.
Once the system has been activated, the
following information is grouped together in the
head-up display:
A.
T
he speed of your vehicle.
B.
C
ruise control/speed limiter information.
C.
I
f your vehicle is so equipped, inter-vehicle
distance information, automatic emergency
braking alerts and navigation instructions.
D.
I
f your vehicle is so equipped, speed limit
information.
System which projects various information onto
a smoked blade in the driver's field of vision so
that they do not have to take their eyes off the
road.
Buttons
Displays during operationHead-up display
For more information on Navigation ,
refer to the Audio and telematics
section. F
W
ith the engine running, press button 1 to
activate the system and deploy the blade.
Activation / Deactivation
F Press and hold button 2 to deactivate the system and retract
the blade.
The activated/deactivated state is saved and
retained on restarting the engine.
Driving