2016 Citroen JUMPY fuel consumption
[x] Cancel search: fuel consumptionPage 220 of 595

218
Jumpy _en_Chap06_conduite_ed01-2016
Stop & StartGoing into engine
STOP mode
If your vehicle has a manual gearbox, its
speed must be below 12 mph (20 km/h) or
stationary (depending on engine); the "ECO"
indicator lamp comes on in the instrument
panel and the engine goes into standby
automatically when you place the gear lever in
neutral and you release the clutch pedal.
For your comfort, during parking
manoeuvres, STOP mode is not
available for a few seconds after
coming out of reverse gear.
Stop & Start does not affect the
functionality of the vehicle, such as for
example, braking, power steering...
A slight delay between the vehicle
stopping and the engine cutting out may
be noticed.If your vehicle is fitted with
Stop & Start, a time counter
calculates the time spent in
STOP mode during a journey.
It resets to zero every time the ignition is
switched on.
Stop & Start time counter
The Stop & Start system puts the engine
t emporarily into standby - STOP mode - during
stops in the traffic (red lights, traffic jams, or
other...). The engine restarts automatically -
START mode - as soon as you want to move
off. The restart takes place instantly, quickly
and silently.
Per fect for urban use, the Stop & Start system
reduces fuel consumption and exhaust
emissions as well as the noise level when
stationary.
If your vehicle has an automatic gearbox
and the vehicle is stationary, the "ECO"
indicator lamp comes on and the engine goes
into standby automatically when you press
the brake pedal or place the gear selector in
position N .
If your vehicle has an electronic gearbox and
the vehicle's speed is below 5 mph (8 km/h),
the "ECO" indicator lamp comes on and the
engine goes into standby automatically when
you press the brake pedal or place the gear
selector in position N . (minutes / seconds or hours / minutes)
Never refuel with the engine in
STOP
mode; you must switch off the
ignition with the button.
Driving
Page 264 of 595

262
Jumpy _en_Chap06_conduite_ed01-2016
Under-inflation detection
The system monitors the pressures in the four
tyres, once the vehicle is moving.
It compares the information given by the four
wheel speed sensors with reference values,
which must be reinitialised ever y time the
tyre pressures are adjusted or a wheel
changed.
The system triggers an alert as soon as it
detects a drop in the inflation pressure of one
or more tyres. The under-inflation detection system
does not replace the need for vigilance
on the part of the driver.
This system does not avoid the need to
check the tyre pressures (including the
spare wheel) every month as well as
before a long journey.
Driving with under-inflated tyres impairs
road holding, extends braking distances
and causes premature tyre wear,
particularly under arduous conditions
(high loading, high speed, long journey).
System which automatically checks the pressures of the tyres while driving.
The inflation pressures defined for
your vehicle can be found on the tyre
pressure label.
For more information on the
Identification markings, refer to the
corresponding section.
Tyre pressures should be checked
when the tyres are "cold" (vehicle
stopped for 1 hour or after a journey of
less than 6 miles (10 km) at moderate
speeds).
Other wise (when hot), add 0.3 bar to
the pressures shown on the label.
Driving with under-inflated tyres
increases fuel consumption.
Snow chains
The system does not have to be
reinitialised after fitting or removing
snow chains.
Spare wheel
The steel spare wheel does not have an
under-inflation detection sensor.
Driving
Page 285 of 595

283
Jumpy _en_Chap07_info-pratiques_ed01-2016
AdBlue® and SCR system
for BlueHDi Diesel engines
To assure respect for the environment and
conformity with the new Euro 6 emissions
standard, without adversely affecting the
per formance or fuel consumption of Diesel
engines, CITROËN has taken the decision to
equip its vehicles with an effective system that
associates SCR (Selective Catalytic Reduction)
with a particle filter (FAP) for the treatment of
exhaust gases.
Presentation of the SCR system
Using a fluid called AdBlue® containing urea, a
catalytic converter turns up to 85% of nitrogen
oxides (NOx) into nitrogen and water, which are
harmless to health and the environment. The AdBlue
® is held in a special tank with a
capacity of about 22 litres: this provides a
driving range of about 12 500 miles
(20 000 km), after which an alert is triggered
warning you when the reserve remaining is
enough for just 1 500 miles (2 400 km).
During each scheduled service of your vehicle
by a CITROËN dealer or a qualified workshop,
the AdBlue
® tank is refilled in order to allow
normal operation of the SCR system. Once the AdBlue
® tank is empty, a
s
ystem required by regulations prevents
starting of the engine.
If the SCR
is faulty, the level of
emissions from your vehicle will no
longer meet the Euro 6 standard: your
vehicle becomes polluting.
In the event of a confirmed fault
with the SCR system, you must go
to a CITROËN dealer or a qualified
workshop as soon as possible: after
a running distance of 650 miles
(1
100 km), a system will be triggered
automatically to prevent engine starting.
When filling the tank, the filling rate
must not exceed 40 litres per minute.
If the estimated mileage between two services
is greater than 12 500 miles (20 000 km), we
recommend that you go to a CITROËN dealer
or a qualified workshop to have the necessary
top-up carried out.
7
Practical information
Page 339 of 595

337
Jumpy _en_Chap09_caracteristiques-techniques_ed01-2016
Identification markingsVarious visible markings for the identification of your vehicle.
A.
V
ehicle Identification Number (VIN)
under the bonnet.
T
his number is engraved on the chassis
near the right hand front wheel arch.
The tyre pressures must be checked
when the tyres are cold, at least once
a month.
If the tyre pressures are too low, this
increases fuel consumption.
B.
V
ehicle Identification Number (VIN) on
the windscreen lower cross member.
T
his number is indicated on a self-
adhesive label which is visible through the
windscreen. C.
M
anufacturer's label.
T
his self-destroying label on the middle
door pillar, right or left hand side, contains
the following information:
-
t
he manufacturer's name,
-
t
he European whole vehicle type
approval number,
-
t
he vehicle identification number (VIN),
-
t
he maximum authorised weight (gross
vehicle weight),
-
t
he maximum authorised weight with
trailer (gross train weight),
-
t
he maximum front axle weight,
-
t
he maximum rear axle weight.D.
T
yre/paint label.
T
his label on the middle door pillar, driver's
side, contains the following information:
-
t
he tyre inflation pressures, laden and
unladen,
-
t
he tyre sizes (including the tyre load
index and speed rating),
-
t
he inflation pressure for the spare
wheel,
-
t
he paint colour code.
9
Technical data
Page 417 of 595

415
1
8
9
1
1
13
14
15
16
11
10
12
Jumpy_en_Chap10b_NAC-1_ed01-2016
Level 1Level 2 Level 3 Comments
Settings
Secondary page Screen
configuration Animation
Activate or deactivate settings.
Brightness Adjust the level of brightness.
Confirm Save the settings.
Settings
Secondary page System
settings Units
Distance and fuel
consumption
Set the units used for distance, fuel consumption
and temperature.
Temperature
Factory settings ReinitializeReturn to the factory settings.
System info ViewView the versions of the different modules
(system, mapping, risk areas) installed in the
system as well as the updates available.
Confirm Save the settings.
Settings
Secondary page Languages All
Select the language then confirm.
Europe
Asia
America
Confirm
Having selected the language, save the setting.
.
Audio and Telematics
Page 422 of 595

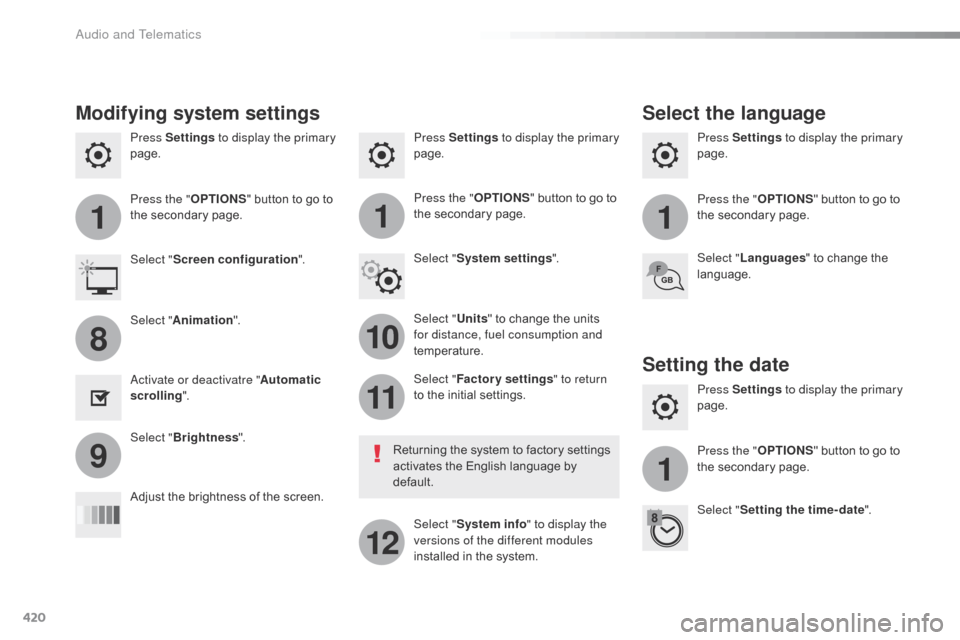
420
111
10
11
12
8
91
Jumpy_en_Chap10b_NAC-1_ed01-2016
Press Settings to display the primary
page. Press Settings
to display the primary
page.
Press Settings
to display the primary
page.
Press the "OPTIONS" button to go to
the secondary page. Press the "
OPTIONS" button to go to
the secondary page.
Press the "
OPTIONS" button to go to
the secondary page.
Select "System settings ".
Select " Screen configuration ".
Select "Units" to change the units
for distance, fuel consumption and
temperature. Select "
Languages " to change the
language.
Activate or deactivatre " Automatic
scrolling ".
Adjust the brightness of the screen. Select "
Factory settings " to return
to the initial settings.
Select " System info " to display the
versions of the different modules
installed in the system.
Modifying system settings
Returning the system to factory settings
activates the English language by
default.
Select "
Animation ".
Select " Brightness ".
Select the language
Press Settings to display the primary
page.
Press the " OPTIONS" button to go to
the secondary page.
Select " Setting the time- date ".
Setting the date
Audio and Telematics
Page 473 of 595

471
1
8
9
1
1
13
14
15
16
11
10
12
Jumpy_en_Chap10c_RCC-1_ed01-2016
Level 1Level 2 Level 3 Comments
Settings
Secondary page Screen
configuration Animation
Activate or deactivate settings.
Brightness Adjust the level of brightness.
Confirm Save the settings.
Settings
Secondary page System
settings Units
Distance and fuel
consumption
Set the units used for distance, fuel consumption
and temperature.
Temperature
Factory settings ReinitializeReturn to the factory settings.
System info ViewView the versions of the different modules
(system, mapping, risk areas) installed in the
system as well as the updates available.
Confirm Save the settings.
Settings
Secondary page Languages All
Select the language then confirm.
Europe
Asia
America
Confirm
Having selected the language, save the setting.
.
Audio and Telematics
Page 478 of 595

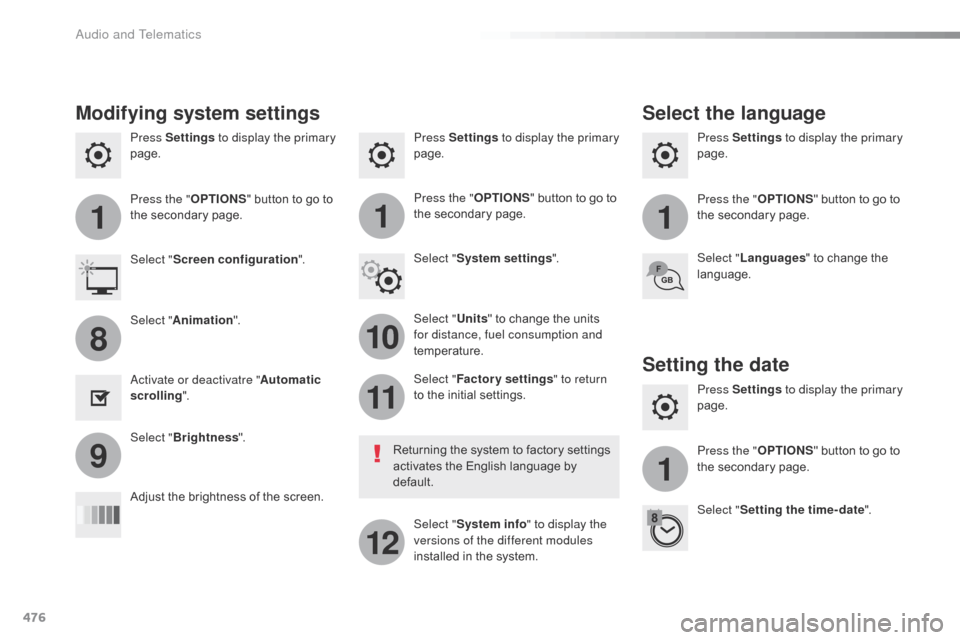
476
111
10
11
12
8
91
Jumpy_en_Chap10c_RCC-1_ed01-2016
Press Settings to display the primary
page. Press Settings
to display the primary
page.
Press Settings
to display the primary
page.
Press the "OPTIONS" button to go to
the secondary page. Press the "
OPTIONS" button to go to
the secondary page.
Press the "
OPTIONS" button to go to
the secondary page.
Select "System settings ".
Select " Screen configuration ".
Select "Units" to change the units
for distance, fuel consumption and
temperature. Select "
Languages " to change the
language.
Activate or deactivatre " Automatic
scrolling ".
Adjust the brightness of the screen. Select "
Factory settings " to return
to the initial settings.
Select " System info " to display the
versions of the different modules
installed in the system.
Modifying system settings
Returning the system to factory settings
activates the English language by
default.
Select "
Animation ".
Select " Brightness ".
Select the language
Press Settings to display the primary
page.
Press the " OPTIONS" button to go to
the secondary page.
Select " Setting the time- date ".
Setting the date
Audio and Telematics