Page 353 of 512
1
1
20
5
4
2
7
27 Audio and Telematics
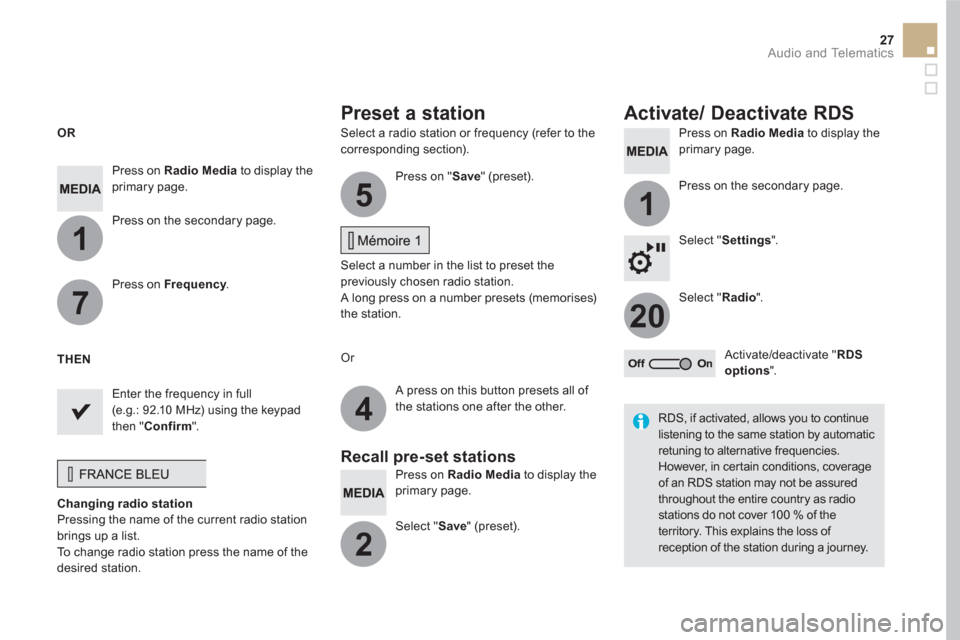
Select a radio station or frequency (refer to the
corresponding section).
Press on Radio Media
to display the
primary page.
Press on the secondary page.
Select " Settings
".
Select " Radio
".
Activate/deactivate " RDS
options
".
Press on Radio Media
to display the
primary page.
Press on the secondary page.
Press on " Save
" (preset).
Select a number in the list to preset the
previously chosen radio station.
A long press on a number presets (memorises)
the station.
Press on Frequency
.
Enter the frequency in full
(e.g.: 92.10 MHz) using the keypad
then " Confirm
".
Changing radio station
Pressing the name of the current radio station
brings up a list.
To change radio station press the name of the
desired station.
Or
Press on Radio Media
to display the
primary page.
Select " Save
" (preset).
Preset a station
Activate/ Deactivate RDS
OR
THEN
A press on this button presets all of
the stations one after the other.
Recall pre-set stations
RDS, if activated, allows you to continue
listening to the same station by automatic
retuning to alternative frequencies.
However, in certain conditions, coverage
of an RDS station may not be assured
throughout the entire country as radio
stations do not cover 100 % of the
territory. This explains the loss of
reception of the station during a journey.
Page 367 of 512
11
1
8
9
10
41 Audio and Telematics
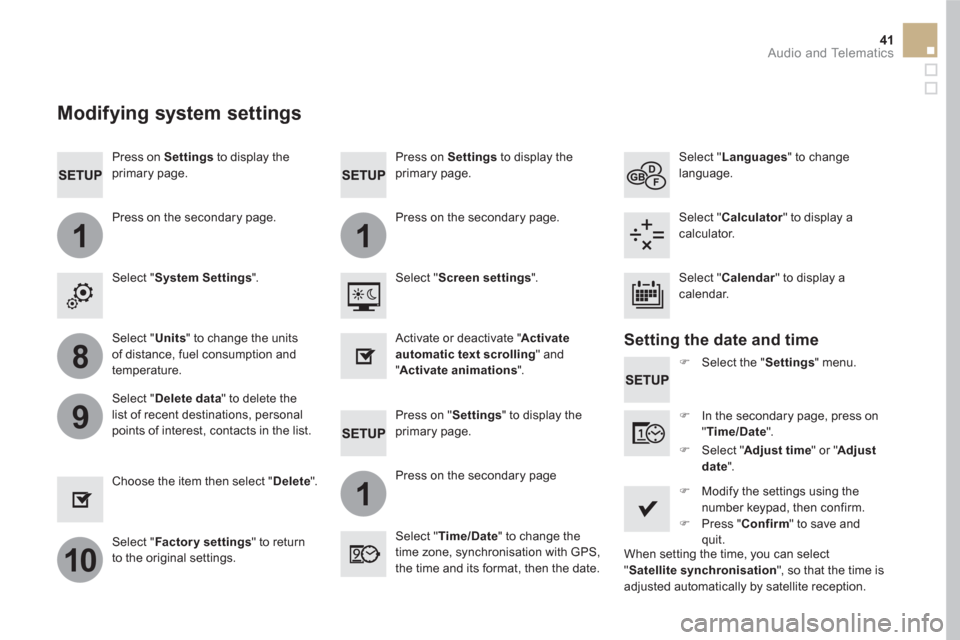
Press on Settings
to display the
primary page.
Press on "Settings" to display the
primary page.
Press on Settings
to display the
primary page.
Press on the secondary page.
Press on the secondary page
Press on the secondary page.
Select " System Settings
".
Select " Time/Date
" to change the
time zone, synchronisation with GPS,
the time and its format, then the date.
Select " Screen settings
".
Select " Units
" to change the units
of distance, fuel consumption and
temperature.
Select " Languages
" to change
language.
�)
Select the " Settings
" menu.
Activate or deactivate " Activate
automatic text scrolling
" and
" Activate animations
".
Select " Delete data
" to delete the
list of recent destinations, personal
points of interest, contacts in the list.
Select " Calculator
" to display a
calculator.
�)
In the secondary page, press on
" Time/Date
".
Choose the item then select " Delete
".
Select " Calendar
" to display a
calendar.
�)
Modify the settings using the
number keypad, then confirm.
�)
Press " Confirm
" to save and
quit.
�)
Select " Adjust time
" or " Adjust
date
".
Select " Factor y settings
" to return
to the original settings.
Modifying system settings
Setting the date and time
When setting the time, you can select
" Satellite synchronisation
", so that the time is
adjusted automatically by satellite reception.
Page 379 of 512
53 Audio and Telematics
Level 1
Level 2
Level 3
Comments
Connected
services
Apple
®
CarPlay
®
Te l e p h o n e
Favourites
The "Telephone" function is placed automatically
in "Siri" voice mode.
Press on "Display contacts" for access to the
telephone menus.
Calls
Contacts
Keypad
Messages
Music
Lists
Press on "Music" to browse and select the tracks
on your smartphone.
Press on "Playing" for access to the track
currently playing.
Artists
Tr a c k s
Albums
Other...
Plan
Destinations
Press on "Destinations" to search for an address
by "Siri" voice command or by using the keypad.
The GPS function is through the telephone's 3G,
4G or Wi-Fi internet connection.
Messages
Display messages
The "Messages" function is place automatically
in "Siri" voice mode to speak the message and
the addressee.
Press on "Display messages" for access to the
messages.
Playing
Access to the track currently playing.
Page 386 of 512
1
19
20
22
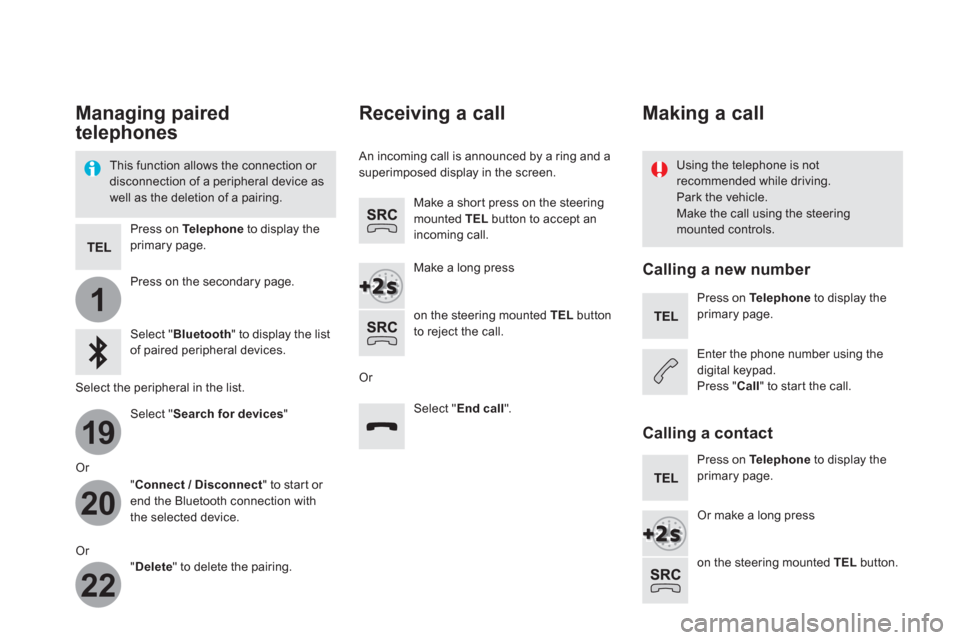
Managing paired
telephones
This function allows the connection or
disconnection of a peripheral device as
well as the deletion of a pairing.
Using the telephone is not
recommended while driving.
Park the vehicle.
Make the call using the steering
mounted controls.
Press on Te l e p h o n e
to display the
primary page.
Press on the secondary page.
Select " Bluetooth
" to display the list
of paired peripheral devices.
Select the peripheral in the list.
Select " Search for devices
"
Or
" Connect / Disconnect
" to start or
end the Bluetooth connection with
the selected device.
Or
" Delete
" to delete the pairing.
Receiving a call
An incoming call is announced by a ring and a
superimposed display in the screen.
Make a short press on the steering
mounted TEL
button to accept an
incoming call.
Make a long press
on the steering mounted TEL
button
to reject the call.
Or
Select " End call
".
Making a call
Calling a new number
Press on Te l e p h o n e
to display the
primary page.
Enter the phone number using the
digital keypad.
Press " Call
" to start the call.
Calling a contact
Press on Te l e p h o n e
to display the
primary page.
Or make a long press
on the steering mounted TEL
button.
Page 426 of 512
1
1
8
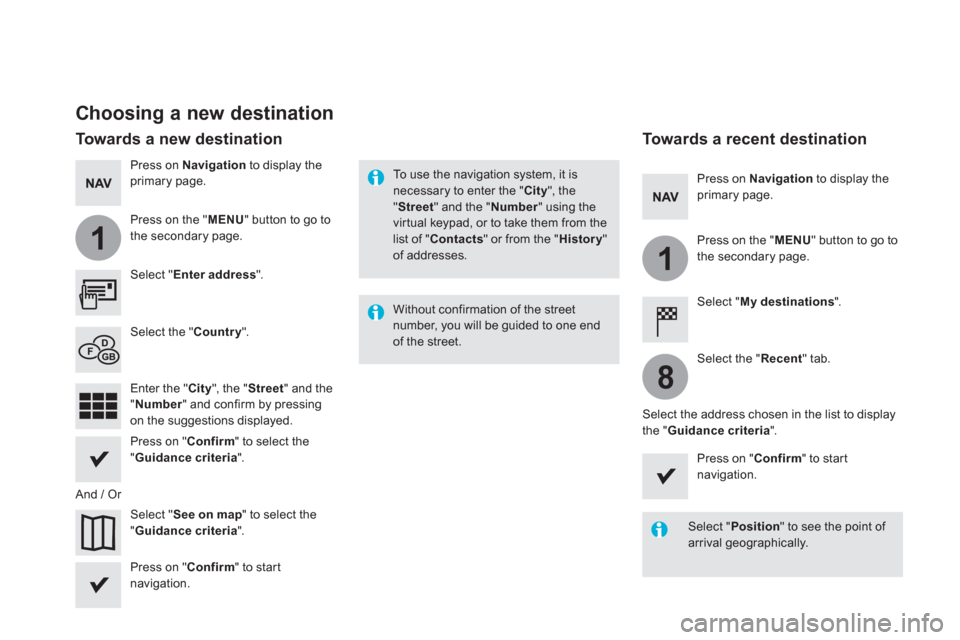
Choosing a new destination
Select " Enter address
".
Select " See on map
" to select the
" Guidance criteria
".
Select the " Country
".
Press on " Confirm
" to select the
" Guidance criteria
".
Press on " Confirm
" to start
navigation.
Press on " Confirm
" to start
navigation.
And / Or
Press on Navigation
to display the
primary page.
Press on the " MENU
" button to go to
the secondary page.
Towards a new destination
Towards a recent destination
Select " My destinations
".
Press on Navigation
to display the
primary page.
Press on the " MENU
" button to go to
the secondary page.
Enter the " City
", the " Street
" and the
" Number
" and confirm by pressing
on the suggestions displayed.
Select the " Recent
" tab.
Select the address chosen in the list to display
the " Guidance criteria
".
To use the navigation system, it is
necessary to enter the " City
", the
" Street
" and the " Number
" using the
virtual keypad, or to take them from the
list of " Contacts
" or from the " History
"
of addresses.
Without confirmation of the street
number, you will be guided to one end
of the street.
Select " Position
" to see the point of
arrival geographically.
Page 428 of 512
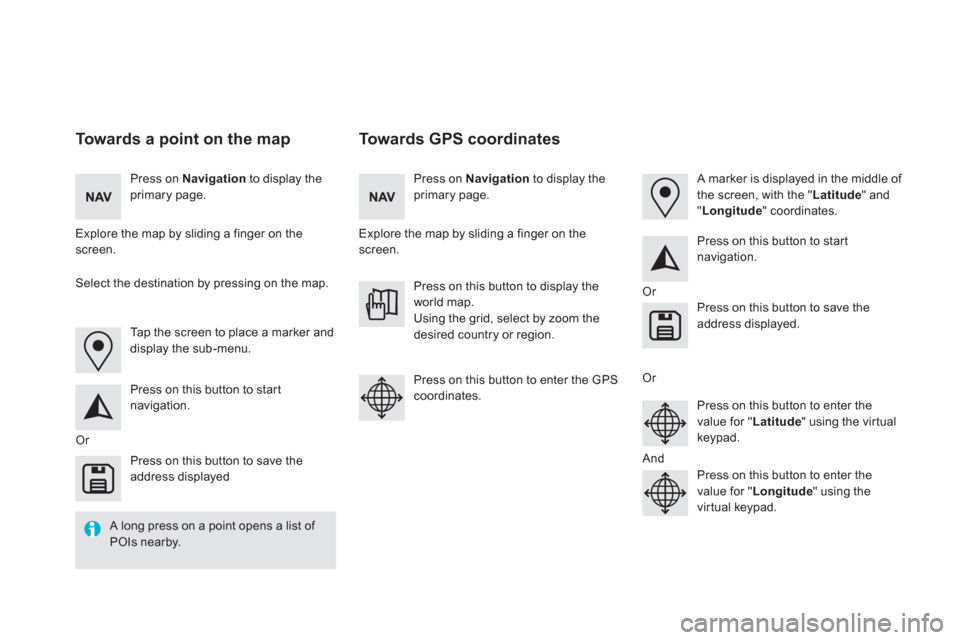
Towards GPS coordinates
Towards a point on the map
Press on Navigation
to display the
primary page.
Press on Navigation
to display the
primary page.
Explore the map by sliding a finger on the
screen.
Explore the map by sliding a finger on the
screen.
Tap the screen to place a marker and
display the sub-menu.
Or
Or
Or
And
Select the destination by pressing on the map.
Press on this button to start
navigation.
Press on this button to start
navigation.
Press on this button to display the
world map.
Using the grid, select by zoom the
desired country or region.
Press on this button to save the
address displayed
Press on this button to save the
address displayed.
Press on this button to enter the GPS
coordinates.
Press on this button to enter the
value for " Latitude
" using the virtual
keypad.
Press on this button to enter the
value for " Longitude
" using the
virtual keypad.
A marker is displayed in the middle of
the screen, with the " Latitude
" and
" Longitude
" coordinates.
A long press on a point opens a list of
POIs nearby.
Page 439 of 512
37 Audio and Telematics
To distribute information on the
declaration of danger zones, you
should check the option: " Allow
declaration of danger areas
".
You can download updates to the
system, danger zones and mapping,
from the brand's website.
The download procedure can be found
in the same place.
Declaration of "Danger
areas"
Press on Navigation
to display the
primary page.
Press on the "Declare a new danger
area" button located in the upper bar
of the touch screen.
Select the option " Ty p e
" to choose
the type de "Danger area".
Select the " Speed
" option and enter
it using the virtual keypad.
Press on " Confirm
" to save and
distribute the information.
Page 445 of 512
11
1
7
8
43 Audio and Telematics
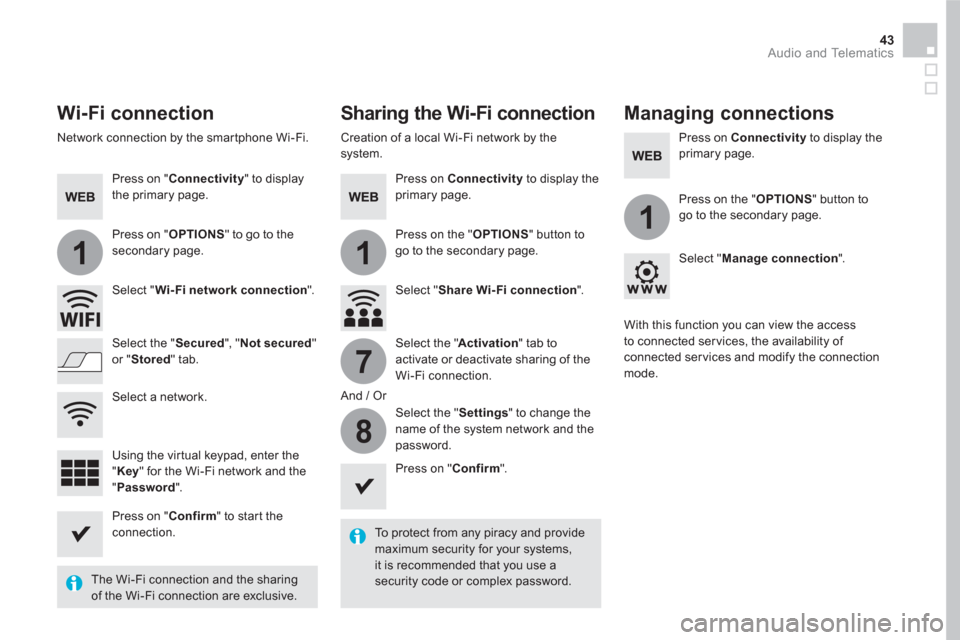
Wi-Fi connection
Sharing the Wi-Fi connection
Managing connections
To protect from any piracy and provide
maximum security for your systems,
it is recommended that you use a
security code or complex password.
The Wi-Fi connection and the sharing
of the Wi-Fi connection are exclusive.
Press on " Confirm
" to start the
connection.
Press on " Confirm
".
Press on " Connectivity
" to display
the primary page.
Network connection by the smartphone Wi-Fi.
Creation of a local Wi-Fi network by the
system.
Press on Connectivity
to display the
primary page.
Press on Connectivity
to display the
primary page.
Press on " OPTIONS
" to go to the
secondary page.
Press on the " OPTIONS
" button to
go to the secondary page.
Press on the " OPTIONS
" button to
go to the secondary page.
Select " Wi- Fi network connection
".
Select " Share Wi- Fi connection
".
Select " Manage connection
".
And / Or
Select the " Secured
", " Not secured
"
or " Stored
" tab.
Select the " Activation
" tab to
activate or deactivate sharing of the
Wi-Fi connection.
Select the " Settings
" to change the
name of the system network and the
password.
With this function you can view the access
to connected ser vices, the availability of
connected ser vices and modify the connection
mode.
Using the virtual keypad, enter the
" Key
" for the Wi-Fi network and the
" Password
".
Select a network.